Page 205 of 548
185
3-1. Using the touch screen
3
Interior features
The initial screen
If the power switch is set to “ACC” or
“IG-ON” mode, the initializing screen
will be displayed for a few seconds as
the system starts up.
SwitchesPa g e
“CLIMATE”P. 1 9 2
“A U D I O ”P. 2 0 0
“INFO” (Displaying the “Informa-
tion” screen)P. 1 8 4
“DISP” (Adjusting the display)P. 1 8 8
Trip Information. (Displaying the
“Trip Information” screen)P. 6
MaintenanceNavigation System Owner's Manual
Te l e p h o n eP. 2 6 5
CalendarNavigation System Owner's Manual
“LEXUS Park Assist”P. 1 5 5
LanguageP. 1 8 7
Screen SettingP. 1 9 0
Adjust ClockP. 3 1 4 /
Navigation System Owner's Manual
Page 219 of 548
199
3-2. Using the air conditioning system and defogger
3
Interior features
Rear window and outside re ar view mirror defoggers
■Operating conditions
The power switch must be in the “IG-ON” mode.
CAUTION
■When the outside rear view mirror defoggers are on
Do not touch the rear view mirror surfaces, as they can become very hot and burn
you.
NOTICE
■To prevent 12 volt battery discharge
Turn the defoggers off when the hybrid system is off.
These features are used to defog the rear window, and to remove rain-
drops, dew and frost from the outside rear view mirrors.
Press the button.
Press the button to turn on the
rear window and outside rear
view mirror defoggers. The
defoggers will automatically
turn off after approximately 15
minutes. Pressing the button
again also turns the defoggers
off.
Page 248 of 548

228
3-3. Using the audio system
■MP3 and WMA files
MP3 (MPEG Audio LAYER 3) is a standard audio compression format.
Files can be compressed to approximately 1 /10 of their original size by using MP3
compression.
WMA (Windows Media
TMAudio) is a Microsoft audio compression format.
This format compresses audio data to a size smaller than that of the MP3 format.
There is a limit to the MP3 and WMA file standards and to the media/formats
recorded by them that can be used.
●MP3 file compatibility
• Compatible standards
MP3 (MPEG1 LAYER3, MPEG2 LSF LAYER3)
• Compatible sampling frequencies
MPEG1 LAYER3: 32, 44.1, 48 (kHz)
MPEG2 LSF LAYER3: 16, 22.05, 24 (kHz)
• Compatible bit rates
MPEG1 LAYER3: 64, 80, 96, 112, 128, 160, 192, 224, 256, 320 (kbps)
• MPEG2 LSF LAYER3: 64, 80, 96 , 112, 128, 144, 160 (kbps)
*: Compatible with VBR
• Compatible channel modes: stereo, joint stereo, dual channel and monaural
●WMA file compatibility
• Compatible standards
WMA Ver. 7, 8, 9
• Compatible sampling frequencies
32, 44.1, 48 (kHz)
• Compatible bit rates
Ver. 7, 8: CBR 48, 64, 80, 96, 128, 160, 192 (kbps)
Ver. 9: CBR 48, 64, 80, 96, 128, 160, 192, 256, 320 (kbps)
*: Only compatible with 2-channel playback
●Compatible media
Media that can be used for MP3 and WMA playback are CD-Rs and CD-RWs.
Playback in some instances may not be po ssible, depending on the status of the
CD-R or CD-RW. Playback may not be poss ible or the audio may jump if the disc
is scratched or marked with fingerprints.
Page 249 of 548

229
3-3. Using the audio system
3
Interior features
●Compatible disc formats
The following disc formats can be used.
• Disc formats: CD-ROM Mode 1 and Mode 2
CD-ROM XA Mode 2, Form 1 and Form 2
• File formats: ISO9660 level 1, level 2, (Romeo, Joliet)
MP3 and WMA files written in any format other than those listed above may
not play correctly, and their file names and folder names may not be dis-
played correctly.
Items related to standards and limitations are as follows:
• Maximum directory hierarchy: 8 levels
• Maximum length of folder names/file names: 32 characters
• Maximum number of folders: 192 (including the root)
• Maximum number of files per disc: 255
●File names
The only files that can be recognized as MP3/WMA and played are those with
the extension .mp3 or .wma.
●Multi-sessions
As the audio system is compatible with multi-sessions, it is possible to play discs
that contain MP3 and WMA files. However, only the first session can be played.
●ID3 and WMA tags
ID3 tags can be added to MP3 files, making it possible to record the track title
and artist name, etc.
The system is compatible with ID3 Ver. 1. 0, 1.1, and Ver. 2.2, 2.3 ID3 tags. (The
number of characters is based on ID3 Ver. 1.0 and 1.1.)
WMA tags can be added to WMA files, ma king it possible to record the track
title and artist name in the same way as with ID3 tags.
Page 253 of 548
233
3-3. Using the audio system
3
Interior features
Loading a discs■ Loading a single disc
Push .
When the indicator changes from flashing amber to green, insert
a disc after the DVD player door opens.
■ Loading multiple discs
Press and hold until you hear a beep.
When the indicator changes from flashing amber to green, insert
a disc after the DVD player door opens.
After inserting a disc, wait until the indicator changes from flash-
ing amber to green, then insert the next disc after the DVD player
door has opened.
Repeat steps 2 and 3 until you have inserted all discs.
To cancel the operation, press the or button. If you do not
insert a disc within 15 seconds, loading will be canceled automatically.
■DVD hint screen
This screen appears when a DVD
video, DVD audio or video CD is
first selected with the power switch
in “ACC” or “IG-ON” mode.
Touch once you have
read the message.
STEP1
STEP2
STEP1
STEP2
STEP3
STEP4
Page 279 of 548
259
3-3. Using the audio system
3
Interior features
Using the steering switches
Turning on the powerPress when the audio system is off.
The audio system can be turned OFF by holding the switch down for 1 second
or more.
Changing the audio source
Press when the audio system is on. The audio source changes as
follows each time the bu tton is pressed. If a cassette tape or CD is not
inserted, that mode will be skipped.
FM (1, 2) cassette player CD/DVD player AM SAT (1, 2, 3)
Adjusting the volume
Press “+” on to increase the vo lume and “-” to decrease the vol-
ume.
Hold down the button to continue increasing or decreasing the volume.
Some audio features can be controlled using the steering switches.
Power on, select audio
source
Vo l u m e
Radio: Select radio stations
Cassette: Fast forward, rewind and select-
ing tracks
CD: Select tracks, discs and folder
DVD: Select tracks, discs and chapter
Page 284 of 548

264
3-4. Using the hands-free system
■Compatible models
Compatible with HFP (Hands Free Profile) Ver. 1.0 and OPP (Object Push Profile)
Ve r. 1 .1 .
■Certification for the hands-free system
This device complies with Part 15 of the FCC Rules and RSS-210. Operation is sub-
ject to the following two conditions: (1) This device may not cause harmful interfer-
ence, and (2) This device must accept any interference received, including
interference that may cause undesired operation.
CAUTION
■FCC WARNING
Changes or modifications not expressly approved by the party responsible for
compliance could void the user's authority to operate the equipment.
Radio Frequency Exposure. This device is approved for Mobile Application only
and, to comply with applicable FCC radio frequency exposure regulations, must be
used with a distance of at least 7.9 in. (20 cm) between the antenna and the body of
any person at all time during use.
■Caution while driving
Do not use the mobile phone or connect the Bluetooth
® system.
NOTICE
■When leaving the vehicle
Do not leave your mobile phone in the vehicle. The inside of the vehicle may
become hot, causing da mage to the phone.
FCC ID: HYQBT0501A
IC ID: 1551A-BT0501A
Page 287 of 548

267
3-4. Using the hands-free system
3
Interior features
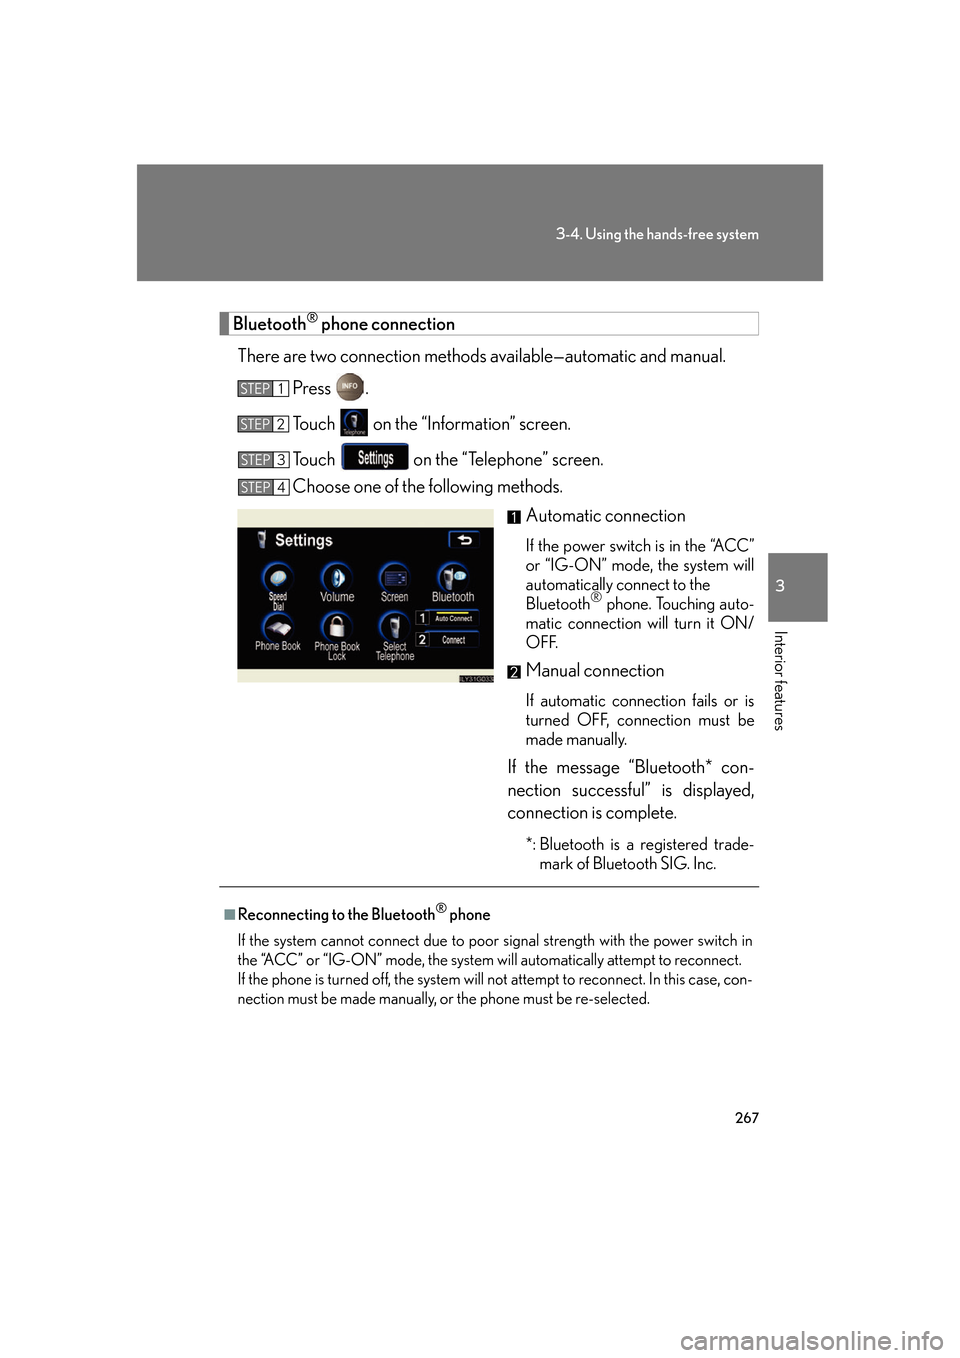
Bluetooth® phone connection
There are two connection methods av ailable—automatic and manual.
Press .
Touch on the “Information” screen.
Touch on the “Telephone” screen.
Choose one of the following methods. Automatic connection
If the power switch is in the “ACC”
or “IG-ON” mode, the system will
automatically connect to the
Bluetooth
® phone. Touching auto-
matic connection will turn it ON/
OFF.
Manual connection
If automatic connection fails or is
turned OFF, connection must be
made manually.
If the message “Bluetooth* con-
nection successful” is displayed,
connection is complete.
*: Bluetooth is a registered trade- mark of Bluetooth SIG. Inc.
STEP1
STEP2
STEP3
STEP4
■Reconnecting to the Bluetooth® phone
If the system cannot connect due to poor signal strength with the power switch in
the “ACC” or “IG-ON” mode, the system wi ll automatically attempt to reconnect.
If the phone is turned off, the system will not attempt to reconnect. In this case, con-
nection must be made manually, or the phone must be re-selected.