2007 KIA Sportage brake light
[x] Cancel search: brake lightPage 246 of 350
Driving tips36
5
1
2
3
4
5
6
7
8
9
Safety chains You should always attach chains
between your vehicle and your trail-
er. Cross the safety chains under the
tongue of the trailer so that the
tongue will not drop to the road if it
becomes separated from the hitch.
Instructions about safety chains may
be provided by the hitch manufactur-
er or by the trailer manufacturer.
Follow the manufacturer’s recom-
mendation for attaching safety
chains. Always leave just enough
slack so you can turn with your trail-
er. And, never allow safety chains to
drag on the ground.
Trailer brakes If your trailer weighs more than the
maximum trailer weight without trail-
er brakes loaded, then it needs its
own brakes and they must be ade-
quate. Be sure to read and follow the
instructions for the trailer brakes so
you’ll be able to install, adjust and
maintain them properly.
Don’t tap into your vehicle's brake
system.
Driving with a trailer Towing a trailer requires a certain
amount of experience. Before setting
out for the open road, you must get
to know your trailer. Acquaint your-
self with the feel of handling and
braking with the added weight of the
trailer. And always keep in mind that
the vehicle you are driving is now a
good deal longer and not nearly so
responsive as your vehicle is by
itself.
Before you start, check the trailer
hitch and platform, safety chains,
electrical connector(s), lights, tires
and mirror adjustment. If the trailer
has electric brakes, start your vehicle
and trailer moving and then apply the
trailer brake controller by hand to be
sure the brakes are working. This lets
you check your electrical connection
at the same time.
During your trip, check occasionally
to be sure that the load is secure,
and that the lights and any trailer
brakes are still working.
WARNING -
Trailer brakes
Do not use a trailer with its own
brakes unless you are absolute-
ly certain that you have properly
set up the brake system. This is
not a task for amateurs. Use an
experienced, competent trailer
shop for this work.
Page 248 of 350
Driving tips38
5
1
2
3
4
5
6
7
8
9
Do not connect a trailer lighting sys-
tem directly to your vehicle’s lighting
system. Use only an approved trailer
wiring harness.
Your Authorized Kia Dealer can
assist you in installing the wiring har-
ness.
Driving on grades Reduce speed and shift to a lower
gear before you start down a long or
steep downgrade. If you don’t shift
down, you might have to use your
brakes so much that they would get
hot and no longer operate efficiently.
On a long uphill grade, shift down
and reduce your speed to around 70
km/h (45 mph) to reduce the possi-
bility of engine and transaxle over-
heating.
If your trailer weighs more than the
maximum trailer weight without trail-
er brakes and you have an automat-
ic transaxle, you should drive in D
(Drive) when towing a trailer.
Operating your vehicle in D (Drive)
when towing a trailer will minimize
heat build up and extend the life of
your transaxle.
✽ ✽
NOTICE• When towing a trailer on steep
grades (in excess of 6%) pay close
attention to the engine coolant
temperature gauge to ensure the
engine does not overheat. If the
needle of the coolant temperature
gauge moves across the dial
towards “H” (HOT), pull over and
stop as soon as it is safe to do so,
and allow the engine to idle until it
cools down. You may proceed once
the engine has cooled sufficiently.
• You must decide driving speed depending on trailer weight and
uphill grade to reduce the possibil-
ity of engine and transaxle over-
heating.
CAUTION
Failure to use an approved trail-
er wiring harness could result indamage to the vehicle electricalsystem and/or personal injury.
Page 273 of 350
611
In case of an emergency
1
2
3
4
5
6
7
8
9
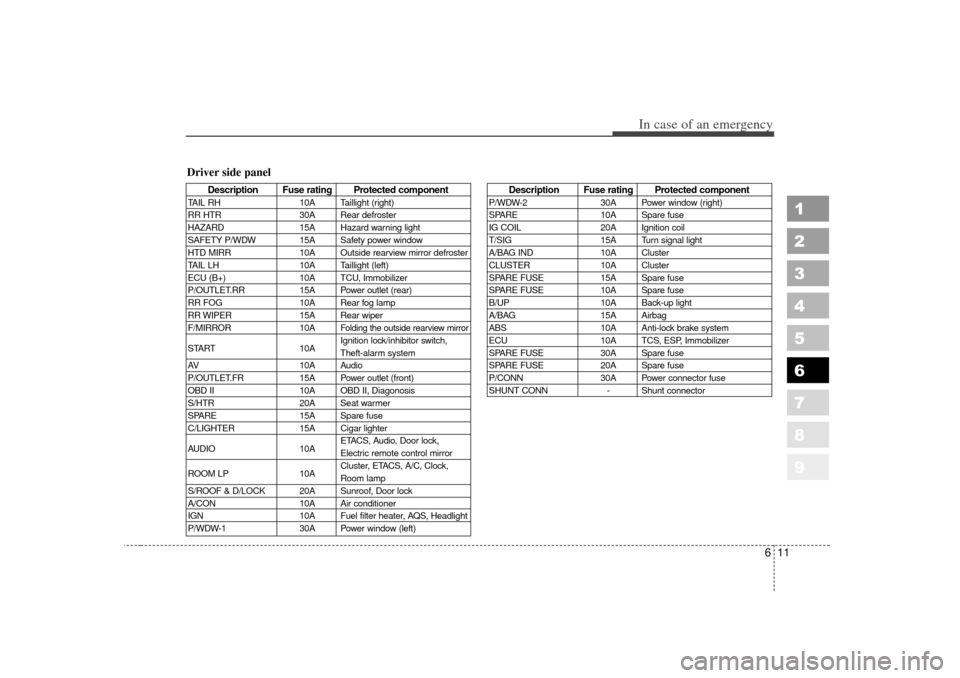
Description Fuse rating Protected component
TAIL RH10A Taillight (right)
RR HTR 30A Rear defroster
HAZARD 15A Hazard warning light
SAFETY P/WDW 15A Safety power window
HTD MIRR 10A Outside rearview mirror defroster
TAIL LH 10A Taillight (left)
ECU (B+) 10A TCU, Immobilizer
P/OUTLET.RR 15A Power outlet (rear)
RR FOG 10A Rear fog lamp
RR WIPER 15A Rear wiper
F/MIRROR 10A
Folding the outside rearview mirror
START10AIgnition lock/inhibitor switch,
Theft-alarm system
AV 10A Audio
P/OUTLET.FR 15A Power outlet (front)
OBD II 10A OBD II, Diagonosis
S/HTR 20A Seat warmer
SPARE 15A Spare fuse
C/LIGHTER 15A Cigar lighter
AUDIO 10AETACS, Audio, Door lock,
Electric remote control mirror
ROOM LP 10ACluster, ETACS, A/C, Clock,
Room lamp
S/ROOF & D/LOCK 20A Sunroof, Door lock
A/CON 10A Air conditioner
IGN 10A Fuel filter heater, AQS, Headlight
P/WDW-1 30A Power window (left)
Description Fuse rating Protected component
P/WDW-230A Power window (right)
SPARE 10A Spare fuse
IG COIL 20A Ignition coil
T/SIG 15A Turn signal light
A/BAG IND 10A Cluster
CLUSTER 10A Cluster
SPARE FUSE 15A Spare fuse
SPARE FUSE 10A Spare fuse
B/UP 10A Back-up light
A/BAG 15A Airbag
ABS 10A Anti-lock brake system
ECU 10A TCS, ESP, Immobilizer
SPARE FUSE 30A Spare fuse
SPARE FUSE 20A Spare fuse
P/CONN 30A Power connector fuse
SHUNT CONN - Shunt connector
Driver side panel
Page 295 of 350
Maintenance87
1
2
3
4
5
6
7
8
9
OWNER MAINTENANCE Owner maintenance schedule The following lists are vehicle checks
and inspections that should be per-
formed by the owner or an
Authorized Kia Dealer at the fre-
quencies indicated to help ensure
safe, dependable operation of your
vehicle.
Any adverse conditions should be
brought to the attention of your deal-
er as soon as possible.
These Owner Maintenance Checks
are generally not covered by war-
ranties and you may be charged for
labor, parts and lubricants used.
When you stop for fuel: Check the engine oil level.
Check coolant level in coolantreservoir.
Check the windshield washer fluid level.
Look for low or under-inflated tires.
While operating your vehicle: Note any changes in the sound of the exhaust or any smell of
exhaust fumes in the vehicle.
Check for vibrations in the steering wheel. Notice any increased steer-
ing effort or looseness in the steer-
ing wheel, or change in its straight-
ahead position.
Notice if your vehicle constantly turns slightly or “pulls” to one side
when traveling on smooth, level
road.
When stopping, listen and check for strange sounds, pulling to one
side, increased brake pedal travel
or “hard-to-push” brake pedal.
If any slipping or changes in the operation of your transaxle occurs,
check the transaxle fluid level.
Check automatic transaxle P (Park) function.
Check parking brake.
Check for fluid leaks under your vehicle (water dripping from the air
conditioning system during or after
use is normal).
WARNING
Be careful when checking your
engine coolant level when the
engine is hot. Scalding hot
coolant and steam may blow out
under pressure. This could cause
burns or other serious injury.
Page 296 of 350
79
Maintenance
1
2
3
4
5
6
7
8
9
At least monthly: Check coolant level in the coolantrecovery reservoir.
Check the operation of all exterior lights, including the stoplights, turn
signals and hazard warning flash-
ers.
Check the inflation pressures of all tires including the spare.
At least twice a year
(i.e., every Spring and Fall) : Check radiator, heater and air con- ditioning hoses for leaks or da-
mage.
Check windshield washer spray and wiper operation. Clean wiper
blades with clean cloth dampened
with washer fluid.
Check headlight alignment.
Check muffler, exhaust pipes, shields and clamps.
Check the lap/shoulder belts for wear and function.
Check for worn tires and loose wheel lug nuts.
At least once a year : Clean body and door drain holes.
Lubricate door hinges and checks,and hood hinges.
Lubricate door and hood locks and latches.
Lubricate door rubber weather- strips.
Check the air conditioning system before the warm weather season.
Check the power steering fluid level.
Inspect and lubricate automatic transaxle linkage and controls.
Clean battery and terminals.
Check the brake fluid level.
Page 311 of 350
Maintenance24
7
1
2
3
4
5
6
7
8
9
✽ ✽
NOTICE“COLD” scale is for reference only
and should NOT be used to deter-
mine transaxle fluid level.✽ ✽NOTICENew automatic transaxle fluid
should be red. The red dye is added
so the assembly plant can identify it
as automatic transaxle fluid and dis-
tinguish it from engine oil or
antifreeze. The red dye, which is not
an indicator of fluid quality, is not
permanent. As the vehicle is driven,
the automatic transaxle fluid will
begin to look darker. The color may
eventually appear light brown.
Therefore, have an Authorized Kia
dealer change the automatic
transaxle fluid according to the
Scheduled Maintenance at the
beginning of this section.
Changing the automatic
transaxle fluidHave automatic transaxle fluid
changed by an Authorized Kia
Dealer according to the Maintenance
Schedule at the beginning of this
section.
Use only the specified automatic
transaxle fluid. (Refer to
"Recommended Lubricants" later in
this section.)
CAUTION
Low fluid level causes
transaxle slippage. Overfillingcan cause foaming, loss of fluidand transaxle malfunction.
The use of a non-specified fluid could result in transaxle mal-function and failure.
WARNING
- Parking brake
To avoid sudden movement of
the vehicle, apply parking brake
and depress the brake pedal
before moving the shift lever.
WARNING
- Transaxle
fluid
The transaxle fluid level should
be checked when the engine is at
normal operating temperature.
This means that the engine, radi-
ator, radiator hose and exhaust
system etc., are very hot.
Exercise great care not to burn
yourself during this procedure.
Page 337 of 350
Maintenance50
7
1
2
3
4
5
6
7
8
9
EXTERIOR CARE Exterior general caution It is very important to follow the label
directions when using any chemical
cleaner or polish. Read all warning
and caution statements that appear
on the label.Finish maintenanceWashing To help protect your vehicle’s finish
from rust and deterioration, wash it
thoroughly and frequently at least
once a month with lukewarm or cold
water.
If you use your vehicle for off-road
driving, you should wash it after each
off-road trip. Pay special attention to
the removal of any accumulation of
salt, dirt, mud, and other foreign
materials. Make sure the drain holes
in the lower edges of the doors and
rocker panels are kept clear and
clean. Insects, tar, tree sap, bird droppings,
industrial pollution and similar
deposits can damage your vehicle’s
finish if not removed immediately.
Even prompt washing with plain
water may not completely remove all
these deposits. A mild soap, safe for
use on painted surfaces, may be
used.
After washing, rinse the vehicle thor-
oughly with lukewarm or cold water.
Do not allow soap to dry on the fin-
ish.
✽ ✽
NOTICEDo not use strong soap, chemical
detergents or hot water, and do not
wash the vehicle in direct sunlight or
when the body of the vehicle is
warm.
✽ ✽NOTICE• Water washing in the engine com-
partment may cause the failure of
electrical circuits located in the
engine compartment.
• Never allow water or other liquids to come in contact with electri-
cal/electronic components inside
the vehicle as this may damage
them.
WARNING -
Wet brakes
After washing the vehicle, test
the brakes while driving slowly
to see if they have been affected
by water. If braking performance
is impaired, dry the brakes by
applying them lightly while
maintaining a slow forward
speed.
Page 339 of 350
Maintenance52
7
1
2
3
4
5
6
7
8
9
Underbody maintenanceCorrosive materials used for ice and
snow removal and dust control may
collect on the underbody. If these
materials are not removed, acceler-
ated rusting can occur on underbody
parts such as the fuel lines, frame,
floor pan and exhaust system, even
though they have been treated with
rust protection.
Thoroughly flush the vehicle under-
body and wheel openings with luke-
warm or cold water once a month,
after off-road driving and at the end
of each winter. Pay special attention
to these areas because it is difficult
to see all the mud and dirt. It will do
more harm than good to wet down
the road grime without removing it.
The lower edges of doors, rocker
panels, and frame members have
drain holes that should not be
allowed to clog with dirt; trapped
water in these areas can cause rust-
ing.
Aluminum wheel maintenance The aluminum wheels are coated
with a clear protective finish.
Do not use any abrasive cleaner,
polishing compound, solvent, or
wire brushes on aluminum wheels.
They may scratch or damage the
finish.
Use only a mild soap or neutral detergent, and rinse thoroughly
with water. Also, be sure to clean
the wheels after driving on salted
roads. This helps prevent corro-
sion.
Avoid washing the wheels with high-speed car wash brushes.
Do not use any acid detergent. It may damage and corrode the alu-
minum wheels coated with a clear
protective finish.
WARNING
After washing the vehicle, test
the brakes while driving slowly
to see if they have been affected
by water. If braking performance
is impaired, dry the brakes by
applying them lightly while
maintaining a slow forward
speed.