2007 KIA Sorento roof
[x] Cancel search: roofPage 10 of 325

Keys / 3-2
Remote keyless entry / 3-3
Immobilizer system / 3-5
Door locks / 3-7
Window / 3-13
Seat / 3-15
Safety belts / 3-25
Air bags - advanced supplemental restraint system / 3-47
Hood / 3-69
Fuel filler lid / 3-71
Auto fuel cutoff switch / 3-74
Mirrors / 3-74
Homelink® wireless control system / 3-78
Interior lights / 3-82
Storage compartment / 3-83
Interior features / 3-86
Sunroof / 3-91
Luggage net / 3-94
Tonneau cover / 3-95
Luggage center box / 3-96
Roof rack / 3-96
Antenna / 3-98
Audio remote control / 3-99
Audio system / 3-100
Knowing your vehicle
3
Page 66 of 325

357
Knowing your vehicle
Curtain air bagCurtain air bags are located along both
sides of the roof rails above the front and
rear doors.
They are designed to help protect the
heads of the front seat occupants and
the rear outboard seat occupants in cer-
tain side impact collisions.
WARNING
The front seat passenger air bagis much larger than the steering
wheel air bag and inflates with
considerably more force. It can
seriously hurt or kill a passenger
who is not in the proper position
and wearing the safety belt prop-
erly. The front passengers should
always move their seat as far
back as practical and sit back in
their seat.
It is essential that the front pas- sengers always wear their safety
belts when vehicle is in motion,
even when the vehicle is moving
in a parking lot or up a driveway
into garage.
If the driver brakes the vehicle heavily prior to an impact, unbelt-
ed occupants will be thrown for-
ward. If the front passenger is not
wearing the safety belts, they will
be directly in front of the air bags
when deployment occurs. In that
situation, serious injury or death
is possible.
(Continued)
(Continued)
Never allow front passenger toput their hands, feet or face on or
close to the instrument panel. In
the event of air bag deployment,
such a mispositioned occupant
would be likely to suffer severe
injury or death.
Never allow children/old and fee- ble persons/pregnant women to
sit on the front passenger’s seat.
They may be seriously injured by
the air bag inflation when air bag
deploys.
Do not put objects or stickers on the instrument panel. Do not
apply any accessory to the front
windshield. Do not install after-
market mirrors or accessories on
the factory-installed rearview mir-
ror. Any of these could interfere
with the deployment of the air bag
or could hit your body at high
speed and cause severe bodily
injury and even death.
S2BLA351
Page 74 of 325

365
Knowing your vehicle
Noise and smokeWhen the air bags inflate, they make a
loud noise and they leave smoke and
powder in the air inside of the vehicle.
This is normal and is a result of the igni-
tion of the air bag inflator. After the air
bag inflates, you may feel substantial dis-
comfort in breathing due to the contact of
your chest to both the safety belt and the
air bag, as well as from breathing the
smoke and powder.We strongly urge
you to open your doors and/or win-
dows as soon as possible after impact
in order to reduce discomfort and pre-
vent prolonged exposure to the
smoke and powder.
Though the smoke and powder are non-
toxic, they may cause irritation (eyes,
nose and throat, etc.). Wash and rinse
with cold water immediately and consult
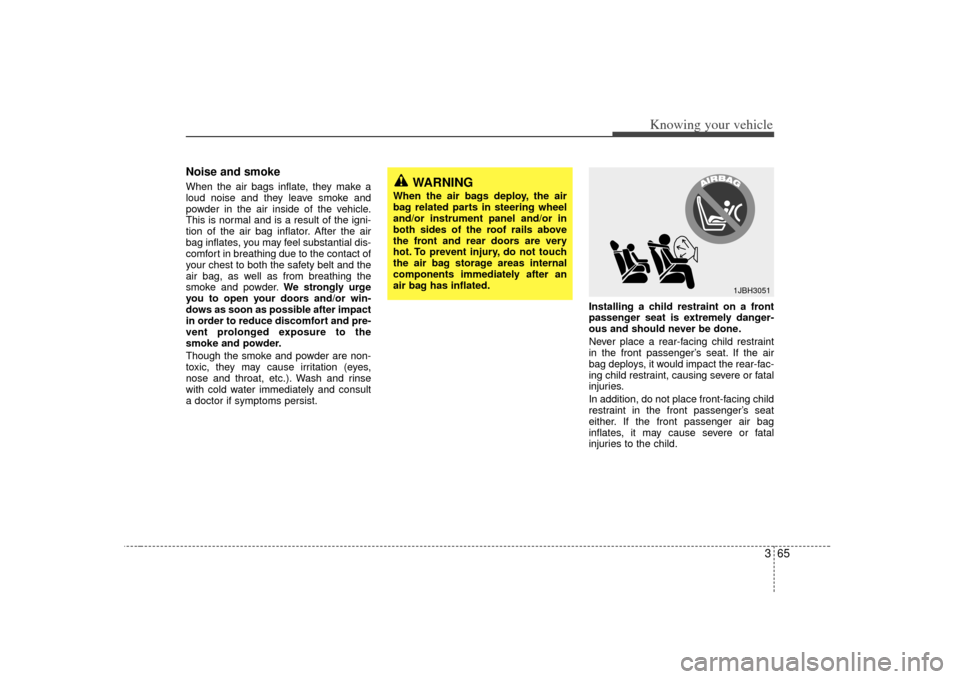
a doctor if symptoms persist. Installing a child restraint on a front
passenger seat is extremely danger-
ous and should never be done.
Never place a rear-facing child restraint
in the front passenger’s seat. If the air
bag deploys, it would impact the rear-fac-
ing child restraint, causing severe or fatal
injuries.
In addition, do not place front-facing child
restraint in the front passenger’s seat
either. If the front passenger air bag
inflates, it may cause severe or fatal
injuries to the child.
WARNING
When the air bags deploy, the air
bag related parts in steering wheel
and/or instrument panel and/or in
both sides of the roof rails above
the front and rear doors are very
hot. To prevent injury, do not touch
the air bag storage areas internal
components immediately after an
air bag has inflated.
1JBH3051
Page 76 of 325

367
Knowing your vehicle
Repairing or scrapping the vehi-
cles Repairing steering wheel, instrumentpanel, center console or roofs, or
installing car audio around center con-
sole or painting front sheet metal could
disable the air bag system. Have them
checked by an authorized Kia dealer.
When leaving the vehicle at an autho- rized Kia dealer, inform that the vehicle
is equipped with air bag system, and
leave the owner’s manual in the vehi-
cle.
Since air bag system contains explo- sive chemical substances, contact an
authorized Kia dealer when scrapping
the vehicle.
WARNING
Do not modify your steeringwheel, seat or any other part of
the Supplemental Restraint
System. Modification could make
the system inoperable.
Do not work on the system’s com- ponents or wiring. This could
cause the air bags to inflate inad-
vertently, possibly seriously injur-
ing someone. Working on the sys-
tem could also disable the sys-
tem so that the air bags would not
deploy in a collision.
Any work on the SRS system, such as removing, installing,
repairing, or any work on the
steering wheel must be per-
formed by a qualified Kia techni-
cian. Improper handling of the air
bag system may result in serious
personal injury.
Page 100 of 325

391
Knowing your vehicle
If your vehicle is equipped with this fea-
ture, you can slide or tilt your sunroof
with the sunroof control buttons located
on the overhead console.
The sunroof can only be opened, closed,
or tilted when the ignition switch is in the
ON position.
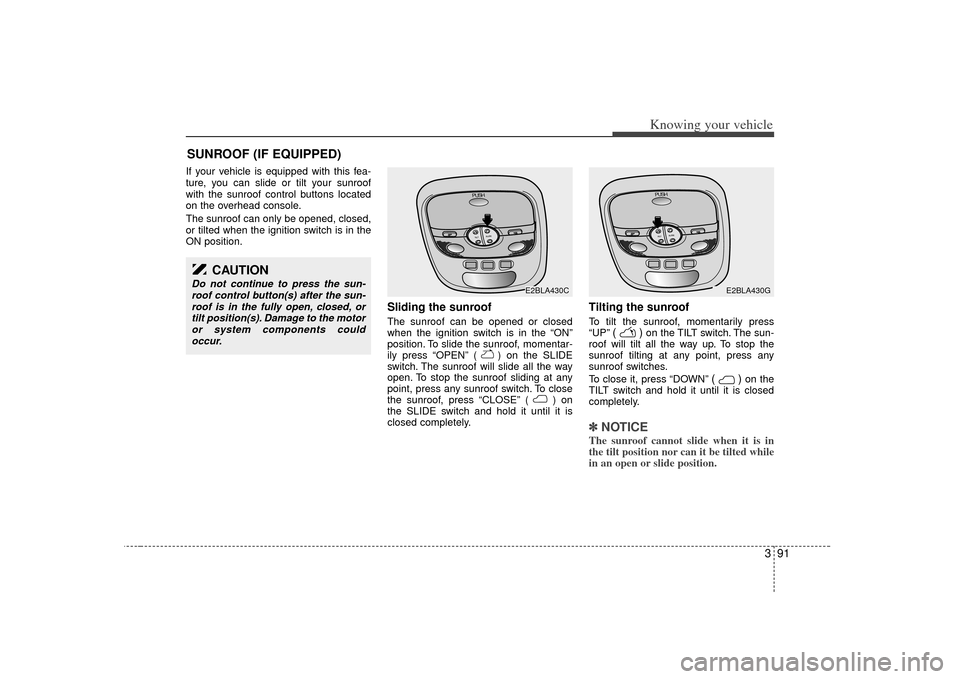
Sliding the sunroof The sunroof can be opened or closed
when the ignition switch is in the “ON”
position. To slide the sunroof, momentar-
ily press “OPEN” ( ) on the SLIDE
switch. The sunroof will slide all the way
open. To stop the sunroof sliding at any
point, press any sunroof switch. To close
the sunroof, press “CLOSE” ( ) on
the SLIDE switch and hold it until it is
closed completely.
Tilting the sunroof To tilt the sunroof, momentarily press
“UP”
()
on the TILT switch. The sun-
roof will tilt all the way up. To stop the
sunroof tilting at any point, press any
sunroof switches.
To close it, press “DOWN”
()
on the
TILT switch and hold it until it is closed
completely.
✽ ✽ NOTICEThe sunroof cannot slide when it is in
the tilt position nor can it be tilted while
in an open or slide position.
SUNROOF (IF EQUIPPED)
CAUTION
Do not continue to press the sun-
roof control button(s) after the sun-roof is in the fully open, closed, ortilt position(s). Damage to the motoror system components couldoccur.
PUSHTILTSLIDE
E2BLA430C
PUSHTILTSLIDE
E2BLA430G
Page 101 of 325

Knowing your vehicle92
3Sunshade The sunshade will be opened with the
glass panel automatically when the glass
panel is slid. After closing the glass panel
the sunshade will only close manually.
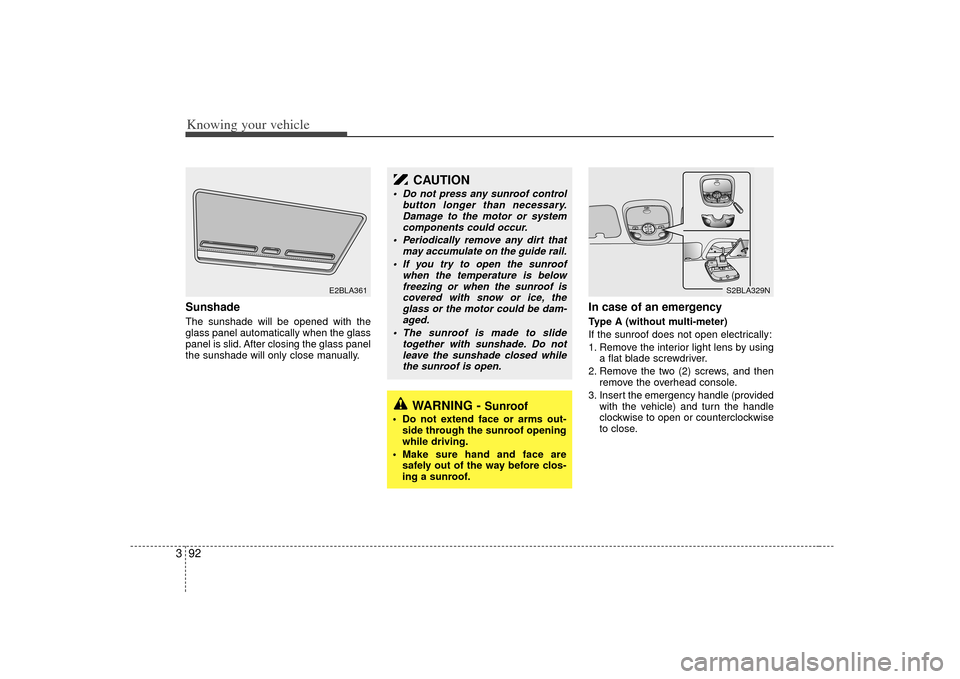
In case of an emergency Type A (without multi-meter)
If the sunroof does not open electrically:
1. Remove the interior light lens by using
a flat blade screwdriver.
2. Remove the two (2) screws, and then remove the overhead console.
3. Insert the emergency handle (provided with the vehicle) and turn the handle
clockwise to open or counterclockwise
to close.
E2BLA361
S2BLA329N
CAUTION
Do not press any sunroof control button longer than necessary.Damage to the motor or systemcomponents could occur.
Periodically remove any dirt that may accumulate on the guide rail.
If you try to open the sunroof when the temperature is belowfreezing or when the sunroof iscovered with snow or ice, the glass or the motor could be dam-aged.
The sunroof is made to slide together with sunshade. Do notleave the sunshade closed whilethe sunroof is open.
WARNING -
Sunroof
Do not extend face or arms out- side through the sunroof opening
while driving.
Make sure hand and face are safely out of the way before clos-
ing a sunroof.
Page 102 of 325

393
Knowing your vehicle
Type B (with multi-meter)
If the sunroof does not open electrically:
1. Open sunglass holder.
2. Break tab to open access hold foremergency handle.
3. Insert the emergency handle (provided with the vehicle) and turn the handle
clockwise to open or counterclockwise
to close.
Resetting the sunroofWhenever the vehicle battery is discon-
nected or discharged, or you use the
emergency handle to operate the sun-
roof, you have to reset your sunroof sys-
tem as follows:
1. Turn the ignition key to the ON posi- tion.
2. According to the position of the sun- roof, do as follows.
1) in case that the sunroof has closed completely or been tilted :
Press the TILT UP button until the
sunroof has tilted upward com-
pletely.
2) in case that the sunroof has slide- opened:
Press and hold the CLOSE
button for more than 5 seconds
until the sunroof has closed com-
pletely. Press the TILT UP button
until the sunroof has tilted upward
completely. 3. Release the TILT UP button.
4. Press and hold the TILT UP button
once again until the sunroof has
returned to the original position of TILT
UP after it is raised a little higher than
the maximum TILT UP position.
When this is complete, the sunroof sys-
tem is reset.
OBL036329N
Page 105 of 325

Knowing your vehicle96
3
CAUTION
The crossbars should be placed
in the proper load carrying posi-tions prior to placing items ontothe roof rack.
If the vehicle is equipped with a sunroof, be sure not to positioncargo onto the roof rack in such away that it could interfere withsunroof operation.
When carrying cargo on the roof rack, take the necessary precau-tions to make sure the cargo doesnot damage the roof of the vehicle.
When carrying large objects on the roof rack, make sure they donot exceed the overall roof length or width.
The luggage center box is located under
the floor in cargo area. You can place a
first aid kit, a reflector triangle, tools, etc.
in the box for easy access.
1. Grasp the handle on the edge of the cover and lift it.
2. Detach the hook from the cover and hang the hook on the weather strip.
When not in use, hang the hook on the
bottom of the cover. If the vehicle has a roof rack, you can
load things on top of your vehicle. The
two cross bars on the roof rack can be
repositioned forward or rearward for con-
veniently loading cargo or luggage. With
an assistant on the opposite side of the
vehicle, press and hold the slider lock
buttons on each side, then move the
cross bar to the desired position.
Release the buttons and lock the cross
bar by moving the crossbar slightly for-
ward or rearward.LUGGAGE CENTER BOX
E2BLB312B
6BLA618B
ROOF RACK (IF EQUIPPED)