2007 KIA Sorento hood
[x] Cancel search: hoodPage 8 of 325

Your vehicle at a glance22INSTRUMENT PANEL OVERVIEW
OBL006001N
1. Light control / Turn signals ................4-51
2. Instrument cluster .............................4-36
3. Wiper/Washer ...................................4-54
4. Climate control system* ............4-59/4-66
5. Audio* ...............................................3-98
6. Passenger’s Air Bag* ........................3-51
7. Hazard ..............................................4-58
8. Hood release lever ............................3-69
9. Driver’s Air Bag*................................3-50
10. Steering wheel ................................4-25
11. Ignition switch ...................................4-2
12. Parking brake lever .........................4-21
13. Shift lever ..........................................4-5
14. Glove box ........................................3-85
* : if equipped
12345
6
7
89
10
11
12
13 14
Page 10 of 325

Keys / 3-2
Remote keyless entry / 3-3
Immobilizer system / 3-5
Door locks / 3-7
Window / 3-13
Seat / 3-15
Safety belts / 3-25
Air bags - advanced supplemental restraint system / 3-47
Hood / 3-69
Fuel filler lid / 3-71
Auto fuel cutoff switch / 3-74
Mirrors / 3-74
Homelink® wireless control system / 3-78
Interior lights / 3-82
Storage compartment / 3-83
Interior features / 3-86
Sunroof / 3-91
Luggage net / 3-94
Tonneau cover / 3-95
Luggage center box / 3-96
Roof rack / 3-96
Antenna / 3-98
Audio remote control / 3-99
Audio system / 3-100
Knowing your vehicle
3
Page 38 of 325
329
Knowing your vehicle
WARNING
- Twisted belts
A twisted or jammed safety belt
cannot restrain you properly. If you
cannot untwist or unjam the safety
belt, have an authorized Kia dealer
service it immediately. Never drive
or ride with a twisted or jammed
safety belt.
WARNING
- Belt use
Safety belts must be used correctly
to work properly in an accident.
Each seating position in your vehi-
cle has a specific safety belt assem-
bly that includes a buckle and
tongue designed to be used togeth-
er.
Failure to heed these warnings and
follow these instructions will
increase the risk and severity of
injuries and the likelihood of death
in an accident.(Continued)
(Continued)
Use the shoulder portion of thesafety belt on the outside shoul-
der only. Never wear the shoulder
portion under the arm.
Never swing the safety belt around your neck to fit over the
inside shoulder.
Never wear the shoulder portion of the safety belt across the neck
or face.
Wear the lap portion as low as possible. Be sure that the lap belt
fits snugly around the hips.
Never wear a lap portion of a
lap/shoulder belt over your waist;
it should always go over the
stronger area of your hips.
Never use a single safety belt for more than one person.
The front seatbacks should always remain in a comfortable,
upright position when the vehicle
is moving.
WARNING
- Safety beltcare
A damaged belt may not give you
the protection you need in an
accident.
Inspect your safety belts periodi- cally for excessive wear or dam-
age. Pull out each belt fully and
look for fraying, cuts, burns or
other damage. Pull the safety belt
out and let it retract a number of
times. Make sure that the
lap/shoulder belts return smooth-
ly and easily into the retractor.
Check the latches to make sure they latch and release without
interference or delay.
Never close the doors on any part of the lap or shoulder belt.
Any belt not in good condition or in good working order should be
promptly replaced.
Page 73 of 325
Knowing your vehicle64
3How does the air bag system
operate Air bag only operates when the ignition
switch is turned to ON or START posi-
tion.
Air bags inflate instantly in the event of serious frontal or side collision in order
to help protect the occupants from seri-
ous physical injury.
There is no single speed at which the air bags will inflate.
Generally, air bags are designed to
inflate by the severity of a collision and
its direction. These two factors deter-
mine whether the sensors send out an
electronic deployment/inflation signal.
Air bag deployment depends on a number of factors including vehicle
speed, angles of impact and the densi-
ty and stiffness of the vehicles or
objects which your vehicle hits in the
collision. Though, factors are not limit-
ed to those mentioned above.
The front air bags will completely inflate and deflate in an instant.
It is virtually impossible for you to see
the air bags inflate during an accident.
It is much more likely that you will sim-
ply see the deflated air bags hanging
out of their storage compartments after
the collision. In order to help provide protection in a
severe collision, the air bags must
inflate rapidly. The speed of air bag
inflation has been determined by the
Canadian Motor Vehicle Safety
Standards (CMVSS) to reduce the like-
lihood of serious or life-threatening
injuries and is thus a mandatory part of
the air bag design.
However, air bag inflation can also
cause injuries which normally can
include facial abrasions, bruises and
broken bones, and sometimes more
serious injuries because the inflation
speed also causes the air bags to
expand with a great deal of force.
There are even circumstances under which contact with the steer-
ing wheel air bag can cause fatal
injuries, especially if the occupant
is positioned excessively close to
the steering wheel.
WARNING
To avoid severe personal injury ordeath caused by deploying air
bags in a collision, the driver
should sit as far back from the
steering wheel air bag as possi-
ble (at least 250 mm (10 inches)
away). The front passenger
should always move their seat as
far back as possible and sit back
in their seat.
Air bag inflates instantly in an event of collision, passengers
may be injured by the air bag
expansion force if they are not in
proper position.
Air bag inflation may cause injuries which normally include
facial or bodily abrasions, injuries
by broken glass or burns by the
explosives.
Page 78 of 325
369
Knowing your vehicle
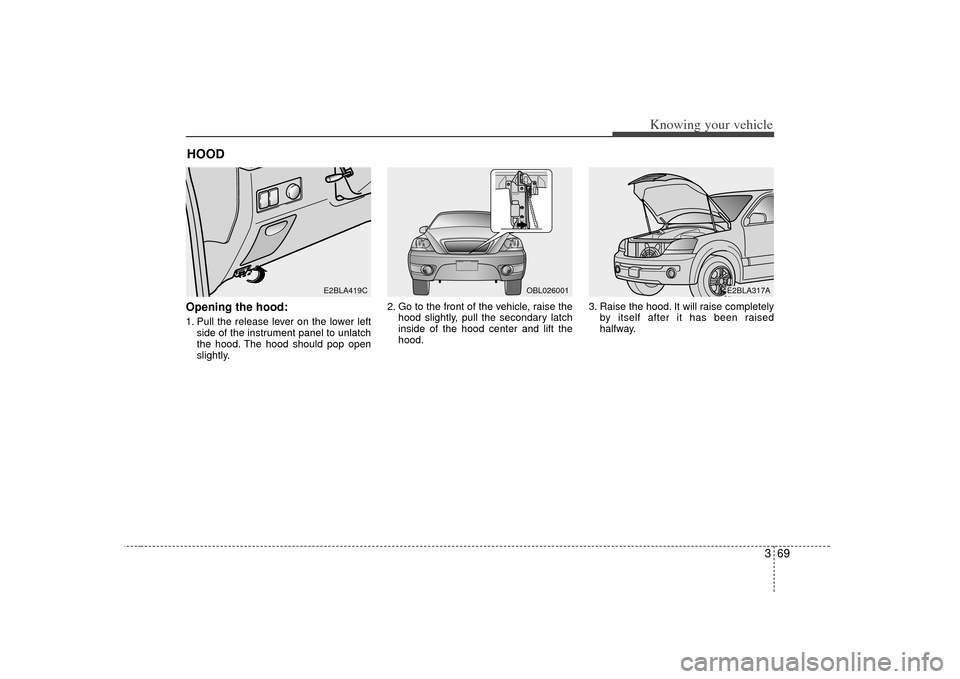
Opening the hood:1. Pull the release lever on the lower leftside of the instrument panel to unlatch
the hood. The hood should pop open
slightly. 2. Go to the front of the vehicle, raise the
hood slightly, pull the secondary latch
inside of the hood center and lift the
hood. 3. Raise the hood. It will raise completely
by itself after it has been raised
halfway.HOOD
E2BLA419C
OBL026001
E2BLA317A
Page 79 of 325

Knowing your vehicle70
3Closing the hood1. Before closing the hood, check the fol-
lowing:
must be correctly installed.
bustible material must be removed
from the engine compartment.
2. Lower the hood halfway and push down to securely lock in place.
Make sure the hood is properly locked
before driving.
WARNING -
Hood
Before closing the hood, makesure that all engine parts and
tools have been removed from
the engine area and that no one’s
hands are near the hood opening.
Do not leave gloves, rags or any other combustible material in the
engine compartment. Doing so
may cause a heat-induced fire.
Page 205 of 325
475
Driving your vehicle
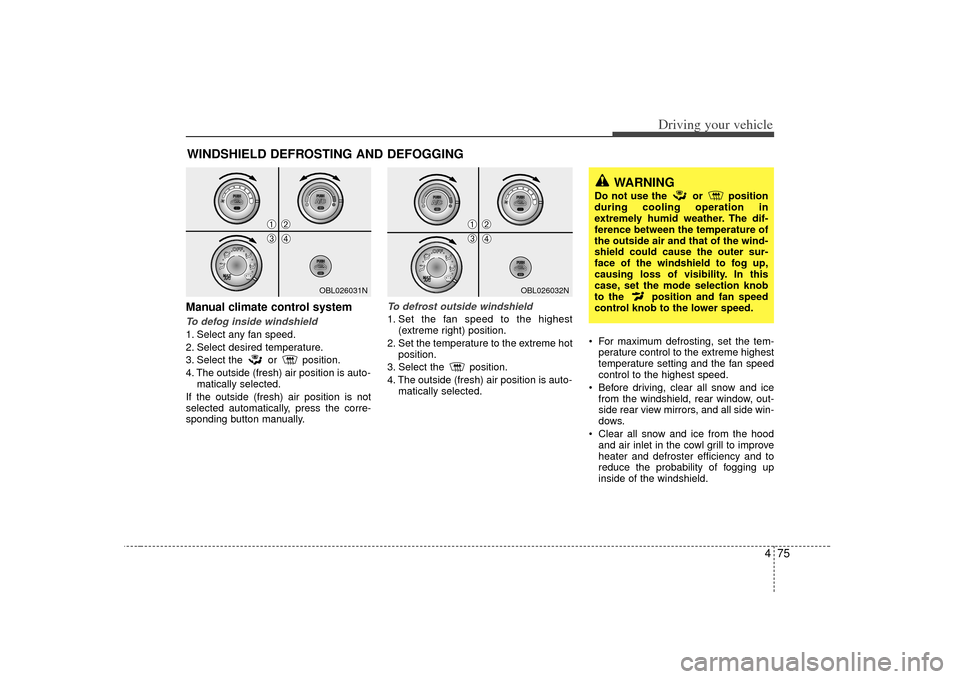
Manual climate control systemTo defog inside windshield 1. Select any fan speed.
2. Select desired temperature.
3. Select the or position.
4. The outside (fresh) air position is auto-matically selected.
If the outside (fresh) air position is not
selected automatically, press the corre-
sponding button manually.
To defrost outside windshield 1. Set the fan speed to the highest (extreme right) position.
2. Set the temperature to the extreme hot position.
3. Select the position.
4. The outside (fresh) air position is auto- matically selected. For maximum defrosting, set the tem-
perature control to the extreme highest
temperature setting and the fan speed
control to the highest speed.
Before driving, clear all snow and ice from the windshield, rear window, out-
side rear view mirrors, and all side win-
dows.
Clear all snow and ice from the hood and air inlet in the cowl grill to improve
heater and defroster efficiency and to
reduce the probability of fogging up
inside of the windshield.
WINDSHIELD DEFROSTING AND DEFOGGING
OBL026031N
OBL026032N
➀
➁
\b
➃
➀
➁
\b
➃
WARNING
Do not use the or position
during cooling operation in
extremely humid weather. The dif-
ference between the temperature of
the outside air and that of the wind-
shield could cause the outer sur-
face of the windshield to fog up,
causing loss of visibility. In this
case, set the mode selection knob
to the position and fan speed
control knob to the lower speed.
Page 206 of 325
Driving your vehicle76
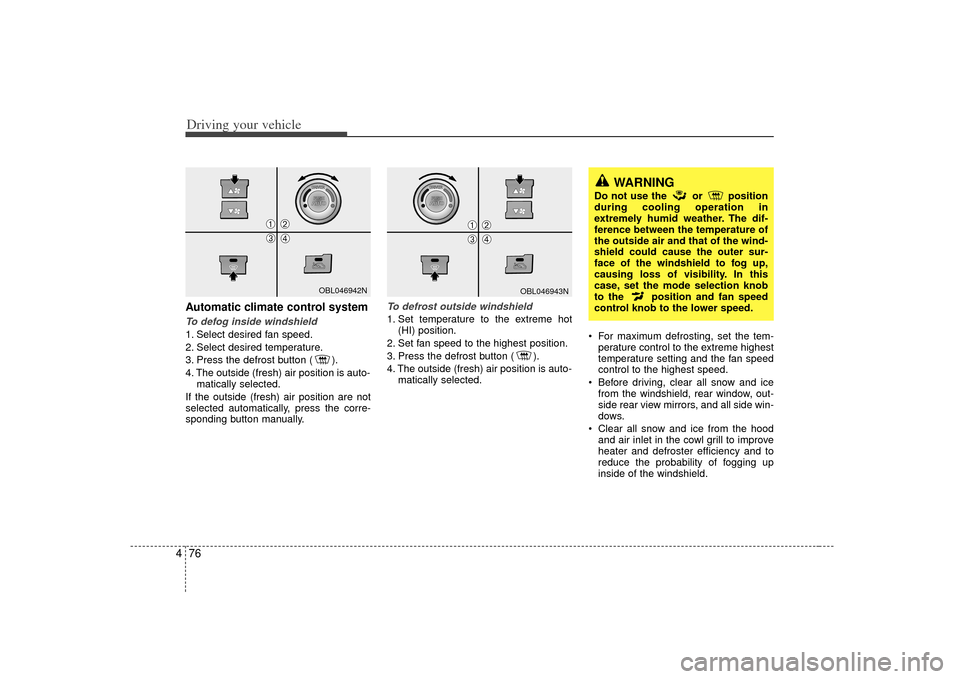
4Automatic climate control systemTo defog inside windshield 1. Select desired fan speed.
2. Select desired temperature.
3. Press the defrost button ( ).
4. The outside (fresh) air position is auto-
matically selected.
If the outside (fresh) air position are not
selected automatically, press the corre-
sponding button manually.
To defrost outside windshield 1. Set temperature to the extreme hot (HI) position.
2. Set fan speed to the highest position.
3. Press the defrost button ( ).
4. The outside (fresh) air position is auto- matically selected. For maximum defrosting, set the tem-
perature control to the extreme highest
temperature setting and the fan speed
control to the highest speed.
Before driving, clear all snow and ice from the windshield, rear window, out-
side rear view mirrors, and all side win-
dows.
Clear all snow and ice from the hood and air inlet in the cowl grill to improve
heater and defroster efficiency and to
reduce the probability of fogging up
inside of the windshield.
OBL046942N
OBL046943N
➀
➁
\b
➃
➀
➁
\b
➃
WARNING
Do not use the or position
during cooling operation in
extremely humid weather. The dif-
ference between the temperature of
the outside air and that of the wind-
shield could cause the outer sur-
face of the windshield to fog up,
causing loss of visibility. In this
case, set the mode selection knob
to the position and fan speed
control knob to the lower speed.