2007 KIA Sephia sensor
[x] Cancel search: sensorPage 77 of 300

367
1
2
3
4
5
6
7
8
9
Knowing your vehicle
Side air bag (if equipped)
Side air bags (side and curtain air
bags) are designed to inflate when
an impact is detected by side colli-
sion sensors depending on the
strength, speed or angles of impact
of side impact collision or rollover by
the side impact.Although the front air bags (driver
’s
and front passenger’ s air bags) are
designed to inflate only in frontal col-
lision, it may inflate in any collision if
front impact sensors detect a suffi-
cient impact. Side air bags (side and
curtain air bags) are designed to
inflate only in side impact collision, it
may inflate in any collision if side
impact sensors detect a sufficient
impact. If the vehicle chassis is impacted by
bumps or objects on unimproved
roads or sidewalks, air bags may
deploy. Drive carefully on unim-
proved roads or on surfaces not
designed for vehicle traffic.
To protect occupants, front air bags
or pre-tensioner safety belts may
deploy in certain side impact colli-
sions.
1JBA3514OUN026090
Page 80 of 300

Knowing your vehicle70
3
1
2
3
4
5
6
7
8
9
Air bags may not inflate if the vehi-
cle collides with objects such as
utility poles or trees, where the
point of impact is concentrated to
one area and the full force of the
impact is not delivered to the sen-
sors.
How does the air bag system
operate Air bag only operates when the
ignition switch is turned to the ON
or START positions.
Air bags inflate instantly in the
event of serious frontal or side col-
lision (if equipped with side air bag
or curtain air bag) in order to help
protect the occupants from serious
physical injury.
There is no single speed at which
the air bags will inflate.
Generally, air bags are designed to
inflate by the severity of a collision
and its direction. These two factors
determine whether the sensors
send out an electronic deploy-
ment/inflation signal.
Air bag deployment depends on a
number of factors including vehicle
speed, angles of impact and the
density and stiffness of the vehi-
cles or objects which your vehicle
hits in the collision. Though, factors
are not limited to those mentioned
above.
The front air bags will completely
inflate and deflate in an instant.
It is impossible for you to see the
air bags inflate during an accident.
It is much more likely that you will
simply see the deflated air bags
hanging out of their storage com-
partments after the collision.
1JBA3518
Page 96 of 300

Knowing your vehicle86
3
1
2
3
4
5
6
7
8
9
Manual type Make this adjustment before you
start driving and while the day/night
lever is in the day position.
Pull the day/night lever toward you to
reduce glare from the headlights of
vehicles behind you during night
driving.Remember that you lose some
rearview clarity in the night position. Electric type (if equipped)
When the engine is running, the
glare is automatically controlled by
the sensor mounted in the rearview
mirror.
The sensor mounted in the mirror
senses the light level around the vehi-
cle, and through a chemical reaction,
automatically controls the headlight
glare from vehicles behind you.
Whenever the shift lever is shifted
into reverse (R), the mirror will auto-
matically go to the brightest setting in
order to improve the drivers view
behind the vehicle. When the ignition switch is ON, the
automatic-dimming function will turn
on automatically.
Press the ON/OFF button (
1) to turn
the automatic-dimming function off.
The mirror indicator light will turn off.
Press the ON/OFF button ( 1) once
again to turn the automatic-dimming
function on. The mirror indicator light
will illuminate.
1LDA2078
Day
Night
Day/Night lever
1KMA3084
➀
Sensor
Indicator
CAUTION
When cleaning the mirror, use apaper towel or similar materialdampened with glass cleaner.Do not spray glass cleanerdirectly on the mirror as thatmay cause the liquid cleaner toenter the mirror housing.
Page 194 of 300

Driving tips25FUEL REQUIREMENTSGasoline engine (unleaded)Your new Kia vehicle is designed to
use only unleaded fuel with a mini-
mum Octane Rating of 87 Anti-
Knock Index (AKI).✽ ✽NOTICENEVER USE LEADED FUEL. The
use of leaded fuel is detrimental to
the catalytic converter and will
damage the engine control system’s
oxygen sensor and affect emission
control.
Never add any fuel system cleaning
agents to the fuel tank other than
what Kia has specified. (Consult an
Authorized Kia Dealer for details.)
Gasoline containing alcohol
and methanolGasohol, a mixture of gasoline and
ethanol (also known as grain alco-
hol), and gasoline or gasohol con-
taining methanol (also known as
wood alcohol) are being marketed
along with or instead of leaded or
unleaded gasoline.
Do not use gasohol containing more
than 10% ethanol, and do not use
gasoline or gasohol containing any
methanol. Either of these fuels may
cause drivability problems and dam-
age to the fuel system.
Discontinue using gasohol of any
kind if drivability problems occur. Vehicle damage or driveability prob-
lems may not be covered by the
manufacturer’s warranty if they result
from the use of:
1. Gasohol containing more than
10% ethanol.
2. Gasoline or gasohol containing methanol.
3. Leaded fuel or leaded gasohol.
1
2
3
4
5
6
7
8
9
CAUTION
Never use gasohol which con- tains methanol. Discontinue useof any gasohol product whichimpairs drivability.
Page 223 of 300

65
In case of an emergency
TPMS (Tire pressure
monitoring system)
malfunction telltaleThe TPMS malfunction indicator turns
on and stays on when there is a prob-
lem with the Tire Pressure Monitoring
System. If the system is able to cor-
rectly detect an under-inflation warning
at the same time as system failure then
it will illuminate both the TPMS mal-
function and the low tire pressure tell-
tale e. g. if Front Left sensor fails, the
TPMS malfunction indicator turns on,
but if Front Right, Rear Left, or Rear
Right tire is under-inflated, the low tire
pressure telltale may turn on at the
same time as the TPMS malfunction
indicator.
Have the system checked by an
authorized Kia dealer as soon as pos-
sible to determine the cause of the
problem.
✽ ✽NOTICE• The TPMS malfunction indicator
may be illuminated if the vehicle is
moving around electric power sup-
ply cable or radio transmitter such
as near police stations, government
and public offices, broadcasting sta-
tions, military installations, air-
ports, or transmitting tower, etc.
which can interfere with normal
operation of the Tire Pressure
Monitoring System (TPMS).
• The TPMS malfunction indicator may be illuminated if some elec-
tronic devices, such as notebook
computers, are used in the vehicle.
This can interfere with normal
operation of the Tire Pressure
Monitoring System (TPMS). (Continued)(Continued)
• If there is a failed tire sensor, it is
possible for the TPMS to tem-
porarily learn a replacement sen-
sor if closely driven to another
vehicle that is also equipped with
TPMS. In rare cases, this may
temporarily delay the TPMS mal-
function indicator from turning
on.
1
2
3
4
5
6
7
8
9
TPMS
Page 224 of 300

In case of an emergency66Changing a tire with TPMSIf you have a flat tire, the Low Tire
Pressure telltale will turn on. Have
the flat tire repaired by an authorized
Kia dealer as soon as possible or
replace the flat tire with the tempo-
rary spare tire.✽ ✽NOTICENEVER use a puncture-repairing
agent to repair and/or inflate a low
pressure tire. If used, you will have
to replace the tire pressure sensor. Each wheel is equipped with a tire
pressure sensor mounted inside the
tire behind the valve stem. You must
use TPMS specific wheels. It is rec-
ommended that you always have
your tires serviced by an authorized
Kia dealer as soon as possible. After you replace the low pressure
tire with the temporary spare tire, the
TPMS malfunction indicator may illu-
minate after restarting and about 20
minutes of continuous driving.
Once the low pressure tire is re-inflat-
ed to the recommended pressure
and installed on the vehicle, the
TPMS malfunction indicator and the
low tire pressure telltale will be soon
extinguished. If the low pressure and
TPMS malfunction indicators are not
extinguished after about 20 minutes
of continuous driving, please visit an
authorized Kia dealer.
You may not be able to identify a low
tire by simply looking at it. Always use
a good quality tire pressure gauge to
measure the tire's inflation pressure.
Please note that a tire that is hot
(from being driven) will have a higher
pressure measurement than a tire
that is cold (from sitting stationary for
at least 3 hours and driven less than
1.6 km (1 mile) during that 3 hour
period). Allow the tire to cool before
measuring the inflation pressure.Always be sure the tire is cold before
inflating to the recommended pres-
sure.
A cold tire means the vehicle has
been sitting for 3 hours and driven for
less than 1.6 km (1 mile) in that 3
hour period.
1
2
3
4
5
6
7
8
9
CAUTION
• Do not use any tire sealant if
your vehicle is equipped witha Tire Pressure MonitoringSystem. The liquid sealant candamage the tire pressure sen-sors.
In order for the system to cor- rectly monitor tires for under-inflation, there should be atotal of exactly 4 sensors fit-ted to each of the four drivenwheel positions. There shouldbe no other sensors in thevehicle since this could causethe system to monitor thewrong sensors
Page 234 of 300

In case of an emergency16
6
1
2
3
4
5
6
7
8
9
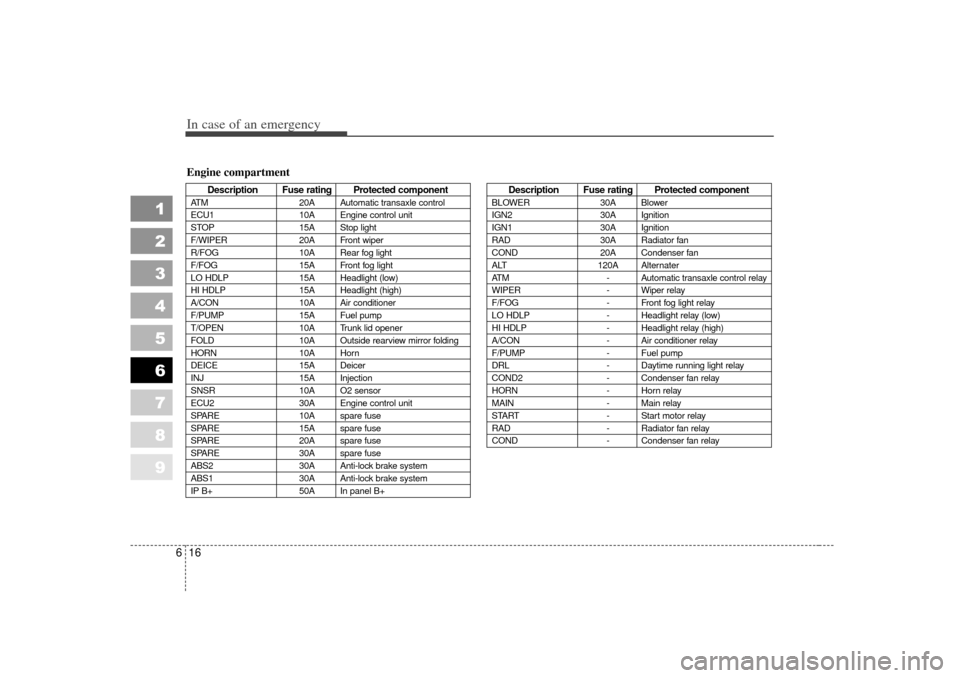
Description Fuse rating Protected component
ATM 20A Automatic transaxle control
ECU1 10A Engine control unit
STOP 15A Stop light
F/WIPER 20A Front wiper
R/FOG 10A Rear fog light
F/FOG 15A Front fog light
LO HDLP 15A Headlight (low)
HI HDLP 15A Headlight (high)
A/CON 10A Air conditioner
F/PUMP 15A Fuel pump
T/OPEN 10A Trunk lid opener
FOLD 10A Outside rearview mirror folding
HORN 10A Horn
DEICE 15A Deicer
INJ 15A Injection
SNSR 10A O2 sensor
ECU2 30A Engine control unit
SPARE 10A spare fuse
SPARE 15A spare fuse
SPARE 20A spare fuse
SPARE 30A spare fuse
ABS2 30A Anti-lock brake system
ABS1 30A Anti-lock brake system
IP B+ 50A In panel B+
Description Fuse rating Protected component
BLOWER30A Blower
IGN2 30A Ignition
IGN1 30A Ignition
RAD 30A Radiator fan
COND 20A Condenser fan
ALT 120A Alternater
ATM - Automatic transaxle control relay
WIPER - Wiper relay
F/FOG - Front fog light relay
LO HDLP - Headlight relay (low)
HI HDLP - Headlight relay (high)
A/CON - Air conditioner relay
F/PUMP - Fuel pump
DRL - Daytime running light relay
COND2 - Condenser fan relay
HORN - Horn relay
MAIN - Main relay
START - Start motor relay
RAD - Radiator fan relay
COND - Condenser fan relay
Engine compartment