2007 JEEP PATRIOT stop start
[x] Cancel search: stop startPage 14 of 440
NOTE:If you try to remove the key before you place the
lever in PARK, the key may become trapped temporarily
in the ignition cylinder. If this occurs, rotate the key to the
right slightly, then remove the key as described. If a
malfunction occurs, the system will trap the key in the
ignition cylinder to warn you that this safety feature is
inoperable. The engine can be started and stopped but
the key cannot be removed until you obtain service.
WARNING!
Never leave children alone in a vehicle. Leaving
children in a vehicle unattended is dangerous for a
number of reasons. A child or others could be seri-
ously or fatally injured. Don't leave the keys in the
ignition. A child could operate power windows,
other controls, or move the vehicle.
CAUTION!
An unlocked car is an invitation to thieves. Always
remove key from the ignition and lock all doors
when leaving the vehicle unattended.
Manual TransaxleÐIf Equipped
Turn the ignition switch to the ACC position, push the
key and cylinder inward, rotate the key to the LOCK
position, and remove the key.
Locking Doors With The Key
You can insert the key with either side up. To lock the
door, turn the key rearward, to unlock the door, turn the
key forward. See Section 7 of this manual for door lock
lubrication.
THINGS TO KNOW BEFORE STARTING YOUR VEHICLE 13
2
Page 17 of 440
Sentry Key Programming
You can program new keys to the system if you have two
valid sentry keys by performing the following procedure:
1. Cut the additional Sentry Key Transponder blank(s) to
match the ignition switch lock cylinder key code.
2. Insert the first valid key into the ignition switch and
turn the ignition switch ON for at least 3 seconds but no
longer than 15 seconds. Turn the ignition switch OFF and
remove the first key.
3. Insert the second valid key and turn the ignition
switch ON within 15 seconds. After ten seconds, a chime
will sound and the Theft Alarm Light will begin to flash.
Turn the ignition switch OFF and remove the second key.
4. Insert a blank Sentry Key into the ignition switch and
turn the ignition switch ON within 60 seconds. After 10
seconds a single chime will sound. The Theft Alarm Light
will stop flashing, turn on for 3 seconds; then turn off.The new Sentry Key has been programmed.
Repeat this procedure to program up to 8 keys. If you do
not have a programmed sentry key, contact your dealer
for details.
General Information
The Sentry Key system complies with FCC rules part 15
and with RSS-210 of Industry Canada. Operation is
subject to the following conditions:
²This device may not cause harmful interference.
²This device must accept any interference that may be
received, including interference that may cause undes-
ired operation.
16 THINGS TO KNOW BEFORE STARTING YOUR VEHICLE
Page 38 of 440
WARNING!
In a collision, you and your passengers can suffer
much greater injuries if you are not properly buckled
up. You can strike the interior of your vehicle or other
passengers, or you can be thrown out of the vehicle.
Always be sure you and others in your vehicle are
buckled up properly.
Buckle up even though you are an excellent driver, even
on short trips. Someone on the road may be a poor driver
and cause a collision that includes you. This can happen
far away from home or on your own street.
Research has shown that seat belts save lives, and they
can reduce the seriousness of injuries in a collision. Someof the worst injuries happen when people are thrown
from the vehicle. Seat belts reduce the possibility of
ejection and the risk of injury caused by striking the
inside of the vehicle.Everyonein a motor vehicle should
be belted at all times.
Lap/Shoulder Belts
All the seats in your vehicle are equipped with Lap/
Shoulder Belts.
The belt webbing retractor is designed to lock during
very sudden stops or collisions. This feature allows the
shoulder part of the belt to move freely with you under
normal conditions. But in a collision, the belt will lock
and reduce the risk of your striking the inside of the
vehicle or being thrown out.
THINGS TO KNOW BEFORE STARTING YOUR VEHICLE 37
2
Page 41 of 440
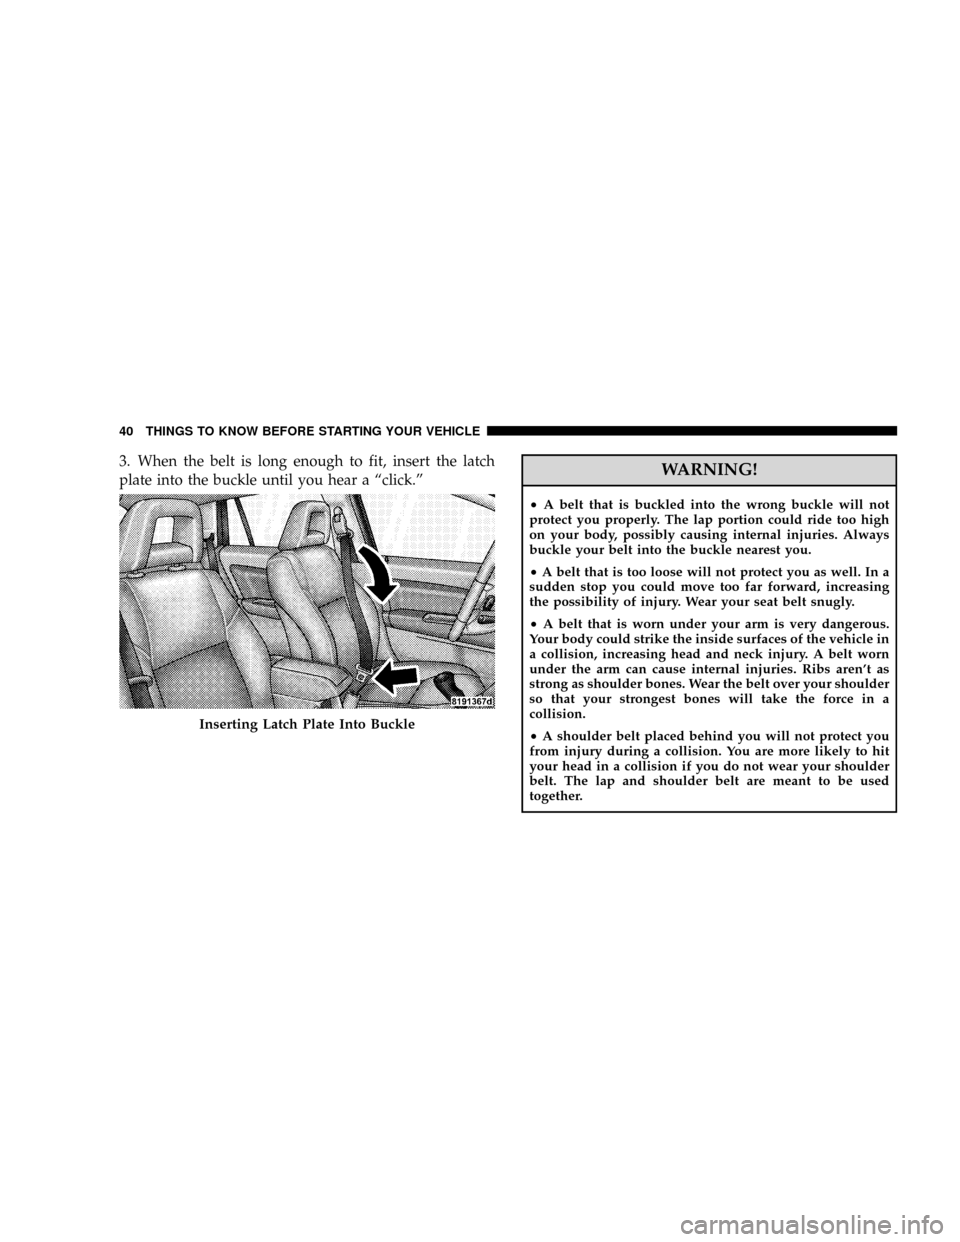
3. When the belt is long enough to fit, insert the latch
plate into the buckle until you hear a ªclick.ºWARNING!
²A belt that is buckled into the wrong buckle will not
protect you properly. The lap portion could ride too high
on your body, possibly causing internal injuries. Always
buckle your belt into the buckle nearest you.
²A belt that is too loose will not protect you as well. In a
sudden stop you could move too far forward, increasing
the possibility of injury. Wear your seat belt snugly.
²A belt that is worn under your arm is very dangerous.
Your body could strike the inside surfaces of the vehicle in
a collision, increasing head and neck injury. A belt worn
under the arm can cause internal injuries. Ribs aren't as
strong as shoulder bones. Wear the belt over your shoulder
so that your strongest bones will take the force in a
collision.
²A shoulder belt placed behind you will not protect you
from injury during a collision. You are more likely to hit
your head in a collision if you do not wear your shoulder
belt. The lap and shoulder belt are meant to be used
together.
Inserting Latch Plate Into Buckle
40 THINGS TO KNOW BEFORE STARTING YOUR VEHICLE
Page 58 of 440
WARNING!
Deployed airbags can't protect you in another colli-
sion. Have the airbags replaced by an authorized
dealer as soon as possible.
Enhanced Accident Response System
In the event of an impact that causes airbag deployment,
with the vehicle stopped, and the vehicle communication
network intact, and the power intact, the Enhanced Acci-
dent Response System performs the following functions:
²Cuts off fuel to the engine.
²Flashes hazard lights.
²Turns on the interior lamps which remain on as long as
the battery has power or until the ignition key is
removed.
²Unlocks the doors automatically
Maintaining Your Airbag System
WARNING!
²Modifications to any part of the airbag system
could cause it to fail when you need it. You could
be injured because the airbags are not there to
protect you. Do not modify the components or
wiring, including adding any kind of badges or
stickers to the steering wheel hub trim cover or the
upper passenger side of the instrument panel. Do
not modify the front bumper, vehicle body struc-
ture, or frame.
²You need proper knee impact protection in a
collision. Do not mount or locate any aftermarket
equipment on or behind the knee impact bolster.
²It is dangerous to try to repair any part of the
airbag system yourself. Be sure to tell anyone who
works on your vehicle that it has airbags.
THINGS TO KNOW BEFORE STARTING YOUR VEHICLE 57
2
Page 65 of 440
²If the belt still can't be tightened, or if by pulling and
pushing on the restraint loosens the belt, disconnect
the latch plate from the buckle, turn the latch plate
around, and insert the latch plate into the buckle
again. If you still can't make the child restraint secure,
try a different seating position.
²Buckle the child into the seat according to the child
restraint manufacturer's directions.
²When your child restraint is not in use, secure it in the
vehicle with the seat belt or remove it from the vehicle.
Don't leave it loose in the vehicle. In a sudden stop or
collision, it could strike the occupants or seat backs
and cause serious personal injury.
Automatic-Locking Retractor (ALR)
To operate the switchable retractor, pull the belt from the
retractor until there is enough to allow you to pass
through the child restraint and slide the latch plate into
the buckle. Then pull on the belt until it is all removedfrom the retractor. Allow the belt to return into the
retractor, pulling on the excess webbing to tighten the lap
portion about the child restraint. Follow the instructions
of the child restraint manufacture.
NOTE:To reset this feature you must let all of the belt
webbing return into the retractor. You will not be able to
pull out more webbing until all of the webbing has been
returned back into the retractor.
Lower Anchors and Tether for CHildren (LATCH)
Your vehicle is equipped with the child restraint anchor-
age system called LATCH, which stands for Lower
Anchors and Tether for CHildren. The LATCH system
provides for the installation of the child restraint without
using the vehicle seat belt. All three rear seating positions
have lower anchorages that are capable of accommodat-
ing LATCH-compatible child seats having flexible,
webbing-mounted lower attachments. Child seats with
64 THINGS TO KNOW BEFORE STARTING YOUR VEHICLE
Page 142 of 440

the accelerator pedal will increase vehicle speed like
normal. When either the brake or the accelerator is
released, HDC will control the vehicle back to the origi-
nal set speed.
HDC is only intended for low speed off-road driving. At
vehicle speeds above 31 mph (50 km/h) HDC will no
longer function. If the HDC indicator lamp begins to
flash it means that the brakes are getting too hot and the
vehicle should be stopped to allow the brakes to cool.
ESP (Electronic Stability Program)
This system enhances directional control and stability of
the vehicle under various driving conditions. ESP cor-
rects for over/under steering of the vehicle by applying
the brake of the appropriate wheel to assist in counter-
acting the over/under steer condition. Engine power
may also be reduced to help the vehicle maintain the
desired path. ESP uses sensors in the vehicle to determine
the vehicle path intended by the driver and compares itto the actual path of the vehicle. When the actual path
does not match the intended path, ESP applies the brake
of the appropriate wheel to assist in counteracting the
oversteer or understeer condition
²Oversteer - when the vehicle is turning more than
appropriate for the steering wheel position.
²Understeer - when the vehicle is turning less than
appropriate for the steering wheel position.
ESP/TCS Indicator Light
The ªESP/TCS Indicator Lightº located in the instrument
cluster, starts to flash as soon as the tires lose traction and
the ESP system becomes active. The ªESP/TCS Indicator
Lightº also flashes when TCS is active. If the ªESP/TCS
Indicator Lightº begins to flash during acceleration, ease
up on the accelerator and apply as little throttle as
possible. Be sure to adapt your speed and driving to the
prevailing road conditions.
UNDERSTANDING THE FEATURES OF YOUR VEHICLE 141
3
Page 144 of 440
gravel conditions and more wheel spin than ESP would
normally allow is required to gain traction.
To turn ESP on again, momentarily depress the ªESP
Control Switchº. This will restore the normal ªESP Onº
mode of operation.
WARNING!
In the Partial ESP mode, the engine torque reduction
and stability features are desensitized. Therefore, the
enhanced vehicle stability offered by ESP is
unavailable.
NOTE:To improve the vehicle's traction when driving
with snow chains, or starting off in deep snow, sand or
gravel, it may be desirable to switch to the ªPartial Offº
mode by pressing the ESP switch. Once the situation
requiring ESP to be switched to the ªPartial Offº mode isovercome, turn ESP back on by momentarily depressing
the ªESP Control Switchº. This may be done while the
vehicle is in motion.
ESP 4WD Operating Modes
In addition to ESP ON and Partial ESP (described above
in ªESP 2WD Operating Modesº), all 4WD equipped
vehicles can also choose the following ESP operating
mode:
ESP OFF
This mode is intended for off-highway or off-road use
when ESP stability features could inhibit vehicle maneu-
verability due to trail conditions. This mode is entered by
depressing and holding the ªESP Control Switchº for 5
seconds when the vehicle is stopped and the engine is
running. After 5 seconds, the ªESP/TCS Indicator Lightº
will illuminate and the ªESP Offº message will appear in
the odometer. Press and release the trip odometer button
located on the instrument cluster to clear this message.
UNDERSTANDING THE FEATURES OF YOUR VEHICLE 143
3