2007 JEEP PATRIOT change wheel
[x] Cancel search: change wheelPage 137 of 440
Security
If you sell your vehicle, be sure to erase the frequencies.
To erase all of the previously trained frequencies, hold
down both outside buttons until the indicator light
begins to flash.
This device complies with part 15 of FCC rules and with
RS-210 of Industry Canada. Operation is subject to the
following conditions:
1. This device may not cause harmful interference.
2. This device must accept any interference that may be
received including interference that may cause undesired
operation.
NOTE:Changes or modifications not expressly ap-
proved by the party responsible for compliance could
void the user's authority to operate the equipment.HomeLinktis a trademark owned by Johnson Controls,
Inc.
ANTI-LOCK BRAKE SYSTEM (ABS) ± IF
EQUIPPED
This system aids the driver in maintaining vehicle control
under adverse braking conditions. The system controls
hydraulic brake pressure to prevent wheel lockup and
help avoid skidding on slippery surfaces during braking.
NOTE:ABS improves steering control of the vehicle
during hard braking maneuvers.
136 UNDERSTANDING THE FEATURES OF YOUR VEHICLE
Page 140 of 440
WARNING!
²BAS cannot prevent the natural laws of physics
from acting on the vehicle, nor can it increase
braking efficiency beyond that afforded by the
condition of the vehicle brakes and tires or the
traction afforded.
²The BAS cannot prevent accidents, including
those resulting from excessive speed in turns,
following another vehicle too closely, or hydro-
planing. Only a safe, attentive, and skillful driver
can prevent accidents.
²The capabilities of a BAS-equipped vehicle must
never be exploited in a reckless or dangerous
manner which could jeopardize the user 's safety
or the safety of others.
Electronic Roll Mitigation (ERM)
This system anticipates the potential for wheel lift by
monitoring the driver 's steering wheel input and the
speed of the vehicle. When ERM determines that the rate
of change of the steering wheel angle and vehicles speed
are sufficient to potentially cause wheel lift, it applies the
appropriate brake and may reduce engine power to
lessen the chance that wheel lift will occur. ERM will only
intervene during very severe or evasive driving maneu-
vers.
ERM can only reduce the chance of wheel lift occurring
during severe or evasive driving maneuvers. It can not
prevent wheel lift due to other factors such as road
conditions, leaving the roadway or striking objects or
other vehicles.
UNDERSTANDING THE FEATURES OF YOUR VEHICLE 139
3
Page 177 of 440

CAUTION!
The TPMS has been optimized for the original
equipment tires and wheels. TPMS pressures and
warning have been established for the tire size
equipped on your vehicle. Undesirable system opera-
tion or sensor damage may result when using re-
placement equipment that is not of the same size,
type, and/or style. Aftermarket wheels can cause
sensor damage. Do not use tire sealant from a can, or
balance beads if your vehicle is equipped with a
TPMS, as damage to the sensors may result.
23. Four-Wheel-Drive Light
This light indicates the vehicle is in 4WD locked mode.
24. Odometer/Trip Odometer
A vacuum fluorescent display indicates the total distance
the vehicle has been driven. Also, the cluster will display,replacing the odometer/trip odometer, vehicle warning
messages such as: door/gate ajar and loose gas cap.
Loose gas cap will be displayed from the Odometer/Trip
Odometer on all models.
NOTE:If vehicle is equipped with the optional Elec-
tronic Vehicle Information Center (EVIC) in the instru-
ment cluster, all warnings including ªdoorº, and ªgATEº
will only be displayed in the EVIC display. For additional
information, refer to ªElectronic Vehicle Information Cen-
ter Ð If Equippedº in Section 3.
U.S. federal regulations require that upon transfer of
vehicle ownership, the seller certify to the purchaser the
correct mileage that the vehicle has been driven. There-
fore, if the odometer reading is changed during repair or
replacement, be sure to keep a record of the reading
before and after the service so that the correct mileage can
be determined.
176 UNDERSTANDING YOUR INSTRUMENT PANEL
Page 191 of 440
Electrical Disturbances
Radio waves may pick up electrical disturbances during
transmission. They mainly affect the wave amplitude,
and thus remain a part of the AM reception. They
interfere very little with the frequency variations that
carry the FM signal.
AM Reception
AM sound is based on wave amplitude, so AM reception
can be disrupted by such things as lightning, power lines
and neon signs.
FM Reception
Because FM transmission is based on frequency varia-
tions, interference that consists of amplitude variations
can be filtered out, leaving the reception relatively clear,
which is the major feature of FM radio.
NOTE:The radio, steering wheel radio controls (if
equipped), and 6 disc CD/DVD changer (if equipped)will remain active for up to 10 minutes after the ignition
switch has been turned off. Opening a vehicle front door
will cancel this feature.
ELECTRONIC DIGITAL CLOCK
The clock and radio each use the display panel built into
the radio. A digital readout shows the frequency and/or
time in hours and minutes (depending on your radio
model) whenever the ignition switch is in the ªONº or
ªACCº position.
When the ignition switch is in the ªOFFº position, or
when the radio frequency is being displayed, time keep-
ing is accurately maintained.
On the AM/FM/CD (6-disc) radio the time button alter-
nates the location of the time and frequency on the
display. On the AM/FM/CD (single-disc) radio only one
of the two, time or frequency is displayed.
190 UNDERSTANDING YOUR INSTRUMENT PANEL
Page 255 of 440
The Basics of Off-Road Driving
You will encounter many types of terrain driving off-
road. You should be familiar with the terrain and area
before proceeding. There are many types of surface
conditions: hard packed dirt, gravel, rocks, grass, sand,
mud, snow and ice. Every surface has a different effect on
your vehicle's steering, handling and traction. Control-
ling your vehicle is one of the keys to successful off-road
driving, so always keep a firm grip on the steering wheel
and maintain a good driving posture. Avoid sudden
accelerations, turns or braking. In most cases there are no
road signs, posted speed limits or signal lights. Therefore
you will need to use your own good judgment on what is
safe and what isn't. When on a trail you should always be
looking ahead for surface obstacles and changes in
terrain. The key is to plan your future driving route while
remembering what you are currently driving over.CAUTION!
Never park your vehicle over dry grass or other
combustible materials. The heat from your vehicle
exhaust system could cause a fire.
WARNING!
Always wear your seat belt and firmly tie down
cargo. Unsecured cargo can become projectiles in an
off-road situation.
When To Use Low (L Off-Road) with the 4WD
Lock Lever Engaged
When To Use Low (L Off-Road) with the 4WD Lock
Lever Engaged When driving off-road, shift into low (L
Off-Road) and activate the 4WD Lock. This will provide
254 STARTING AND OPERATING
Page 261 of 440
CAUTION!
Winching or rocking the vehicle off hard objects
increases the risk of underbody damage.
Hill Climbing
Hill climbing requires good judgment and a good under-
standing of your abilities and your vehicle's limitations.
Hills can cause serious problems. Some are just too steep
to climb and should not be attempted. You should always
feel confident with the vehicle and your abilities. You
should always climb hills straight up and down. Never
attempt to climb a hill on an angle.
²Before Climbing A Steep Hill± As you approach a
hill consider its grade or steepness. Determine if it is
too steep. Look to see what the traction is on the hill
side trail. Is the trail straight up and down? What is on
top and the other side? Are there ruts, rocks, branchesor other obstacles on the path? Can you safely recover
the vehicle if something goes wrong? If everything
looks good and you feel confident, then you should
use low (L Off-Road) with the 4WD Lock engaged and
proceed with caution maintaining your momentum as
you climb the hill
²Driving Up Hill± Once you have determined your
ability to proceed and have shifted into the appropri-
ate gear, line your vehicle up for the straightest
possible run. Accelerate with an easy constant throttle
and apply more power as you start up the hill. Do not
race forward into a steep grade, the abrupt change of
grade could cause you to lose control. If the front end
begins to bounce, ease off the throttle slightly to bring
all four tires back on the ground. As you approach the
crest of the hill ease off the throttle and slowly proceed
over the top. If the wheels start to slip as you approach
the crest of a hill, ease off the accelerator and maintain
headway by turning the steering wheel no more than
260 STARTING AND OPERATING
Page 294 of 440
ªTread Wear Indicatorsº). Refer to the ªTire and Loading
Informationº placard for the size designation of your tire.
The service description and load identification will be
found on the original equipment tire. Failure to use
equivalent replacement tires may adversely affect the
safety, handling, and ride of your vehicle. We recommend
that you contact your original equipment or an autho-
rized tire dealer with any questions you may have on tire
specifications or capability.WARNING!
²Do not use a tire, wheel size or rating other than that
specified for your vehicle. Some combinations of
unapproved tires and wheels may change suspension
dimensions and performance characteristics, result-
ing in changes to steering, handling, and braking of
your vehicle. This can cause unpredictable handling
and stress to steering and suspension components.
You could lose control and have an accident resulting
in serious injury or death. Use only the tire and wheel
sizes with load ratings approved for your vehicle.
²Never use a tire with a smaller load index or capacity,
other than what was originally equipped on your
vehicle. Using a tire with a smaller load index could
result in tire overloading and failure. You could lose
control and have an accident.
²Failure to equip your vehicle with tires having ad-
equate speed capability can result in sudden tire
failure and loss of vehicle control.
STARTING AND OPERATING 293
5
Page 328 of 440
Jack Location
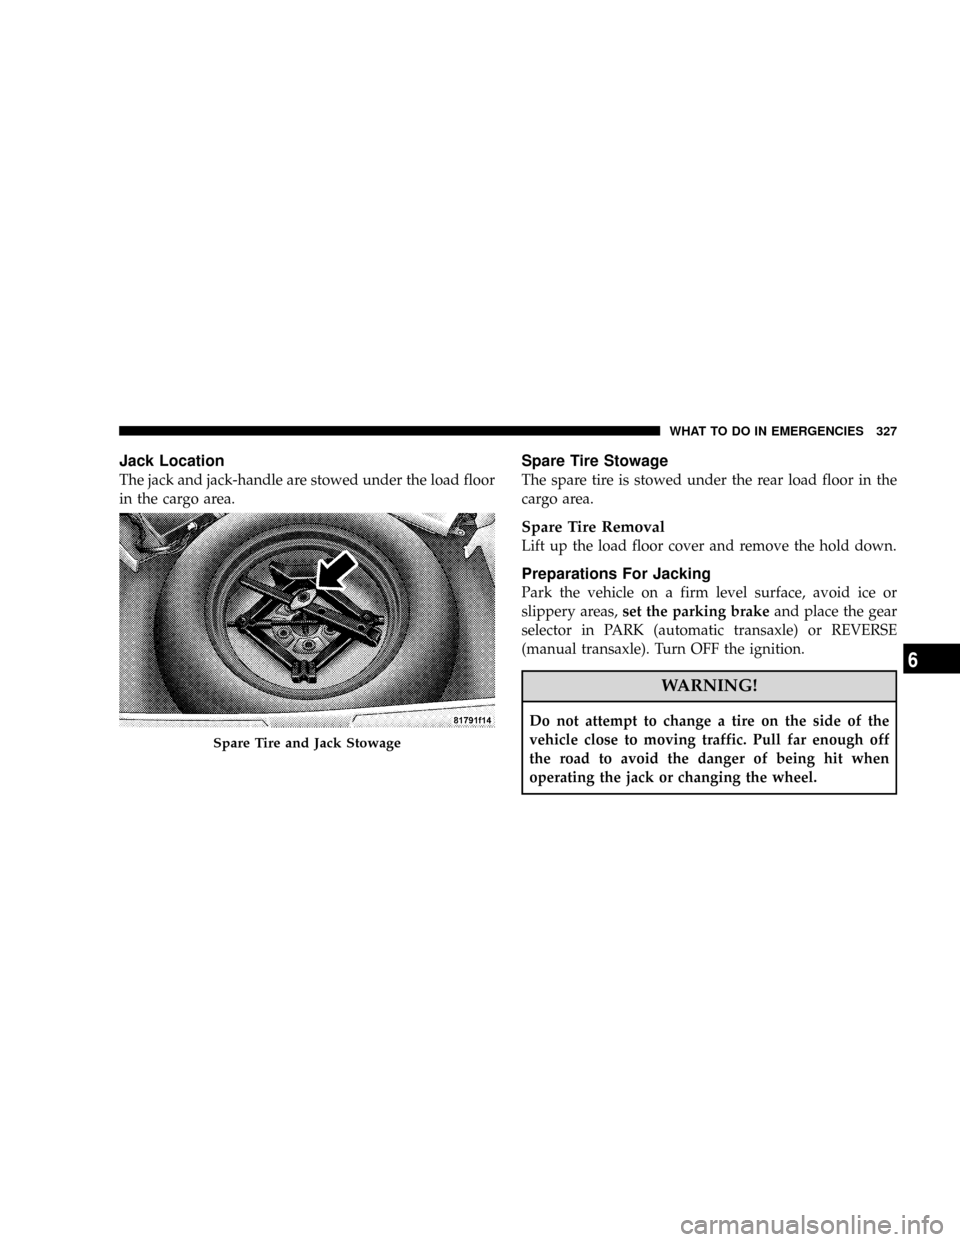
The jack and jack-handle are stowed under the load floor
in the cargo area.
Spare Tire Stowage
The spare tire is stowed under the rear load floor in the
cargo area.
Spare Tire Removal
Lift up the load floor cover and remove the hold down.
Preparations For Jacking
Park the vehicle on a firm level surface, avoid ice or
slippery areas,set the parking brakeand place the gear
selector in PARK (automatic transaxle) or REVERSE
(manual transaxle). Turn OFF the ignition.
WARNING!
Do not attempt to change a tire on the side of the
vehicle close to moving traffic. Pull far enough off
the road to avoid the danger of being hit when
operating the jack or changing the wheel.
Spare Tire and Jack Stowage
WHAT TO DO IN EMERGENCIES 327
6