Page 209 of 456

Supported MP3 File Formats
The radio will recognize only files with the *.mp3 exten-
sion as MP3 files. Non-MP3 files named with the *.mp3
extension may cause playback problems. The radio is
designed to recognize the file as an invalid MP3 and will
not play the file.
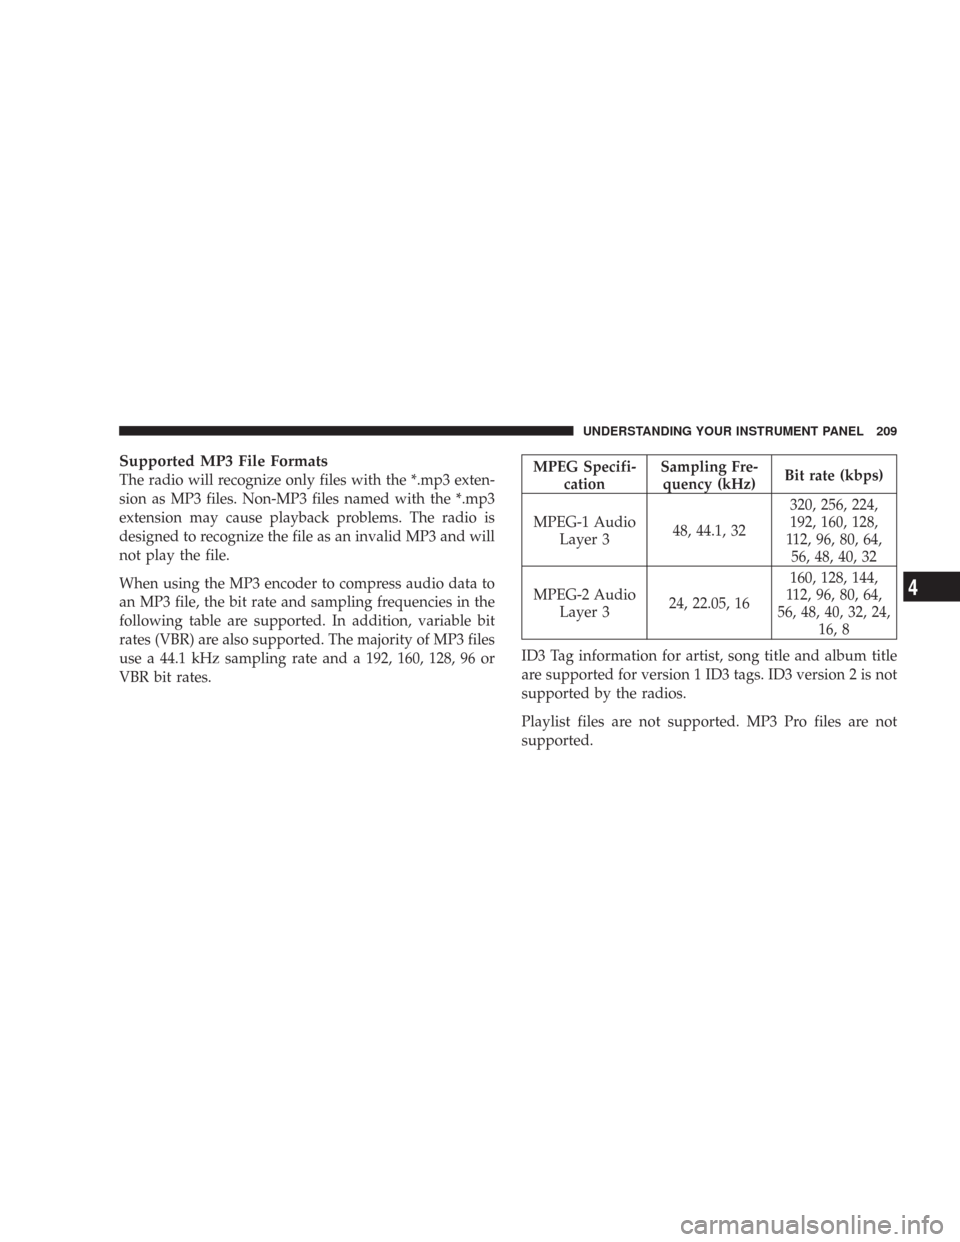
When using the MP3 encoder to compress audio data to
an MP3 file, the bit rate and sampling frequencies in the
following table are supported. In addition, variable bit
rates (VBR) are also supported. The majority of MP3 files
use a 44.1 kHz sampling rate and a 192, 160, 128, 96 or
VBR bit rates.MPEG Specifi-
cationSampling Fre-
quency (kHz)Bit rate (kbps)
MPEG-1 Audio
Layer 348, 44.1, 32320, 256, 224,
192, 160, 128,
112, 96, 80, 64,
56, 48, 40, 32
MPEG-2 Audio
Layer 324, 22.05, 16160, 128, 144,
112, 96, 80, 64,
56, 48, 40, 32, 24,
16, 8
ID3 Tag information for artist, song title and album title
are supported for version 1 ID3 tags. ID3 version 2 is not
supported by the radios.
Playlist files are not supported. MP3 Pro files are not
supported.
UNDERSTANDING YOUR INSTRUMENT PANEL 209
4
Page 210 of 456

Playback of MP3 Files
When a medium containing MP3 data is loaded, the
radio checks all files on the medium. If the medium
contains a lot of folders or files, the radio will take more
time to start playing the MP3 files.
Loading times for playback of MP3 files may be affected
by the following:
•Media - CD-RW media may take longer to load than
CD-R media
•Medium formats - Multisession discs may take longer
to load than non-multisession discs
•Number of files and folders - Loading times will
increase with more files and folders
To increase the speed of disc loading, it is recommended
to use CD-R media and single-session discs. To create a
single-session disc, enable the Disc at Once option before
writing to the disc.
Operation Instructions - (CD Mode for MP3 Audio
Play)
SEEK Button (CD Mode for MP3 Play)
Pressing the right side of the SEEK button plays the next
MP3 File. Pressing the left side of the SEEK button plays
the beginning of the MP3 file. Pressing the button within
the first ten seconds plays the previous file.
LOAD/EJECT Button (CD Mode for MP3 Play)
LOAD/ EJECT - Load
Press the LOAD/ EJECT button and the push-
button with the corresponding number where
the CD is being loaded. The radio will display
PLEASE WAIT and prompt when to INSERT
DISC. After the radio displays�LOAD DISC�insert the
CD into the player.
Radio display will show�LOADING DISC�when the disc
is loading.
210 UNDERSTANDING YOUR INSTRUMENT PANEL
Page 213 of 456
SALES CODE REF — AM/FM/CD (SINGLE DISC)
RADIO WITH OPTIONAL SATELLITE RADIO AND
HANDS FREE PHONE CAPABILITY
NOTE:The radio sales code is located on the lower right
side of your radio faceplate.
Operating Instructions - Radio Mode
NOTE:The ignition switch must be in the ON or ACC
position to operate the radio.
Power Switch/Volume Control (Rotary)
Press the ON/VOL control to turn the radio ON. Press
the ON/VOL a second time to turn OFF the radio.
Electronic Volume Control
The electronic volume control turns continuously (360
degrees) in either direction without stopping. Turning the
volume control to the right increases the volume and to
the left decreases it.
When the audio system is turned on, the sound will be
set at the same volume level as last played.
For your convenience, the volume can be turned down,
but not up, when the audio system is off and the ignition
is ON.
REF Radio
UNDERSTANDING YOUR INSTRUMENT PANEL 213
4
Page 215 of 456

Clock Setting Procedure
1. Press and hold the time button until the hours blink.
2. Adjust the hours by turning the right side Tune/
Audio control.
3. After the hours are adjusted, press the right side
Tune/Audio control to set the minutes. The minutes will
begin to blink.
4. Adjust the minutes using the right side Tune/Audio
control.
5. To exit, press any button/knob or wait 5 seconds.
RW/FF (Radio Mode)
Pressing the rewind/fast forward button causes the tuner
to search for the next frequency in the direction of the
arrows. This feature operates in either AM, FM or Satel-
lite (if equipped) frequencies.
TUNE Control (Radio Mode)
Turn the right side rotary control clockwise to increase or
counter-clockwise to decrease the frequency.
AM/FM Button (Radio Mode)
Press the button to select AM or FM Modes.
Setting the Tone, Balance, and Fade
Press the rotary TUNE control and BASS will display.
Turn the TUNE control to the right or left to increase or
decrease the Bass tones.
Press the rotary TUNE control a second time and MID
will display. Turn the TUNE control to the right or left to
increase or decrease the Mid Range tones.
Press the rotary TUNE control a third time and TREB will
display. Turn the TUNE control to the right or left to
increase or decrease the Treble tones.
UNDERSTANDING YOUR INSTRUMENT PANEL 215
4
Page 219 of 456

Operation Instructions - Auxiliary Mode
The auxiliary (AUX) jack is an audio input jack, which
allows the user to plug in a portable device such as an
MP3 player, cassette player, or microphone and utilize
the vehicle’s audio system to amplify the source and play
through the vehicle speakers.
The auxiliary mode becomes active when an electrical
device is plugged into the AUX jack using a standard 3.5
mm stereo audio cable and the user presses and releases
the MODE button until AUX appears on the display.
NOTE:The radio will return to the last stored mode if
the ignition switch is turned from the OFF/LOCK posi-
tion to the ACC position, the radio is turned on, and the
radio was previously in the AUX mode.
SEEK Button (Auxiliary Mode)
No function.
MUTE Button (Auxiliary Mode)
Press the MUTE button to cancel the sound from the
speakers.�MUTE�will display. Press the MUTE button a
second time and the sound from the speakers will return.
Rotating the volume control or turning OFF the ignition
will also return the sound from the speakers.
SCAN Button (Auxiliary Mode)
No function.
EJECT Button (Auxiliary Mode)
No function.
PSCAN Button (Auxiliary Mode)
No function.
UNDERSTANDING YOUR INSTRUMENT PANEL 219
4
Page 224 of 456
Audio Clock Display
Select this option to change the size of the clock on the
audio screens.
1. When you are at an audio screen, quickly press the
TIME button on the navigation faceplate.
2. In this example the large clock appears on the screen.3. To switch the clock to the small clock, quickly press
TIME again.
4. To toggle back to the large clock, simply press TIME.
224 UNDERSTANDING YOUR INSTRUMENT PANEL
Page 393 of 456
FUSE PANEL
Interior Fuses
The fuse panel is on the lower instrument panel just to
the left of the steering column.
CavityCartridge
FuseMini
FuseDescription
1 30 Amp
GreenAudio Amp (B+)
2 15 Amp
BlueSunroof (B+)
3 10 Amp
RedHtd Mirror (EBL)
4 20 Amp
YellowRr Pwr Out (B+)
5 10 Amp
RedRr HVAC (R/O) (XK
Only)
6 Spare
(B+)
7 20 Amp
YellowDoor Locks (B+)
8 15 Amp
BlueSteer Col Lock (B+)
(ELV)
Fuse Panel Location
MAINTAINING YOUR VEHICLE 393
7
Page:
< prev 1-8 9-16 17-24