Page 4734 of 6020
Manual Transmission (MUX) 7B1-15
25. Install the gear control knob.
Legend 1. Knob
2. Rear Floor Console
3. Front Floor Console
26. Connect battery ground cable.
RTW77BSH000101
1
32
BACK TO CHAPTER INDEX
TO MODEL INDEX
ISUZU KB P190 2007
Page 4834 of 6020
7D-4 TRANSFER CASE
On-Vehicle Service
Transfer Case Oil Level
RTW 67DMF000101
Legend
(1) Transfer Case
(2) Filler Plug and O-ring
Removal
1. Disconnect the battery ground cable.
2. Rise and support the vehicle with suitable stands.
3. Remove the filler plug and O-ring.
4. Check the oil level reaches the filler hole.
5. If the oil level is low, fill the transfer oil (5W -30) o
r
equivalent to the transfer through the filler hole.
Installation
1. Replace the filler plug and O-ring tighten it to the
specified torque.
Filler plug torque: 39 N ⋅
⋅⋅
⋅
m (4.0 kgf ⋅
⋅⋅
⋅
m/29 lb ⋅
⋅⋅
⋅
ft)
2. Lower the vehicle to the ground.
3. Connect the battery ground cable.
BACK TO CHAPTER INDEX
TO MODEL INDEX
ISUZU KB P190 2007
Page 4835 of 6020

TRANSFER CASE 7D-5
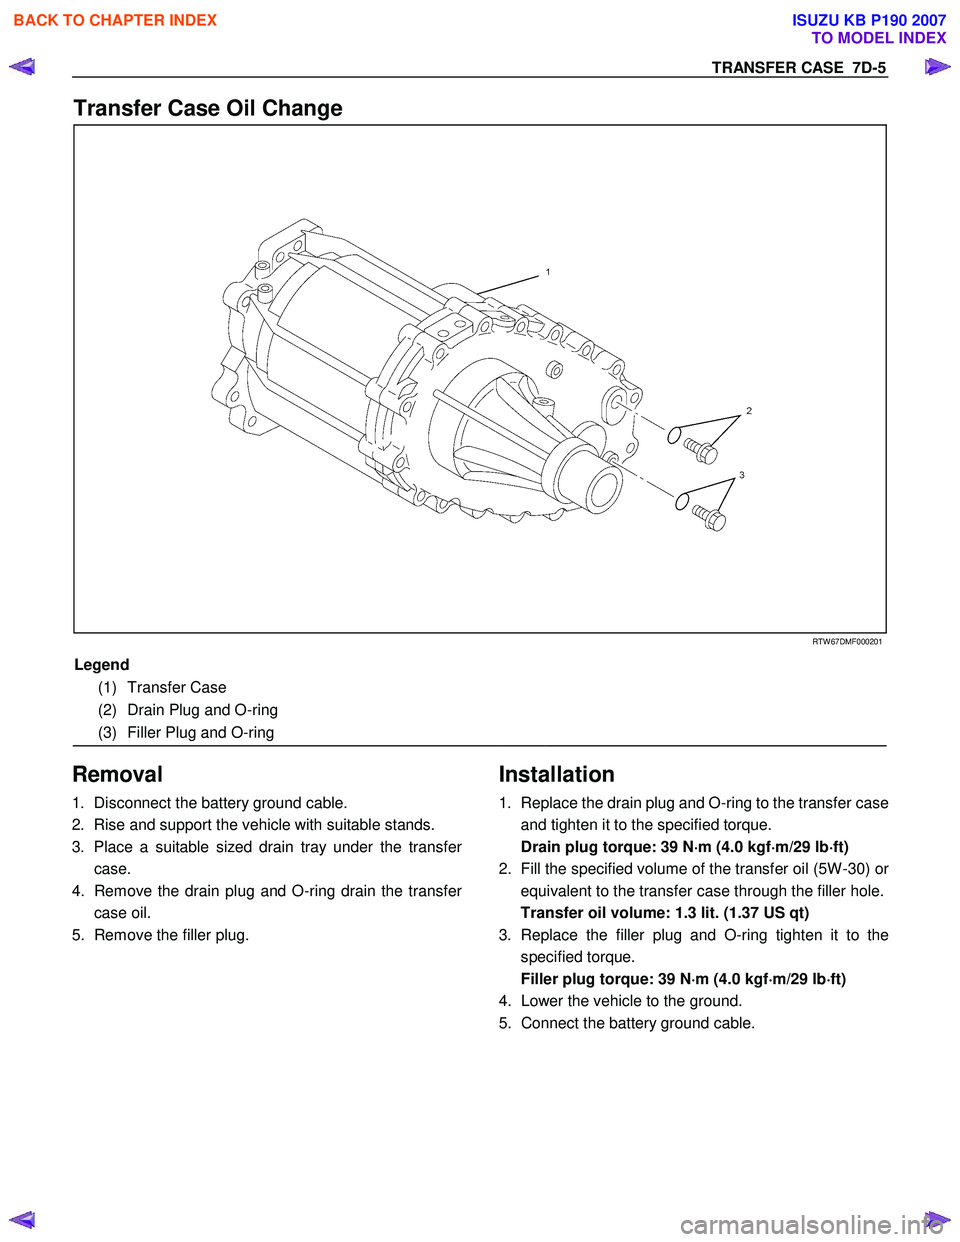
Transfer Case Oil Change
RTW 67DMF000201
Legend
(1) Transfer Case
(2) Drain Plug and O-ring
(3) Filler Plug and O-ring
Removal
1. Disconnect the battery ground cable.
2. Rise and support the vehicle with suitable stands.
3. Place a suitable sized drain tray under the transfe
r
case.
4. Remove the drain plug and O-ring drain the transfe
r
case oil.
5. Remove the filler plug.
Installation
1. Replace the drain plug and O-ring to the transfer case
and tighten it to the specified torque.
Drain plug torque: 39 N ⋅
⋅⋅
⋅
m (4.0 kgf ⋅
⋅⋅
⋅
m/29 lb ⋅
⋅⋅
⋅
ft)
2. Fill the specified volume of the transfer oil (5W -30) o
r
equivalent to the transfer case through the filler hole.
Transfer oil volume: 1.3 lit. (1.37 US qt)
3. Replace the filler plug and O-ring tighten it to the specified torque.
Filler plug torque: 39 N ⋅
⋅⋅
⋅
m (4.0 kgf ⋅
⋅⋅
⋅
m/29 lb ⋅
⋅⋅
⋅
ft)
4. Lower the vehicle to the ground.
5. Connect the battery ground cable.
BACK TO CHAPTER INDEX
TO MODEL INDEX
ISUZU KB P190 2007
Page 4836 of 6020
7D-6 TRANSFER CASE
Transfer Case Front Oil Seal
Transfer Front Oil Seal and Associated Parts
RTW 67DMF000301
Legend
(3) O-ring
(1) Front Propeller Shaft (4) Output Flange
(2) End Nut (5) Front Oil Seal
Removal
1. Disconnect the battery ground cable.
2. Raise and support the vehicle with suitable stands.
3. Place a suitable sized drain tray under the transfe
r
case.
4. Remove the drain plug and drain the transfer case oil.
5. Remove the filler plug.
6. Remove the front propeller shaft.
7. Use a flange holder (5-8840-0133-0) to remove the end nut from the front output shaft then remove the
O-ring and the output flange.
8. Remove the front oil seal from the front cover.
RTW 77DSH000201
BACK TO CHAPTER INDEX
TO MODEL INDEX
ISUZU KB P190 2007
Page 4838 of 6020
7D-8 TRANSFER CASE
9. Install the drain plug to the transfer case and tighten it
to the specified torque.
Drain plug torque: 39 N ⋅
⋅⋅
⋅
m (4.0 kgf ⋅
⋅⋅
⋅
m/29 lb ⋅
⋅⋅
⋅
ft)
Transfer oil volume: 1.3 lit. (1.37 US qt)
10. Install the filler plug and tighten it to the specified torque:
Filler plug torque: 39 N ⋅
⋅⋅
⋅
m (4.0 kgf ⋅
⋅⋅
⋅
m/29 lb ⋅
⋅⋅
⋅
ft)
11. Install the front propeller shaft.
Propeller shaft bolts torque: 59 N ⋅
⋅⋅
⋅
m (6.0 kgf ⋅
⋅⋅
⋅
m/43 lb ⋅
⋅⋅
⋅
ft)
12. Lower the vehicle to the ground.
13. Connect the battery ground cable.
BACK TO CHAPTER INDEX
TO MODEL INDEX
ISUZU KB P190 2007
Page 4839 of 6020
TRANSFER CASE 7D-9
Transfer Case Rear Oil Seal
Transfer Rear Oil Seal and Associated Parts
220R300018
Legend
(1) Rear Propeller Shaft
(2) Rear Oil Seal
Removal
1. Disconnect the battery ground cable.
2. Raise and support the vehicle with suitable stands.
3. Remove the rear propeller shaft.
4. Remove the oil seal from the transfer case.
Installation
1. Thoroughly clean around the oil seal bore in the
transfer case and ensure there are no burrs.
2.
Apply the engine oil to the new oil seal outer surfaces
and apply the recommended grease (BESCO L2) o
r
equivalent to the oil seal lip.
BACK TO CHAPTER INDEX
TO MODEL INDEX
ISUZU KB P190 2007
Page 4840 of 6020
7D-10 TRANSFER CASE
3. Tap an oil seal in to place, use an oil seal installer
5-8840-2786-0 and a soft hammer.
RTW 77DSH000401
220R300021
4. Install the rear propeller shaft.
Propeller shaft bolts torque: 59 N ⋅
⋅⋅
⋅
m (6.0 kgf ⋅
⋅⋅
⋅
m/43 lb ⋅
⋅⋅
⋅
ft)
5. Lower the vehicle to the ground.
6. Connect the battery ground cable.
BACK TO CHAPTER INDEX
TO MODEL INDEX
ISUZU KB P190 2007
Page 4842 of 6020

7D-12 TRANSFER CASE
Removal
NOTE: Before removing transmission and transfer
assembly from vehicle, change the transfer mode to
2W D using the 4W D push button switch on dash panel.
1. Disconnect battery ground cable.
2. Raise and support vehicle with suitable stands. Drain
transfer case fluid.
3. Remove rear propeller shaft and front propeller shaft.
NOTE: Apply alignment marks on the flange at both front
and rear sides.
4. Disconnect harness connectors and clip.
Connector: transfer switch, 2W D-4W D actuator,
speed sensor.
NOTE: Avoid turning the vehicle ignition switch to the ON
position when the 2W D-4W D connector is removed
(battery connected).
If the ignition switch must be turned to the ON position,
the controller must first be removed (memory must be
cleared because the CHECK 4W D INDICATOR will
light).
5. Remove transfer case assembly from the vehicle.
Installation
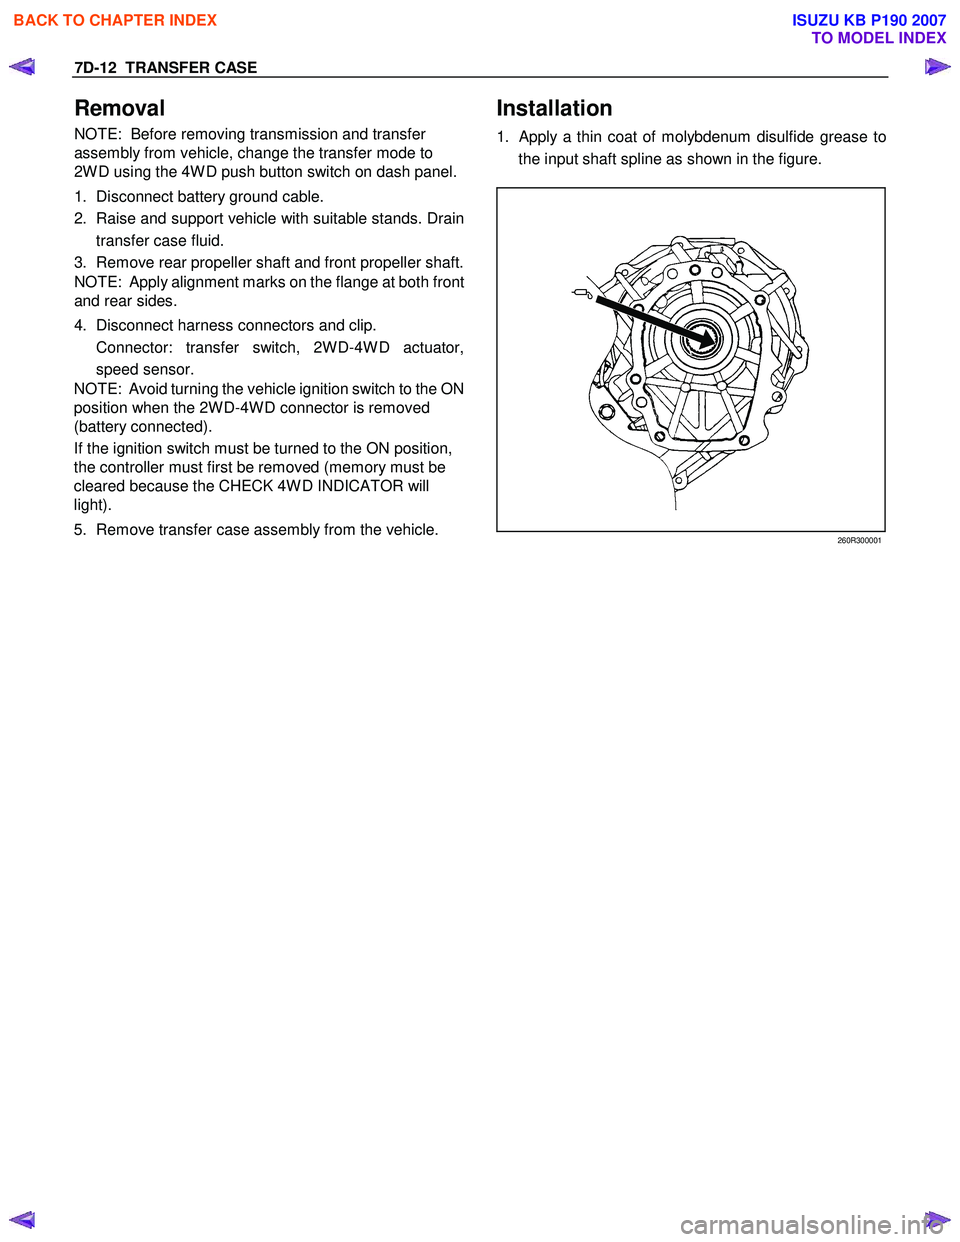
1. Apply a thin coat of molybdenum disulfide grease to
the input shaft spline as shown in the figure.
260R300001
BACK TO CHAPTER INDEX
TO MODEL INDEX
ISUZU KB P190 2007