2007 ISUZU KB P190 automatic transmission
[x] Cancel search: automatic transmissionPage 3909 of 6020
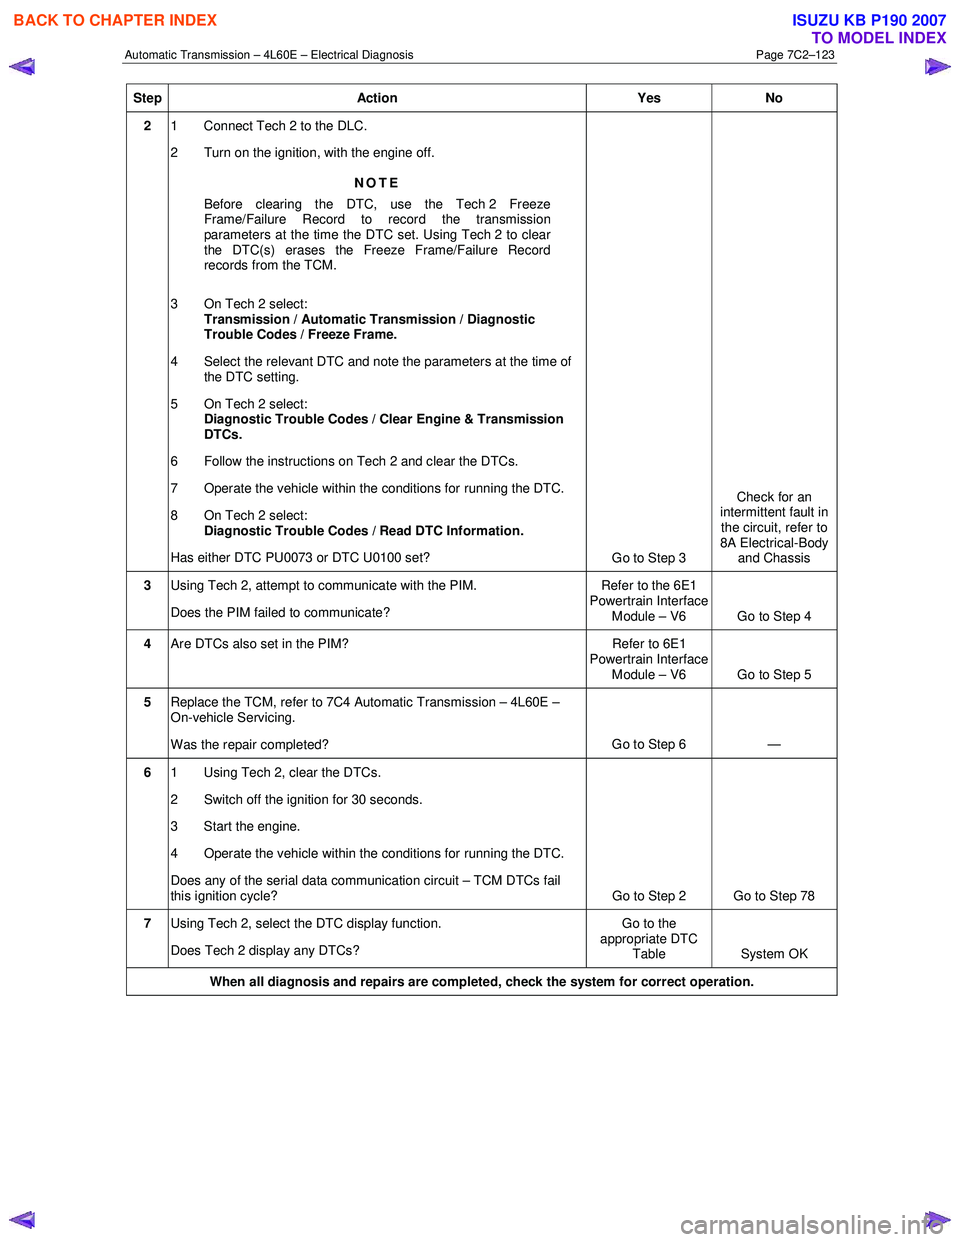
Automatic Transmission – 4L60E – Electrical Diagnosis Page 7C2–123
Step Action Yes No
2 1 Connect Tech 2 to the DLC.
2 Turn on the ignition, with the engine off.
NOTE
Before clearing the DTC, use the Tech 2 Freeze
Frame/Failure Record to record the transmission
parameters at the time the DTC set. Using Tech 2 to clear
the DTC(s) erases the Freeze Frame/Failure Record
records from the TCM.
3 On Tech 2 select: Transmission / Automatic Transmission / Diagnostic
Trouble Codes / Freeze Frame.
4 Select the relevant DTC and note the parameters at the time of the DTC setting.
5 On Tech 2 select:
Diagnostic Trouble Codes / Clear Engine & Transmission
DTCs.
6 Follow the instructions on Tech 2 and clear the DTCs.
7 Operate the vehicle within the conditions for running the DTC.
8 On Tech 2 select:
Diagnostic Trouble Codes / Read DTC Information.
Has either DTC PU0073 or DTC U0100 set? Go to Step 3 Check for an
intermittent fault in the circuit, refer to
8A Electrical-Body and Chassis
3 Using Tech 2, attempt to communicate with the PIM.
Does the PIM failed to communicate? Refer to the 6E1
Powertrain Interface Module – V6 Go to Step 4
4 Are DTCs also set in the PIM? Refer to 6E1
Powertrain Interface
Module – V6 Go to Step 5
5 Replace the TCM, refer to 7C4 Automatic Transmission – 4L60E –
On-vehicle Servicing.
Was the repair completed? Go to Step 6
—
6 1 Using Tech 2, clear the DTCs.
2 Switch off the ignition for 30 seconds.
3 Start the engine.
4 Operate the vehicle within the conditions for running the DTC.
Does any of the serial data communication circuit – TCM DTCs fail
this ignition cycle? Go to Step 2 Go to Step 78
7 Using Tech 2, select the DTC display function.
Does Tech 2 display any DTCs? Go to the
appropriate DTC Table System OK
When all diagnosis and repairs are completed, check the system for correct operation.
BACK TO CHAPTER INDEX
TO MODEL INDEX
ISUZU KB P190 2007
Page 3910 of 6020
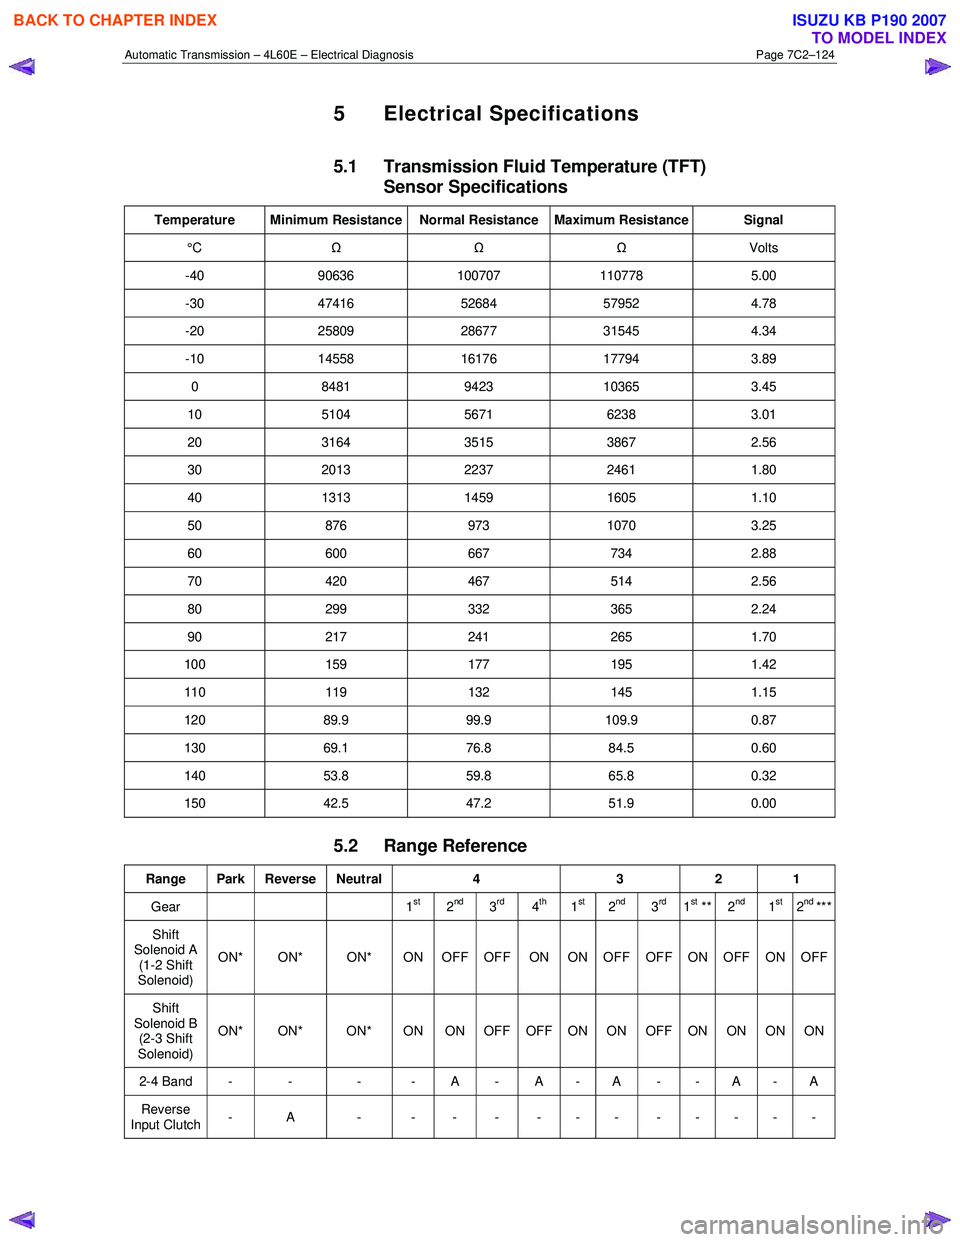
Automatic Transmission – 4L60E – Electrical Diagnosis Page 7C2–124
5 Electrical Specifications
5.1 Transmission Fluid Temperature (TFT)
Sensor Specifications
Temperature Minimum Resistance Normal Resistance Maximum Resistance Signal
°C Ω Ω Ω Volts
-40 90636 100707 110778 5.00
-30 47416 52684 57952 4.78
-20 25809 28677 31545 4.34
-10 14558 16176 17794 3.89
0 8481 9423 10365 3.45
10 5104 5671 6238 3.01
20 3164 3515 3867 2.56
30 2013 2237 2461 1.80
40 1313 1459 1605 1.10
50 876 973 1070 3.25
60 600 667 734 2.88
70 420 467 514 2.56
80 299 332 365 2.24
90 217 241 265 1.70
100 159 177 195 1.42
110 119 132 145 1.15
120 89.9 99.9 109.9 0.87
130 69.1 76.8 84.5 0.60
140 53.8 59.8 65.8 0.32
150 42.5 47.2 51.9 0.00
5.2 Range Reference
Range Park Reverse Neutral 4 3 2 1
Gear 1st 2nd3rd4th1st2nd3rd1st ** 2nd 1st2nd ***
Shift
Solenoid A (1-2 Shift
Solenoid) ON* ON* ON* ON OFF OFF ON ON OFF OFF ON OFF ON OFF
Shift
Solenoid B (2-3 Shift
Solenoid) ON* ON* ON* ON ON OFF OFF ON ON OFF ON ON ON ON
2-4 Band - - - - A - A - A - - A - A
Reverse
Input Clutch - A - - - - - - - - - - - -
BACK TO CHAPTER INDEX
TO MODEL INDEX
ISUZU KB P190 2007
Page 3911 of 6020
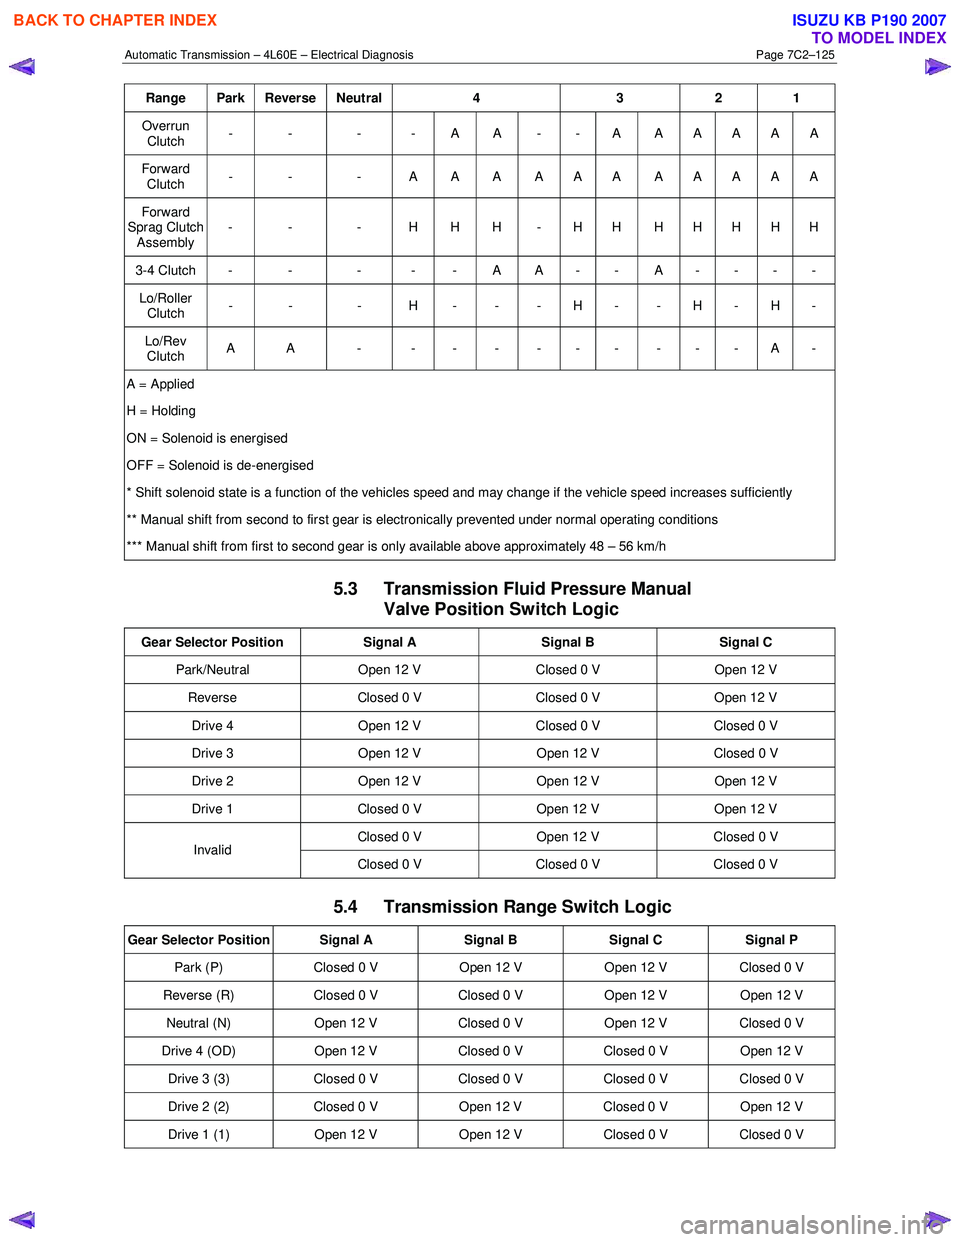
Automatic Transmission – 4L60E – Electrical Diagnosis Page 7C2–125
Range Park Reverse Neutral 4 3 2 1
Overrun
Clutch - - - - A A - - A A A A A A
Forward
Clutch - - - A A A A A A A A A A A
Forward
Sprag Clutch Assembly - - - H H H - H H H H H H H
3-4 Clutch - - - - - A A - - A - - - -
Lo/Roller
Clutch - - - H - - - H - - H - H -
Lo/Rev
Clutch A A - - - - - - - - - - A -
A = Applied
H = Holding
ON = Solenoid is energised
OFF = Solenoid is de-energised
* Shift solenoid state is a function of the vehicles speed and may change if the vehicle speed increases sufficiently
** Manual shift from second to first gear is electronically prevented under normal operating conditions
*** Manual shift from first to second gear is only available above approximately 48 – 56 km/h
5.3 Transmission Fluid Pressure Manual Valve Position Switch Logic
Gear Selector Position Signal A Signal B Signal C
Park/Neutral Open 12 V Closed 0 V Open 12 V
Reverse Closed 0 V Closed 0 V Open 12 V
Drive 4 Open 12 V Closed 0 V Closed 0 V
Drive 3 Open 12 V Open 12 V Closed 0 V
Drive 2 Open 12 V Open 12 V Open 12 V
Drive 1 Closed 0 V Open 12 V Open 12 V
Closed 0 V Open 12 V Closed 0 V Invalid
Closed 0 V Closed 0 V Closed 0 V
5.4 Transmission Range Switch Logic
Gear Selector Position Signal A Signal B Signal C Signal P
Park (P) Closed 0 V Open 12 V Open 12 V Closed 0 V
Reverse (R) Closed 0 V Closed 0 V Open 12 V Open 12 V
Neutral (N) Open 12 V Closed 0 V Open 12 V Closed 0 V
Drive 4 (OD) Open 12 V Closed 0 V Closed 0 V Open 12 V
Drive 3 (3) Closed 0 V Closed 0 V Closed 0 V Closed 0 V
Drive 2 (2) Closed 0 V Open 12 V Closed 0 V Open 12 V
Drive 1 (1) Open 12 V Open 12 V Closed 0 V Closed 0 V
BACK TO CHAPTER INDEX
TO MODEL INDEX
ISUZU KB P190 2007
Page 3912 of 6020
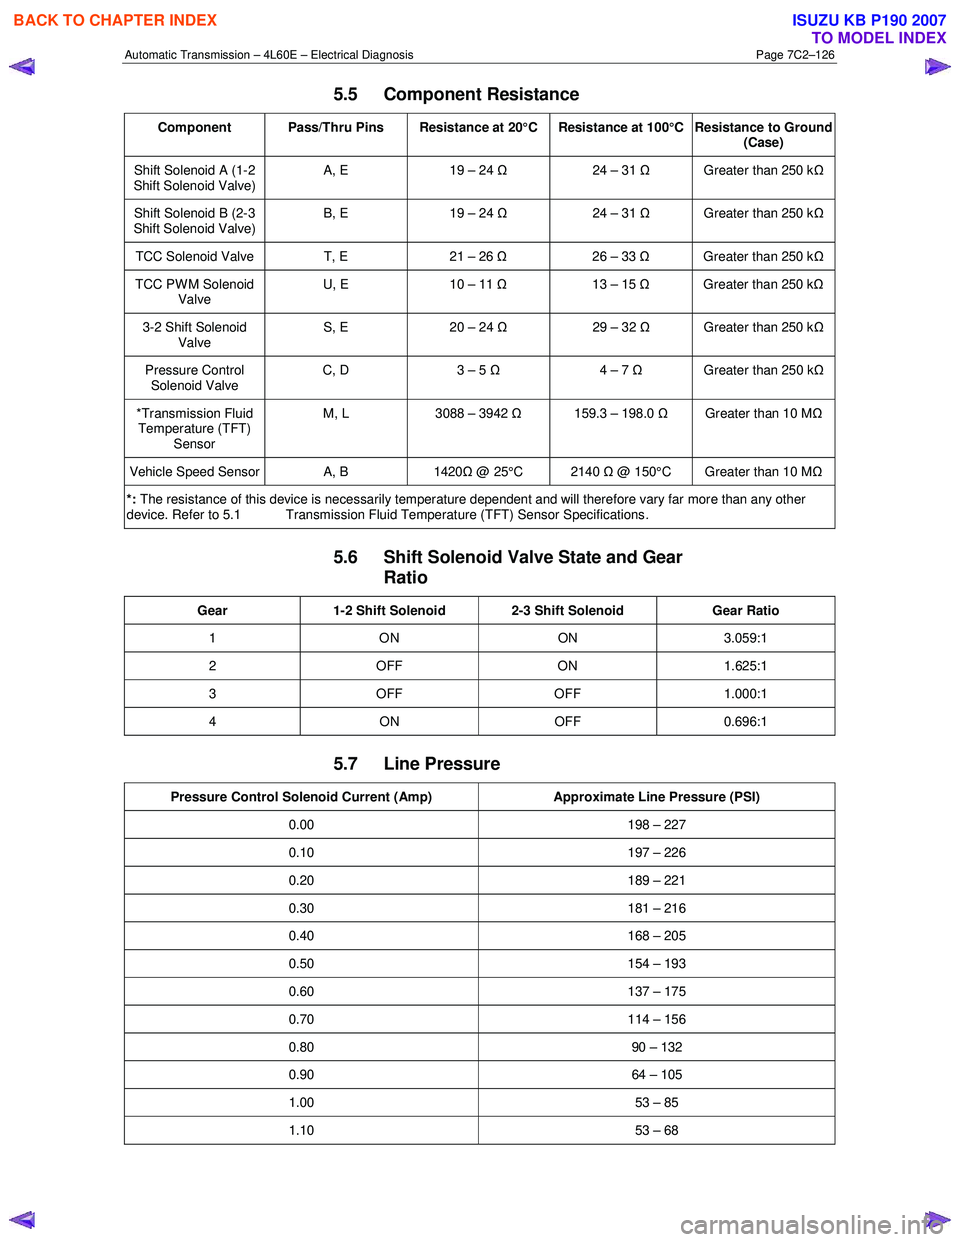
Automatic Transmission – 4L60E – Electrical Diagnosis Page 7C2–126
5.5 Component Resistance
Component Pass/Thru Pins Resistance at 20°C Resistance at 100°C Resistance to Ground
(Case)
Shift Solenoid A (1-2
Shift Solenoid Valve) A, E 19 – 24
Ω 24 – 31 Ω Greater than 250 k Ω
Shift Solenoid B (2-3
Shift Solenoid Valve) B, E 19 – 24
Ω 24 – 31 Ω Greater than 250 k Ω
TCC Solenoid Valve T, E 21 – 26 Ω 26 – 33 Ω Greater than 250 k Ω
TCC PWM Solenoid
Valve U, E
10 – 11 Ω 13 – 15 Ω Greater than 250 k Ω
3-2 Shift Solenoid
Valve S, E 20 – 24
Ω 29 – 32 Ω Greater than 250 k Ω
Pressure Control
Solenoid Valve C, D
3 – 5 Ω 4 – 7 Ω Greater than 250 k Ω
*Transmission Fluid
Temperature (TFT) Sensor M, L
3088 – 3942 Ω 159.3 – 198.0 Ω Greater than 10 M Ω
Vehicle Speed Sensor A, B 1420Ω @ 25°C 2140 Ω @ 150°C Greater than 10 M Ω
*: The resistance of this device is necessarily temperature dependent and will therefore vary far more than any other
device. Refer to 5.1 Transmission Fluid Temperature (TFT) Sensor Specifications .
5.6 Shift Solenoid Valve State and Gear
Ratio
Gear 1-2 Shift Solenoid 2-3 Shift Solenoid Gear Ratio
1 ON ON 3.059:1
2 OFF ON 1.625:1
3 OFF OFF 1.000:1
4 ON OFF 0.696:1
5.7 Line Pressure
Pressure Control Solenoid Current (Amp) Approximate Line Pressure (PSI)
0.00 198 – 227
0.10 197 – 226
0.20 189 – 221
0.30 181 – 216
0.40 168 – 205
0.50 154 – 193
0.60 137 – 175
0.70 114 – 156
0.80 90 – 132
0.90 64 – 105
1.00 53 – 85
1.10 53 – 68
BACK TO CHAPTER INDEX
TO MODEL INDEX
ISUZU KB P190 2007
Page 3913 of 6020
Automatic Transmission – 4L60E – Electrical Diagnosis Page 7C2–127
6 Special Tools
For a complete listing of all the special tools used for servicing the 4L60E hydra-matic automatic transmission, refer to
7C1 Automatic transmission – 4L60E – General Information.
BACK TO CHAPTER INDEX
TO MODEL INDEX
ISUZU KB P190 2007
Page 3914 of 6020
Automatic Transmission – 4L60E – On-vehicle Servicing Page 7C4–1
7C4
Automatic Transmission – 4L60E –
On-vehicle Servicing
ATTENTION
Before performing any service operation or other procedure described in this Section, refer to General Information Warnings, Cautions and Notes for correct workshop practices with regard to safety and/or property damage.
1 General Information ............................................................................................................ ...................3
1.1 General Service Information ................................................................................................................................. 3
Description ............................................................................................................................................................. 3
Service Information ............................................................................................................ ................................... 3
1.2 WARNINGS, CAUTIONS and NOTES................................................................................................... ................. 3
Definition of WARNING, CAUTION and NOTE Statements ............................................................................. .... 3
WARNING Defined............................................................................................................................................. 4
CAUTION Defined .............................................................................................................................................. 4
NOTE Defined .................................................................................................................................................... 4
2 Maintenance Operations......................................................................................................... ...............5
2.1 Transmission Fluid ................................................................................................................................................ 5
Transmission Fluid Colour...................................................................................................... .............................. 5
Transmission Fluid Level ...................................................................................................................................... 5
2.2 Reverse Flush and Flow Rate Test ............................................................................................... ........................ 6
Reverse Flush ........................................................................................................................................................ 6
Flow Rate Test........................................................................................................................................................ 7
3 Service Operations ............................................................................................................. ....................8
3.1 Fluid Change and Filter Replacement ............................................................................................ ...................... 8
Remove ................................................................................................................................................................... 8
Reinstall .................................................................................................................................................................. 9
3.2 Shift Selector Assembly ...................................................................................................................................... 11
Remove ................................................................................................................................................................. 11
Reinstall ................................................................................................................................................................ 12
3.3 Selector Cable Assembly .................................................................................................................................... 14
Remove ................................................................................................................................................................. 15
Reinstall ................................................................................................................................................................ 15
3.4 Neutral Start and Back-up Lamp Switch ............................................................................................................ 16
Remove ................................................................................................................................................................. 16
Reinstall ................................................................................................................................................................ 17
Adjust .................................................................................................................................................................... 17
3.5 Vehicle Speed Sensor ......................................................................................................................................... 18
Remove ................................................................................................................................................................. 18
Reinstall ................................................................................................................................................................ 19
3.6 Manual Shaft Oil Seal .......................................................................................................................................... 19
Replace ................................................................................................................................................................. 19
3.7 Transmission Support and Mount ................................................................................................. ..................... 20
Remove ................................................................................................................................................................. 20
Reinstall ................................................................................................................................................................ 21
3.8 Extension Housing Oil Seal, RWD ...................................................................................................................... 22
Replace ................................................................................................................................................................. 22
3.9 Extension Housing and Rear Bush, RWD ........................................................................................... ............... 22
BACK TO CHAPTER INDEX
TO MODEL INDEX
ISUZU KB P190 2007
Page 3915 of 6020
Automatic Transmission – 4L60E – On-vehicle Servicing Page 7C4–2
Remove ................................................................................................................................................................. 22
Reinstall ................................................................................................................................................................ 24
3.10 Adaptor Housing, 4WD ........................................................................................................................................ 24
Remove and Reinstall .......................................................................................................................................... 24
3.11 Shift Solenoid Locations ..................................................................................................................................... 25
Location and Identification .................................................................................................... ............................. 25
3.12 1 – 2 Accumulator Assembly ..................................................................................................... ......................... 25
Remove ................................................................................................................................................................. 25
Clean and Inspect ................................................................................................................................................ 26
Reinstall ................................................................................................................................................................ 26
3.13 Control Valve Body Harness ..................................................................................................... .......................... 26
Remove ................................................................................................................................................................. 26
Reinstall ................................................................................................................................................................ 28
3.14 Control Valve Body .............................................................................................................................................. 30
Remove ................................................................................................................................................................. 30
Reinstall ................................................................................................................................................................ 31
3.15 Spacer Plate, Check Balls, Filter Screens and 3 – 4 Accumulator ................................................................ .. 35
Remove ................................................................................................................................................................. 35
Clean and Inspect ................................................................................................................................................ 36
Reinstall ................................................................................................................................................................ 37
3.16 Filler Tube and Breather Hose .................................................................................................. .......................... 39
Remove ................................................................................................................................................................. 39
Reinstall ................................................................................................................................................................ 40
3.17 Transmission Cooler Line/Hose Assemblies ....................................................................................... ............. 41
Remove ................................................................................................................................................................. 41
Reinstall ................................................................................................................................................................ 42
3.18 Transmission Assembly...................................................................................................................................... 43
Remove ................................................................................................................................................................. 43
Reinstall ................................................................................................................................................................ 46
3.19 Transmission Control Module ............................................................................................................................ 47
Remove ................................................................................................................................................................. 47
Reinstall ................................................................................................................................................................ 48
TCM Programming Procedure ...................................................................................................... ...................... 48
4 Specifications .......................................................................................................................................50
5 Torque Wrench Specifications................................................................................................... .........51
6 Special Tools ........................................................................................................................................52
BACK TO CHAPTER INDEX
TO MODEL INDEX
ISUZU KB P190 2007
Page 3916 of 6020
Automatic Transmission – 4L60E – On-vehicle Servicing Page 7C4–3
1 General Information
This Section describes the removal and reinstallation procedures of the four speed 4L60E hydra-matic automatic
transmission as well as the service operations which can be performed with the transmission still fitted to the vehicle.
1.1 General Service Information
Description
The shift selector mechanism is linked to the transmission manual shaft with a selector cable. A heat protector is fitted
over the neutral start and back-up switch and manual shaft select lever.
For rear wheel drive (RWD) vehicles an extension housing is fitted to the rear of the transmission case.
Four wheel drive (4W D) vehicles have an adaptor housing and transfer case fitted to the rear of the transmission case,
for description and service operation refer to 7D Transfer Case and Adaptor Housing.
The four speed 4L60E hydra-matic automatic transmission is fitted with a filler tube, a breather hose and a vent pipe for
hot fluid overflow.
The transmission fluid is driven through a cooler within the radiator via the cooler line/hose assemblies to maintain
normal operating temperature.
Service Information
Throughout the service operations within this
Section, when handling retaining clips, using
compressed air or cleaning fluids, wear safety
equipment to avoid personal injury.
Refer to 7C1 Automatic Transmission – 4L60E – General Information for the following:
• information relating to mechanical and electrical operations,
• abbreviations, transmission specifications, special tools and torque wrench specifications,
• servicing, cleaning and inspection procedure recommendations.
It is essential to read and understand the General Information, W arnings, Cautions and Service Notes contained in that
same Section, before any service operation is performed on the four speed 4L60E hydra-matic automatic transmission or
any associated components.
Failure to comply with the procedures and service notes can affect the reliable and efficient operation of this automatic
transmission.
1.2 WARNINGS, CAUTIONS and NOTES
This Section contains various W ARNINGS, CAUTIONS and NOTE statements that you must observe carefully to reduce
the risk of death or injury during service, repair procedures or vehicle operation. Incorrect service or repair procedures
may damage the vehicle or cause operational faults. W ARNINGS, CAUTION and NOTE statements are not exhaustive.
GM HOLDEN LTD can not possibly warn of all the potentially hazardous consequences of failure to follow these
instructions.
Definition of WARNING, CAUTION and NOTE Statements
Diagnosis and repair procedures in this Section contain both general and specific W ARNING, CAUTION and NOTE
statements. GM HOLDEN LTD is dedicated to the presentation of service information that helps the technician to
diagnose and repair the systems necessary for proper operation of the vehicle. Certain procedures may present a hazard
to the technician if they are not followed in the recommended manner. W ARNING, CAUTION and NOTE statements are
designed to help prevent these hazards from occurring, but not all hazards can be foreseen.
BACK TO CHAPTER INDEX
TO MODEL INDEX
ISUZU KB P190 2007