2007 ISUZU KB P190 Circuit
[x] Cancel search: CircuitPage 3479 of 6020
Engine Management – V6 – Diagnostics Page 6C1-2–201
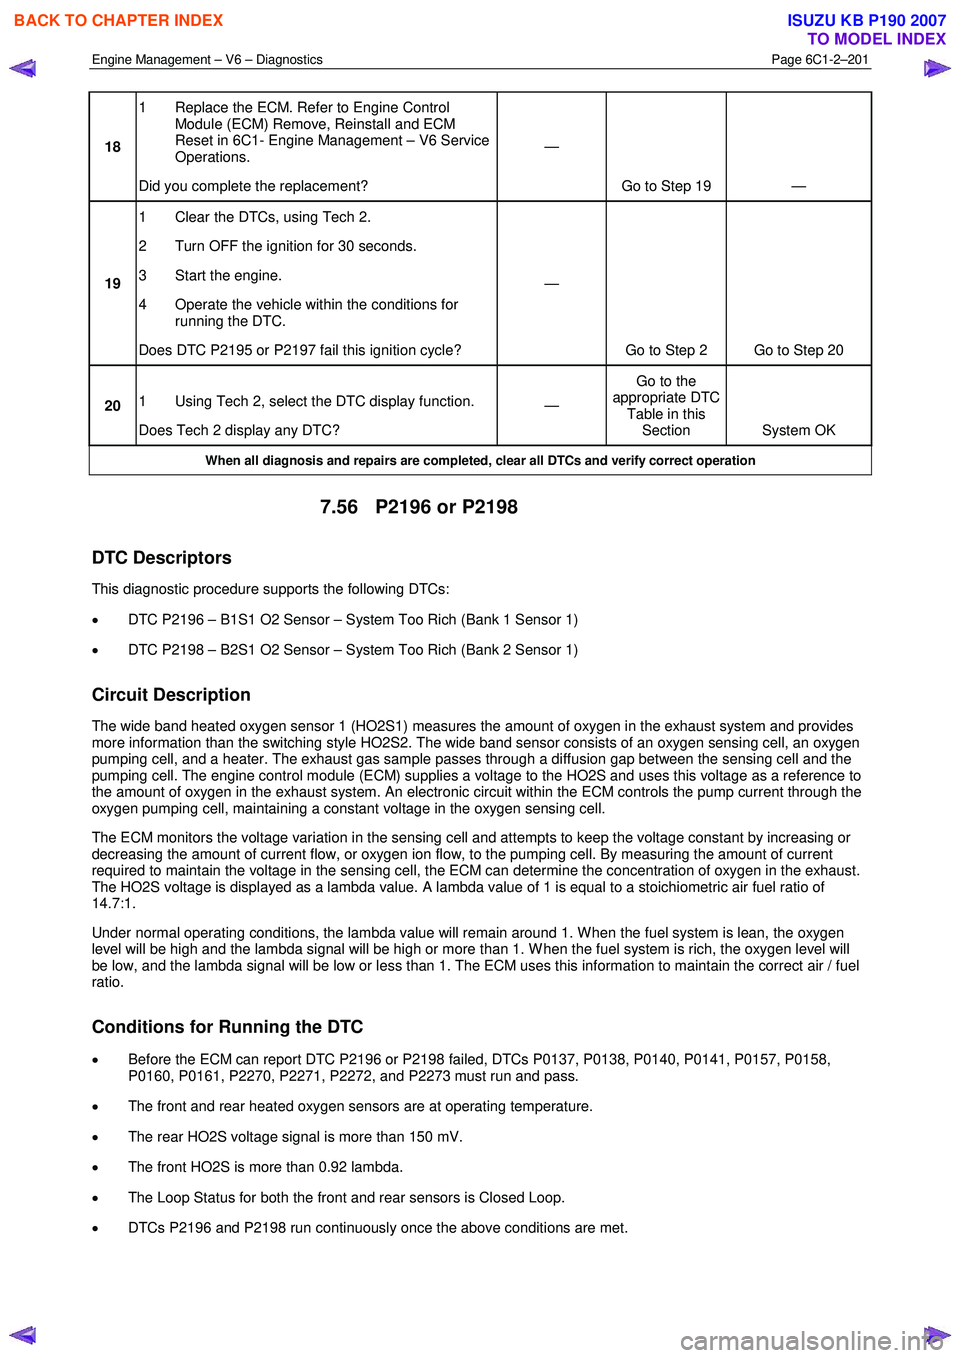
18 1 Replace the ECM. Refer to Engine Control
Module (ECM) Remove, Reinstall and ECM
Reset in 6C1- Engine Management – V6 Service
Operations.
Did you complete the replacement? —
Go to Step 19 —
19 1 Clear the DTCs, using Tech 2.
2 Turn OFF the ignition for 30 seconds.
3 Start the engine.
4 Operate the vehicle within the conditions for running the DTC.
Does DTC P2195 or P2197 fail this ignition cycle? —
Go to Step 2 Go to Step 20
20 1 Using Tech 2, select the DTC display function.
Does Tech 2 display any DTC? —
Go to the
appropriate DTC Table in this Section System OK
When all diagnosis and repairs are completed, clear all DTCs and verify correct operation
7.56 P2196 or P2198
DTC Descriptors
This diagnostic procedure supports the following DTCs:
• DTC P2196 – B1S1 O2 Sensor – System Too Rich (Bank 1 Sensor 1)
• DTC P2198 – B2S1 O2 Sensor – System Too Rich (Bank 2 Sensor 1)
Circuit Description
The wide band heated oxygen sensor 1 (HO2S1) measures the amount of oxygen in the exhaust system and provides
more information than the switching style HO2S2. The wide band sensor consists of an oxygen sensing cell, an oxygen
pumping cell, and a heater. The exhaust gas sample passes through a diffusion gap between the sensing cell and the
pumping cell. The engine control module (ECM) supplies a voltage to the HO2S and uses this voltage as a reference to
the amount of oxygen in the exhaust system. An electronic circuit within the ECM controls the pump current through the
oxygen pumping cell, maintaining a constant voltage in the oxygen sensing cell.
The ECM monitors the voltage variation in the sensing cell and attempts to keep the voltage constant by increasing or
decreasing the amount of current flow, or oxygen ion flow, to the pumping cell. By measuring the amount of current
required to maintain the voltage in the sensing cell, the ECM can determine the concentration of oxygen in the exhaust.
The HO2S voltage is displayed as a lambda value. A lambda value of 1 is equal to a stoichiometric air fuel ratio of
14.7:1.
Under normal operating conditions, the lambda value will remain around 1. W hen the fuel system is lean, the oxygen
level will be high and the lambda signal will be high or more than 1. W hen the fuel system is rich, the oxygen level will
be low, and the lambda signal will be low or less than 1. The ECM uses this information to maintain the correct air / fuel
ratio.
Conditions for Running the DTC
• Before the ECM can report DTC P2196 or P2198 failed, DTCs P0137, P0138, P0140, P0141, P0157, P0158,
P0160, P0161, P2270, P2271, P2272, and P2273 must run and pass.
• The front and rear heated oxygen sensors are at operating temperature.
• The rear HO2S voltage signal is more than 150 mV.
• The front HO2S is more than 0.92 lambda.
• The Loop Status for both the front and rear sensors is Closed Loop.
• DTCs P2196 and P2198 run continuously once the above conditions are met.
BACK TO CHAPTER INDEX
TO MODEL INDEX
ISUZU KB P190 2007
Page 3480 of 6020
Engine Management – V6 – Diagnostics Page 6C1-2–202
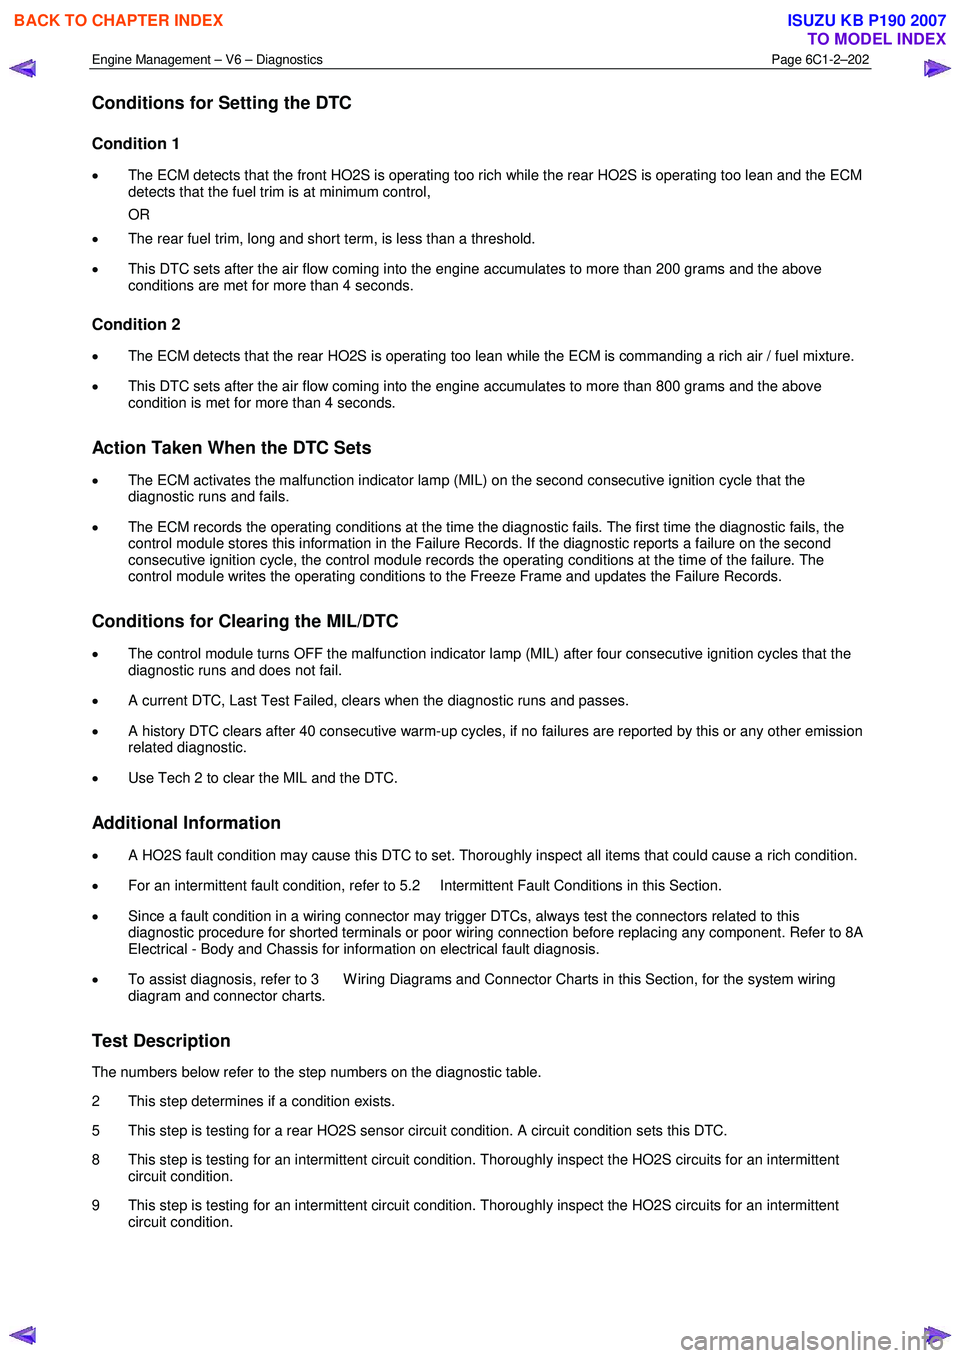
Conditions for Setting the DTC
Condition 1
• The ECM detects that the front HO2S is operating too rich while the rear HO2S is operating too lean and the ECM
detects that the fuel trim is at minimum control,
OR
• The rear fuel trim, long and short term, is less than a threshold.
• This DTC sets after the air flow coming into the engine accumulates to more than 200 grams and the above
conditions are met for more than 4 seconds.
Condition 2
• The ECM detects that the rear HO2S is operating too lean while the ECM is commanding a rich air / fuel mixture.
• This DTC sets after the air flow coming into the engine accumulates to more than 800 grams and the above
condition is met for more than 4 seconds.
Action Taken When the DTC Sets
• The ECM activates the malfunction indicator lamp (MIL) on the second consecutive ignition cycle that the
diagnostic runs and fails.
• The ECM records the operating conditions at the time the diagnostic fails. The first time the diagnostic fails, the
control module stores this information in the Failure Records. If the diagnostic reports a failure on the second
consecutive ignition cycle, the control module records the operating conditions at the time of the failure. The
control module writes the operating conditions to the Freeze Frame and updates the Failure Records.
Conditions for Clearing the MIL/DTC
• The control module turns OFF the malfunction indicator lamp (MIL) after four consecutive ignition cycles that the
diagnostic runs and does not fail.
• A current DTC, Last Test Failed, clears when the diagnostic runs and passes.
• A history DTC clears after 40 consecutive warm-up cycles, if no failures are reported by this or any other emission
related diagnostic.
• Use Tech 2 to clear the MIL and the DTC.
Additional Information
• A HO2S fault condition may cause this DTC to set. Thoroughly inspect all items that could cause a rich condition.
• For an intermittent fault condition, refer to 5.2 Intermittent Fault Conditions in this Section.
• Since a fault condition in a wiring connector may trigger DTCs, always test the connectors related to this
diagnostic procedure for shorted terminals or poor wiring connection before replacing any component. Refer to 8A
Electrical - Body and Chassis for information on electrical fault diagnosis.
• To assist diagnosis, refer to 3 W iring Diagrams and Connector Charts in this Section, for the system wiring
diagram and connector charts.
Test Description
The numbers below refer to the step numbers on the diagnostic table.
2 This step determines if a condition exists.
5 This step is testing for a rear HO2S sensor circuit condition. A circuit condition sets this DTC.
8 This step is testing for an intermittent circuit condition. Thoroughly inspect the HO2S circuits for an intermittent circuit condition.
9 This step is testing for an intermittent circuit condition. Thoroughly inspect the HO2S circuits for an intermittent circuit condition.
BACK TO CHAPTER INDEX
TO MODEL INDEX
ISUZU KB P190 2007
Page 3481 of 6020
Engine Management – V6 – Diagnostics Page 6C1-2–203
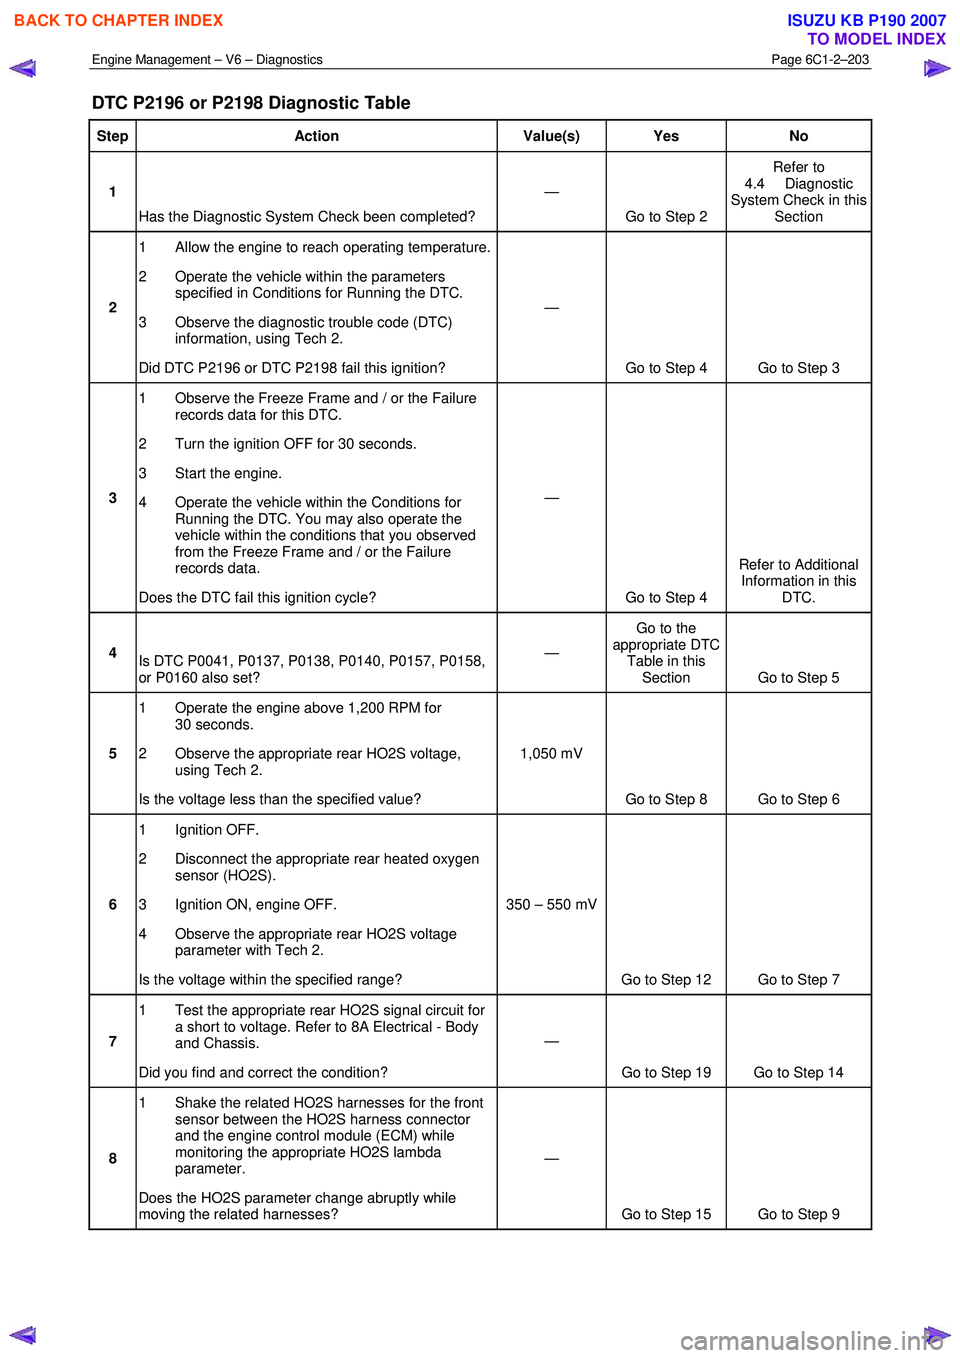
DTC P2196 or P2198 Diagnostic Table
Step Action Value(s) Yes No
1
Has the Diagnostic System Check been completed? —
Go to Step 2 Refer to
4.4 Diagnostic
System Check in this Section
2 1 Allow the engine to reach operating temperature.
2 Operate the vehicle within the parameters specified in Conditions for Running the DTC.
3 Observe the diagnostic trouble code (DTC) information, using Tech 2.
Did DTC P2196 or DTC P2198 fail this ignition? —
Go to Step 4 Go to Step 3
3 1 Observe the Freeze Frame and / or the Failure
records data for this DTC.
2 Turn the ignition OFF for 30 seconds.
3 Start the engine.
4 Operate the vehicle within the Conditions for Running the DTC. You may also operate the
vehicle within the conditions that you observed
from the Freeze Frame and / or the Failure
records data.
Does the DTC fail this ignition cycle? —
Go to Step 4 Refer to Additional
Information in this DTC.
4 Is DTC P0041, P0137, P0138, P0140, P0157, P0158,
or P0160 also set? —
Go to the
appropriate DTC Table in this Section Go to Step 5
5 1 Operate the engine above 1,200 RPM for
30 seconds.
2 Observe the appropriate rear HO2S voltage, using Tech 2.
Is the voltage less than the specified value? 1,050 mV
Go to Step 8 Go to Step 6
6 1 Ignition OFF.
2 Disconnect the appropriate rear heated oxygen sensor (HO2S).
3 Ignition ON, engine OFF.
4 Observe the appropriate rear HO2S voltage parameter with Tech 2.
Is the voltage within the specified range? 350 – 550 mV
Go to Step 12 Go to Step 7
7 1 Test the appropriate rear HO2S signal circuit for
a short to voltage. Refer to 8A Electrical - Body
and Chassis.
Did you find and correct the condition? —
Go to Step 19 Go to Step 14
8 1 Shake the related HO2S harnesses for the front
sensor between the HO2S harness connector
and the engine control module (ECM) while
monitoring the appropriate HO2S lambda
parameter.
Does the HO2S parameter change abruptly while
moving the related harnesses? —
Go to Step 15 Go to Step 9
BACK TO CHAPTER INDEX
TO MODEL INDEX
ISUZU KB P190 2007
Page 3482 of 6020
Engine Management – V6 – Diagnostics Page 6C1-2–204
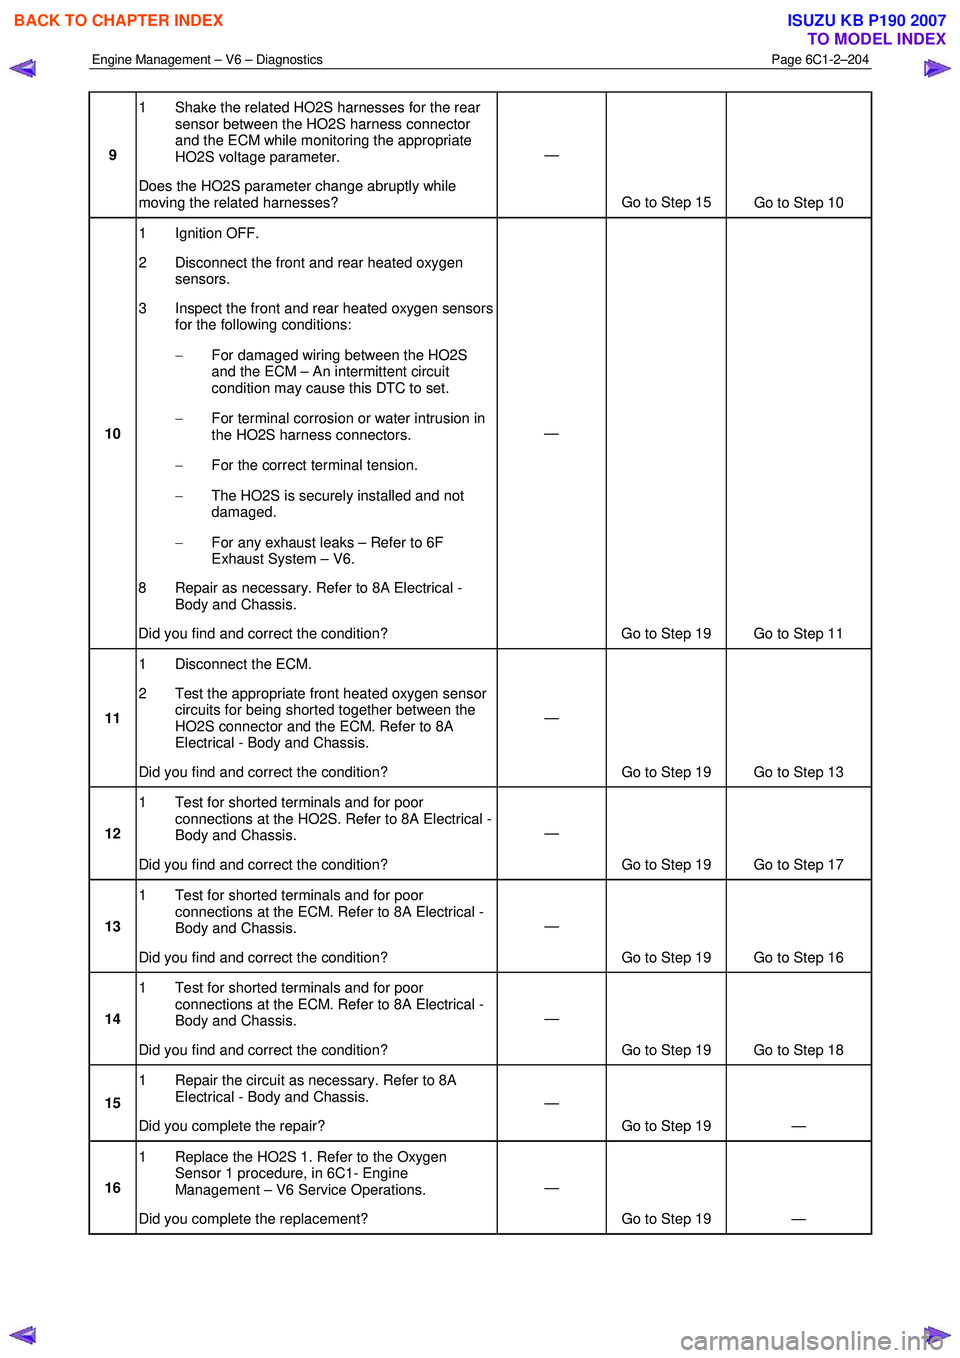
9 1 Shake the related HO2S harnesses for the rear
sensor between the HO2S harness connector
and the ECM while monitoring the appropriate
HO2S voltage parameter.
Does the HO2S parameter change abruptly while
moving the related harnesses? —
Go to Step 15 Go to Step 10
10 1 Ignition OFF.
2 Disconnect the front and rear heated oxygen sensors.
3 Inspect the front and rear heated oxygen sensors for the following conditions:
− For damaged wiring between the HO2S
and the ECM – An intermittent circuit
condition may cause this DTC to set.
− For terminal corrosion or water intrusion in
the HO2S harness connectors.
− For the correct terminal tension.
− The HO2S is securely installed and not
damaged.
− For any exhaust leaks – Refer to 6F
Exhaust System – V6.
8 Repair as necessary. Refer to 8A Electrical - Body and Chassis.
Did you find and correct the condition? —
Go to Step 19 Go to Step 11
11 1 Disconnect the ECM.
2 Test the appropriate front heated oxygen sensor circuits for being shorted together between the
HO2S connector and the ECM. Refer to 8A
Electrical - Body and Chassis.
Did you find and correct the condition? —
Go to Step 19 Go to Step 13
12 1 Test for shorted terminals and for poor
connections at the HO2S. Refer to 8A Electrical -
Body and Chassis.
Did you find and correct the condition? —
Go to Step 19 Go to Step 17
13 1 Test for shorted terminals and for poor
connections at the ECM. Refer to 8A Electrical -
Body and Chassis.
Did you find and correct the condition? —
Go to Step 19 Go to Step 16
14 1 Test for shorted terminals and for poor
connections at the ECM. Refer to 8A Electrical -
Body and Chassis.
Did you find and correct the condition? —
Go to Step 19 Go to Step 18
15 1 Repair the circuit as necessary. Refer to 8A
Electrical - Body and Chassis.
Did you complete the repair? —
Go to Step 19 —
16 1 Replace the HO2S 1. Refer to the Oxygen
Sensor 1 procedure, in 6C1- Engine
Management – V6 Service Operations.
Did you complete the replacement? —
Go to Step 19 —
BACK TO CHAPTER INDEX
TO MODEL INDEX
ISUZU KB P190 2007
Page 3483 of 6020
Engine Management – V6 – Diagnostics Page 6C1-2–205
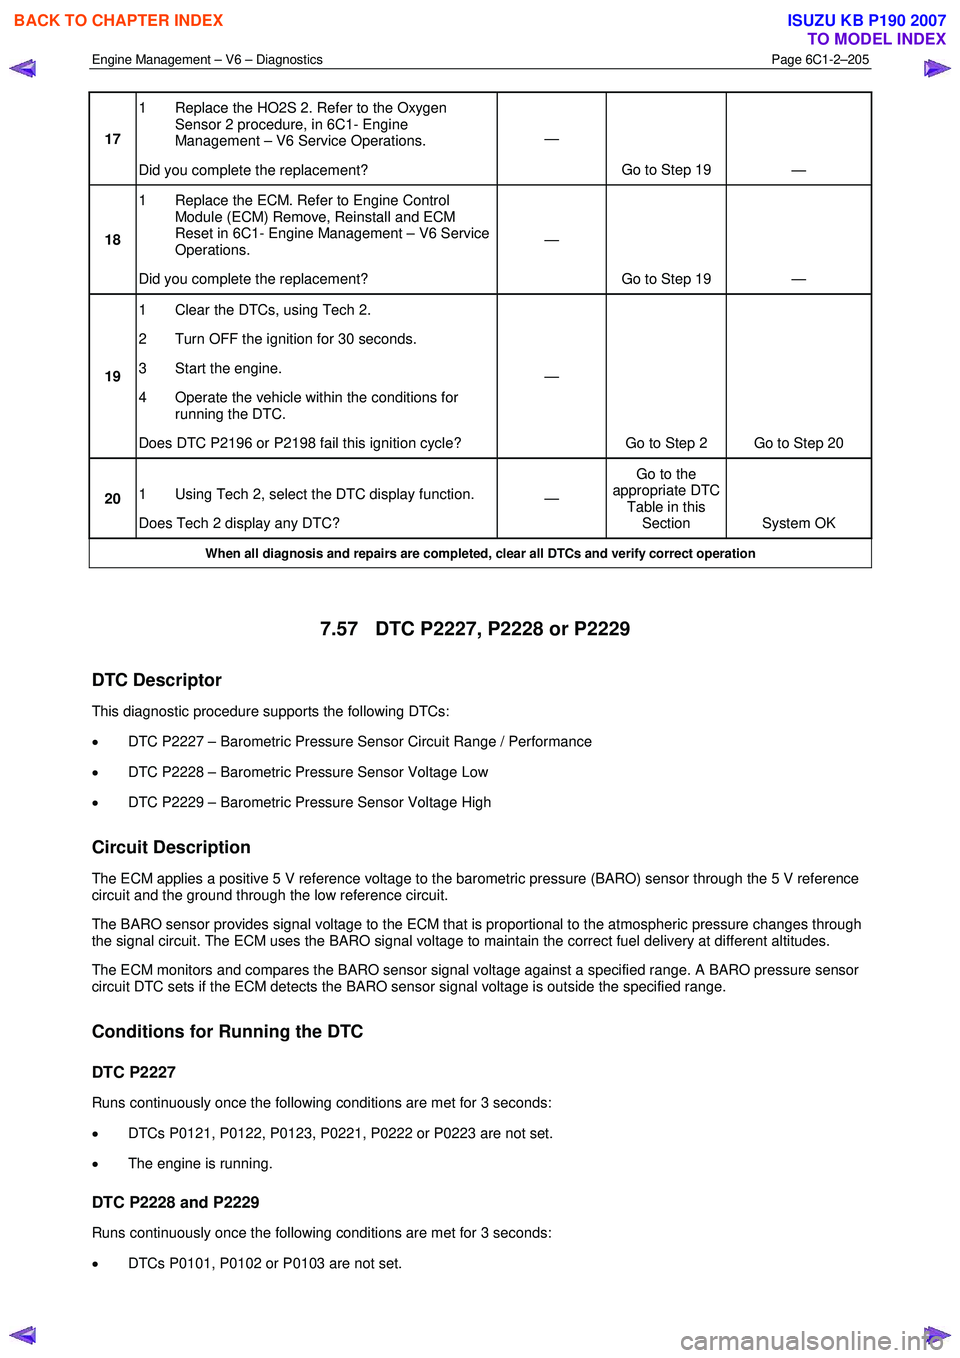
17 1 Replace the HO2S 2. Refer to the Oxygen
Sensor 2 procedure, in 6C1- Engine
Management – V6 Service Operations.
Did you complete the replacement? —
Go to Step 19 —
18 1 Replace the ECM. Refer to Engine Control
Module (ECM) Remove, Reinstall and ECM
Reset in 6C1- Engine Management – V6 Service
Operations.
Did you complete the replacement? —
Go to Step 19 —
19 1 Clear the DTCs, using Tech 2.
2 Turn OFF the ignition for 30 seconds.
3 Start the engine.
4 Operate the vehicle within the conditions for running the DTC.
Does DTC P2196 or P2198 fail this ignition cycle? —
Go to Step 2 Go to Step 20
20 1 Using Tech 2, select the DTC display function.
Does Tech 2 display any DTC? —
Go to the
appropriate DTC Table in this Section System OK
When all diagnosis and repairs are completed, clear all DTCs and verify correct operation
7.57 DTC P2227, P2228 or P2229
DTC Descriptor
This diagnostic procedure supports the following DTCs:
• DTC P2227 – Barometric Pressure Sensor Circuit Range / Performance
• DTC P2228 – Barometric Pressure Sensor Voltage Low
• DTC P2229 – Barometric Pressure Sensor Voltage High
Circuit Description
The ECM applies a positive 5 V reference voltage to the barometric pressure (BARO) sensor through the 5 V reference
circuit and the ground through the low reference circuit.
The BARO sensor provides signal voltage to the ECM that is proportional to the atmospheric pressure changes through
the signal circuit. The ECM uses the BARO signal voltage to maintain the correct fuel delivery at different altitudes.
The ECM monitors and compares the BARO sensor signal voltage against a specified range. A BARO pressure sensor
circuit DTC sets if the ECM detects the BARO sensor signal voltage is outside the specified range.
Conditions for Running the DTC
DTC P2227
Runs continuously once the following conditions are met for 3 seconds:
• DTCs P0121, P0122, P0123, P0221, P0222 or P0223 are not set.
• The engine is running.
DTC P2228 and P2229
Runs continuously once the following conditions are met for 3 seconds:
• DTCs P0101, P0102 or P0103 are not set.
BACK TO CHAPTER INDEX
TO MODEL INDEX
ISUZU KB P190 2007
Page 3484 of 6020
Engine Management – V6 – Diagnostics Page 6C1-2–206
• The engine is running.
Conditions for Setting the DTC
DTC P2227
The ECM detects the BARO pressure changed greater than 5 kPa within 20 seconds or the BARO pressure changed
greater than 30 kPa since the last ignition cycle.
DTC P2228
The ECM detects the BARO sensor signal voltage is less than 0.20 V.
DTC P2229
The ECM detects the BARO sensor signal voltage is greater than 4.8 V for longer than 2.0 seconds.
Conditions for Clearing DTC
The BARO pressure sensor circuit DTCs are Type ‘B’ DTC. Refer to 1.4 Diagnostic Trouble Codes in this Section, for
action taken when a Type ‘B’ DTC sets and conditions for clearing Type ‘B’ DTCs.
Additional Information
• Refer to 6C1-1 Engine Management – V6 – General Information for details of the BARO Sensor operation.
• For an intermittent fault condition, refer to 5.2 Intermittent Fault Conditions in this Section.
• Since fault condition in a wiring connector may trigger DTCs, always test the connectors related to this diagnostic
procedure for shorted terminals or poor wiring connection before replacing any component. Refer to 8A Electrical -
Body and Chassis for information on electrical fault diagnosis.
• To assist diagnosis, refer to 3 W iring Diagrams and Connector Charts in this Section, for the system wiring
diagram and connector charts.
Test Description
The following numbers refer to the step numbers in the diagnostic table:
4 Test signal circuit of the BARO sensor. This circuit should display a voltage within the specified range.
5 Measures the integrity of the TP sensor low reference circuit. Removal of the ECM Fuse 29 enables the ECM to power down completely prior to the test procedure.
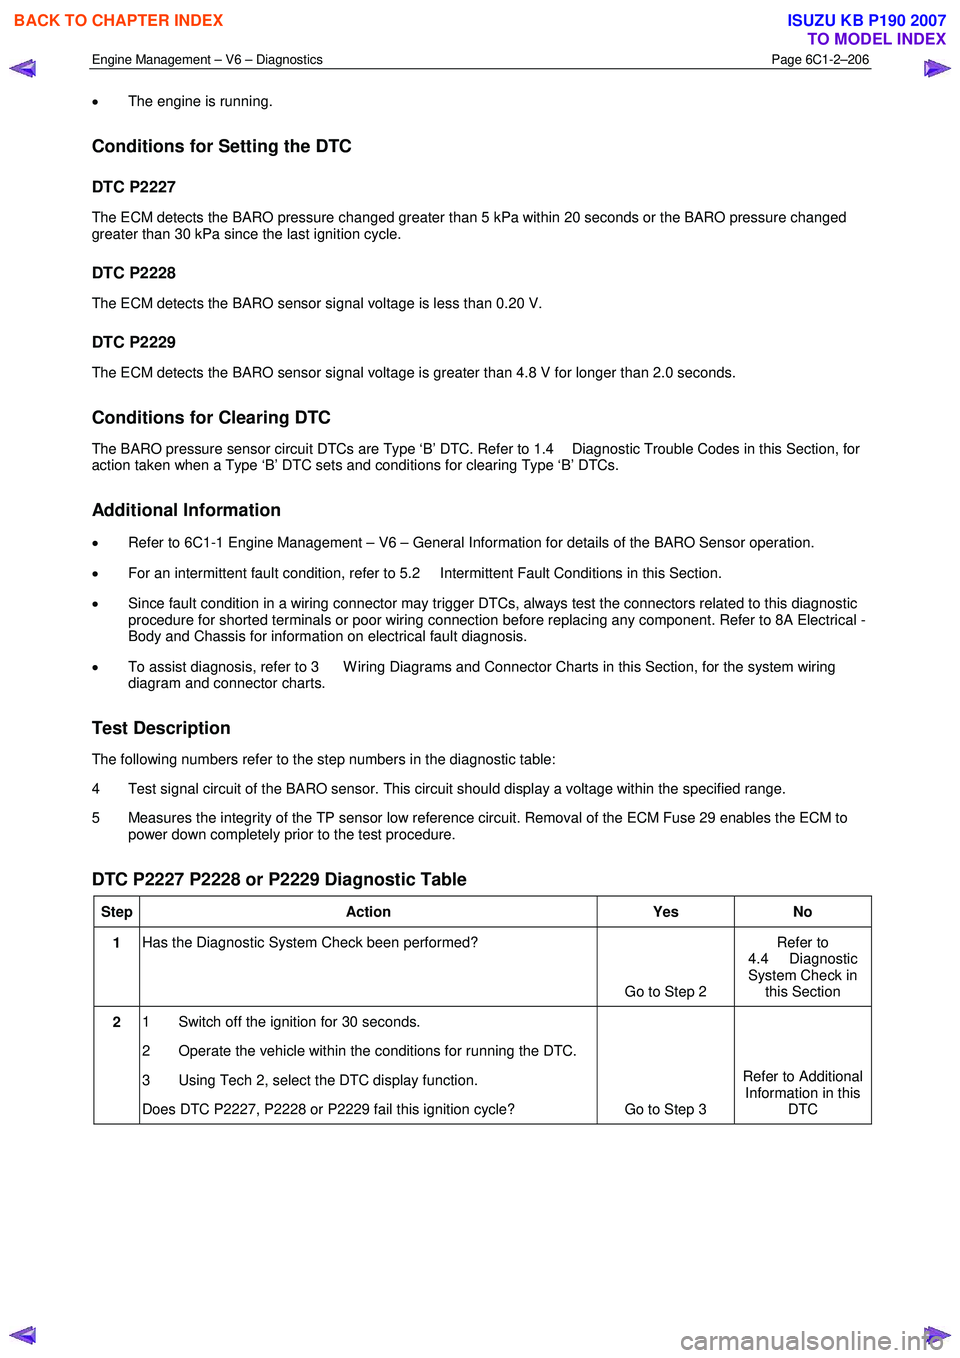
DTC P2227 P2228 or P2229 Diagnostic Table
Step Action Yes No
1 Has the Diagnostic System Check been performed?
Go to Step 2 Refer to
4.4 Diagnostic
System Check in this Section
2 1 Switch off the ignition for 30 seconds.
2 Operate the vehicle within the conditions for running the DTC.
3 Using Tech 2, select the DTC display function.
Does DTC P2227, P2228 or P2229 fail this ignition cycle? Go to Step 3 Refer to Additional
Information in this DTC
BACK TO CHAPTER INDEX
TO MODEL INDEX
ISUZU KB P190 2007
Page 3485 of 6020
Engine Management – V6 – Diagnostics Page 6C1-2–207
Step Action Yes
No
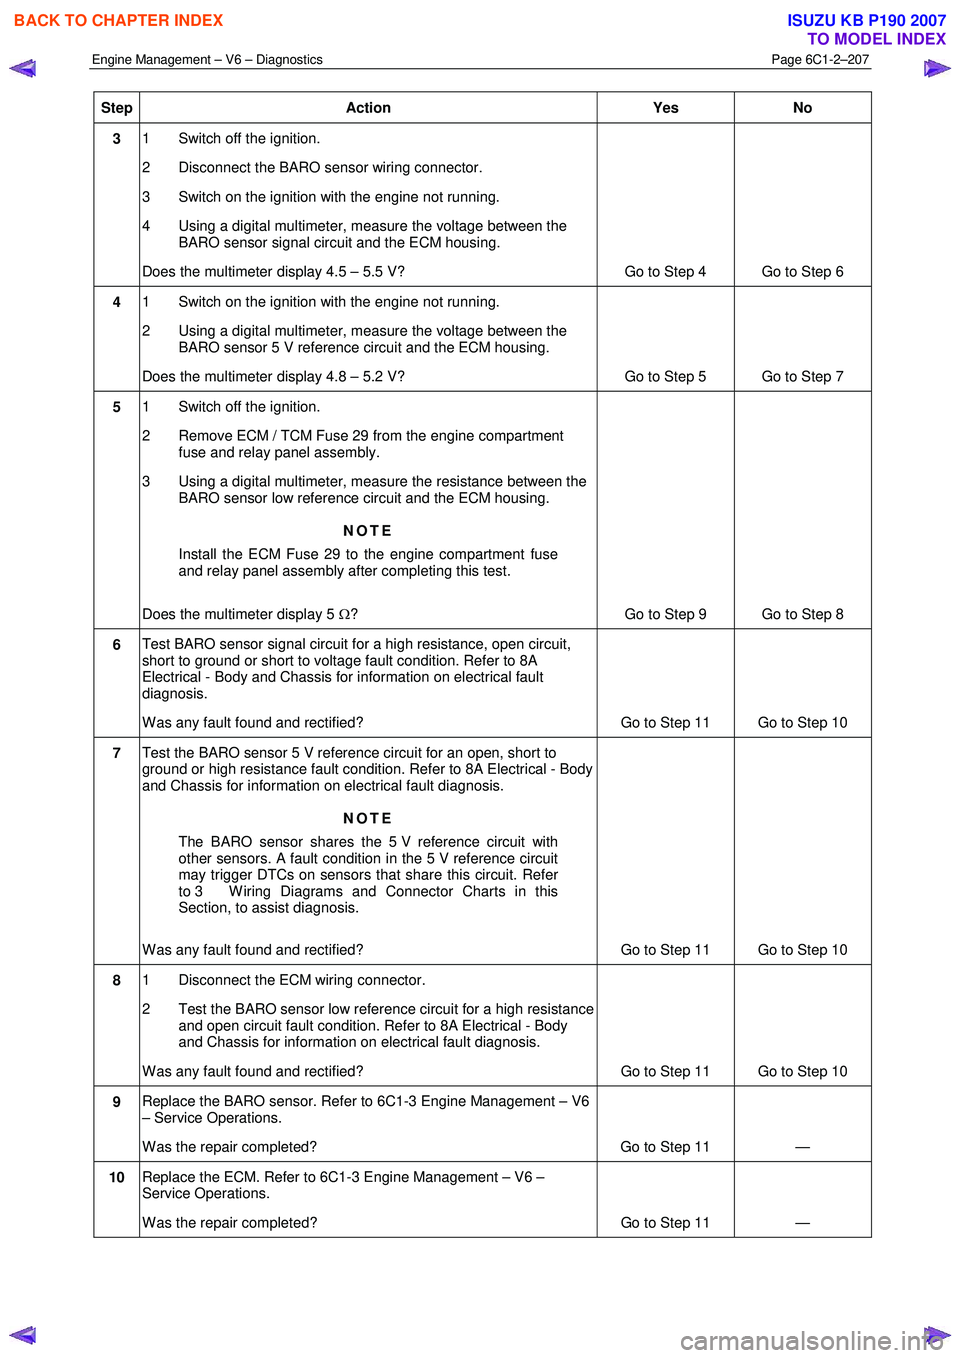
3 1 Switch off the ignition.
2 Disconnect the BARO sensor wiring connector.
3 Switch on the ignition with the engine not running.
4 Using a digital multimeter, measure the voltage between the BARO sensor signal circuit and the ECM housing.
Does the multimeter display 4.5 – 5.5 V? Go to Step 4 Go to Step 6
4 1 Switch on the ignition with the engine not running.
2 Using a digital multimeter, measure the voltage between the BARO sensor 5 V reference circuit and the ECM housing.
Does the multimeter display 4.8 – 5.2 V? Go to Step 5 Go to Step 7
5 1 Switch off the ignition.
2 Remove ECM / TCM Fuse 29 from the engine compartment fuse and relay panel assembly.
3 Using a digital multimeter, measure the resistance between the BARO sensor low reference circuit and the ECM housing.
NOTE
Install the ECM Fuse 29 to the engine compartment fuse
and relay panel assembly after completing this test.
Does the multimeter display 5 Ω? Go to Step 9 Go to Step 8
6 Test BARO sensor signal circuit for a high resistance, open circuit,
short to ground or short to voltage fault condition. Refer to 8A
Electrical - Body and Chassis for information on electrical fault
diagnosis.
W as any fault found and rectified? Go to Step 11 Go to Step 10
7 Test the BARO sensor 5 V reference circuit for an open, short to
ground or high resistance fault condition. Refer to 8A Electrical - Body
and Chassis for information on electrical fault diagnosis.
NOTE
The BARO sensor shares the 5 V reference circuit with
other sensors. A fault condition in the 5 V reference circuit
may trigger DTCs on sensors that share this circuit. Refer
to 3 W iring Diagrams and Connector Charts in this
Section, to assist diagnosis.
W as any fault found and rectified? Go to Step 11 Go to Step 10
8 1 Disconnect the ECM wiring connector.
2 Test the BARO sensor low reference circuit for a high resistance and open circuit fault condition. Refer to 8A Electrical - Body
and Chassis for information on electrical fault diagnosis.
W as any fault found and rectified? Go to Step 11 Go to Step 10
9 Replace the BARO sensor. Refer to 6C1-3 Engine Management – V6
– Service Operations.
W as the repair completed? Go to Step 11 —
10 Replace the ECM. Refer to 6C1-3 Engine Management – V6 –
Service Operations.
W as the repair completed? Go to Step 11 —
BACK TO CHAPTER INDEX
TO MODEL INDEX
ISUZU KB P190 2007
Page 3486 of 6020
Engine Management – V6 – Diagnostics Page 6C1-2–208
Step Action Yes
No
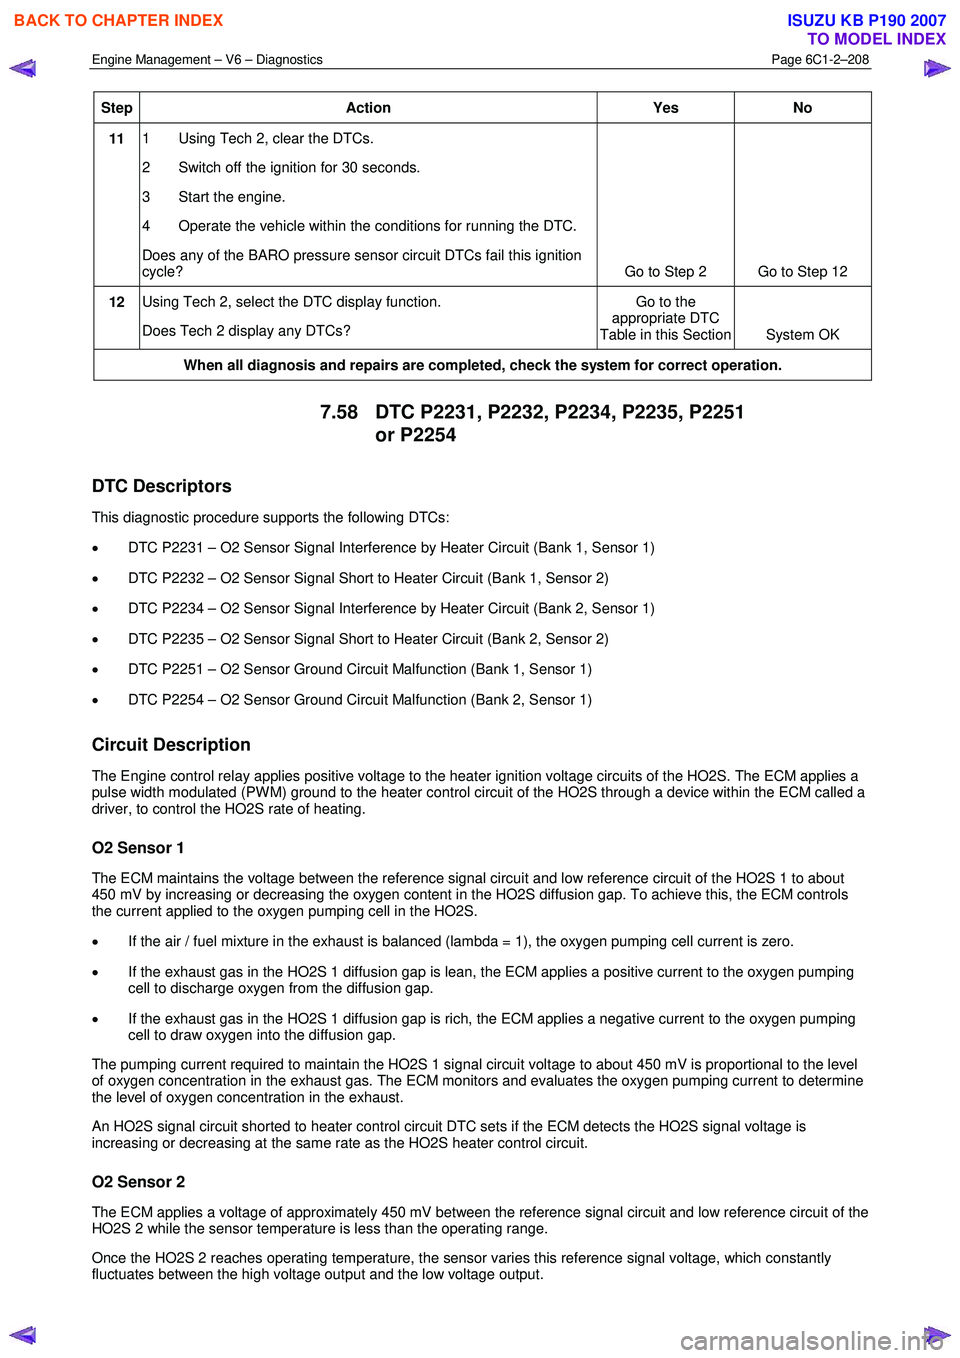
11 1 Using Tech 2, clear the DTCs.
2 Switch off the ignition for 30 seconds.
3 Start the engine.
4 Operate the vehicle within the conditions for running the DTC.
Does any of the BARO pressure sensor circuit DTCs fail this ignition
cycle? Go to Step 2 Go to Step 12
12 Using Tech 2, select the DTC display function.
Does Tech 2 display any DTCs? Go to the
appropriate DTC
Table in this Section System OK
When all diagnosis and repairs are completed, check the system for correct operation.
7.58 DTC P2231, P2232, P2234, P2235, P2251
or P2254
DTC Descriptors
This diagnostic procedure supports the following DTCs:
• DTC P2231 – O2 Sensor Signal Interference by Heater Circuit (Bank 1, Sensor 1)
• DTC P2232 – O2 Sensor Signal Short to Heater Circuit (Bank 1, Sensor 2)
• DTC P2234 – O2 Sensor Signal Interference by Heater Circuit (Bank 2, Sensor 1)
• DTC P2235 – O2 Sensor Signal Short to Heater Circuit (Bank 2, Sensor 2)
• DTC P2251 – O2 Sensor Ground Circuit Malfunction (Bank 1, Sensor 1)
• DTC P2254 – O2 Sensor Ground Circuit Malfunction (Bank 2, Sensor 1)
Circuit Description
The Engine control relay applies positive voltage to the heater ignition voltage circuits of the HO2S. The ECM applies a
pulse width modulated (PW M) ground to the heater control circuit of the HO2S through a device within the ECM called a
driver, to control the HO2S rate of heating.
O2 Sensor 1
The ECM maintains the voltage between the reference signal circuit and low reference circuit of the HO2S 1 to about
450 mV by increasing or decreasing the oxygen content in the HO2S diffusion gap. To achieve this, the ECM controls
the current applied to the oxygen pumping cell in the HO2S.
• If the air / fuel mixture in the exhaust is balanced (lambda = 1), the oxygen pumping cell current is zero.
• If the exhaust gas in the HO2S 1 diffusion gap is lean, the ECM applies a positive current to the oxygen pumping
cell to discharge oxygen from the diffusion gap.
• If the exhaust gas in the HO2S 1 diffusion gap is rich, the ECM applies a negative current to the oxygen pumping
cell to draw oxygen into the diffusion gap.
The pumping current required to maintain the HO2S 1 signal circuit voltage to about 450 mV is proportional to the level
of oxygen concentration in the exhaust gas. The ECM monitors and evaluates the oxygen pumping current to determine
the level of oxygen concentration in the exhaust.
An HO2S signal circuit shorted to heater control circuit DTC sets if the ECM detects the HO2S signal voltage is
increasing or decreasing at the same rate as the HO2S heater control circuit.
O2 Sensor 2
The ECM applies a voltage of approximately 450 mV between the reference signal circuit and low reference circuit of the
HO2S 2 while the sensor temperature is less than the operating range.
Once the HO2S 2 reaches operating temperature, the sensor varies this reference signal voltage, which constantly
fluctuates between the high voltage output and the low voltage output.
BACK TO CHAPTER INDEX
TO MODEL INDEX
ISUZU KB P190 2007