2007 HYUNDAI VERACRUZ rear view mirror
[x] Cancel search: rear view mirrorPage 18 of 441

Your vehicle at a glance2 2INTERIOR OVERVIEW
1. Door lock/unlock button ....................4-16
2. Driver position memory system
button*...............................................4-38
3. Outside rearview mirror control
switch ................................................4-50
4. Central door lock switch....................4-16
5. Power window lock button ................4-29
6. Power window switches ....................4-26
7. Air vent ..............................................4-85
8. Front fog light switch*........................4-75
9. Instrument panel illumination control
knob ..................................................4-53
10. ESC OFF button .............................5-26
11. Power adjustable pedal control
switch* ............................................4-39
12. AWD LOCK button* ........................5-16
13. AC inverter switch*........................4-115
14. Power tailgate main control button* 4-21
15. Steering wheel power tilt control* ...4-41
16. Steering wheel ................................4-40
17. Fuse box .........................................7-44
18. Hood release lever ..........................4-30
19. Parking brake pedal ........................5-22
20. Brake pedal .....................................5-21
21. Accelerator pedal ..............................5-6
22. Seat...................................................3-2
* : if equipped
OEN006001N
B010000AEN-EU
EN hma 2.qxd 11/27/2006 5:09 PM Page 2
procarmanuals.com
Page 120 of 441

Features of your vehicle38 4D120000AENA driver position memory system is pro-
vided to store and recall the driver seat,
outside rearview mirror and steering
wheel positions with a simple button
operation. By saving the desired positions
into the system memory, different drivers
can reposition the driver seat, outside
rearview mirror and steering wheel based
upon their driving preference. If the bat-
tery is disconnected, the position memo-
ry will be lost and the driving positions
should be restored in the system.✽ ✽
NOTICEThe buzzer sounds 10 times if there is a
malfunction of the memory system.
Have the driver position memory system
checked by an authorized HYUNDAI
dealer.
Storing positions into memory
using the buttons on the doorD120101AENStoring driver’s seat positions1. Shift the transaxle shift lever into P
while the ignition switch is ON.
2. Adjust the driver seat, outside
rearview mirror and steering wheel to
positions comfortable for the driver.
3. Press SET button on the control panel.
The system will beep once.
4. Press one of the memory buttons (1 or
2) within 5 seconds after pressing the
SET button. The system will beep
twice when memory has been suc-
cessfully stored.
D120102AENRecalling positions from memory1. Shift the transaxle shift lever into P
while the ignition switch is ON.
2. To recall the position in memory, press
the desired memory button (1 or 2).
The system will beep once, then the
driver seat, outside rearview mirror
and steering wheel will automatically
adjust to the stored positions.
Adjusting one of the control knobs for the
driver seat, outside rearview mirror and
steering wheel while the system is recall-
ing the stored positions will cause the
movement for that component to stop
and move in the direction that the control
knob is moved. Other components will
continue to the recalled position.
DRIVER POSITION MEMORY SYSTEM (IF EQUIPPED)
WARNING
Never attempt to operate the driver
position memory system while the
vehicle is moving.
This could result in loss of control,
and an accident causing death,
serious injury, or property damage.
WARNING
Use caution when recalling adjust-
ment memory while sitting in the
vehicle. Push the seat position con-
trol knob to the desired position
immediately if the seat moves too
far in any direction.
OEN036100
EN hma 4~83.qxd 11/28/2006 3:34 PM Page 38
procarmanuals.com
Page 124 of 441

Features of your vehicle42 4D130500AUNHornTo sound the horn, press the horn sym-
bol on your steering wheel.
Check the horn regularly to be sure it
operates properly.
✽ ✽
NOTICETo sound the horn, press the area indi-
cated by the horn symbol on your steer-
ing wheel (see illustration). The horn
will operate only when this area is
pressed.
D140100AUNInside rearview mirrorAdjust the rearview mirror to center on
the view through the rear window. Make
this adjustment before you start driving.
CAUTION
Do not strike the horn severely to
operate it, or hit it with your fist. Do
not press on the horn with a sharp-
pointed object.
MIRRORS
WARNING -
Rear visibility
Do not place objects in the rear
seat or cargo area which would
interfere with your vision through
the rear window.
OEN046031
EN hma 4~83.qxd 11/28/2006 3:35 PM Page 42
procarmanuals.com
Page 125 of 441

443
Features of your vehicle
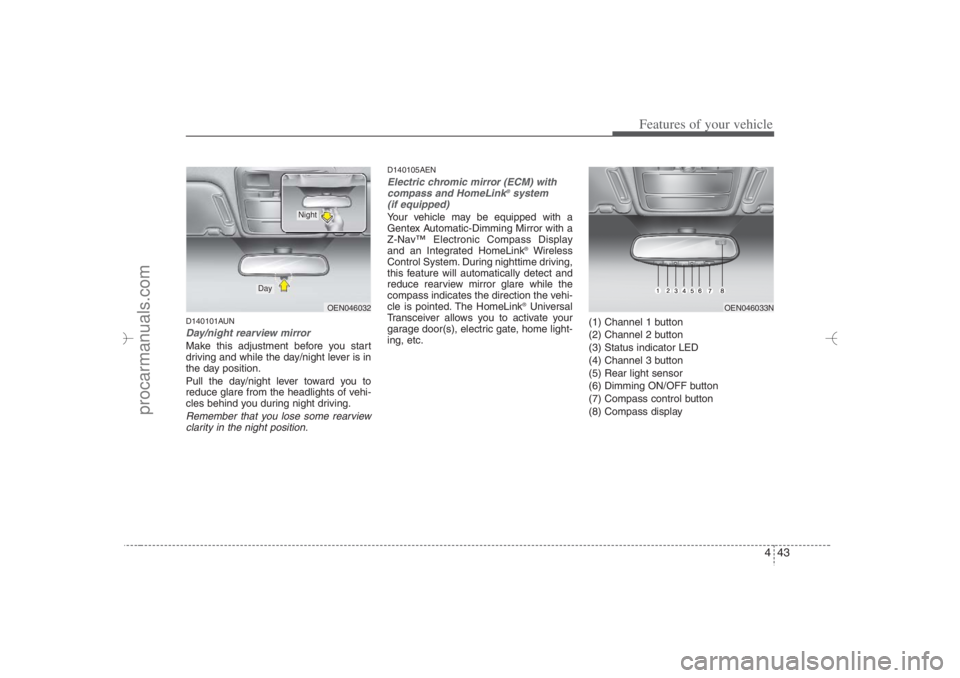
D140101AUNDay/night rearview mirror Make this adjustment before you start
driving and while the day/night lever is in
the day position.
Pull the day/night lever toward you to
reduce glare from the headlights of vehi-
cles behind you during night driving.Remember that you lose some rearview
clarity in the night position.
D140105AENElectric chromic mirror (ECM) with
compass and HomeLink
®system
(if equipped)
Your vehicle may be equipped with a
Gentex Automatic-Dimming Mirror with a
Z-Nav™ Electronic Compass Display
and an Integrated HomeLink
®Wireless
Control System. During nighttime driving,
this feature will automatically detect and
reduce rearview mirror glare while the
compass indicates the direction the vehi-
cle is pointed. The HomeLink®Universal
Transceiver allows you to activate your
garage door(s), electric gate, home light-
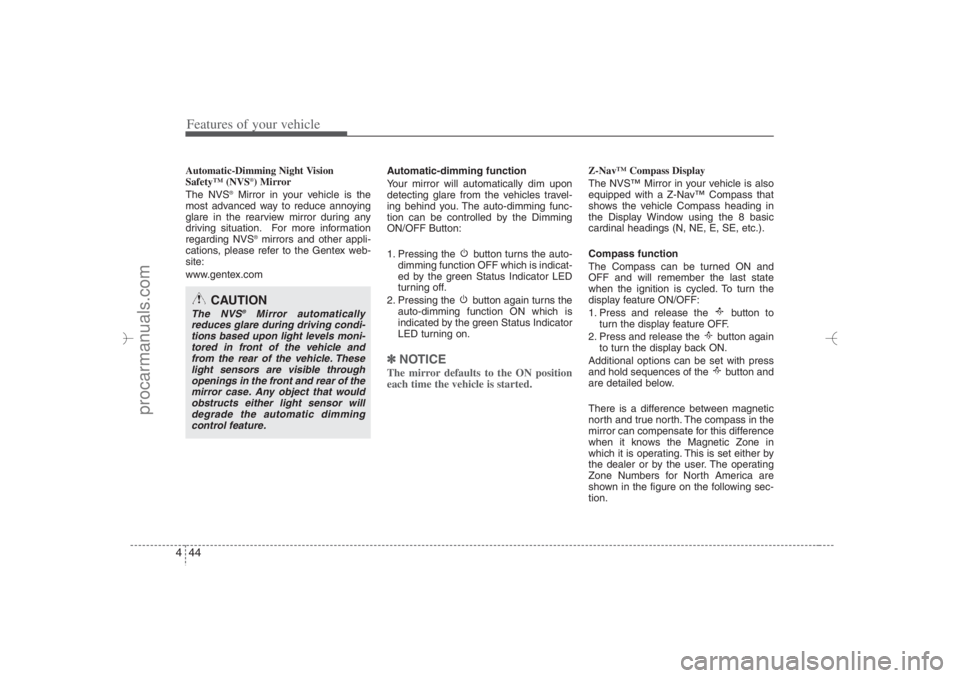
ing, etc.(1) Channel 1 button
(2) Channel 2 button
(3) Status indicator LED
(4) Channel 3 button
(5) Rear light sensor
(6) Dimming ON/OFF button
(7) Compass control button
(8) Compass display
OEN046033N
OEN046032
Day
Night
EN hma 4~83.qxd 11/28/2006 3:35 PM Page 43
procarmanuals.com
Page 126 of 441

Features of your vehicle44 4Automatic-Dimming Night Vision
Safety™ (NVS
®) Mirror
The NVS
®Mirror in your vehicle is the
most advanced way to reduce annoying
glare in the rearview mirror during any
driving situation. For more information
regarding NVS
®mirrors and other appli-
cations, please refer to the Gentex web-
site:
www.gentex.comAutomatic-dimming function
Your mirror will automatically dim upon
detecting glare from the vehicles travel-
ing behind you. The auto-dimming func-
tion can be controlled by the Dimming
ON/OFF Button:
1. Pressing the button turns the auto-
dimming function OFF which is indicat-
ed by the green Status Indicator LED
turning off.
2. Pressing the button again turns the
auto-dimming function ON which is
indicated by the green Status Indicator
LED turning on.
✽ ✽
NOTICEThe mirror defaults to the ON position
each time the vehicle is started.
Z-Nav™ Compass Display
The NVS™ Mirror in your vehicle is also
equipped with a Z-Nav™ Compass that
shows the vehicle Compass heading in
the Display Window using the 8 basic
cardinal headings (N, NE, E, SE, etc.).
Compass function
The Compass can be turned ON and
OFF and will remember the last state
when the ignition is cycled. To turn the
display feature ON/OFF:
1. Press and release the button to
turn the display feature OFF.
2. Press and release the button again
to turn the display back ON.
Additional options can be set with press
and hold sequences of the button and
are detailed below.
There is a difference between magnetic
north and true north. The compass in the
mirror can compensate for this difference
when it knows the Magnetic Zone in
which it is operating. This is set either by
the dealer or by the user. The operating
Zone Numbers for North America are
shown in the figure on the following sec-
tion.
CAUTION
The NVS
®
Mirror automatically
reduces glare during driving condi-
tions based upon light levels moni-
tored in front of the vehicle and
from the rear of the vehicle. These
light sensors are visible through
openings in the front and rear of the
mirror case. Any object that would
obstructs either light sensor will
degrade the automatic dimming
control feature.
EN hma 4~83.qxd 11/28/2006 3:35 PM Page 44
procarmanuals.com
Page 132 of 441

Features of your vehicle50 4D140200AUN-EUOutside rearview mirror Be sure to adjust mirror angles before
driving.
Your vehicle is equipped with both left-
hand and right-hand outside rearview
mirrors. The mirrors can be adjusted
remotely with the remote switch. The mir-
ror heads can be folded back to prevent
damage during an automatic car wash or
when passing in a narrow street.
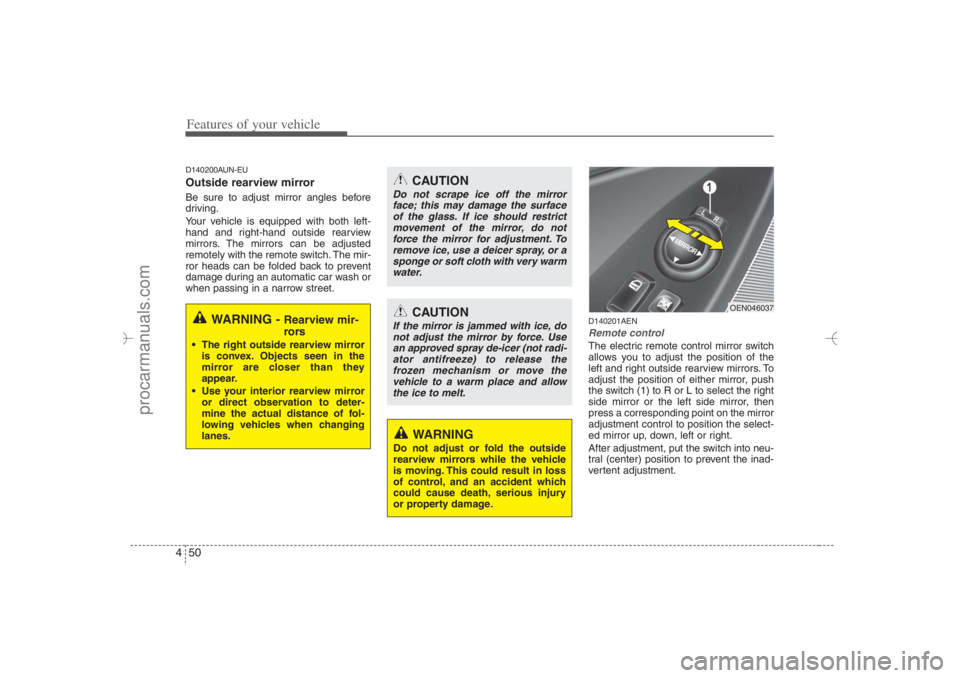
D140201AENRemote controlThe electric remote control mirror switch
allows you to adjust the position of the
left and right outside rearview mirrors. To
adjust the position of either mirror, push
the switch (1) to R or L to select the right
side mirror or the left side mirror, then
press a corresponding point on the mirror
adjustment control to position the select-
ed mirror up, down, left or right.
After adjustment, put the switch into neu-
tral (center) position to prevent the inad-
vertent adjustment.
WARNING -
Rearview mir-
rors
The right outside rearview mirror
is convex. Objects seen in the
mirror are closer than they
appear.
Use your interior rearview mirror
or direct observation to deter-
mine the actual distance of fol-
lowing vehicles when changing
lanes.
CAUTION
Do not scrape ice off the mirror
face; this may damage the surface
of the glass. If ice should restrict
movement of the mirror, do not
force the mirror for adjustment. To
remove ice, use a deicer spray, or a
sponge or soft cloth with very warm
water.
CAUTION
If the mirror is jammed with ice, do
not adjust the mirror by force. Use
an approved spray de-icer (not radi-
ator antifreeze) to release the
frozen mechanism or move the
vehicle to a warm place and allow
the ice to melt.
WARNING
Do not adjust or fold the outside
rearview mirrors while the vehicle
is moving. This could result in loss
of control, and an accident which
could cause death, serious injury
or property damage.
OEN046037
EN hma 4~83.qxd 11/28/2006 3:36 PM Page 50
procarmanuals.com
Page 133 of 441

451
Features of your vehicle
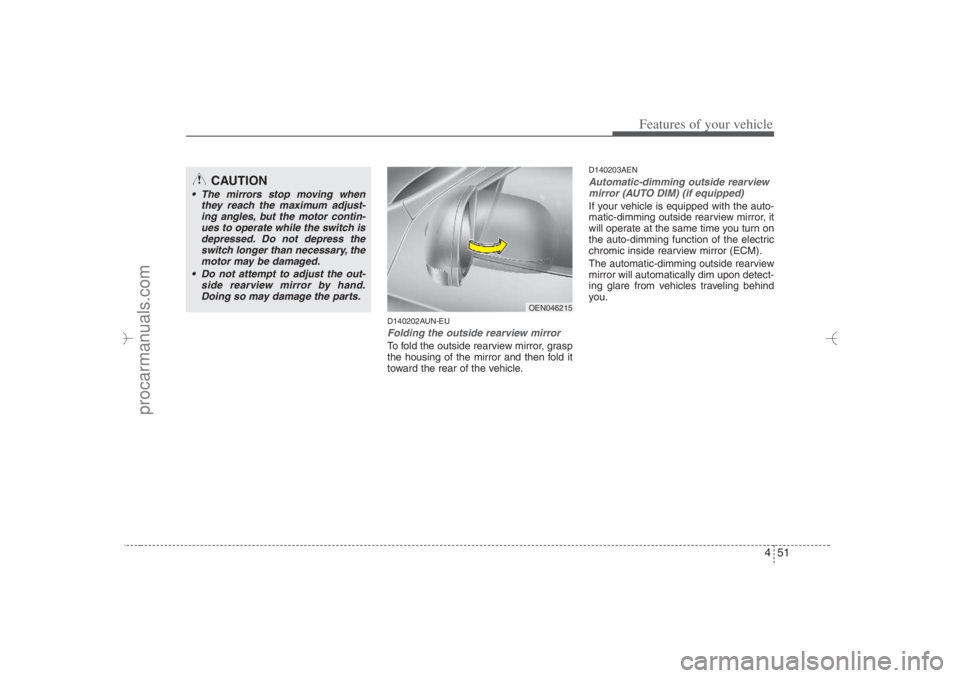
D140202AUN-EUFolding the outside rearview mirrorTo fold the outside rearview mirror, grasp
the housing of the mirror and then fold it
toward the rear of the vehicle.
D140203AENAutomatic-dimming outside rearview
mirror (AUTO DIM) (if equipped)If your vehicle is equipped with the auto-
matic-dimming outside rearview mirror, it
will operate at the same time you turn on
the auto-dimming function of the electric
chromic inside rearview mirror (ECM).
The automatic-dimming outside rearview
mirror will automatically dim upon detect-
ing glare from vehicles traveling behind
you.
CAUTION
The mirrors stop moving when
they reach the maximum adjust-
ing angles, but the motor contin-
ues to operate while the switch is
depressed. Do not depress the
switch longer than necessary, the
motor may be damaged.
Do not attempt to adjust the out-
side rearview mirror by hand.
Doing so may damage the parts.
OEN046215
EN hma 4~83.qxd 11/28/2006 3:36 PM Page 51
procarmanuals.com
Page 165 of 441

483
Features of your vehicle
D220000AUN✽ ✽
NOTICEIf you want to defrost and defog the
front windshield, refer to “Windshield
defrosting and defogging” in this sec-
tion.
D220100AUNRear window defrosterThe defroster heats the window to
remove frost, fog and thin ice from the
rear window, while the engine is running.To activate the rear window defroster,
press the rear window defroster button
located in the center facia switch panel.
The indicator on the rear window
defroster button illuminates when the
defroster is ON.
If there is heavy accumulation of snow on
the rear window, brush it off before oper-
ating the rear defroster.
The rear window defroster automatically
turns off after approximately 20 minutes
or when the ignition switch is turned off.
To turn off the defroster, press the rear
window defroster button again.
D220101AENOutside rearview mirror defroster
(if equipped)If your vehicle is equipped with the out-
side rearview mirror defrosters, they will
operate at the same time you turn on the
rear window defroster.D220200AENFront windshield deicer
(if equipped)If your vehicle is equipped with the front
windshield deicer, it will be operating at
the same time you operate the rear win-
dow defroster.
CAUTION
To prevent damage to the conduc-
tors bonded to the inside surface of
the rear window, never use sharp
instruments or window cleaners
containing abrasives to clean the
window.
OEN046090OEN046091
Type AType B
DEFROSTER
EN hma 4~83.qxd 11/28/2006 3:38 PM Page 83
procarmanuals.com