2007 Hyundai Tiburon engine coolant
[x] Cancel search: engine coolantPage 213 of 269

6
DO-IT-YOURSELF MAINTENANCE
13
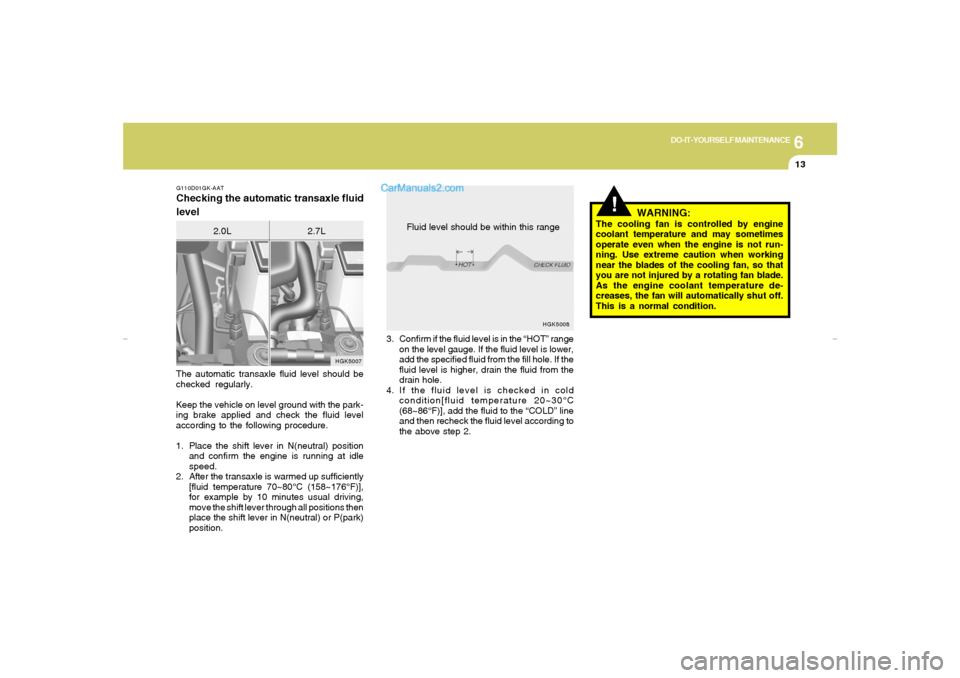
3. Confirm if the fluid level is in the “HOT” range
on the level gauge. If the fluid level is lower,
add the specified fluid from the fill hole. If the
fluid level is higher, drain the fluid from the
drain hole.
4. If the fluid level is checked in cold
condition[fluid temperature 20~30°C
(68~86°F)], add the fluid to the “COLD” line
and then recheck the fluid level according to
the above step 2.
G110D01GK-AATChecking the automatic transaxle fluid
levelThe automatic transaxle fluid level should be
checked regularly.
Keep the vehicle on level ground with the park-
ing brake applied and check the fluid level
according to the following procedure.
1. Place the shift lever in N(neutral) position
and confirm the engine is running at idle
speed.
2. After the transaxle is warmed up sufficiently
[fluid temperature 70~80°C (158~176°F)],
for example by 10 minutes usual driving,
move the shift lever through all positions then
place the shift lever in N(neutral) or P(park)
position.
HGK5007
2.0L 2.7L
!
HGK5008
Fluid level should be within this range
WARNING:
The cooling fan is controlled by engine
coolant temperature and may sometimes
operate even when the engine is not run-
ning. Use extreme caution when working
near the blades of the cooling fan, so that
you are not injured by a rotating fan blade.
As the engine coolant temperature de-
creases, the fan will automatically shut off.
This is a normal condition.
gkflhma-6.p659/12/2006, 3:22 PM 13
Page 221 of 269

6
DO-IT-YOURSELF MAINTENANCE
21
!
CHECKING ELECTRIC COOLING
FANS!
G220A01A-AAT
WARNING:
The cooling fan is controlled by engine
coolant temperature and may sometimes
operate even when the engine is not run-
ning. Use extreme caution when working
near the blades of the coolant fan, so that
you are not injured by a rotating fan blade.
As the engine coolant temperature de-
creases the fan will automatically shut off.
This is a normal condition. If electrolyte gets on your skin,
thoroughly wash the contacted
area.
If you feel a pain or a burning
sensation, get medical attention
immediately.
Wear eye protection when charg-
ing or working near a battery.
Always provide ventilation when
working in an enclosed space.
o When lifting a plastic-cased battery, ex-
cessive pressure on the case may cause
battery acid to leak, resulting in personal
injury. Lift with a battery carrier or with
your hands on opposite corners.
o Never attempt to charge the battery when
the battery cables are connected.
o The electrical ignition system works with
high voltage.
Never touch these components with the
engine running or the ignition switched
on.
WARNING:
G220C01A-AATChecking Condenser Cooling FanThe condenser coolant fan should come on
automatically whenever the air conditioning is in
operation.G220B01A-AATChecking Engine Cooling FanThe engine cooling fan should come on auto-
matically if the engine coolant temperature is
high.
POWER STEERING FLUID LEVELG230A04A-AATThe power steering fluid level should be checked
regularly. To check the power steering fluid
level, be sure the engine is "OFF", then check
to make certain that the power steering fluid
level is between the "MAX" and "MIN" level
markings on the fluid reservoir.NOTE:o Grinding noise from the power steering
pump may be heard immediately after
the engine is started in extremely cold
conditions (below - 4°F). If the noise
stops during warm up, there is no abnor-
mal function in the system. It is due to a
power steering fluid characteristic in
extremely cold conditions.
o Do not start the engine when the power
steering oil reservoir is empty.
HGK5011
gkflhma-6.p659/12/2006, 3:23 PM 21
Page 223 of 269

6
DO-IT-YOURSELF MAINTENANCE
23
G290B02GK-AATAdjustment After Headlight Assembly
ReplacementIf the vehicle has had front body repair and the
headlight assembly has been replaced, the
headlight aiming should be checked using an
aiming screen as shown in the illustration. Turn
on the headlight switch.
1. Adjust headlights so that main axis of light is
parallel to center line of the body and is
aligned with point "P" shown in the illustration.
2. Dotted lines in the illustration show the center
of headlights.
G290B01HR-1A
L
W
H
H
Cut-off line
Ground line
Horizontal lineVertical line
!
1. Keep all tires inflated to the correct pressure.
2. Place the vehicle on level ground and press
the front bumper & rear bumper down sev-
eral times. Place vehicle at a distance of 118
in. (3m) from the test wall.
3. See that the vehicle is unloaded (except for
full levels of coolant, engine oil and fuel, and
spare tire, jack, and tools).
4. Clean the head light lenses and turn on the
headlights.
5. Open the hood.
6. Draw the vertical line (through the center of
each headlight beam pattern) and the hori-
zontal line (through the center of each head-
light beam pattern) on the aiming screen.
7. Adjust each cut-off line of the low beam to the
parallel line with a phillips screwdriver -
VERTICAL AIMING.
WARNING:
Never attempt to adjust the horizontal align-
ment of your headlights. Horizontal aiming
must be adjusted by an authorized Hyundai
dealer to avoid incorrect alignment that will
reduce the effectiveness of your headlights.
SPECIFICATION:"H"
Horizontal center line of headlights from ground:
Low Beam: 27.2 in. (690mm)
High Beam: 26.5 in. (672mm)
"W"
Distance between each headlight center :
Low Beam: 52.6 in. (1,336mm)
High Beam: 43.2 in. (1,098mm)
"L"
Distance between the headlights and the wall
that the lights are tested against : 118 in. (3,000
mm)
gkflhma-6.p659/12/2006, 3:23 PM 23
Page 239 of 269

7
EMISSION CONTROL SYSTEMS2
EMISSION CONTROL SYSTEM
H010D01A-AAT3. Exhaust Emission Control SystemThe Exhaust Emission Control System is a
highly effective system which controls exhaust
emissions while maintaining good vehicle per-
formance.
H010B01A-AAT1. Crankcase Emission Control
SystemThe Positive Crankcase Ventilation System is
employed to prevent air pollution caused by
blow-by gases being emitted from the crank-
case. This system supplies fresh filtered air to
the crankcase through the air intake hose.
Inside the crankcase, the fresh air mixes with
blow-by gases, which then pass through the
PCV valve and into the induction system.
H010A03GK-AATYour Hyundai is equipped with an emission
control system to meet all requirements of the
U.S. Environmental Protection Agency or Cali-
fornia Air Resources Board.
There are three emission control systems which
are as follows.
1) Crankcase Emission Control System
2) Evaporative Emission Control System
3) Exhaust Emission Control System
In order to ensure the proper function of the
emission control systems, it is recommended
that you have your car inspected and main-
tained by an authorized Hyundai dealer in ac-
cordance with the maintenance schedule in this
manual.
Caution for the Inspection and Maintenance
Test (Vehicle with Electronic Stability Con-
trol)
o To prevent the vehicle from misfiring
during dynamometer testing, discon-
nect the ABS connector located inside
of the wheel guard (driver side).
o For more information, see shop manual
(BR Group, Wheel Speed Sensor).
CanisterFuel vapors generated inside the fuel tank are
absorbed and stored in the onboard canister.
When the engine is running, the fuel vapors
absorbed in the canister are drawn into the
induction system through the purge control
solenoid valve.Purge Control Solenoid Valve (PCSV)The purge control solenoid valve is controlled
by the Engine Control Module (ECM); when the
engine coolant temperature is low during idling,
the PCSV closes so that evaporated fuel is not
taken into the engine. After the engine warms-
up during ordinary driving, the PCSV opens to
introduce evaporated fuel to the engine.
H010C01S-AAT2. Evaporative Emission Control (Includ-
ing ORVR: Onboard Refueling Vapor
Recovery) SystemThe Evaporative Emission Control System is
designed to prevent fuel vapors from escaping
into the atmosphere.
(The ORVR system is designed to allow the
vapors from the fuel tank to be loaded into a
canister while refueling at the gas station, pre-
venting the escape of fuel vapors into the
atmosphere.)
gkflhma-7.p659/12/2006, 3:30 PM 2
Page 261 of 269

9
VEHICLE SPECIFICATIONS4
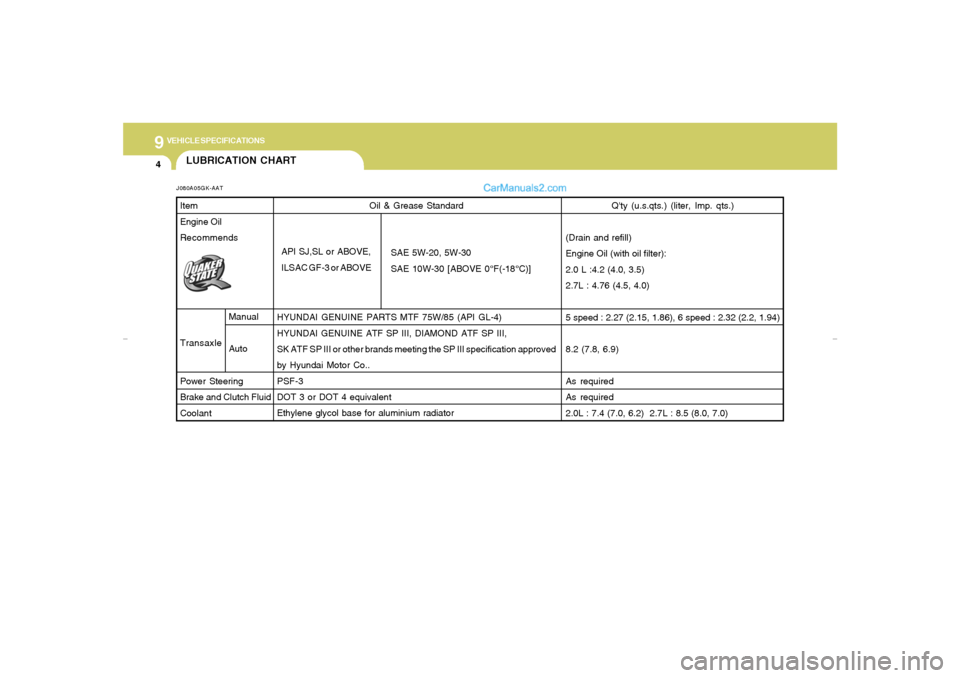
Oil & Grease Standard
HYUNDAI GENUINE PARTS MTF 75W/85 (API GL-4)
HYUNDAI GENUINE ATF SP III, DIAMOND ATF SP III,
SK ATF SP III or other brands meeting the SP III specification approved
by Hyundai Motor Co..
PSF-3
DOT 3 or DOT 4 equivalent
Ethylene glycol base for aluminium radiator
LUBRICATION CHARTJ080A05GK-AAT
API SJ,SL or ABOVE,
ILSAC GF-3 or ABOVESAE 5W-20, 5W-30
SAE 10W-30 [ABOVE 0°F(-18°C)]
Item
Engine Oil
Recommends
Transaxle
Power Steering
Brake and Clutch Fluid
Coolant
Manual
Auto
Q'ty (u.s.qts.) (liter, Imp. qts.)
(Drain and refill)
Engine Oil (with oil filter):
2.0 L :4.2 (4.0, 3.5)
2.7L : 4.76 (4.5, 4.0)
5 speed : 2.27 (2.15, 1.86), 6 speed : 2.32 (2.2, 1.94)
8.2 (7.8, 6.9)
As required
As required
2.0L : 7.4 (7.0, 6.2) 2.7L : 8.5 (8.0, 7.0)
gkflhma-9.p659/12/2006, 3:31 PM 4
Page 264 of 269

10
INDEX
3
Driving
Economical driving .......................................................................2-15
Smooth cornering.........................................................................2-16
Winter driving...............................................................................2-16
E
Electronic Stability Control (ESC) .....................................................2-12
Emissions Control Systems ............................................................... 7-1
Engine
Before starting the engine .............................................................. 2-3
Compartment................................................................................. 6-2
Coolant........................................................................................... 6-7
Coolant temperature gauge .........................................................1-53
If the engine overheats .................................................................. 3-4
Number........................................................................................... 8-2
Oil ................................................................................................... 6-5
Starting........................................................................................... 2-5
Engine Exhaust Can Be Dangerous .................................................. 2-2
F
Floor mat Anchor ..............................................................................1-79
Front Fog Light Switch ......................................................................1-62
Front Seats
Adjustable front seats ..................................................................1-10
Adjustable headrests...................................................................1-12
Adjusting seatback angle .............................................................1-11
Adjusting seat forward and rearward..........................................1-11
Lumbar support control ...............................................................1-13
Seat cushion height adjustment..................................................1-13Fuel
Capacity......................................................................................... 9-2
Gauge...........................................................................................1-52
Recommendations......................................................................... 1-2
Fuel Filler Lid
Remote release............................................................................1-74
Fuses
Fuse Panel Description ...............................................................6-34
G
General Everyday Checks................................................................. 6-4
Glove box ..........................................................................................1-69
H
Hazard Warning System ..................................................................1-63
Headlight Aiming Adjustment ............................................................6-23
Headlight Bulb....................................................................................6-24
Heating and cooling control
Rotary Type.................................................................................1-84
Automatic Type ............................................................................1-94
High-mounted Rear Stop light ...........................................................
1-72
Hood Release....................................................................................1-73
Horn.................................................................................................1-79
I
Ignition Switch ...................................................................................... 2-3
Instrument Cluster and Indicator Lights...........................................1-46
Intermittent Wiper..............................................................................1-61
gkflhma-10.p659/12/2006, 3:14 PM 3