2007 Hyundai Terracan jump start
[x] Cancel search: jump startPage 175 of 291
2
DRIVING YOUR HYUNDAI
19
!
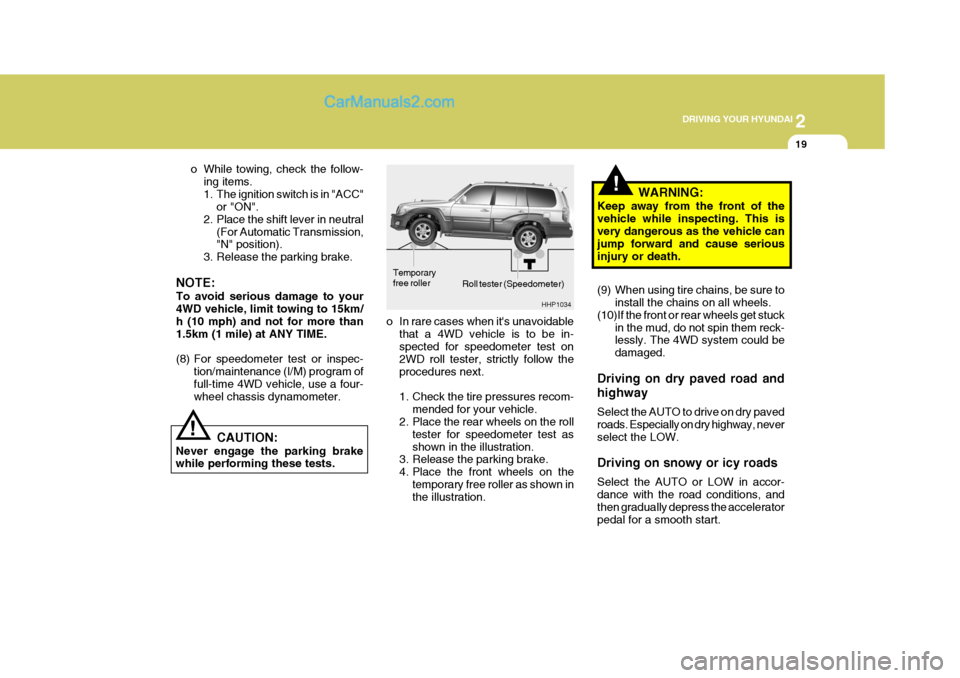
Roll tester (Speedometer)
o In rare cases when it's unavoidable that a 4WD vehicle is to be in- spected for speedometer test on 2WD roll tester, strictly follow theprocedures next.
1. Check the tire pressures recom- mended for your vehicle.
2. Place the rear wheels on the roll
tester for speedometer test as shown in the illustration.
3. Release the parking brake.
4. Place the front wheels on the
temporary free roller as shown in the illustration. WARNING:
Keep away from the front of the vehicle while inspecting. This is very dangerous as the vehicle can jump forward and cause seriousinjury or death.
(9) When using tire chains, be sure to install the chains on all wheels.
(10)If the front or rear wheels get stuck in the mud, do not spin them reck- lessly. The 4WD system could be damaged.
Driving on dry paved road and highway Select the AUTO to drive on dry paved roads. Especially on dry highway, neverselect the LOW. Driving on snowy or icy roads Select the AUTO or LOW in accor- dance with the road conditions, and then gradually depress the accelerator pedal for a smooth start.
! CAUTION:
Never engage the parking brake while performing these tests. o While towing, check the follow-
ing items.
1. The ignition switch is in "ACC" or "ON".
2. Place the shift lever in neutral
(For Automatic Transmission, "N" position).
3. Release the parking brake.
NOTE: To avoid serious damage to your 4WD vehicle, limit towing to 15km/ h (10 mph) and not for more than1.5km (1 mile) at ANY TIME.
(8) For speedometer test or inspec- tion/maintenance (I/M) program of full-time 4WD vehicle, use a four- wheel chassis dynamometer. HHP1034
Temporary free roller
Page 176 of 291
2 DRIVING YOUR HYUNDAI
20
Water can wash the grease from wheel bearings, causing rusting and prema-ture failure, and may also enter the axles, transmission and transfer case, reducing the gear oil's lubricating quali-ties.
!
CAUTION:
o While the full-time 4WD vehicle is being raised on a jack, never start the engine or cause the tires to rotate. There is the danger that rotatingtires touching the ground could cause the vehicle to go off the jack and to jump forward.
o If one of the front or rear wheels begins to spin in mud, snow,etc., the vehicle can sometimesbe driven out by depressing the accelerator pedal further; how- ever, avoid running the enginecontinuously at high rpm be- cause doing so could damage the 4WD system.
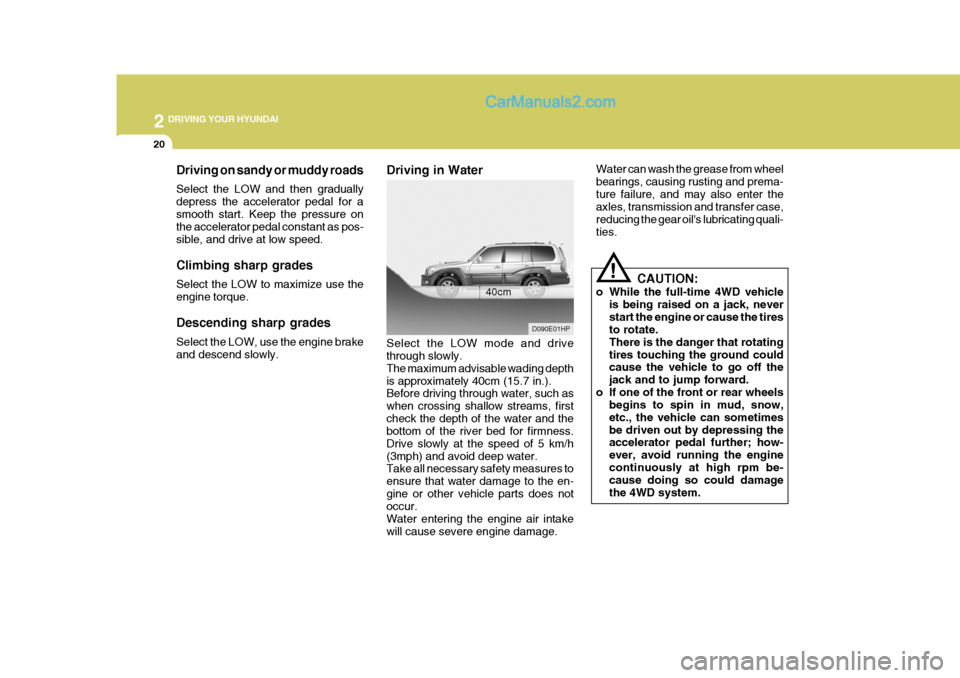
Driving in Water Select the LOW mode and drive through slowly. The maximum advisable wading depthis approximately 40cm (15.7 in.). Before driving through water, such as when crossing shallow streams, firstcheck the depth of the water and the bottom of the river bed for firmness. Drive slowly at the speed of 5 km/h(3mph) and avoid deep water. Take all necessary safety measures to ensure that water damage to the en-gine or other vehicle parts does not occur. Water entering the engine air intakewill cause severe engine damage.
D090E01HP
40cm
Driving on sandy or muddy roads Select the LOW and then gradually depress the accelerator pedal for asmooth start. Keep the pressure on the accelerator pedal constant as pos- sible, and drive at low speed. Climbing sharp grades Select the LOW to maximize use the engine torque. Descending sharp grades Select the LOW, use the engine brake and descend slowly.
Page 178 of 291
2 DRIVING YOUR HYUNDAI
22
!
C130A01HP-GAT
WARNING:
Nothing should be carried on top of the cargo area cover behind the rear seat. If there were an accident or a sudden stop, such objectscould move forward and cause dam- age to the vehicle or injure the oc- cupants.
o After being parked, check to be sure the parking brake is not engaged and that the parking brake indicator light is out before driving away.
o Driving through water may get the brakes wet. They can also get wetwhen the car is washed. Wet brakes can be dangerous! Your car will notstop as quickly if the brakes are wet. Wet brakes cause the car to pull to one side. To dry the brakes, applythe brakes lightly until the braking action returns to normal, taking care to keep the car under control at alltimes. If the braking action does not return to normal, stop as soon as it is safe to do so and call your Hyundaidealer for assistance.
GOOD BRAKING PRAC- TICES
LIMITED-SLIP DIFFEREN- TIAL (LSD)
D190A01HP-GAT (If Installed) A limited-slip differential, if equipped, is for the rear wheel differential only.The features of this limited-slip differ- ential are described below: Just as with a conventional differential,the wheel on one side is allowed to turn at a different speed from the wheel on the other side when the vehicle iscornering. The difference between the limited-slip differential and a conven- tional differential is that if the wheel onone side of the vehicle loses traction, a greater amount of torque is applied to the rear wheel on the other side toimprove traction. CAUTION:
o Never start the engine with the gearshift lever placed in the for-ward or reverse while one of therear wheels is jacked up and the other in contact with the ground; doing so may cause the vehicleto jump forward.
o Use only recommended oil for
LSD in the rear axle.See page 9-5 for the recom- mended oil descriptions.
!
Page 189 of 291
3
If the Engine Will not Start .......................................... 3-2
Jump Starting .............................................................. 3-3
If the Engine Overheats .............................................. 3-4
Spare Tire .................................................................... 3-5
If You Have a Flat Tire ................................................ 3-7
Changing A Flat Tire ................................................... 3-7
If Your Vehicle Must Be Towed .................................3-14
Emergency Towing .................................................... 3-15
If You Lose Your Keys .............................................. 3-16
WHAT TO DO IN AN EMERGENCY
3
Page 190 of 291

3 WHAT TO DO IN AN EMERGENCY
2
!
IF THE ENGINE WILL NOT START
D010A01A-AAT D010B01HP-GAT If Engine Doesn’t Turn Over or Turns Over Slowly
1. If your car has an automatic trans- mission, be sure the gear selector lever is in "N" or "P" and the emer-gency brake is set.
2. Check the battery connections to be
sure they are clean and tight.
3. Turn on the interior light. If the light dims or goes out when you operatethe starter, the battery is discharged.
4. Check the starter connections to be sure they are securely tightened.
5. Do not push or pull the vehicle to start it. See instructions for "Jump Starting". D010C02A-EAT If Engine Turns Over Normally but Does Not Start
1. Check fuel level.
2. With the key in the "OFF" position,
check all connectors at ignition coils and spark plugs(For Gasoline En- gine) or check all connectors atglow plug and glow plug relay(For Diesel Engine). Reconnect any that may be disconnected or loose.
3. Check fuel line in the engine room.
4. If engine still refuses to start, call a
Hyundai dealer or seek other quali- fied assistance.
WARNING:
If the engine will not start, do not push or pull the car to start it. This could result in a collision or causeother damage. In addition, push or pull starting may cause the cata- lytic converter to be overloaded andcreate a fire hazard.
D010D01A-AAT If Engine Stalls While Driving
1. Reduce your speed gradually, keep-ing a straight line. Move cautiously off the road to a safe place.
2. Turn on your emergency flashers.
3. Try to start the engine again. If your vehicle will not start, contact aHyundai dealer or seek other quali-fied assistance.
HHP5020
Page 191 of 291
3
WHAT TO DO IN AN EMERGENCY
3JUMP STARTING
!
D020A02A-AAT
WARNING:
The gas produced by the battery during the jump-start operation is highly explosive. If these instruc- tions are not followed exactly, seri-ous personal injury and damage to the vehicle may occur! If you are not sure how to follow this proce-dure, seek qualified assistance. Automobile batteries contain sul- furic acid. This is poisonous andhighly corrosive. When jump start- ing, wear protective glasses and be careful not to get acid on yourself,your clothing or on the car. o If you should accidentally get acid
on your skin or in your eyes,immediately remove any contami- nated clothing and flush the area with clear water for at least 15 min-utes. Then promptly obtain medical attention. If you must be transported to an emergency facility, continue toapply water to the affected area with a sponge or cloth.
o The gas produced by the battery
during the jump-start operation ishighly explosive. Do not smoke or allow a spark or an open flame inthe vicinity.
o The battery being used to provide
the jump start must be 12-volt. If youcannot determine that it is a 12-volt battery, do not attempt to use it for the jump start.
o To jump start a car with a discharged battery, follow this procedure ex-actly:
1. If the booster battery is installed in another vehicle, be sure the twovehicles are not touching. 2. Turn off all unnecessary lights and
acces-sories in both vehicles.
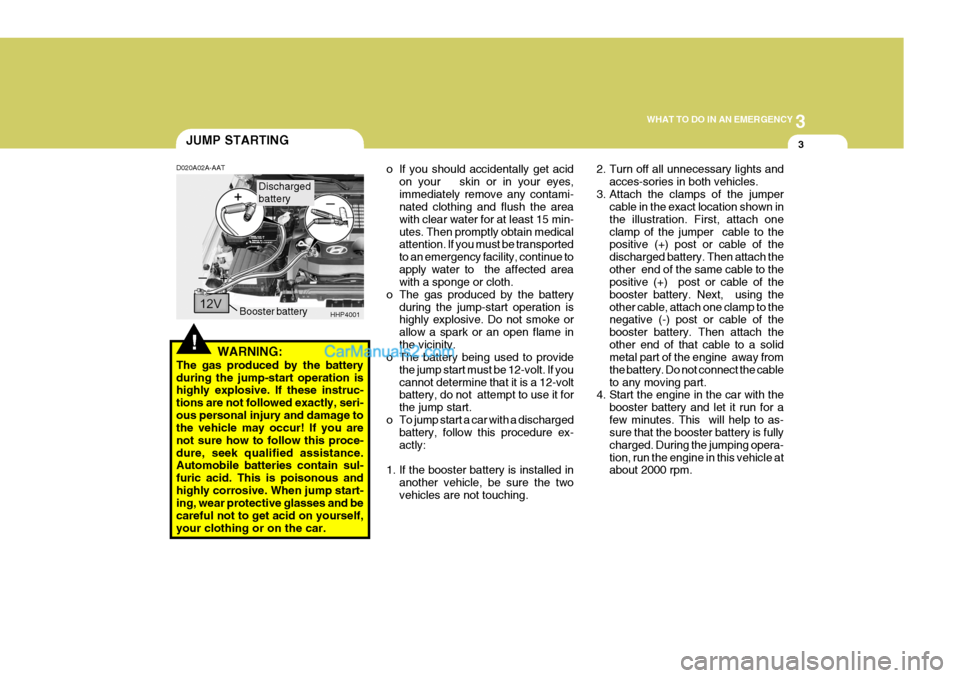
3. Attach the clamps of the jumper cable in the exact location shown inthe illustration. First, attach oneclamp of the jumper cable to the positive (+) post or cable of the discharged battery. Then attach theother end of the same cable to the positive (+) post or cable of the booster battery. Next, using theother cable, attach one clamp to the negative (-) post or cable of the booster battery. Then attach theother end of that cable to a solid metal part of the engine away from the battery. Do not connect the cableto any moving part.
4. Start the engine in the car with the
booster battery and let it run for afew minutes. This will help to as- sure that the booster battery is fully charged. During the jumping opera-tion, run the engine in this vehicle at about 2000 rpm.
HHP4001
Booster battery
Discharged battery
Page 192 of 291
3 WHAT TO DO IN AN EMERGENCY
4IF THE ENGINE OVERHEATS
!
5. Start the engine in the car with the
discharged battery using the nor- mal starting procedure. After the engine starts, leave the jumper cables connected and let the enginerun at fast idle or about 2000 rpm for several minutes.
6. Carefully remove the jumper cables in the reverse order of attachment.
If you do not know why your battery became discharged (because the lights were left on, etc.), have the charging system checked by your Hyundaidealer. D030A02HP-AAT If your temperature gauge indicates overheating, you experience a loss of power, or hear loud pinging or knock- ing, the engine is probably too hot. Ifthis happens to you, you should:
1. Pull off the road and stop as soon as
it is safe to do so.
2. Place the gear selector lever in "P"
(automatic), or neutral (manual transmission) and set the parking brake. If the air conditioning is on, turn it off.
3. If engine coolant is running out un- der the car or steam is coming outfrom under the hood, stop the en-gine. Do not open the hood until the engine coolant has stopped running or the steaming has stopped. If thereis no visible loss of coolant and no steam, leave the engine running and check to be sure the enginecooling fan is operating. If the fan is not running, turn the engine off. 4. Check to see if the water pump drive
belt is missing. If it is not missing, check to see that it is tight. If the drive belt seems to be satisfactory, check for engine coolant leakingfrom the radiator, hoses or under the car. (If the air conditioning had been in use, it is normal for coldwater to be draining from it when you stop).
WARNING:
While the engine is running, keephands and clothing away from mov- ing parts such as the fan and drivebelts to prevent injury.
Page 287 of 291

10INDEX
4
Headlight Leveling Device S ystem ..........................1-100
Heating and Ventilation ............................................ 1-105
Air flow control ........................................... 1-106, 1-117
Temperature control .... .......................................... 1-108
High-Mounted Rear Stop Light ...................................1-95
Hood Release ............................................................ 1-97
Horn ........................................................................... 1-99
I Ignition Sw itch ............................................................. 2-3
Immobilizer S ystem ..................................................... 1-5
Limp Home Procedures ................................... 1-7, 1-9
Key ................................................................... 1-5, 1-8
Indicator and Warning Lights.................................... 1-58
Instrument Cluster and Indicator Li ghts................... 1-54
Instrument Panel Light Control (Rheo stat)............... 1-79
Interior Light .............................................................. 1-85
Intermittent Wiper ..................................................... 1-77
J Jump Starting .............................................................. 3-3
K
Key .............................................................................. 1-4 If you lose your keys ............................................. 3-17
Positions ................................................................... 2-4 L
Limited-Slip Differential
.............................................. 2-22
Luggage Compartment
Cargo Security Screen ........................................... 1-94
Light ........................................................................ 1-93
Net .......................................................................... 1-93
M Maintenance Intervals Explanation of scheduled maintenance items ......... 5-9
Maintenance under severe usage conditions .......... 5-8 Scheduled maintenance ........................................... 5-4
Service requ irements............................................... 5-2
Mirrors Day/night inside rearview ....... .................................1-90
Outside rearvi ew ..................................................... 1-88
Multimeter .................................................................. 1-69
Altimeter ................................................................. 1-70
Barometer ............................................................... 1-72
Digital Clock ........................................................... 1-72
Electrical azimuth compass ................................... 1-70
Relative altimeter .................................................... 1-71
O
Odometer ................................................................... 1-67
P Parking Brake ............................................................ 1-91
Part-time 4WD Opera tion ........................................... 2-14