2007 Hyundai Santa Fe lower control arm
[x] Cancel search: lower control armPage 120 of 355
1FEATURES OF YOUR HYUNDAI
108
!
WARNING:
The transceiver has been tested and
complies with FCC and Industry Canada
rules. Changes or modifications not ex-
pressly approved by the party respon-
sible for compliance could void the user's
authority to operate the device.
NVS
® is a registered trademark and Z-
Nav™ is a trademark of the Gentex Corpo-
ration, Zeeland, Michigan. HomeLink
® is
a registered trademark owned by Johnson
Controls, Incorporated, Milwaukee, Wis-
consin.
FCC ID: NZLZTVHL3
IC: 4112A-ZTVHL3This device complies with Part 15 FCC
Rules. Operation is subject to the following
two conditions: (1) this device may not
cause harmful interference, and (2) this
device must accept any interference re-
ceived, including interference that may
cause undesired operation.
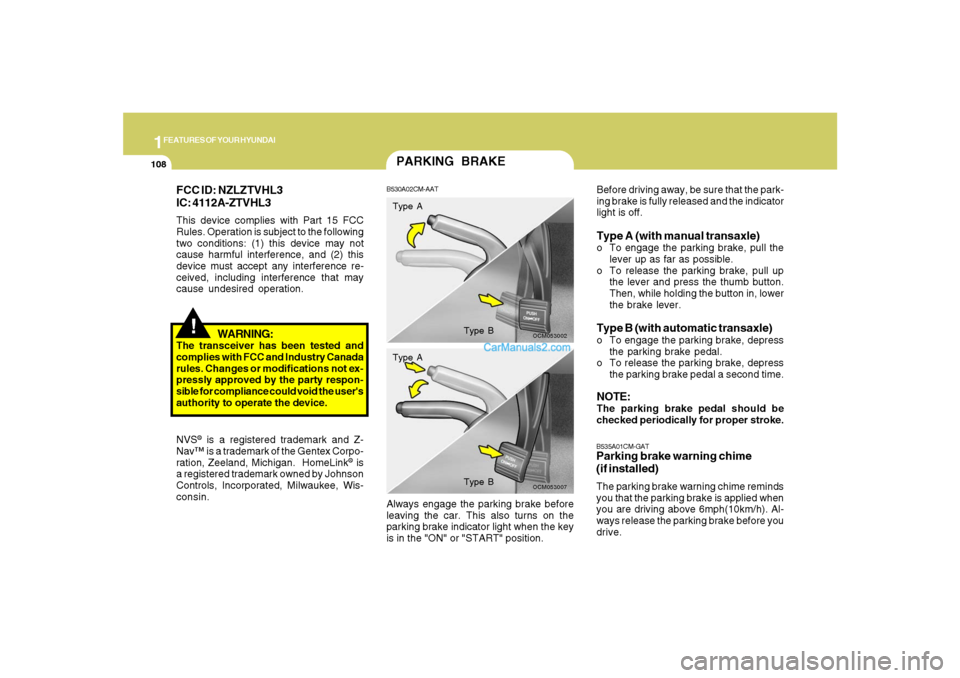
PARKING BRAKEB530A02CM-AAT
OCM053002
Type A
Type B
OCM053007
Type A
Type B
Before driving away, be sure that the park-
ing brake is fully released and the indicator
light is off.Type A (with manual transaxle)o To engage the parking brake, pull the
lever up as far as possible.
o To release the parking brake, pull up
the lever and press the thumb button.
Then, while holding the button in, lower
the brake lever.Type B (with automatic transaxle)o To engage the parking brake, depress
the parking brake pedal.
o To release the parking brake, depress
the parking brake pedal a second time.NOTE:The parking brake pedal should be
checked periodically for proper stroke.B535A01CM-GATParking brake warning chime
(if installed)The parking brake warning chime reminds
you that the parking brake is applied when
you are driving above 6mph(10km/h). Al-
ways release the parking brake before you
drive. Always engage the parking brake before
leaving the car. This also turns on the
parking brake indicator light when the key
is in the "ON" or "START" position.
Page 143 of 355
1
FEATURES OF YOUR HYUNDAI
131
FEATURES OF YOUR HYUNDAI
131131131131
B730A01CM-AATOperation Tipso To keep dust or unpleasant fumes from
entering the car through the ventilation
system, temporarily set the air intake
control to (
).
Be sure to return the control to (
)
when the irritation has passed to keep
fresh air in the vehicle. This will help
keep the driver alert and comfortable.
o Air for the heating/cooling system is
drawn in through the grilles just ahead
of the windshield. Care should be taken
that these are not blocked by leaves,
snow, ice or other obstructions.
o To prevent interior fog on the wind-
shield, set the air intake control to the
fresh air (
) position, fan speed to the
desired position, turn on the air condi-
tioning system, and adjust temperature
control to desired temperature.
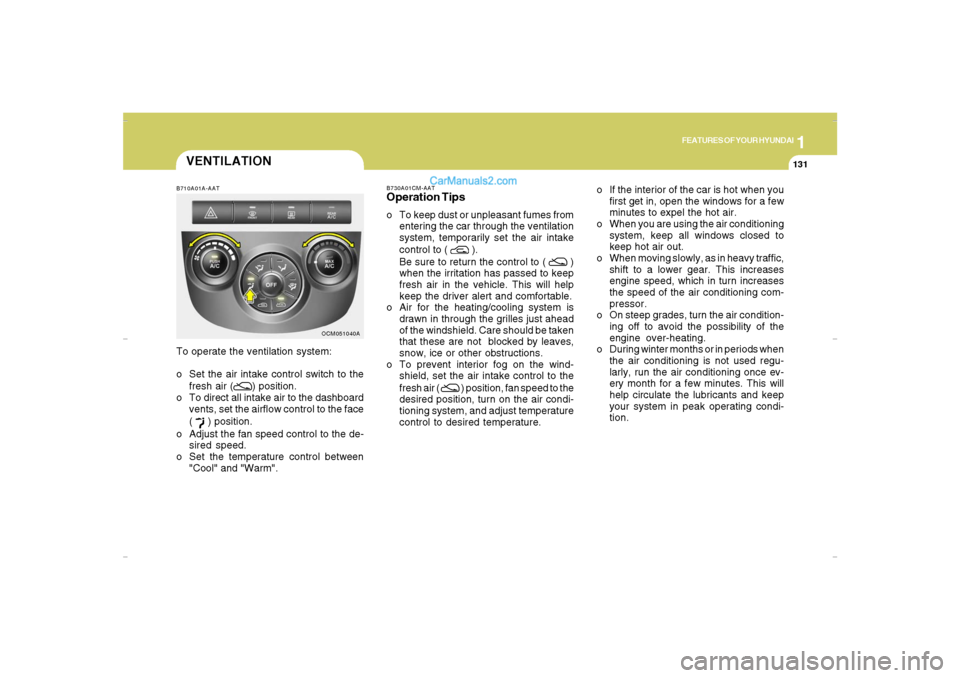
OCM051040A B710A01A-AAT
To operate the ventilation system:
o Set the air intake control switch to the
fresh air (
) position.
o To direct all intake air to the dashboard
vents, set the airflow control to the face
(
) position.
o Adjust the fan speed control to the de-
sired speed.
o Set the temperature control between
"Cool" and "Warm".
VENTILATION
o If the interior of the car is hot when you
first get in, open the windows for a few
minutes to expel the hot air.
o When you are using the air conditioning
system, keep all windows closed to
keep hot air out.
o When moving slowly, as in heavy traffic,
shift to a lower gear. This increases
engine speed, which in turn increases
the speed of the air conditioning com-
pressor.
o On steep grades, turn the air condition-
ing off to avoid the possibility of the
engine over-heating.
o During winter months or in periods when
the air conditioning is not used regu-
larly, run the air conditioning once ev-
ery month for a few minutes. This will
help circulate the lubricants and keep
your system in peak operating condi-
tion.
Cmhma-1b.p653/20/2006, 4:59 PM 131
Page 255 of 355

3
WHAT TO DO IN AN EMERGENCY
7
!
WARNING:
Significantly low tire pressure makes
the vehicle unstable and can contrib-
ute to loss of vehicle control and
increased braking distances.
Continued driving on low pressure
tires will cause the tires to overheat
and fail. CAUTION:
In winter or cold weather, the low tire
pressure telltale may be illuminated
if the tire pressure was adjusted to
the recommended tire inflation pres-
sure in warm weather. It does not
mean your TPMS is malfunctioning
because the decreased temperature
leads to a proportional lowering of
tire pressure.
When you drive your vehicle from a
warm area to a cold area or from a
cold area to a warm area, or the
outside temperature significantly
increases or decreases, you should
check the tire inflation pressure and
adjust the tires to the recommended
tire inflation pressure.
!
TPMS (Tire pressure moni-
toring system) malfunction
The TPMS malfunction indicator comes
on and stays on when there is a problem
with the Tire Pressure Monitoring Sys-
tem. If the Front Left sensor fails, the
TPMS malfunction indicator illuminates,
but if the Front Right, Rear Left, or Rear
Right tire is under-inflated, the low tire
pressure and position telltales may illu-
minate together with the TPMS mal-
function indicator.
Have the system checked by an autho-
rized Hyundai dealer as soon as pos-
sible to determine the cause of the
problem.
Cmhma-3.p653/20/2006, 5:02 PM 7
Page 281 of 355
5
VEHICLE MAINTENANCE REQUIREMENTS
5
Note : *1. For the first time replace the coolant at 60,000 miles (96,000 km) or 60 months. After that replace it every 30,000 miles (48,000 km) or 24 months.
*2. Inspect every 37,500 miles (60,000 km) replace every 75,000 miles (120,000 km) or 60 months
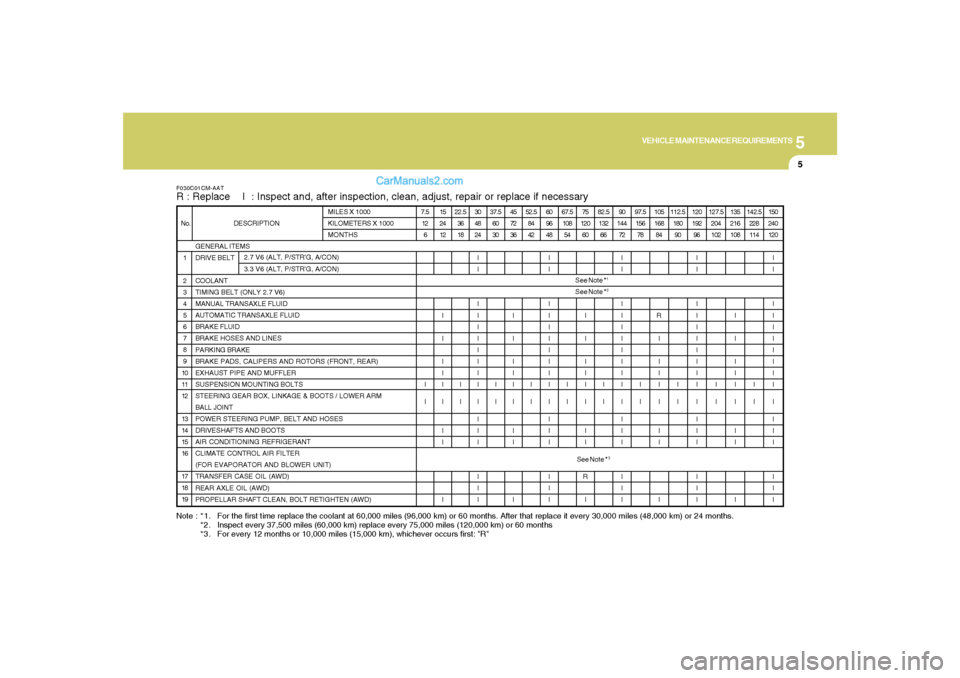
*3. For every 12 months or 10,000 miles (15,000 km), whichever occurs first: "R"F030C01CM-AATR : Replace I : Inspect and, after inspection, clean, adjust, repair or replace if necessary
GENERAL ITEMS
DRIVE BELT
COOLANT
TIMING BELT (ONLY 2.7 V6)
MANUAL TRANSAXLE FLUID
AUTOMATIC TRANSAXLE FLUID
BRAKE FLUID
BRAKE HOSES AND LINES
PARKING BRAKE
BRAKE PADS, CALIPERS AND ROTORS (FRONT, REAR)
EXHAUST PIPE AND MUFFLER
SUSPENSION MOUNTING BOLTS
STEERING GEAR BOX, LINKAGE & BOOTS / LOWER ARM
BALL JOINT
POWER STEERING PUMP, BELT AND HOSES
DRIVESHAFTS AND BOOTS
AIR CONDITIONING REFRIGERANT
CLIMATE CONTROL AIR FILTER
(FOR EVAPORATOR AND BLOWER UNIT)
TRANSFER CASE OIL (AWD)
REAR AXLE OIL (AWD)
PROPELLAR SHAFT CLEAN, BOLT RETIGHTEN (AWD) 1
2
3
4
5
6
7
8
9
10
11
12
13
14
15
16
17
18
19 No. DESCRIPTIONMILES X 1000
KILOMETERS X 1000
MONTHS
2.7 V6 (ALT, P/STR'G, A/CON)
3.3 V6 (ALT, P/STR'G, A/CON)7.5
12
6
I
I15
24
12
I
I
I
I
I
I
I
I
I22.5
36
18
I
I30
48
24
I
I
I
I
I
I
I
I
I
I
I
I
I
I
I
I
I37.5
60
30
I
I45
72
36
I
I
I
I
I
I
I
I
I52.5
84
42
I
I60
96
48
I
I
I
I
I
I
I
I
I
I
I
I
I
I
I
I
I67.5
108
54
I
I75
120
60
I
I
I
I
I
I
I
I
R
I82.5
132
66
I
I90
144
72
I
I
I
I
I
I
I
I
I
I
I
I
I
I
I
I
I97.5
156
78
I
I105
168
84
R
I
I
I
I
I
I
I
I112.5
180
90
I
I120
192
96
I
I
I
I
I
I
I
I
I
I
I
I
I
I
I
I
I127.5
204
102
I
I135
216
108
I
I
I
I
I
I
I
I
I142.5
228
114
I
I150
240
120
I
I
I
I
I
I
I
I
I
I
I
I
I
I
I
I
ISee Note *
1
See Note *
2
See Note *
3
Page 282 of 355
5
VEHICLE MAINTENANCE REQUIREMENTS6
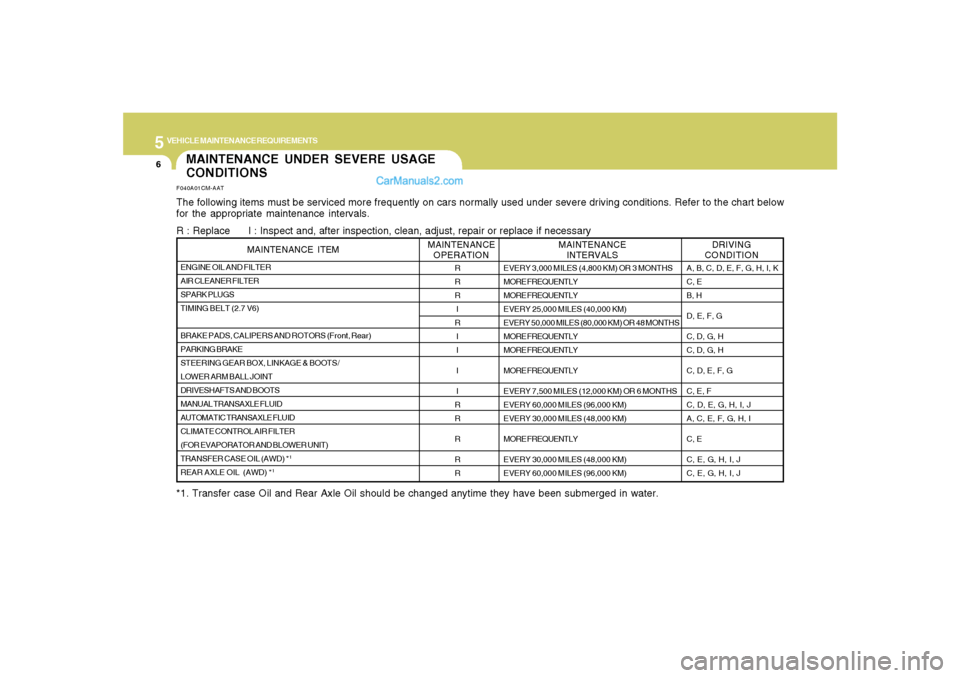
MAINTENANCE UNDER SEVERE USAGE
CONDITIONSF040A01CM-AATThe following items must be serviced more frequently on cars normally used under severe driving conditions. Refer to the chart below
for the appropriate maintenance intervals.
R : Replace I : Inspect and, after inspection, clean, adjust, repair or replace if necessary
*1. Transfer case Oil and Rear Axle Oil should be changed anytime they have been submerged in water.ENGINE OIL AND FILTER
AIR CLEANER FILTER
SPARK PLUGS
TIMING BELT (2.7 V6)
BRAKE PADS, CALIPERS AND ROTORS (Front, Rear)
PARKING BRAKE
STEERING GEAR BOX, LINKAGE & BOOTS/
LOWER ARM BALL JOINT
DRIVESHAFTS AND BOOTS
MANUAL TRANSAXLE FLUID
AUTOMATIC TRANSAXLE FLUID
CLIMATE CONTROL AIR FILTER
(FOR EVAPORATOR AND BLOWER UNIT)
TRANSFER CASE OIL (AWD) *
1
REAR AXLE OIL (AWD) *
1
MAINTENANCE ITEM
R
R
R
I
R
I
I
I
I
R
R
R
R
R
EVERY 3,000 MILES (4,800 KM) OR 3 MONTHS
MORE FREQUENTLY
MORE FREQUENTLY
EVERY 25,000 MILES (40,000 KM)
EVERY 50,000 MILES (80,000 KM) OR 48 MONTHS
MORE FREQUENTLY
MORE FREQUENTLY
MORE FREQUENTLY
EVERY 7,500 MILES (12,000 KM) OR 6 MONTHS
EVERY 60,000 MILES (96,000 KM)
EVERY 30,000 MILES (48,000 KM)
MORE FREQUENTLY
EVERY 30,000 MILES (48,000 KM)
EVERY 60,000 MILES (96,000 KM)
DRIVING
CONDITION MAINTENANCE
INTERVALS MAINTENANCE
OPERATION
A, B, C, D, E, F, G, H, I, K
C, E
B, H
D, E, F, G
C, D, G, H
C, D, G, H
C, D, E, F, G
C, E, F
C, D, E, G, H, I, J
A, C, E, F, G, H, I
C, E
C, E, G, H, I, J
C, E, G, H, I, J
Page 299 of 355
6
DO-IT-YOURSELF MAINTENANCE
13
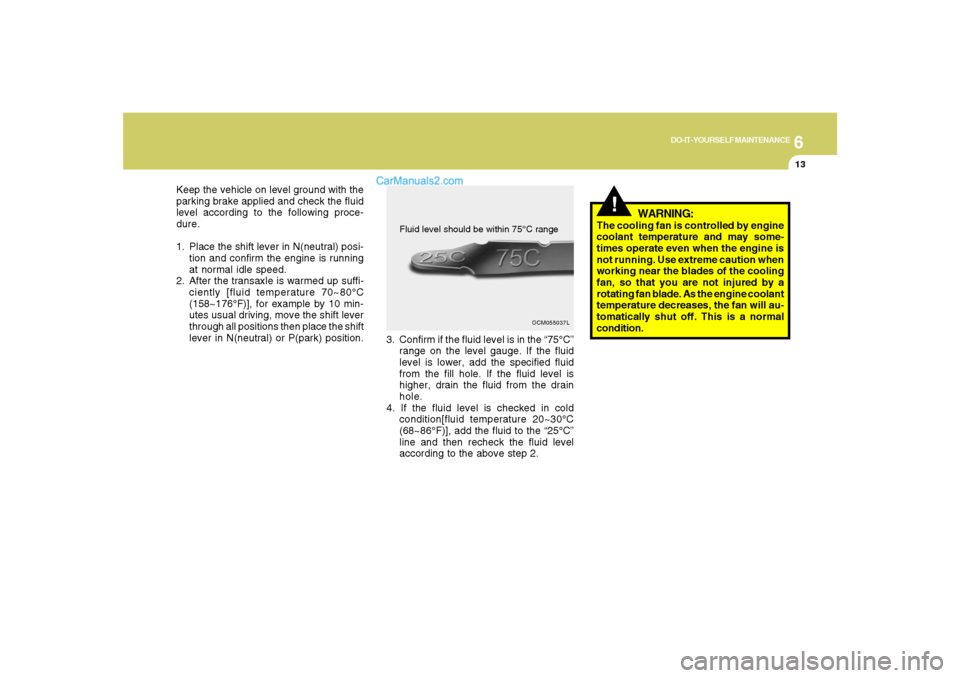
Keep the vehicle on level ground with the
parking brake applied and check the fluid
level according to the following proce-
dure.
1. Place the shift lever in N(neutral) posi-
tion and confirm the engine is running
at normal idle speed.
2. After the transaxle is warmed up suffi-
ciently [fluid temperature 70~80°C
(158~176°F)], for example by 10 min-
utes usual driving, move the shift lever
through all positions then place the shift
lever in N(neutral) or P(park) position.
OCM055037L
!
WARNING:
The cooling fan is controlled by engine
coolant temperature and may some-
times operate even when the engine is
not running. Use extreme caution when
working near the blades of the cooling
fan, so that you are not injured by a
rotating fan blade. As the engine coolant
temperature decreases, the fan will au-
tomatically shut off. This is a normal
condition.
Fluid level should be within 75°C range
3. Confirm if the fluid level is in the “75°C”
range on the level gauge. If the fluid
level is lower, add the specified fluid
from the fill hole. If the fluid level is
higher, drain the fluid from the drain
hole.
4. If the fluid level is checked in cold
condition[fluid temperature 20~30°C
(68~86°F)], add the fluid to the “25°C”
line and then recheck the fluid level
according to the above step 2.
Page 320 of 355

6
DO-IT-YOURSELF MAINTENANCE
34
G200E01CM-AATInner Panel
OCM055024N
FUSE RATING
15A
25A
15A
10A
15A
10A
10A
10A
30A
10A
15A
10A
10A
10A
10A
10A
10ACIRCUIT PROTECTED
CIGARETTE LIGHTER
FRONT POWER OUTLET, REAR POWER OUTLET
CENTER POWER OUTLET
POWER OUTSIDE MIRROR SWITCH, AUDIO, ATM KEY LOCK CONTROL MODULE,
DIGITAL CLOCK
MULTIFUNCTION SWITCH, REAR WIPER CONTROL MODULE,REAR WIPER
MOTOR
RAIN SENSOR
RHEOSTAT, BCM, INSTRUMENT CLUSTER
A/C CONTROL MODULE, INCAR & HUMIDITY SENSOR, HIGH BLOWER RELAY,
REAR A/CON SWITCH, ICM RELAY BOX, AQS SENSOR, SUNROOF MOTOR,
BLOWER BELAY, ELECTRO CHROMIC MIRROR
BLOWER RELAY, BLOWER MOTOR, A/C CONTROL MODULE
A/C CONTROL MODULE
SRS CONTROL MODULE
PAB ON/OFF SWITCH, INSTRUMENT CLUSTER
HAZARD SWITCH
MULTIFUNTION SWITCH, STEERING ANGLE SENSOR, ESC SWITCH, ATM KEY
LOCK CONTROL MODULE SEAT WARMER MODULE
OIL LEVEL SENSOR MODULE, BCM
INSTRUMENT CLUSTER, PRE-EXCITATION RESISTOR, BCM, GENERATOR, SEMI
ACTIVE CONTROL MODULE (GASOLINE)
BURGLAR ALARM RELAY
C/LIGHTER
P/OUTLET
P/OUTLET
CTR
AUDIO #2
RR WIPER
IMS
BCM #2
A/CON 2
BLOWER
A/CON 1
A/BAG #1
A/BAG IND
T/SIG
ATM LOCK
BCM #1
CLUSTER
STARTFUSE