2007 Hyundai Santa Fe lights
[x] Cancel search: lightsPage 238 of 355
2
DRIVING YOUR HYUNDAI
27
TRAILER OR VEHICLE TOWING!
C190A01S-AATIf you are considering towing with your car,
you should first check with your State's
Department of Motor Vehicles to deter-
mine their legal requirements.
Since laws vary from State to State the
requirements for towing trailers, cars, or
other types of vehicles or apparatus may
differ. Ask your Hyundai dealer for further
details before towing.
CAUTION:
Do not do any towing with your car during
its first 1,200 miles (2,000 km) in order to
allow the engine to properly break in.
Failure to heed this caution may result in
serious engine or transaxle damage.
USE OF LIGHTSC180A01A-AATCheck your lights regularly for correct op-
eration and always keep them clean. When
driving during the day in conditions of poor
visibility, it is helpful to drive with head-
lights on low beam. This enables you to be
seen as well as to see.
!
o Driving on tires with no or insufficient
tread is dangerous. Worn-out tires
can result in loss of vehicle control,
collisions, injury, and even death.
Worn-out tires should be replaced as
soon as possible and should never be
used for driving. Always check tire
tread before driving your car. Refer to
8-12 for further information and tread
limits.
WARNING:
2. Fuel, engine coolant and engine oil:
High speed travel consumes more fuel
than urban motoring. Do not forget to check
both engine coolant and engine oil.
3. Drive belt:
A loose or damaged drive belt may result
in overheating of the engine.
Page 241 of 355
2
DRIVING YOUR HYUNDAI
30
C190F01CM-AATTrailer or Vehicle Towing Tips1. Before towing, check hitch and safety
chain connections as well as proper
operation of the trailer running lights,
brake lights, and turn signals.
2. Trailer towing requires more fuel than
normal conditions.
3. To maintain engine braking efficiency,
do not tow a trailer with the transaxle in
fifth gear (manual transaxle).
4. Always secure items in the trailer to
prevent load shift while driving.
5. Check the condition and air pressure of
all tires on the trailer and your car. Low
tire pressure can seriously affect the
handling. Also check the spare tire.
6. The vehicle/trailer combination is more
affected by crosswind and buffeting.
When being passed by a large vehicle,
keep a constant speed and steer straight
ahead. If there is too much wind buffet-
ing, slow down to get out of the other
vehicle's air turbulence.7. When parking your car and trailer, es-
pecially on a hill, be sure to follow all the
normal precautions. Turn your front
wheel into the curb, set the parking
brake firmly, and put the transaxle in 1st
or Reverse (manual) or Park (automatic).
In addition, place wheel chocks at each
of the trailer's tires.
8. If the trailer has electric brakes, start
your vehicle and trailer moving, and
then apply the trailer brake controller by
hand to be sure the brakes are working.
This lets you check your electrical con-
nection at the same time.
9. During your trip, check occasionally to
be sure that the load is secure, and that
the lights and any trailer brakes are still
working.
10. Avoid jerky starts, sudden accelera-
tion or sudden stops.
11. Avoid sharp turns and rapid lane
changes.
12. Avoid holding the brake pedal down
too long or too frequently. This could
cause the brakes to overheat, resulting
in reduced braking efficiency.
!
WARNING:
o Improperly loading your vehicle and
trailer can seriously affect its steer-
ing and braking performance causing
a crash which could cause serious
injury or death.
o Towing a trailer affects vehicle han-
dling and braking.
o Drive more slowly when towing a trailer
and allow more distance when brak-
ing.
o Be careful when driving in slippery
and windy conditions.
o Be careful when turning and while
driving up and down hills.
Page 251 of 355
3
WHAT TO DO IN AN EMERGENCY
3
JUMP STARTING!
o If you should accidentally get acid on
your skin or in your eyes, immediately
remove any contaminated clothing and
flush the area with clear water for at
least 15 minutes. Then promptly obtain
medical attention. If you must be trans-
ported to an emergency facility, con-
tinue to apply water to the affected area
with a sponge or cloth.
o The gas produced by the battery during
the jump-start operation is highly explo-
sive. Do not smoke or allow a spark or
an open flame in the vicinity.
o The battery being used to provide the
jump start must be 12-volt. If you cannot
determine that it is a 12-volt battery, do
not attempt to use it for the jump start.
o To jump start a car with a discharged
battery, follow this procedure exactly:
1. If the booster battery is installed in an-
other vehicle, be sure the two vehicles
are not touching.
2. Turn off all unnecessary lights and ac-
cessories in both vehicles.
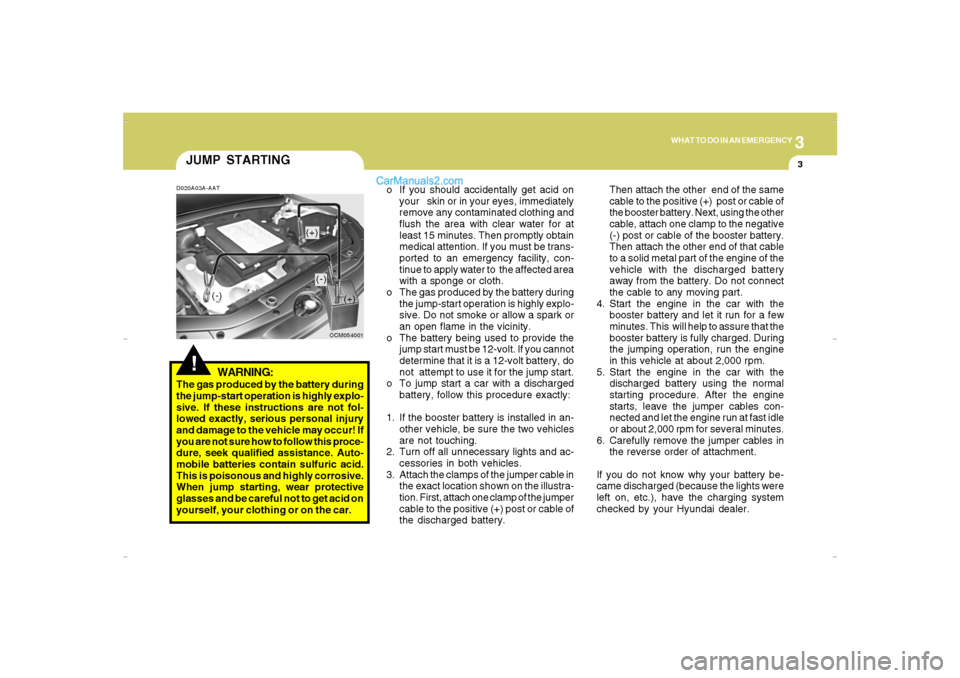
3. Attach the clamps of the jumper cable in
the exact location shown on the illustra-
tion. First, attach one clamp of the jumper
cable to the positive (+) post or cable of
the discharged battery.Then attach the other end of the same
cable to the positive (+) post or cable of
the booster battery. Next, using the other
cable, attach one clamp to the negative
(-) post or cable of the booster battery.
Then attach the other end of that cable
to a solid metal part of the engine of the
vehicle with the discharged battery
away from the battery. Do not connect
the cable to any moving part.
4. Start the engine in the car with the
booster battery and let it run for a few
minutes. This will help to assure that the
booster battery is fully charged. During
the jumping operation, run the engine
in this vehicle at about 2,000 rpm.
5. Start the engine in the car with the
discharged battery using the normal
starting procedure. After the engine
starts, leave the jumper cables con-
nected and let the engine run at fast idle
or about 2,000 rpm for several minutes.
6. Carefully remove the jumper cables in
the reverse order of attachment.
If you do not know why your battery be-
came discharged (because the lights were
left on, etc.), have the charging system
checked by your Hyundai dealer.
D020A03A-AAT
WARNING:
The gas produced by the battery during
the jump-start operation is highly explo-
sive. If these instructions are not fol-
lowed exactly, serious personal injury
and damage to the vehicle may occur! If
you are not sure how to follow this proce-
dure, seek qualified assistance. Auto-
mobile batteries contain sulfuric acid.
This is poisonous and highly corrosive.
When jump starting, wear protective
glasses and be careful not to get acid on
yourself, your clothing or on the car.
OCM054001
(-)
(+)
(+)(-)
Cmhma-3.p653/20/2006, 5:02 PM 3
Page 290 of 355
6
DO-IT-YOURSELF MAINTENANCE
4
GENERAL CHECKS
G020C01A-AATVehicle InteriorThe following should be checked each
time when the vehicle is driven:
o Lights operation
o Windshield wiper operation
o Horn operation
o Defroster, heating system operation
(and air conditioning, if installed)
o Steering operation and condition
o Mirror condition and operation
o Turn signal operation
o Accelerator pedal operation
o Brake operation, including parking
brake
o Manual transaxle operation, including
clutch operation
o Automatic transaxle operation, includ-
ing "Park" mechanism operation
o Seat control condition and operation
o Seat belt condition and operation
o Sunvisor operation
If you notice anything that does not operate
correctly or appears to be functioning cor-
rectly, inspect it carefully and seek assis-
tance from your Hyundai dealer if service
is needed.
G020B01A-AATVehicle ExteriorThe following should be checked monthly:
o Overall appearance and condition
o Wheel condition and wheel nut torque
o Exhaust system condition
o Light condition and operation
o Windshield glass condition
o Wiper blade condition
o Paint condition and body corrosion
o Fluid leaks
o Door and hood lock condition
o Tire pressure and condition
(including spare tire)
G020A01A-AATEngine CompartmentThe following should be checked regu-
larly:
o Engine oil level and condition
o Transaxle fluid level and condition
o Brake fluid level
o Clutch fluid level
o Engine coolant level
o Windshield washer fluid level
o Accessory drive belt condition
o Engine coolant hose condition
o Fluid leaks (on or below components)
o Power steering fluid level
o Battery condition
o Air filter condition
Page 304 of 355
6
DO-IT-YOURSELF MAINTENANCE
18
!
CAUTION:
When replacing a fusible link, never use
anything but a new fusible link with the
same or lower amperage rating. Never
use a piece of wire or a higher-rated
fusible link. This could result in serious
damage and create a fire hazard.
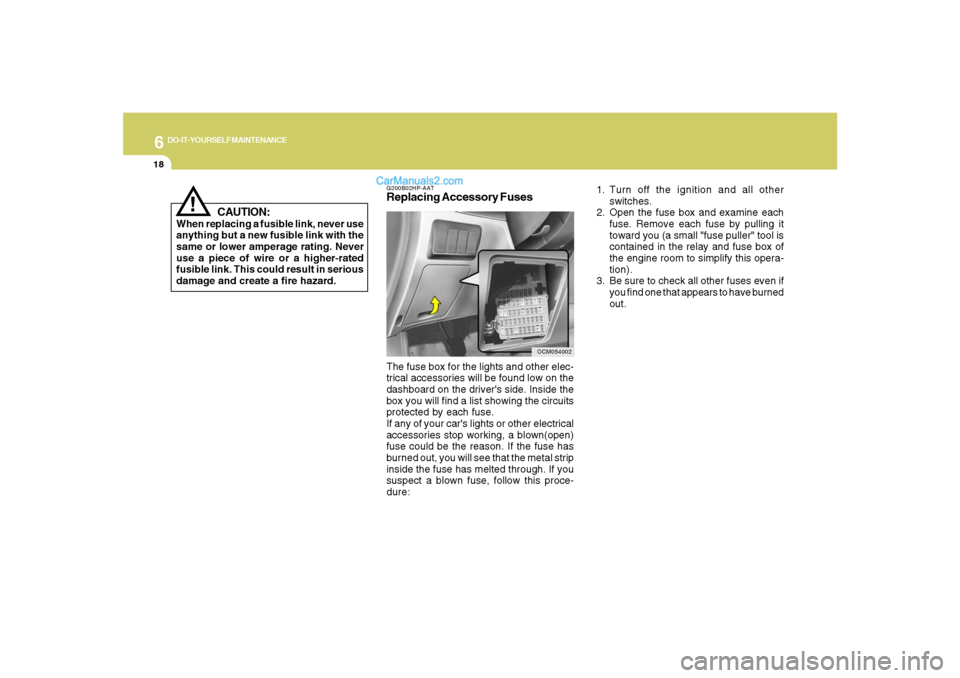
G200B02HP-AATReplacing Accessory Fuses
OCM054002
The fuse box for the lights and other elec-
trical accessories will be found low on the
dashboard on the driver's side. Inside the
box you will find a list showing the circuits
protected by each fuse.
If any of your car's lights or other electrical
accessories stop working, a blown(open)
fuse could be the reason. If the fuse has
burned out, you will see that the metal strip
inside the fuse has melted through. If you
suspect a blown fuse, follow this proce-
dure:1. Turn off the ignition and all other
switches.
2. Open the fuse box and examine each
fuse. Remove each fuse by pulling it
toward you (a small "fuse puller" tool is
contained in the relay and fuse box of
the engine room to simplify this opera-
tion).
3. Be sure to check all other fuses even if
you find one that appears to have burned
out.
Page 306 of 355
6
DO-IT-YOURSELF MAINTENANCE
20
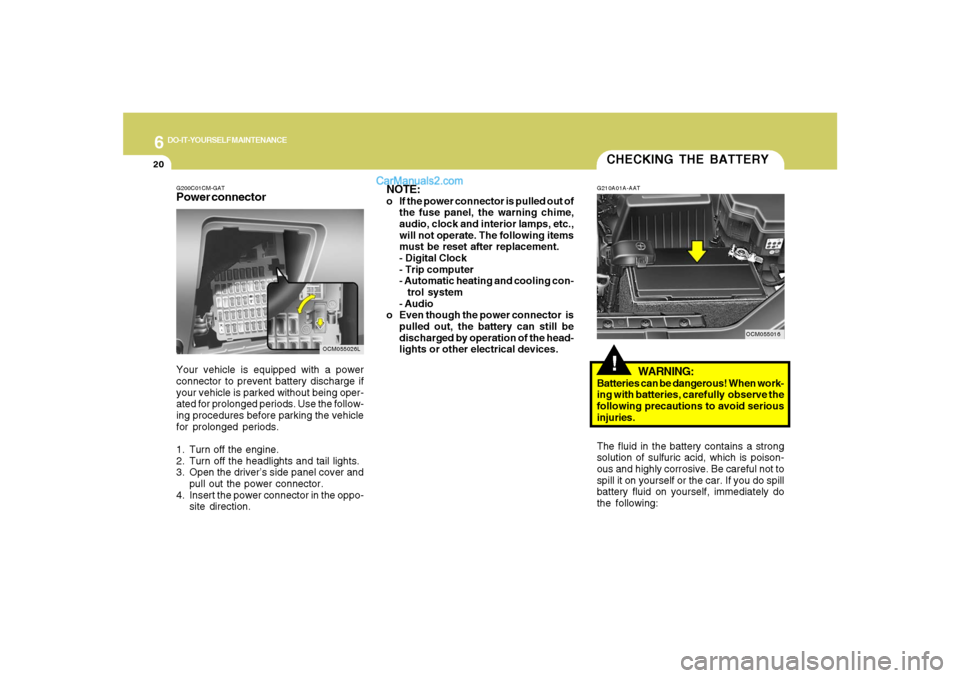
G200C01CM-GATPower connectorNOTE:
o If the power connector is pulled out of
the fuse panel, the warning chime,
audio, clock and interior lamps, etc.,
will not operate. The following items
must be reset after replacement.
- Digital Clock
- Trip computer
- Automatic heating and cooling con-
trol system
- Audio
o Even though the power connector is
pulled out, the battery can still be
discharged by operation of the head-
lights or other electrical devices.
Your vehicle is equipped with a power
connector to prevent battery discharge if
your vehicle is parked without being oper-
ated for prolonged periods. Use the follow-
ing procedures before parking the vehicle
for prolonged periods.
1. Turn off the engine.
2. Turn off the headlights and tail lights.
3. Open the driver’s side panel cover and
pull out the power connector.
4. Insert the power connector in the oppo-
site direction.
OCM055026L
CHECKING THE BATTERY!
G210A01A-AAT
WARNING:
Batteries can be dangerous! When work-
ing with batteries, carefully observe the
following precautions to avoid serious
injuries.
The fluid in the battery contains a strong
solution of sulfuric acid, which is poison-
ous and highly corrosive. Be careful not to
spill it on yourself or the car. If you do spill
battery fluid on yourself, immediately do
the following:
OCM055016
Page 351 of 355
10
INDEX
4
Air intake control switch ............................................................1-126
Bi-level heating..........................................................................1-128
Defrosting / Defogging ..............................................................1-133
Fan speed control (Blower control)..........................................1-126
Temperature control.................................................................1-130
High-Mounted Rear Stop Light ......................................................1-112
Hood Release.................................................................................1-115
Horn..............................................................................................1-119
I
Ignition Switch ...................................................................................... 2-5
Instrument Cluster and Indicator Lights...........................................1-62
Instrument Panel Light Control (Rheostat).......................................1-84
Interior Light.......................................................................................1-93
J
Jump Starting...................................................................................... 3-3
K
Keys................................................................................................... 1-3
If you lose your keys ...................................................................3-21
Positions......................................................................................... 2-5
L
Light Bulbs Replacement ..................................................................6-24
Luggage Compartment ..................................................................1-109
Cargo security screen ..............................................................1-109
Luggage Net ..............................................................................1-110
Luggage under tray ...................................................................1-111M
Maintenance Intervals
Explanation of scheduled maintenance items ............................... 5-7
Maintenance under severe usage conditions............................... 5-6
Scheduled maintenance................................................................ 5-4
Service requirements.................................................................... 5-2
Mirrors
Automatic Dimming Rear View Mirror With Compass ................1-99
Day-night inside rearview mirror .................................................1-99
Homelink mirror.........................................................................1-102
Outside rearview mirror ...............................................................1-98
Outside rearview mirror Heater ..................................................1-98
O
Odometer / Trip Odometer ...............................................................1-72
Occupant Classification System ......................................................1-52
P
Parking Brake.................................................................................
1-108
Power Outlet......................................................................................1-86
Power Steering Fluid Level ...............................................................6-23
R
Rear Seat
Adjusting seatback angle .............................................................1-22
Folding rear seatback ..................................................................1-23
Rear Window Defroster Switch ........................................................1-88
Reporting Safety Defects .................................................................8-17
Risk of Rollover................................................................................... 2-3
Roof Rack......................................................................................1-111
Page 353 of 355

10
INDEX
6
Vehicle Specifications
Engine ............................................................................................. 9-3
Lubrication chart............................................................................ 9-4
Dimensions..................................................................................... 9-2
W
Warning and Indicator Lights ............................................................1-64
Windows
Power...........................................................................................1-15
Windshield Wiper and Washer ..........................................................1-79
Rear Window wiper and washer switch......................................1-82
Windshield Wiper Blade De-icer .......................................................1-83
Windshield Wiper Blades.................................................................... 6-9
Winter Driving....................................................................................2-24