Page 246 of 355
2
DRIVING YOUR HYUNDAI
35
C190F03JMTotal
1400 lbs
(635 kg)
860 lbs
(390 kg)
540 lbs
(245 kg) Item
A
B
CDescription
Vehicle Capacity Weight
Subtract Occupant Weight
172 lbs (78 kg) x 5
Available Cargo Weight
Example 3
ABC
Refer to your vehicle's tire and loading
information label for specific informa-
tion about your vehicle's capacity weight
and seating positions. The combined
weight of the driver, passengers and
cargo should never exceed your
vehicle's capacity weight.
C190G03JM-AATCompliance Label
The compliance label is located on the
driver's side of the center piller outer
panel.
The label shows the maximum allow-
able weight of the fully loaded vehicle.
This is called the GVWR (Gross Ve-
hicle Weight Rating). The GVWR in-
cludes the weight of the vehicle, all
occupants, fuel and cargo.
C190G01JM
Page 248 of 355
2
DRIVING YOUR HYUNDAI
37
NOTE:
o Overloading your vehicle may
cause damage. Repairs would not
be covered by your warranty. Do
not overload your vehicle.
o Using heavier suspension com-
ponents to get added durability
might not change your weight rat-
ings. Ask your dealer to help you
load your vehicle the right way.
The label will help you decide how much
cargo and installed equipment your ve-
hicle can carry.
If you carry items inside your vehicle –
like suitcases, tools, packages, or any-
thing else – they move as fast as the
vehicle goes. If you have to stop or turn
quickly, or if there is a crash, the items
will keep going and can cause an injury
if they strikes the driver or a passenger.
!
WARNING:
Items you carry inside your vehicle
can strike and injure people in a
sudden stop or turn, or in a crash.
o Put things in the cargo area of
your vehicle. Try to spread the
weight evenly.
o Never stack items, like suitcases,
inside the vehicle above the tops
of the seats.
o Do not leave an unsecured child
restraint in your vehicle.
o When you carry something inside
the vehicle, secure it.
o Do not drive with a seat folded
down unless necessary.
Page 261 of 355
3
WHAT TO DO IN AN EMERGENCY
13
D060D01A-AAT3. Loosen Wheel Nuts
The wheel nuts should be loosened
slightly before raising the car. To loosen
the nuts, turn the wrench handle coun-
terclockwise. When doing this, be sure
that the socket is seated completely
over the nut so it cannot slip off. For
maximum leverage, position the wrench
so the handle is to the left as shown in
the drawing. Then, while holding the
wrench near the end of the handle, push
down on it with steady pressure. Do not
remove the nuts at this time. Just
loosen them about one-half turn.
OCM054011
D060C02A-AAT2. Block the Wheel
Block the wheel that is diagonally oppo-
site from the flat to keep the vehicle
from rolling when the vehicle is raised
on the jack.
1VQA4023Flat tire
Remove the spare tire and remove the
jack and tool bag from the luggage
compartment.
NOTE:
The spare tire is located underneath
the car.D060B02O-AAT1. Obtain Spare Tire and Tool
OCM054008
Cmhma-3.p653/20/2006, 5:02 PM 13
Page 264 of 355
316
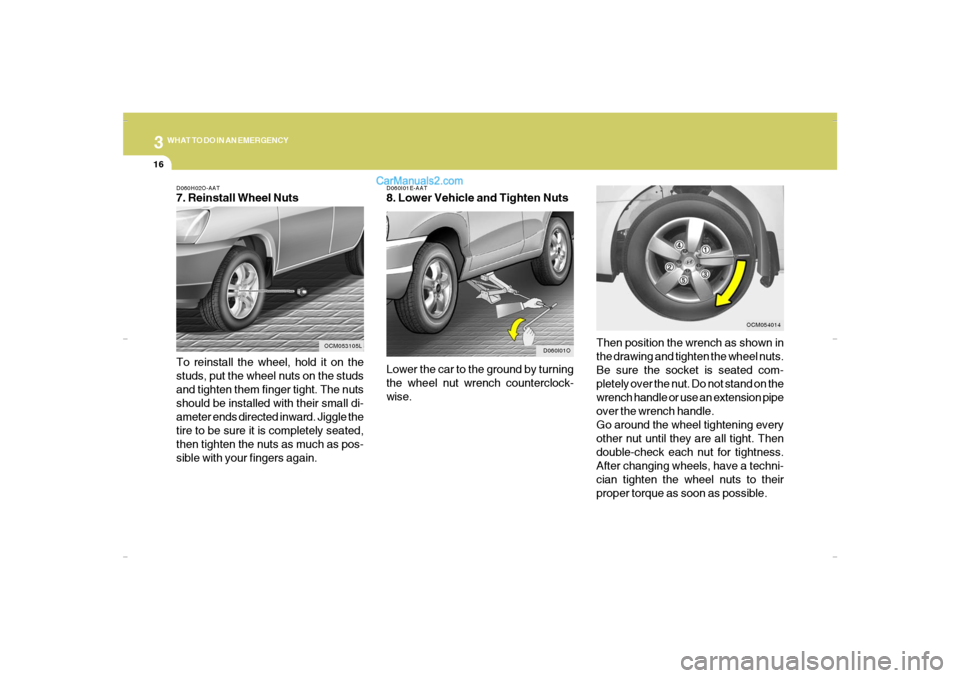
WHAT TO DO IN AN EMERGENCYD060H02O-AAT7. Reinstall Wheel Nuts
To reinstall the wheel, hold it on the
studs, put the wheel nuts on the studs
and tighten them finger tight. The nuts
should be installed with their small di-
ameter ends directed inward. Jiggle the
tire to be sure it is completely seated,
then tighten the nuts as much as pos-
sible with your fingers again.
OCM053105LD060I01E-AAT
8. Lower Vehicle and Tighten Nuts
Lower the car to the ground by turning
the wheel nut wrench counterclock-
wise.
D060I01O
Then position the wrench as shown in
the drawing and tighten the wheel nuts.
Be sure the socket is seated com-
pletely over the nut. Do not stand on the
wrench handle or use an extension pipe
over the wrench handle.
Go around the wheel tightening every
other nut until they are all tight. Then
double-check each nut for tightness.
After changing wheels, have a techni-
cian tighten the wheel nuts to their
proper torque as soon as possible.
OCM054014
Cmhma-3.p653/20/2006, 5:03 PM 16
Page 275 of 355
4
CORROSION PREVENTION AND APPEARANCE CARE6
E040D01A-AATCleaning the Seat BeltsTo clean the seat belts, use a cloth or
sponge with mild soap or detergent and
warm water. Do not use strong detergents,
dye, bleach or abrasive materials on the
seat belts as this may weaken the fabric.
While cleaning the belts, inspect them for
excessive wear, cuts, fraying or other signs
of damage and replace them if necessary.E040C01A-AATCleaning the CarpetsUse a foam-type carpet cleaner. Cleaners
of this type are available in aerosol cans in
liquid form or powder. Read the instruc-
tions and follow them exactly. Using a
vacuum cleaner with the appropriate at-
tachment, remove as much dirt from the
carpets as possible. Apply the foam follow-
ing the manufacturer's directions, then rub
in overlapping circles. Do not add water.
These cleaners work best when the carpet
is kept as dry as possible.
E040B01A-AATTo Clean the Leather Upholstery
(If installed)In the normal course of use, leather uphol-
stered surfaces will, like any material, pick-
up dust and dirt. This dust and dirt must be
cleaned off or it may work into the surface
of the leather, causing damage.
Fine leather needs care, and should be
cleaned when necessary. Washing leather
thoroughly with soap and water will keep
your leather lustrous, beautiful and ensure
you have many years of wear.
Take a piece of cheese cloth and using any
mild soap and lukewarm water, work up a
good lather. Thoroughly wash the leather.
Wipe clean with a slightly damp cloth and
dry with soft cloth. Do this as often as the
leather becomes soiled.
During tanning operations, sufficient oils
are incorporated through processing that
none need be applied during the life of the
leather. Oil applied to the finished surface
will in no way help the leather and may do
more harm than good. Varnishes and fur-
niture polishes should never be used un-
der any conditions.
CLEANING THE INTERIORE040A01A-AATCleaning the upholstery and interior
trimVinyl
Remove dust and loose dirt from vinyl with
a whisk broom or vacuum cleaner. Clean
vinyl surfaces with a vinyl cleaner.
Fabric
Remove dust and loose dirt from fabric
with a whisk broom or vacuum cleaner.
Clean with a mild soap solution recom-
mended for upholstery or carpets. Re-
move fresh spots immediately with a fabric
spot cleaner. If fresh spots do not receive
immediate attention, the fabric can be
stained and its color can be affected. Also,
its fire-resistant properties can be reduced
if the material is not properly maintained.
CAUTION:
Using anything but recommended clean-
ers and procedures may affect the
fabric’s appearance and fire-resistant
properties.
!
Page 290 of 355
6
DO-IT-YOURSELF MAINTENANCE
4
GENERAL CHECKS
G020C01A-AATVehicle InteriorThe following should be checked each
time when the vehicle is driven:
o Lights operation
o Windshield wiper operation
o Horn operation
o Defroster, heating system operation
(and air conditioning, if installed)
o Steering operation and condition
o Mirror condition and operation
o Turn signal operation
o Accelerator pedal operation
o Brake operation, including parking
brake
o Manual transaxle operation, including
clutch operation
o Automatic transaxle operation, includ-
ing "Park" mechanism operation
o Seat control condition and operation
o Seat belt condition and operation
o Sunvisor operation
If you notice anything that does not operate
correctly or appears to be functioning cor-
rectly, inspect it carefully and seek assis-
tance from your Hyundai dealer if service
is needed.
G020B01A-AATVehicle ExteriorThe following should be checked monthly:
o Overall appearance and condition
o Wheel condition and wheel nut torque
o Exhaust system condition
o Light condition and operation
o Windshield glass condition
o Wiper blade condition
o Paint condition and body corrosion
o Fluid leaks
o Door and hood lock condition
o Tire pressure and condition
(including spare tire)
G020A01A-AATEngine CompartmentThe following should be checked regu-
larly:
o Engine oil level and condition
o Transaxle fluid level and condition
o Brake fluid level
o Clutch fluid level
o Engine coolant level
o Windshield washer fluid level
o Accessory drive belt condition
o Engine coolant hose condition
o Fluid leaks (on or below components)
o Power steering fluid level
o Battery condition
o Air filter condition
Page 320 of 355

6
DO-IT-YOURSELF MAINTENANCE
34
G200E01CM-AATInner Panel
OCM055024N
FUSE RATING
15A
25A
15A
10A
15A
10A
10A
10A
30A
10A
15A
10A
10A
10A
10A
10A
10ACIRCUIT PROTECTED
CIGARETTE LIGHTER
FRONT POWER OUTLET, REAR POWER OUTLET
CENTER POWER OUTLET
POWER OUTSIDE MIRROR SWITCH, AUDIO, ATM KEY LOCK CONTROL MODULE,
DIGITAL CLOCK
MULTIFUNCTION SWITCH, REAR WIPER CONTROL MODULE,REAR WIPER
MOTOR
RAIN SENSOR
RHEOSTAT, BCM, INSTRUMENT CLUSTER
A/C CONTROL MODULE, INCAR & HUMIDITY SENSOR, HIGH BLOWER RELAY,
REAR A/CON SWITCH, ICM RELAY BOX, AQS SENSOR, SUNROOF MOTOR,
BLOWER BELAY, ELECTRO CHROMIC MIRROR
BLOWER RELAY, BLOWER MOTOR, A/C CONTROL MODULE
A/C CONTROL MODULE
SRS CONTROL MODULE
PAB ON/OFF SWITCH, INSTRUMENT CLUSTER
HAZARD SWITCH
MULTIFUNTION SWITCH, STEERING ANGLE SENSOR, ESC SWITCH, ATM KEY
LOCK CONTROL MODULE SEAT WARMER MODULE
OIL LEVEL SENSOR MODULE, BCM
INSTRUMENT CLUSTER, PRE-EXCITATION RESISTOR, BCM, GENERATOR, SEMI
ACTIVE CONTROL MODULE (GASOLINE)
BURGLAR ALARM RELAY
C/LIGHTER
P/OUTLET
P/OUTLET
CTR
AUDIO #2
RR WIPER
IMS
BCM #2
A/CON 2
BLOWER
A/CON 1
A/BAG #1
A/BAG IND
T/SIG
ATM LOCK
BCM #1
CLUSTER
STARTFUSE
Page 321 of 355
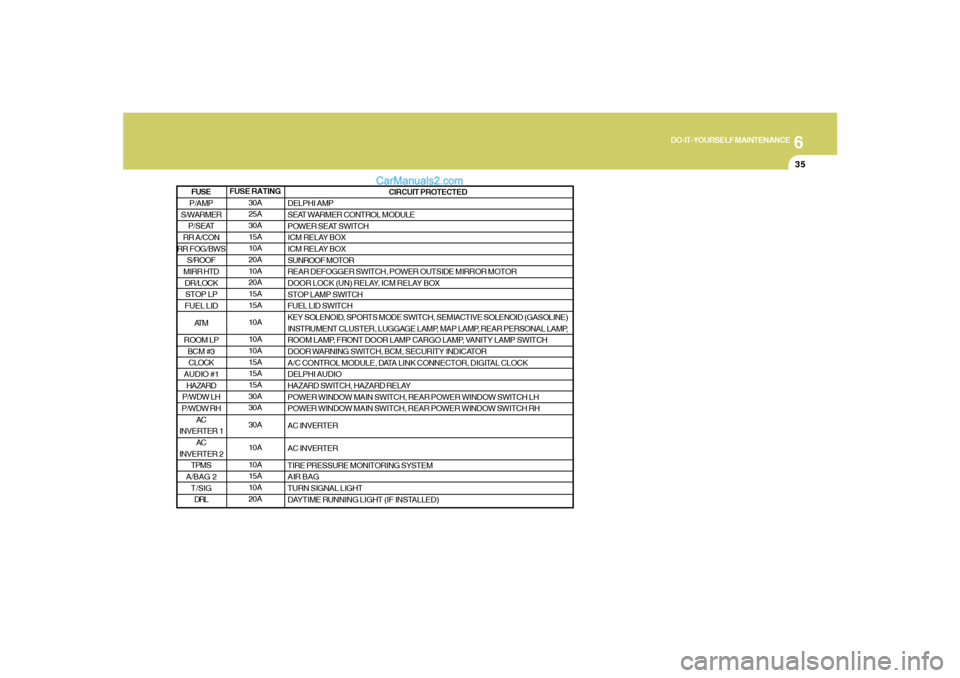
6
DO-IT-YOURSELF MAINTENANCE
35
FUSE RATING
30A
25A
30A
15A
10A
20A
10A
20A
15A
15A
10A
10A
10A
15A
15A
15A
30A
30A
30A
10A
10A
15A
10A
20ACIRCUIT PROTECTED
DELPHI AMP
SEAT WARMER CONTROL MODULE
POWER SEAT SWITCH
ICM RELAY BOX
ICM RELAY BOX
SUNROOF MOTOR
REAR DEFOGGER SWITCH, POWER OUTSIDE MIRROR MOTOR
DOOR LOCK (UN) RELAY, ICM RELAY BOX
STOP LAMP SWITCH
FUEL LID SWITCH
KEY SOLENOID, SPORTS MODE SWITCH, SEMIACTIVE SOLENOID (GASOLINE)
INSTRUMENT CLUSTER, LUGGAGE LAMP, MAP LAMP, REAR PERSONAL LAMP,
ROOM LAMP, FRONT DOOR LAMP CARGO LAMP, VANITY LAMP SWITCH
DOOR WARNING SWITCH, BCM, SECURITY INDICATOR
A/C CONTROL MODULE, DATA LINK CONNECTOR, DIGITAL CLOCK
DELPHI AUDIO
HAZARD SWITCH, HAZARD RELAY
POWER WINDOW MAIN SWITCH, REAR POWER WINDOW SWITCH LH
POWER WINDOW MAIN SWITCH, REAR POWER WINDOW SWITCH RH
AC INVERTER
AC INVERTER
TIRE PRESSURE MONITORING SYSTEM
AIR BAG
TURN SIGNAL LIGHT
DAYTIME RUNNING LIGHT (IF INSTALLED)
P/AMP
S/WARMER
P/SEAT
RR A/CON
RR FOG/BWS
S/ROOF
MIRR HTD
DR/LOCK
STOP LP
FUEL LID
AT M
ROOM LP
BCM #3
CLOCK
AUDIO #1
HAZARD
P/WDW LH
P/WDW RH
AC
INVERTER 1
AC
INVERTER 2
TPMS
A/BAG 2
T/SIG
DRLFUSE