Page 241 of 355

2
DRIVING YOUR HYUNDAI
30
C190F01CM-AATTrailer or Vehicle Towing Tips1. Before towing, check hitch and safety
chain connections as well as proper
operation of the trailer running lights,
brake lights, and turn signals.
2. Trailer towing requires more fuel than
normal conditions.
3. To maintain engine braking efficiency,
do not tow a trailer with the transaxle in
fifth gear (manual transaxle).
4. Always secure items in the trailer to
prevent load shift while driving.
5. Check the condition and air pressure of
all tires on the trailer and your car. Low
tire pressure can seriously affect the
handling. Also check the spare tire.
6. The vehicle/trailer combination is more
affected by crosswind and buffeting.
When being passed by a large vehicle,
keep a constant speed and steer straight
ahead. If there is too much wind buffet-
ing, slow down to get out of the other
vehicle's air turbulence.7. When parking your car and trailer, es-
pecially on a hill, be sure to follow all the
normal precautions. Turn your front
wheel into the curb, set the parking
brake firmly, and put the transaxle in 1st
or Reverse (manual) or Park (automatic).
In addition, place wheel chocks at each
of the trailer's tires.
8. If the trailer has electric brakes, start
your vehicle and trailer moving, and
then apply the trailer brake controller by
hand to be sure the brakes are working.
This lets you check your electrical con-
nection at the same time.
9. During your trip, check occasionally to
be sure that the load is secure, and that
the lights and any trailer brakes are still
working.
10. Avoid jerky starts, sudden accelera-
tion or sudden stops.
11. Avoid sharp turns and rapid lane
changes.
12. Avoid holding the brake pedal down
too long or too frequently. This could
cause the brakes to overheat, resulting
in reduced braking efficiency.
!
WARNING:
o Improperly loading your vehicle and
trailer can seriously affect its steer-
ing and braking performance causing
a crash which could cause serious
injury or death.
o Towing a trailer affects vehicle han-
dling and braking.
o Drive more slowly when towing a trailer
and allow more distance when brak-
ing.
o Be careful when driving in slippery
and windy conditions.
o Be careful when turning and while
driving up and down hills.
Page 242 of 355

2
DRIVING YOUR HYUNDAI
31
TRAILER CONNECTOR
CAUTION:
If overheating should occur when tow-
ing, (the temperature gauge reads near
the red zone), taking the following ac-
tions may reduce or eliminate the prob-
lem.
1. Turn off the air conditioner.
2. Reduce highway speed.
3. Select a lower gear when going uphill.
4. When stopping, place the gear selec-
tor in park or neutral and idle the
engine at a higher speed.
!
13. When going down a hill, shift into a
lower gear and use the engine braking
effect.
When ascending a long grade, down-
shift the transaxle to a lower gear and
reduce speed to reduce chances of
engine overloading and/or overheat-
ing.
14. If you have to stop while going uphill,
do not hold the vehicle in place by
pressing on the accelerator. This can
cause the automatic transaxle to over-
heat. Use the parking brake or
footbrake.
15.If the transaxle shifts frequently while
going up a hill, shift down one gear.NOTE:When towing check transaxle fluid more
frequently.
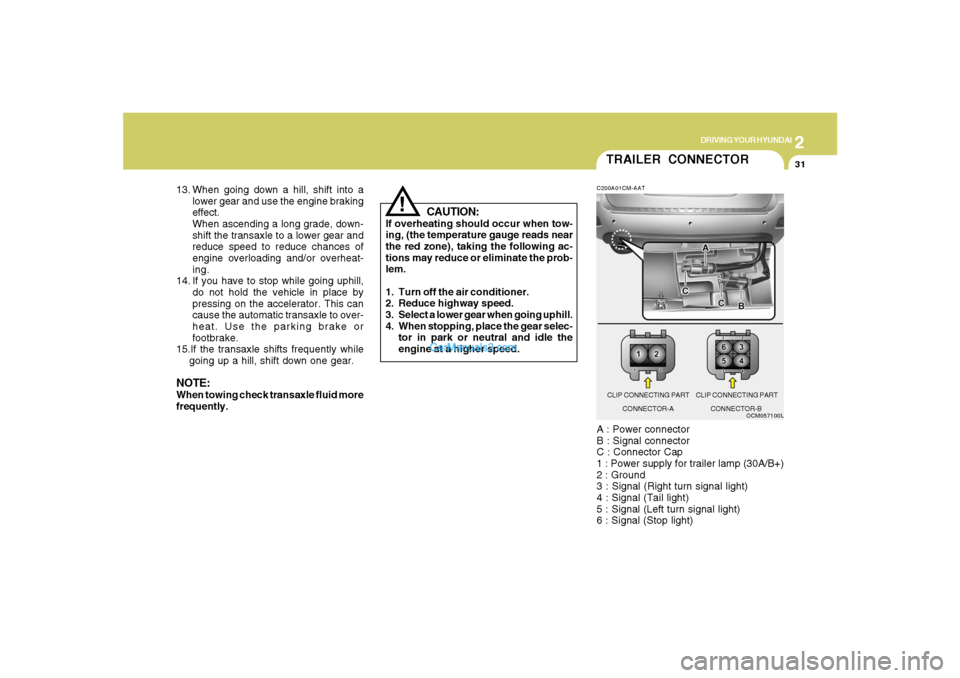
OCM057100L C200A01CM-AAT
A : Power connector
B : Signal connector
C : Connector Cap
1 : Power supply for trailer lamp (30A/B+)
2 : Ground
3 : Signal (Right turn signal light)
4 : Signal (Tail light)
5 : Signal (Left turn signal light)
6 : Signal (Stop light)CLIP CONNECTING PART CLIP CONNECTING PART
CONNECTOR-A CONNECTOR-B
Page 290 of 355

6
DO-IT-YOURSELF MAINTENANCE
4
GENERAL CHECKS
G020C01A-AATVehicle InteriorThe following should be checked each
time when the vehicle is driven:
o Lights operation
o Windshield wiper operation
o Horn operation
o Defroster, heating system operation
(and air conditioning, if installed)
o Steering operation and condition
o Mirror condition and operation
o Turn signal operation
o Accelerator pedal operation
o Brake operation, including parking
brake
o Manual transaxle operation, including
clutch operation
o Automatic transaxle operation, includ-
ing "Park" mechanism operation
o Seat control condition and operation
o Seat belt condition and operation
o Sunvisor operation
If you notice anything that does not operate
correctly or appears to be functioning cor-
rectly, inspect it carefully and seek assis-
tance from your Hyundai dealer if service
is needed.
G020B01A-AATVehicle ExteriorThe following should be checked monthly:
o Overall appearance and condition
o Wheel condition and wheel nut torque
o Exhaust system condition
o Light condition and operation
o Windshield glass condition
o Wiper blade condition
o Paint condition and body corrosion
o Fluid leaks
o Door and hood lock condition
o Tire pressure and condition
(including spare tire)
G020A01A-AATEngine CompartmentThe following should be checked regu-
larly:
o Engine oil level and condition
o Transaxle fluid level and condition
o Brake fluid level
o Clutch fluid level
o Engine coolant level
o Windshield washer fluid level
o Accessory drive belt condition
o Engine coolant hose condition
o Fluid leaks (on or below components)
o Power steering fluid level
o Battery condition
o Air filter condition
Page 310 of 355

6
DO-IT-YOURSELF MAINTENANCE
24
REPLACEMENT OF LIGHT
BULBSG260A01CM-AATBefore attempting to replace a light bulb,
be sure the switch is turned to the "OFF"
position.
The next paragraph shows how to reach
the light bulbs so they may be changed. Be
sure to replace the burned-out bulb with
one of the same number and wattage
rating.
CAUTION:
o Keep the lamps out of contact with
petroleum products, such as oil, gaso-
line, etc.
o After heavy, driving rain or washing,
headlight and taillight lenses could
appear frosty. This condition is
caused by the temperature difference
between the lamp inside and outside.
This is similar to the condensation on
your windows inside your vehicle
during the rain and doesn’t indicate a
problem with your vehicle. If the water
leaks into the lamp bulb circuitry, have
the vehicle checked by an Authorized
Hyundai Dealer.
!
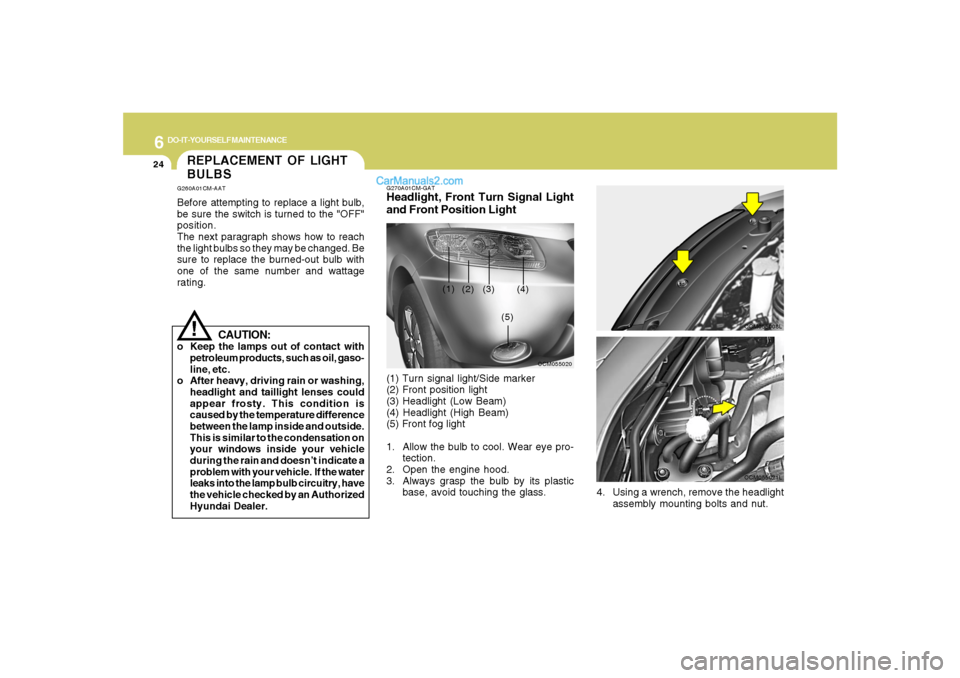
G270A01CM-GATHeadlight, Front Turn Signal Light
and Front Position Light(1) Turn signal light/Side marker
(2) Front position light
(3) Headlight (Low Beam)
(4) Headlight (High Beam)
(5) Front fog light
1. Allow the bulb to cool. Wear eye pro-
tection.
2. Open the engine hood.
3. Always grasp the bulb by its plastic
base, avoid touching the glass.
OCM055020
(1)
(2) (3) (4)
(5)
OCM055008L
4. Using a wrench, remove the headlight
assembly mounting bolts and nut.
OCM055021L
Page 311 of 355
6
DO-IT-YOURSELF MAINTENANCE
25
8. Push the bulb spring to remove the
headlight bulb. 7. Disconnect the connector from the bulb
base in the back of the headlight.
OCM055011LOCM055012L
5. Disconnect the wire harness from the
bulb base in the back of the headlight.
6. Turn the plastic cover counterclock-
wise and remove it.
OCM055010L OCM055009L
9. Remove the protective cap from the
replacement bulb and install the new
bulb by matching the plastic base with
the headlight hole. Reattach the bulb
spring and reconnect the connector.
10. Use the protective cap and carton to
promptly dispose of the old bulb.
11. Check for proper headlight aim.
OCM055014L
12. To replace the front turn signal light
bulb or the front position light bulb, take
it out from the bulb holder and install
the new bulb.
Page 312 of 355
6
DO-IT-YOURSELF MAINTENANCE
26
!
WARNING:
This halogen bulb contains gas under
pressure and if impacted could shatter,
resulting in flying fragments. Always
wear eye protection when servicing the
bulb. Protect the bulb against abrasions
or scratches and against liquids when
lighted. Turn the bulb on only when in-
stalling in a headlight. Replace the head-
light if damaged or cracked. Keep the
bulb out of the reach of children and
dispose of the used bulb with care.
G270A03OG270K01CM-GAT
Front Fog Light (If Installed)
NOTE:It is recommended that the front fog light
bulb be replaced by an authorized
Hyundai dealer.
G270B01CM-AATRear Combination Light
OCM055022
(3)
(1)(2)
(1)Stop/Tail light
(2)Back-up light
(3)Turn signal light/Side marker
1. Open the tail gate.
Page 313 of 355
6
DO-IT-YOURSELF MAINTENANCE
27
2. Remove the cover with a flat-head
screwdriver.
3. Remove the mounting screws of the
rear combination light as shown in the
photo.
OCM055026
OCM055028
OCM055030
(1)
(1) (2)(3)
G270I01CM-GATHigh Mounted Rear Stop Light
(If Installed)
NOTE:It is recommended that the High-Mounted
Rear Stop Light be replaced by an autho-
rized Hyundai Dealer.
OCM055027
(1) Stop/Tail light
(2) Back-up light
(3) Turn signal light/Side marker4. To replace the rear combination light,
take it out from the bulb holder by
turning it counterclockwise.
5. Install the new bulb.
OCM052016
Page 317 of 355
6
DO-IT-YOURSELF MAINTENANCE
31
BULB WATTAGE
Socket Type
S8.5/8.5
PX26D
BAY15D
W2.1 x 9.5D
S8.5/8.5
PG13
W2.1 x 9.5D
W2.1 x 4.6D9
10
11
12Luggage Compartment Light
High Mounted Rear Stop Light (If installed)
Rear Combination Light
Turn Signal Light
Stop/Tail Light
Back-up Light
License Plate Light No.
1
2
3
4
5
6
7
8
Part Name
Glove Box Light
Headlight (Low/High)
Turn Signal Light/Side Marker
Map Light
Interior Light
Front Fog Light (If installed)
Front Position Light
Front Door Edge Warning LightWattage
5
55
27
10
10
27
5
5
G280A01CM-AAT
Wattage No.
OCM055025M
10
16
27
27/8
16
5
Socket Type
Part Name
S8.5/8.5
W2.1 x 9.5D
BAU15s
BAY15D
W2.1 x 9.5D
W2.1 x 9.5D