2007 Hyundai H-1 (Grand Starex) Engine coolant replacement
[x] Cancel search: Engine coolant replacementPage 15 of 284

1
BEFORE DRIVING YOUR VEHICLE
3BEFORE DRIVING YOUR VEHICLE SAFETY CHECKS
!
B010A01P-GAT Be sure you know your vehicle and its equipment and how to use it safely. B010B01P-GAT Before entering the vehicle
o Check that windows, mirrors and
lights are clean.
o Check if any tire is low or flat.
o Look for fluid leaks.
o Check that area is clear if you're about to back up.
B010C03P-GAT After entering the vehicle
o Lock all doors.
o The driver and passengers are wear- ing properly adjusted seat belts.
o The head restraints are properly adjusted, if so equipped.
o Adjust inside and outside mirrors.
o Check warning lights for correct
operation, with the ignition key in the position "ON".
o Check all gauges, for normal opera- tion. WARNING: (Diesel only)
To ensure that sufficient vacuum exists within the brake system dur-ing cold weather start-up condi- tions, it is necessary to run the engine at idle after starting the en-gine. NOTE: Fluid levels, such as engine oil, engine coolant, brake fluid, and windshield washer fluid, should be checked daily and/or weekly, orwhenever you refuel. Further details are described in the "CONSUMER INFORMATION" sec-tion.
Biodiesel Commercially supplied biodiesel blends of no more than 5% biodiesel, com- monly known as "B5 biodiesel" may beused in your vehicle if it meets EN 14214 or equivalent specifications. (EN stands for "European Norm"). The useof biofuels made from rapeseed methyl ester (RME), fatty acid methyl ester (FAME), vegetable oil methyl ester(VME) etc. or mixing diesel with biodiesel will cause increased wear or damage to the engine and fuel system.Repair or replacement of worn or dam- aged components due to the use of non approved fuels will not be covered bythe manufactures warranty.
CAUTION:
o Never use any fuel, whether diesel or B5 biodiesel that fails to meetthe latest petroleum industry speci-fication.
o Never use any fuel additives or
treatments that are not recom-mended or approved by the ve- hicle manufacturer.
!
Page 205 of 284

4
CORROSION PREVENTION AND APPEARANCE CARE
29
4
IN CASE OF EMERGENCY
29
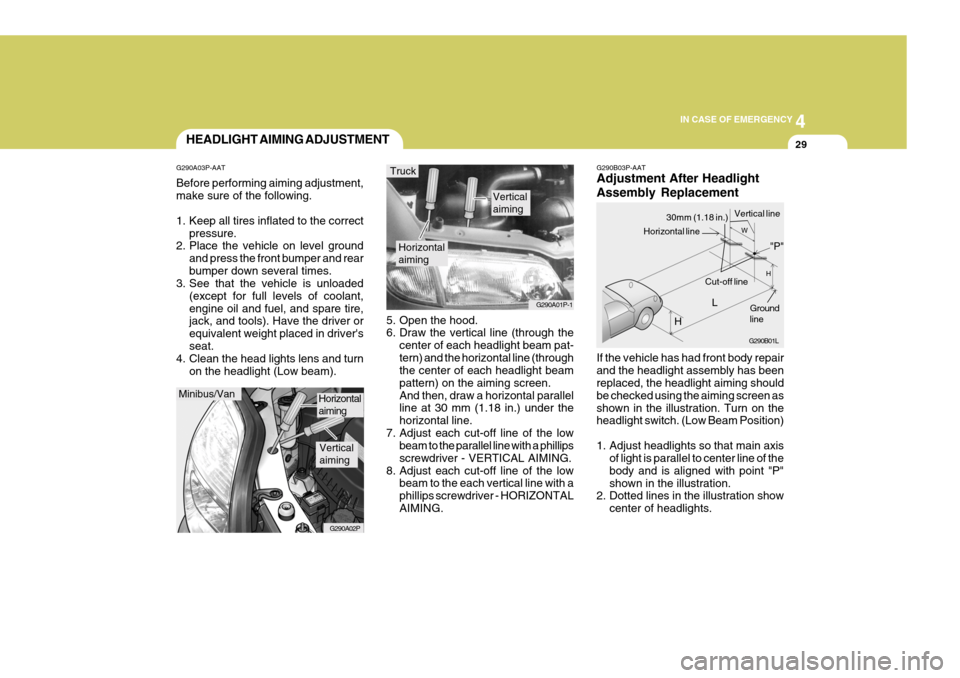
G290B03P-AAT Adjustment After Headlight Assembly Replacement If the vehicle has had front body repair and the headlight assembly has been replaced, the headlight aiming should be checked using the aiming screen asshown in the illustration. Turn on the headlight switch. (Low Beam Position)
1. Adjust headlights so that main axis
of light is parallel to center line of the body and is aligned with point "P"shown in the illustration.
2. Dotted lines in the illustration show
center of headlights.
5. Open the hood.
6. Draw the vertical line (through the
center of each headlight beam pat- tern) and the horizontal line (through the center of each headlight beam pattern) on the aiming screen.And then, draw a horizontal parallel line at 30 mm (1.18 in.) under the horizontal line.
7. Adjust each cut-off line of the low beam to the parallel line with a phillipsscrewdriver - VERTICAL AIMING.
8. Adjust each cut-off line of the low beam to the each vertical line with aphillips screwdriver - HORIZONTALAIMING.
Horizontal aiming
Verticalaiming
G290A01P-1
Truck
G290B01L
LW
H
H Cut-off line
Ground line
"P"
Horizontal line
30mm (1.18 in.) Vertical line
HEADLIGHT AIMING ADJUSTMENT
G290A03P-AAT Before performing aiming adjustment, make sure of the following.
1. Keep all tires inflated to the correct pressure.
2. Place the vehicle on level ground
and press the front bumper and rear bumper down several times.
3. See that the vehicle is unloaded
(except for full levels of coolant,engine oil and fuel, and spare tire, jack, and tools). Have the driver or equivalent weight placed in driver'sseat.
4. Clean the head lights lens and turn
on the headlight (Low beam).
Minibus/Van
G290A02P
Horizontal aiming
Verticalaiming
Page 228 of 284

6VEHICLE MAINTENANCE REQUIREMENTS
2MAINTENANCE INTERVALS
F010C01A-GAT
Specified Scheduled Procedures
These are the procedures such as
inspections, adjustments and replace- ments that are listed in the mainte-nance charts starting on page 6-4. These procedures must be performed at the intervals shown in the mainte-nance schedule to assure that your warranty remains in effect. Although it is strongly recommended that they beperformed by the factory-trained or distributor-trained technicians at your Hyundai dealer, these procedures maybe performed at any qualified service facility. F010D01P-AAT
General Checks
These are the regular checks you should perform when you drive your Hyundai or you fill the fuel tank. A list of these items will be found on page8-6.
F010A01A-GAT Service Requirements To assure that you receive the great- est number of kilometers of satisfying operation from your Hyundai, certain maintenance procedures must be per-formed. Although careful design and engineering have reduced these to a minimum, those that are required areof the utmost importance.It is your responsibility to have thesemaintenance procedures performed to comply with the terms of the warran- ties covering your new Hyundai. TheService Passport supplied with your new vehicle provides further informa- tion about these warranties.
F010B01A-AAT
Maintenance Requirements
The maintenance required for your
Hyundai can be divided into three main areas: o Specified scheduled procedures o General checks o Do-it-yourself maintenance It is suggested that genuine Hyundai
service parts be used for any requiredrepairs or replacements. Other parts of equivalent quality such as engine oil, engine coolant, manual or autotransaxle oil, brake fluid and so on which are not supplied by Hyundai Motor Company or its distributor maybe used without affecting your war- ranty coverage but you should always be sure these are equivalent to thequality of the original Hyundai parts. Your Service Passport provides fur- ther information about your warrantycoverage.
Page 239 of 284

6
VEHICLE MAINTENANCE REQUIREMENTS
13
G080E01P-GAT
o Vacuum and Crankcase
Ventilation Hoses
Inspect the surface of hoses for evi- dence of heat and/or mechanical dam- age. Hard and brittle rubber, cracking, tears, cuts, abrasions, and excessiveswelling indicate deterioration. Particu- lar attention should be paid to examin- ing those hose surfaces nearest tohigh heat sources, such as the ex- haust manifold. Inspect the hose routing to assure that the hoses do not come in contact with any heat source, sharp edges or mov- ing component which might cause heatdamage or mechanical wear. Inspect all hose connections, such as clamps and couplings, to make sure they aresecure, and that no leaks are present. Hoses should be replaced immedi- ately if there is any evidence of dete-rioration or damage. G080F01P-GAT
o Fuel Hose, Vapor Hose and
Fuel Filler Cap
The fuel hose, vapor hose and fuelfiller cap should be inspected at those intervals specified in the maintenance schedule. Make sure that a new fuelhose, vapor hose or fuel filler cap is correctly replaced. Consult your Hyundai dealer if you have any ques-tions. G080G01P-GAT
o Air Cleaner Filter
A genuine Hyundai part is recom- mended for replacement of the air cleaner filter. G080H01P-GAT
o Spark Plugs (Gasoline) Make sure to install new spark plugs of the correct heat range. G080I01P-GAT
o Drive Belts Inspect all drive belts (water pump and alternator) for evidence of cuts, cracks, excessive wear or oiliness, and re- place if necessary. Drive belts shouldbe checked periodically for proper ten- sion and adjusted as necessary. G080J01P-GAT
o Engine Coolant The coolant should be changed at those intervals specified in the Vehicle Maintenance Requirements Section. G080K01P-GAT
o Timing Belt Inspect all parts related with the timing belt for damage and deformation. Re-place any damaged parts.