2007 Hyundai H-1 (Grand Starex) engine oil
[x] Cancel search: engine oilPage 200 of 284

44IN CASE OF EMERGENCY
24
D010B01A-AAT If Engine Doesn't Turn Over or Turns Over Slowly
1. If your car has an automatic
transaxle, be sure the gear selector lever is in "N" or "P" and the emer-gency brake is set.
2. Check the battery connections to be
sure they are clean and tight.
3. Turn on the interior light. If the light dims or goes out when you operatethe starter, the battery is discharged.
4. Check the starter connections to be sure they are securely tightened.
5. Do not push or pull the vehicle to start it. See instructions for "Jump Starting". D010B02P
D010D01A-AAT If the Engine Stalls While Driving
1. Reduce your speed gradually, keep-ing a straight line. Move cautiously off the road to a safe place.
2. Turn on your emergency flashers.
3. Try to start the engine again. If your
vehicle will not start, contact a Hyundai dealer or seek other quali- fied assistance.
JUMP STARTING
!
HA1FL4001
WARNING:
The gas produced by the battery during the jump-start operation is highly explosive. If these instruc-tions are not followed exactly, seri- ous personal injury and damage to the vehicle may occur! If you arenot sure how to follow this proce- dure, seek qualified assistance. Automobile batteries contain sul-furic acid. This is poisonous and highly corrosive. When jump start- ing, wear protective glasses and becareful not to get acid on yourself, your clothing or on the car. E110A02P-GAT
Discharged battery
Booster battery
D010C02A-AAT If Engine Turns Over Normally but Does Not Start 1. Check fuel level. 2. With the key in the "OFF" position,check all connectors at ignition coils and spark plugs(For Gasoline En- gine) or check all connectors atglow plug and glow plug relay(For Diesel Engine). Reconnect any that may be disconnected or loose.
3. Check fuel line in the engine room. 4. If engine still refuses to start, call a
Hyundai dealer or seek other quali- fied assistance.
Page 205 of 284
4
CORROSION PREVENTION AND APPEARANCE CARE
29
4
IN CASE OF EMERGENCY
29
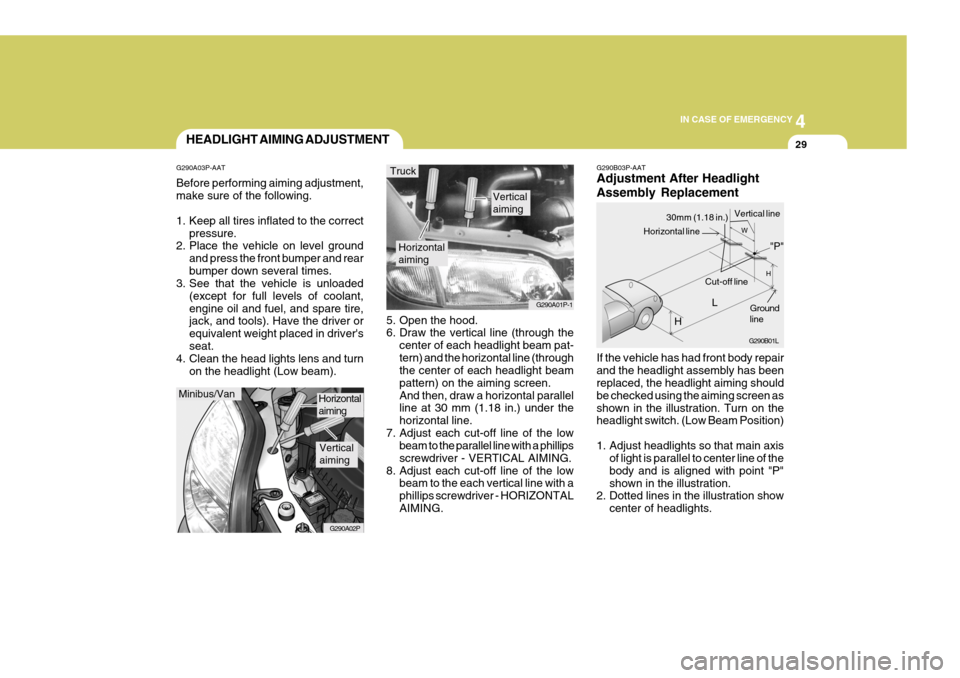
G290B03P-AAT Adjustment After Headlight Assembly Replacement If the vehicle has had front body repair and the headlight assembly has been replaced, the headlight aiming should be checked using the aiming screen asshown in the illustration. Turn on the headlight switch. (Low Beam Position)
1. Adjust headlights so that main axis
of light is parallel to center line of the body and is aligned with point "P"shown in the illustration.
2. Dotted lines in the illustration show
center of headlights.
5. Open the hood.
6. Draw the vertical line (through the
center of each headlight beam pat- tern) and the horizontal line (through the center of each headlight beam pattern) on the aiming screen.And then, draw a horizontal parallel line at 30 mm (1.18 in.) under the horizontal line.
7. Adjust each cut-off line of the low beam to the parallel line with a phillipsscrewdriver - VERTICAL AIMING.
8. Adjust each cut-off line of the low beam to the each vertical line with aphillips screwdriver - HORIZONTALAIMING.
Horizontal aiming
Verticalaiming
G290A01P-1
Truck
G290B01L
LW
H
H Cut-off line
Ground line
"P"
Horizontal line
30mm (1.18 in.) Vertical line
HEADLIGHT AIMING ADJUSTMENT
G290A03P-AAT Before performing aiming adjustment, make sure of the following.
1. Keep all tires inflated to the correct pressure.
2. Place the vehicle on level ground
and press the front bumper and rear bumper down several times.
3. See that the vehicle is unloaded
(except for full levels of coolant,engine oil and fuel, and spare tire, jack, and tools). Have the driver or equivalent weight placed in driver'sseat.
4. Clean the head lights lens and turn
on the headlight (Low beam).
Minibus/Van
G290A02P
Horizontal aiming
Verticalaiming
Page 207 of 284
4
CORROSION PREVENTION AND APPEARANCE CARE
31
4
IN CASE OF EMERGENCY
31
CAUTION:
Keep the lamps out of contact with petroleum products, such as oil,gasoline, etc.
!
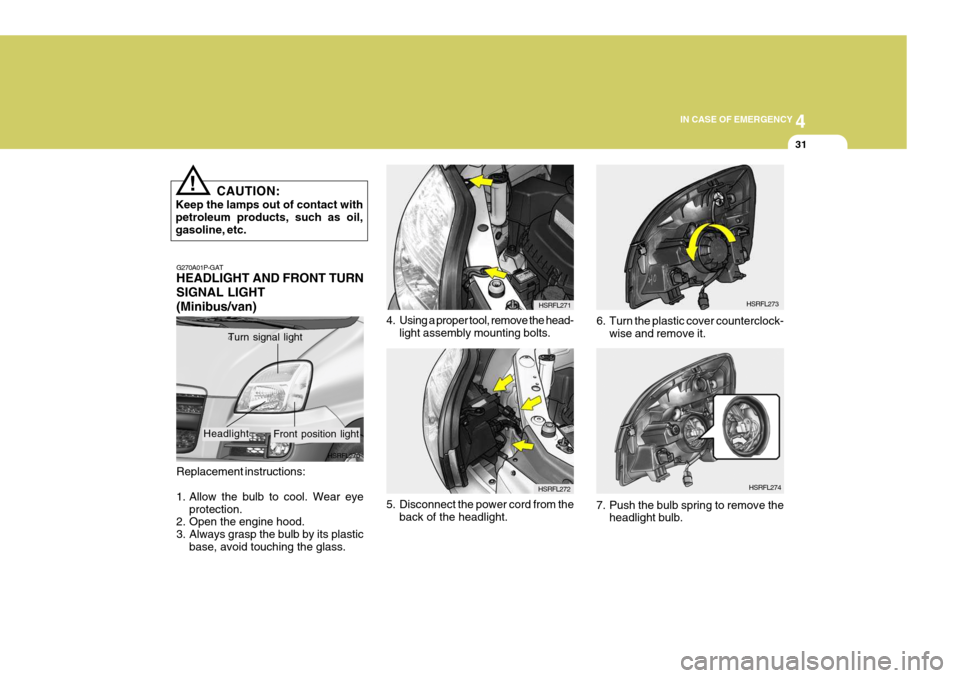
4. Using a proper tool, remove the head- light assembly mounting bolts.
Replacement instructions:
1. Allow the bulb to cool. Wear eye protection.
2. Open the engine hood.
3. Always grasp the bulb by its plastic
base, avoid touching the glass. HSRFL270
G270A01P-GAT HEADLIGHT AND FRONT TURN SIGNAL LIGHT(Minibus/van)
Turn signal light
HSRFL271
Front position light
Headlight
HSRFL274
7. Push the bulb spring to remove the headlight bulb. HSRFL273
6. Turn the plastic cover counterclock- wise and remove it.
HSRFL272
5. Disconnect the power cord from the back of the headlight.
Page 225 of 284
5APPEARANCE CARE
4
F010L01P-GAT
Damaged paint
Small cracks and scratches in the
paint coat should be touched up as soon as possible with HYUNDAI paint pencil or spray paint to prevent corro-sion. Check body areas facing the road or the tires especially carefully for damage to the paint coat caused byflying stones, etc. The paint code num- ber for your vehicle can be found on the vehicle information code plate. F010M01P-GAT
Tar
If tar becomes adhered to the vehicle, use special tar remover to remove it as soon as possible. If the tar leavesa stain, polish the affected area. F010N01P-GAT
Plastic and rubber parts
Use a soft cloth and wash with water.
If necessary, a cleaning agent spe- cially designed for plastics can beused. If engine oil, brake fluid, battery fluid, etc., comes in contact with these parts, wash promptly with water andthen use alcohol to remove the stain completely.
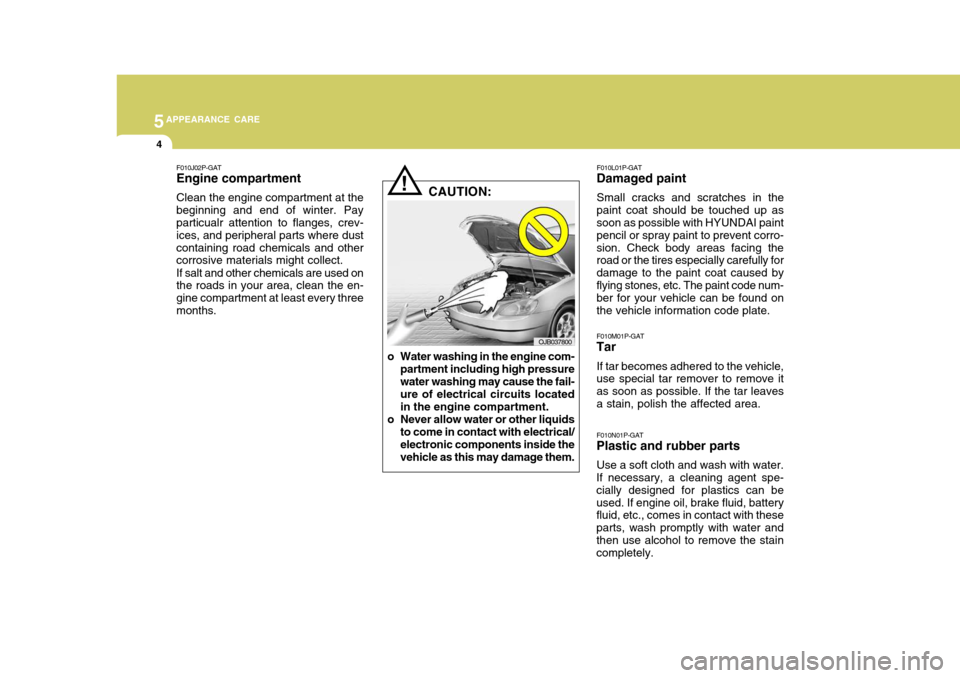
! CAUTION:
o Water washing in the engine com- partment including high pressure water washing may cause the fail- ure of electrical circuits located in the engine compartment.
o Never allow water or other liquids to come in contact with electrical/electronic components inside thevehicle as this may damage them.
OJB037800
F010J02P-GAT Engine compartment Clean the engine compartment at the beginning and end of winter. Pay particualr attention to flanges, crev- ices, and peripheral parts where dustcontaining road chemicals and other corrosive materials might collect. If salt and other chemicals are used on the roads in your area, clean the en- gine compartment at least every threemonths.
Page 228 of 284
6VEHICLE MAINTENANCE REQUIREMENTS
2MAINTENANCE INTERVALS
F010C01A-GAT
Specified Scheduled Procedures
These are the procedures such as
inspections, adjustments and replace- ments that are listed in the mainte-nance charts starting on page 6-4. These procedures must be performed at the intervals shown in the mainte-nance schedule to assure that your warranty remains in effect. Although it is strongly recommended that they beperformed by the factory-trained or distributor-trained technicians at your Hyundai dealer, these procedures maybe performed at any qualified service facility. F010D01P-AAT
General Checks
These are the regular checks you should perform when you drive your Hyundai or you fill the fuel tank. A list of these items will be found on page8-6.
F010A01A-GAT Service Requirements To assure that you receive the great- est number of kilometers of satisfying operation from your Hyundai, certain maintenance procedures must be per-formed. Although careful design and engineering have reduced these to a minimum, those that are required areof the utmost importance.It is your responsibility to have thesemaintenance procedures performed to comply with the terms of the warran- ties covering your new Hyundai. TheService Passport supplied with your new vehicle provides further informa- tion about these warranties.
F010B01A-AAT
Maintenance Requirements
The maintenance required for your
Hyundai can be divided into three main areas: o Specified scheduled procedures o General checks o Do-it-yourself maintenance It is suggested that genuine Hyundai
service parts be used for any requiredrepairs or replacements. Other parts of equivalent quality such as engine oil, engine coolant, manual or autotransaxle oil, brake fluid and so on which are not supplied by Hyundai Motor Company or its distributor maybe used without affecting your war- ranty coverage but you should always be sure these are equivalent to thequality of the original Hyundai parts. Your Service Passport provides fur- ther information about your warrantycoverage.
Page 230 of 284
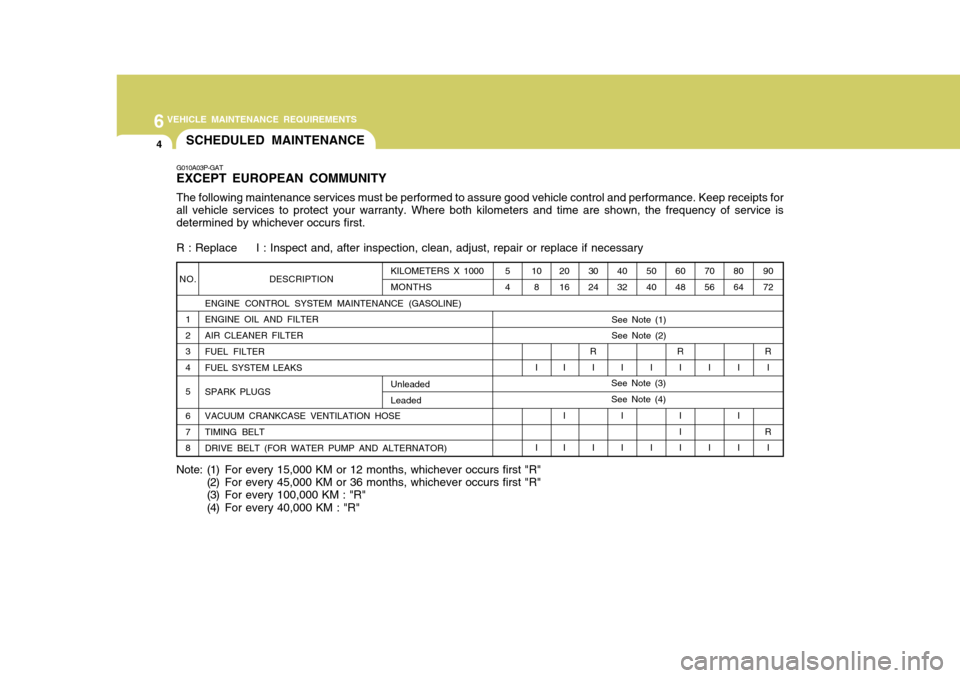
6VEHICLE MAINTENANCE REQUIREMENTS
4
KILOMETERS X 1000 MONTHS
NO.1 2 3 4 5 6 7 8 DESCRIPTION
ENGINE CONTROL SYSTEM MAINTENANCE (GASOLINE)ENGINE OIL AND FILTER AIR CLEANER FILTER FUEL FILTER FUEL SYSTEM LEAKS SPARK PLUGS VACUUM CRANKCASE VENTILATION HOSE TIMING BELT DRIVE BELT (FOR WATER PUMP AND ALTERNATOR)
G010A03P-GAT EXCEPT EUROPEAN COMMUNITY The following maintenance services must be performed to assure good vehicle control and performance. Keep receipts for all vehicle services to protect your warranty. Where both kilometers and time are shown, the frequency of service is determined by whichever occurs first. R : Replace I : Inspect and, after inspection, clean, adjust, repair or replace if necessary80 64
I I I 90 72
R I
R I
7056
I I
60 48
R I I I I
50 40
I I
40 32
I I I
30
24
R I I
20 16
I I I
SCHEDULED MAINTENANCE
108
I I
5 4
See Note (1) See Note (2)
Unleaded LeadedSee Note (3) See Note (4)
Note: (1) For every 15, 000 KM or 12 months, whichever occurs first "R"
(2) For every 45,000 KM or 36 months, whichever occurs first "R"
(3) For every 100,000 KM : "R"
(4) For every 40,000 KM : "R"
Page 231 of 284
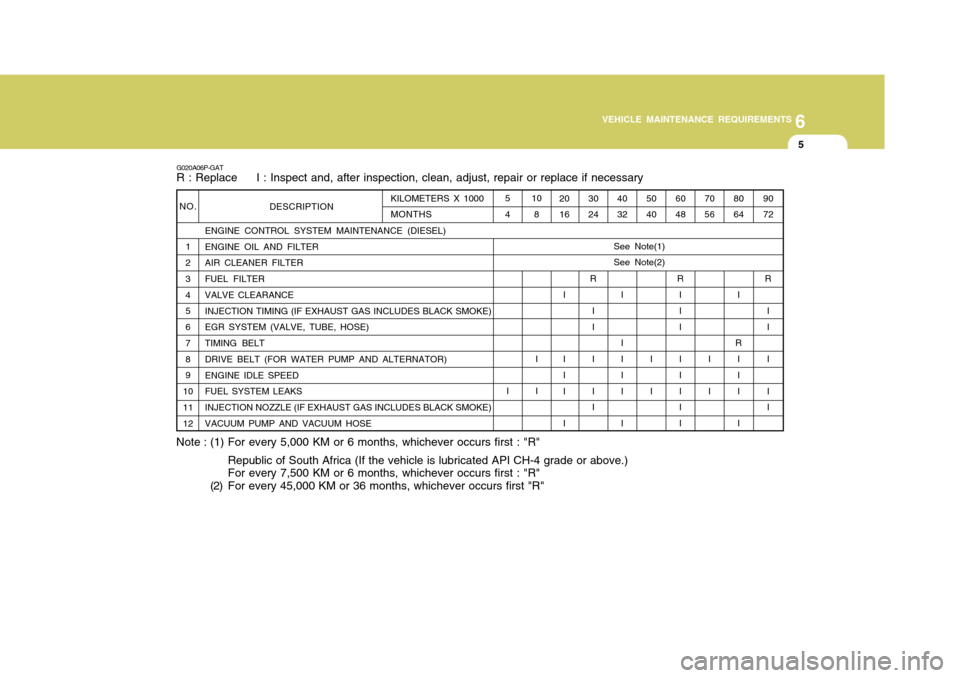
6
VEHICLE MAINTENANCE REQUIREMENTS
5
NO. 1 2 3 4 5 6 7 8 9
1011 12 KILOMETERS X 1000 MONTHS
DESCRIPTION
ENGINE CONTROL SYSTEM MAINTENANCE (DIESEL) ENGINE OIL AND FILTER AIR CLEANER FILTER FUEL FILTER VALVE CLEARANCE INJECTION TIMING (IF EXHAUST GAS INCLUDES BLACK SMOKE) EGR SYSTEM (VALVE, TUBE, HOSE) TIMING BELT DRIVE BELT (FOR WATER PUMP AND ALTERNATOR) ENGINE IDLE SPEED FUEL SYSTEM LEAKS INJECTION NOZZLE (IF EXHAUST GAS INCLUDES BLACK SMOKE) VACUUM PUMP AND VACUUM HOSE
G020A06P-GAT R : Replace I : Inspect and, after inspection, clean, adjust, repair or replace if necessary
80 64
I
R II I I 90 72
R I I II I
7056
I I
60 48
R II I I I I I I
50 40
I I
40 32
I I I I I I
30 24
R I I II I
2016
I I I I I108
I I
5 4
I
See Note(1)
Note : (1) For every 5,000 KM or 6 months, whichever occurs first : "R" Republic of South Africa (If the vehicle is lubricated API CH-4 grade or above.) For every 7,500 KM or 6 months, whichever occurs first : "R"
(2) For every 45,000 KM or 36 months, whichever occurs first "R"
See Note(2)
Page 232 of 284
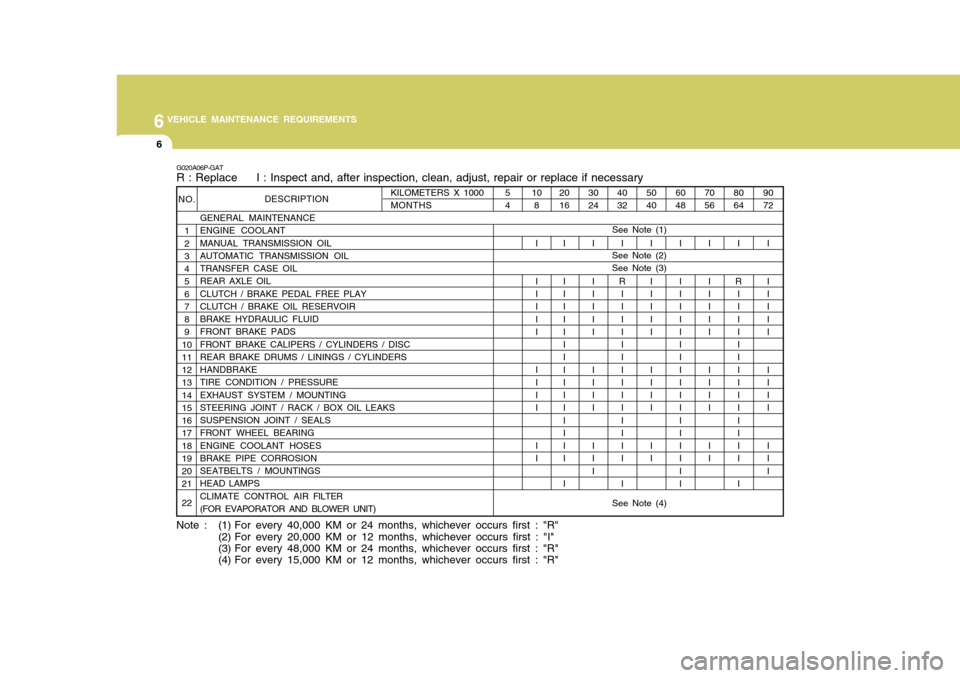
6VEHICLE MAINTENANCE REQUIREMENTS
6
50 40I I I I I I I I I I I I
KILOMETERS X 1000MONTHS
NO.
1 2 3 4 5 6 7 8 9
1011 12 13 14 15 16 17 18 19 20 21 22 DESCRIPTION
GENERAL MAINTENANCE ENGINE COOLANT MANUAL TRANSMISSION OIL AUTOMATIC TRANSMISSION OIL TRANSFER CASE OIL REAR AXLE OIL CLUTCH / BRAKE PEDAL FREE PLAY CLUTCH / BRAKE OIL RESERVOIR BRAKE HYDRAULIC FLUID FRONT BRAKE PADS FRONT BRAKE CALIPERS / CYLINDERS / DISC REAR BRAKE DRUMS / LININGS / CYLINDERS HANDBRAKE TIRE CONDITION / PRESSURE EXHAUST SYSTEM / MOUNTING STEERING JOINT / RACK / BOX OIL LEAKS SUSPENSION JOINT / SEALS FRONT WHEEL BEARING ENGINE COOLANT HOSES BRAKE PIPE CORROSION SEATBELTS / MOUNTINGS HEAD LAMPS CLIMATE CONTROL AIR FILTER
(FOR EVAPORATOR AND BLOWER UNIT)
G020A06P-GAT R : Replace I : Inspect and, after inspection, clean, adjust, repair or replace if necessary
80 64
I
R II I I I I I I I I I I I I I 90 72
I I I I I I I I I I I I I
70 56
I I I I I I I I I I I I
6048
I I I I I I I I I I I I I I I I I I
4032
I
R II I I I I I I I I I I I I I
30 24
I I I I I I I I I I I I I
20 16
I I I I I I I I I I I I I I I I I108
I I I I I I I I I I I I
5 4
See Note (1)
Note : (1) For every 40,000 KM or 24 months, whichever occurs first : "R" (2) For every 20,000 KM or 12 months, whichever occurs first : "I"
(3) For every 48,000 KM or 24 months, whichever occurs first : "R"
(4) For every 15,000 KM or 12 months, whichever occurs first : "R"
See Note (4)
See Note (2) See Note (3)