2007 Hyundai Getz bulb
[x] Cancel search: bulbPage 230 of 463

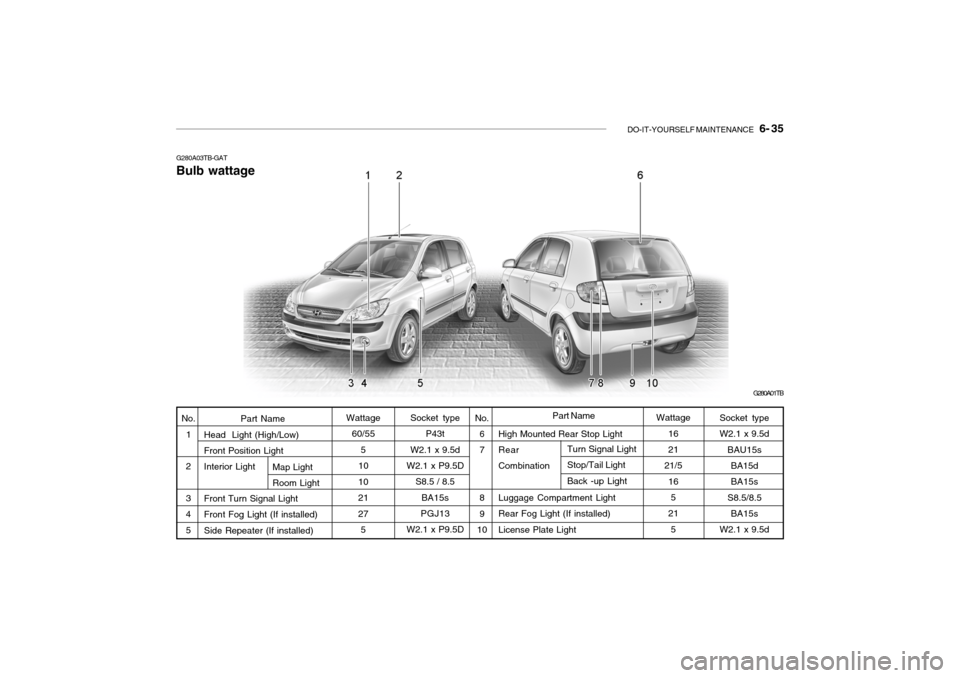
DO-IT-YOURSELF MAINTENANCE 6- 35
Socket type W2.1 x 9.5d
BAU15s
BA15dBA15s
S8.5/8.5
BA15s
W2.1 x 9.5d
Socket type
P43t
W2.1 x 9.5d
W2.1 x P9.5D S8.5 / 8.5
BA15s
PGJ13
W2.1 x P9.5D
High Mounted Rear Stop Light Rear Combination Luggage Compartment Light Rear Fog Light (If installed)License Plate Light
Part Name
Head Light (High/Low) Front Position Light Interior Light Front Turn Signal Light Front Fog Light (If installed)Side Repeater (If installed) No.
67 8 9
10
G280A03TB-GAT
G280A01TB
Wattage 60/55
5
10
102127 5
No.
1
2 3 4 5Wattage 16 21
21/5
165
21
5
Map Light Room Light Part Name
Turn Signal Light Stop/Tail LightBack -up Light
Bulb wattage
Page 250 of 463

10- 2 INDEX
A Active Headrests ........................................................ 1-15
Adjustable headrests .................................................. 1-15
Adjusting arm rest angle .............................................. 1-16
Air Bag ....................................................................... 1-36
Passenger's front airbag O N/OFF switch ................1-40
Side impact airbag ................................................... 1-41
Air Cleaner Filter ......................................................... 6-11
Air Conditioning Care ......................................................................... 6-18
Operation ................................................................. 1-93
Switch ...................................................................... 1-92
Antenna .................................................................... 1-128
Ashtray ....................................................................... 1-67
Audio remote control switch .......................................1-84
Auto Fuel cut Switch .................................................. 1-82
B Battery .............................................................. 2-17, 6-28
Before starting the engine ........................................... 2-3Brake Anti-lock system ...................................................... 2-13
Checking the brakes ................................................ 6-17
Fluid ......................................................................... 6-17
Pedal clearance ....................................................... 6-21
Pedal free play .......................................................... 6-21
Practices ................................................................. 2-12
Breaking-In your New Hyundai .................................... 1-4
Bulbs Replacem ent ..................................................... 6-30
Bulbs wa ttage ............................................................. 6-35C
Care of Cassette Tapes ...........................................
1-126
Care of Disc ............................................................. 1-126
Cargo area cover ........................................................ 1-80
Cassette Tape Player Operation (K220, K240, M280) ........................1-100, 1-105, 1-110
Catalytic Converter ...................................................... 7-3
Central Door Lock ........................................................ 1-9
Child-Protector Rear Door Lock ................................... 1-8
Child Restraint System ............................................... 1-28
Cigarette Lighter ......................................................... 1-66
Climate Control Air Filter .................................. 1-94, 6-19
Clock .......................................................................... 1-66
Clutch
Pedal freep lay .......................................................... 6-21
Combination Light
Headlight flasher ...................................................... 1-60
Headlight swi tch ...................................................... 1-59
High-beam switch .................................................... 1-60
Lane change si gnal .................................................. 1-59
Turn signal operation ............................................... 1-59
Compact Disc Player Operation
(M280, H446) .............................................. 1-113, 1-121
Console tray ............................................................... 1-68
Cooling Fans .............................................................. 6-26
Corrosion protection
Cleaning the interior .................................................. 4-5
Protecting your Hyundai from corrosion ................... 4-2
Washing and waxing ................................................. 4-3
Page 363 of 463

DRIVING YOUR HYUNDAI 2- 3
!
C020A02O-EAT BEFORE STARTING THE EN- GINE Before you start the engine, you should always:
1. Look around the vehicle to be sure
there are no flat tyres, puddles of oil or water or other indications of pos-sible trouble.
2. After entering the car, check to be
sure the parking brake is engaged.
3. Check that all windows, and lights are clean.
4. Check that the interior and exterior mirrors are clean and in position.
5. Check your seat, seatback and
headrestraint to be sure they are intheir proper positions.
6. Close all the doors.
7. Fasten your seat belt and be sure
that all other occupants have fas- tened theirs.
8. Turn off all lights and accessories that are not needed.
9. When you turn the ignition switch to
"ON" check that all appropriate warn- ing lights are operating and that you have sufficient fuel. 10.Check the operation of warning
lights and all bulbs when key is in the "ON" position.
WARNING: (DIESEL ENGINE)
To ensure that sufficient vacuum exists within the brake system dur-ing cold weather start-up condi- tions, it is necessary to run the engine at idle for several secondsafter starting the engine. SC040A1-F COMBINATION IGNITION SWITCH AND STEERING LOCKTo Start the Engine
o If your Hyundai is equipped with a
manual transaxle, place the shift lever in neutral and depress theclutch pedal fully.
o If your Hyundai has an automatic
transaxle, place the shift lever in "P"(park).
o To start the engine, insert the igni-
tion key and turn it to the "START"position. Release it as soon as the engine starts. Do not hold the key in the "START" position for more than15 seconds.
NOTE: For safety, the engine will not start if the shift lever is not in "P" or "N"Position (automatic transaxle).
!WARNING:
Always wear appropriate shoes when operating your vehicle. Unsuitable shoes (high heels, ski boots, etc.) may interfere with yourability to use the brake and accelera- tor pedal, and the clutch (if installed).
Page 412 of 463

6. Do-It-Yourself Maintenance
Engine compartment ........................................................................ 6-2
Daily operating checks ..................................................................... 6-5
Engine oil .......................................................................................... 6-6
Engine oil replenishment .................................................................. 6-8
Engine coolant Checking ................................................................. 6-9Changing the air cleaner filter ......................................................... 6-11
Windscreen Wiper Blades .............................................................. 6-12
Windscreen Washer Reservoir Replenishment ............................. 6-13
Manual Transaxle Lubricant........................................................... 6-14
Automatic Transaxle fluid ............................................................... 6-15
Brake System Checking ................................................................ 6-17
Air conditioning System .................................................................. 6-18
Drive belts ...................................................................................... 6-20
Individual Circuit Fuses .................................................................. 6-21
Power steering fluid level ............................................................... 6-23
Replacing Light Bulbs .................................................................... 6-26
Fuse panel description ................................................................... 6-31
6
Page 437 of 463

6- 26 DO-IT-YOURSELF MAINTENANCE
HTB5009
HTB5011HTB5010
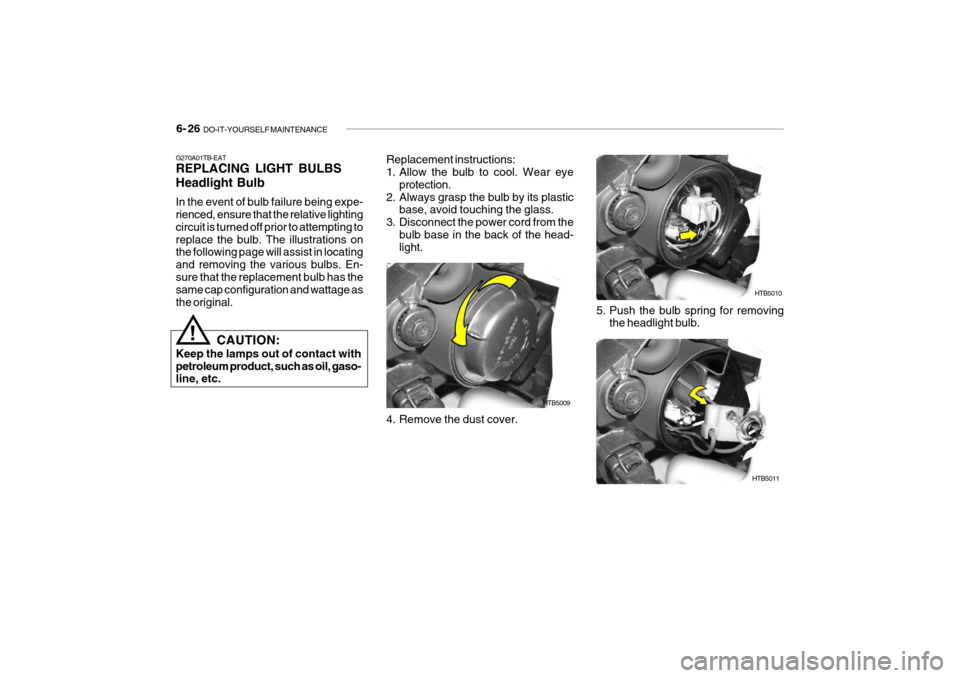
Replacement instructions:
1. Allow the bulb to cool. Wear eye
protection.
2. Always grasp the bulb by its plastic base, avoid touching the glass.
3. Disconnect the power cord from the bulb base in the back of the head-light.
4. Remove the dust cover. 5. Push the bulb spring for removing
the headlight bulb.
G270A01TB-EAT REPLACING LIGHT BULBS Headlight Bulb In the event of bulb failure being expe- rienced, ensure that the relative lighting circuit is turned off prior to attempting toreplace the bulb. The illustrations on the following page will assist in locating and removing the various bulbs. En-sure that the replacement bulb has the same cap configuration and wattage as the original.
!
CAUTION:
Keep the lamps out of contact with petroleum product, such as oil, gaso- line, etc.
Page 438 of 463

DO-IT-YOURSELF MAINTENANCE 6- 27
G270B01TB-GAT Front Turn Signal light / Position Light
1. Disconnect the power cord from the
bulb.
2. Replace to the new bulb. HTB285G270C01TB-GAT Luggage Compartment Light
HTB282
1. Remove the cover with a (-) driver.
2. Disconnect the power cord.
3. Replace to the new bulb. HTB283
!
6. Remove the protective cap from the
replacement bulb and install the new bulb by matching the plastic basewith the headlight hole. Install the dust cover after retightening the bulb spring and reconnect the power cord.
7. Use the protective cap and carton to dispose of the old bulb.
8. Check for proper headlight aim.
WARNING
The halogen bulb contains gas un-der pressure and if impacted couldshatter, resulting in flying fragments. Always wear eye protection when servicing the bulb. Protect the bulbagainst abrasions or scratches and against liquids when lighted. Turn on the bulb only when installed in aheadlight. Replace the headlight if damaged or cracked. Keep the bulb out of the reach of children and dis-pose of the used bulb with care.
Page 439 of 463

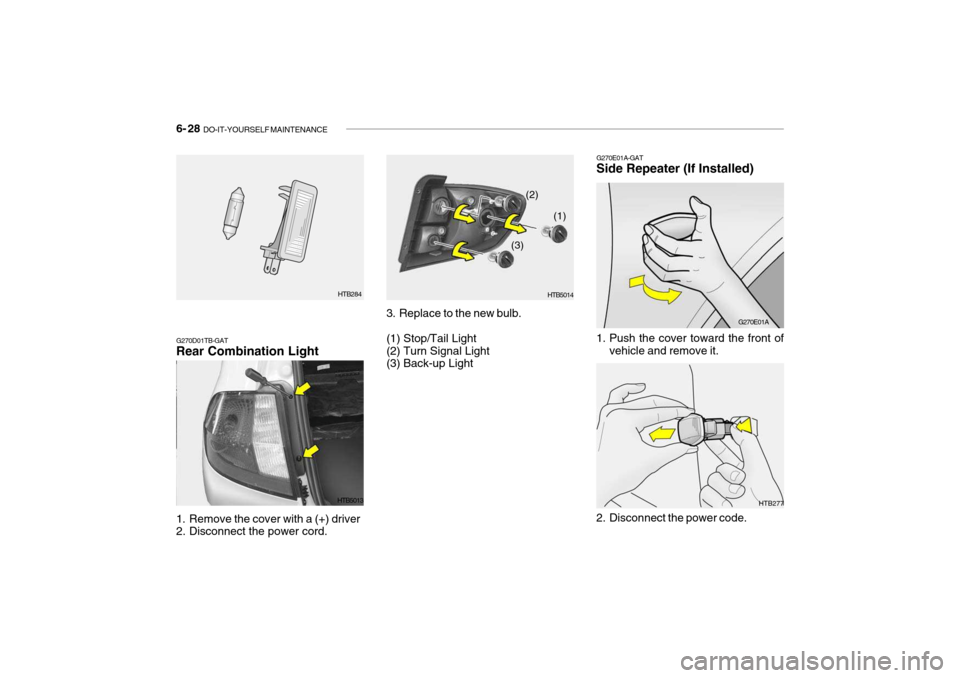
6- 28 DO-IT-YOURSELF MAINTENANCE
HTB277
1. Remove the cover with a (+) driver
2. Disconnect the power cord. 3. Replace to the new bulb. (1) Stop/Tail Light (2) Turn Signal Light (3) Back-up Light
HTB5014G270E01A-GAT Side Repeater (If Installed)
(2) (1)
(3)
1. Push the cover toward the front ofvehicle and remove it.
2. Disconnect the power code.
G270E01A
G270D01TB-GAT Rear Combination Light HTB5013
HTB284
Page 440 of 463

DO-IT-YOURSELF MAINTENANCE 6- 29
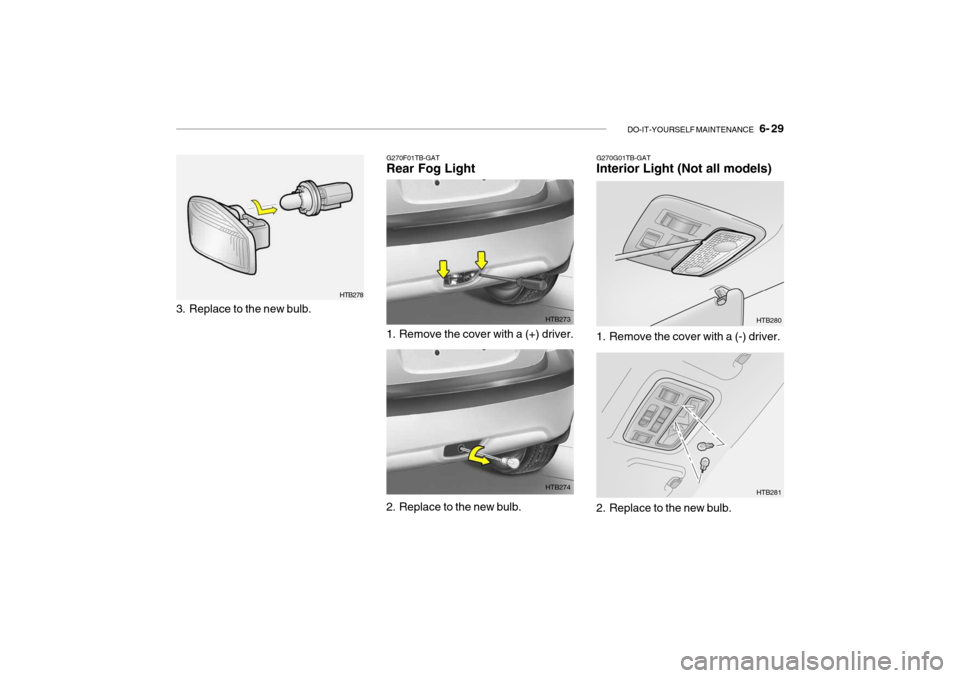
G270G01TB-GAT Interior Light (Not all models)
G270F01TB-GATRear Fog Light
1. Remove the cover with a (+) driver. HTB273
2. Replace to the new bulb. HTB2741. Remove the cover with a (-) driver.
HTB280
2. Replace to the new bulb. HTB281
HTB278
3. Replace to the new bulb.