Page 29 of 282
1
FEATURES OF YOUR HYUNDAI
17
B100A01Y-AAT SEAT WARMER (If Installed) The seat warmer is provided to warm the front seats during cold weather. With the ignition key in the "ON" posi- tion, push either of the switches towarm the driver's seat or the passenger's seat. During mild weather or under conditionsthat the operation of the seat warmer is not needed, keep the switches in the "OFF" position.
B080F01S-AAT Seat Cushion Height Adjustment (Driver's Seat Only) (If Installed)
To raise or lower the front part of the seat cushion, turn the front knob for- ward or rearward. To raise or lower the rear part of the seat cushion, turn therear knob forward or rearward.o Do not adjust the headrest height while the vehicle is in motion.
B080F01MC
OMC025033
B080G01A-GAT Adjusting Armrest Angle (Driver's side only) (If Installed)
OMC025031
The armrest will be raised or lowered manually. To raise the armrest, pull it up. To lower it, press the armrest down.
Page 39 of 282

1
FEATURES OF YOUR HYUNDAI
27
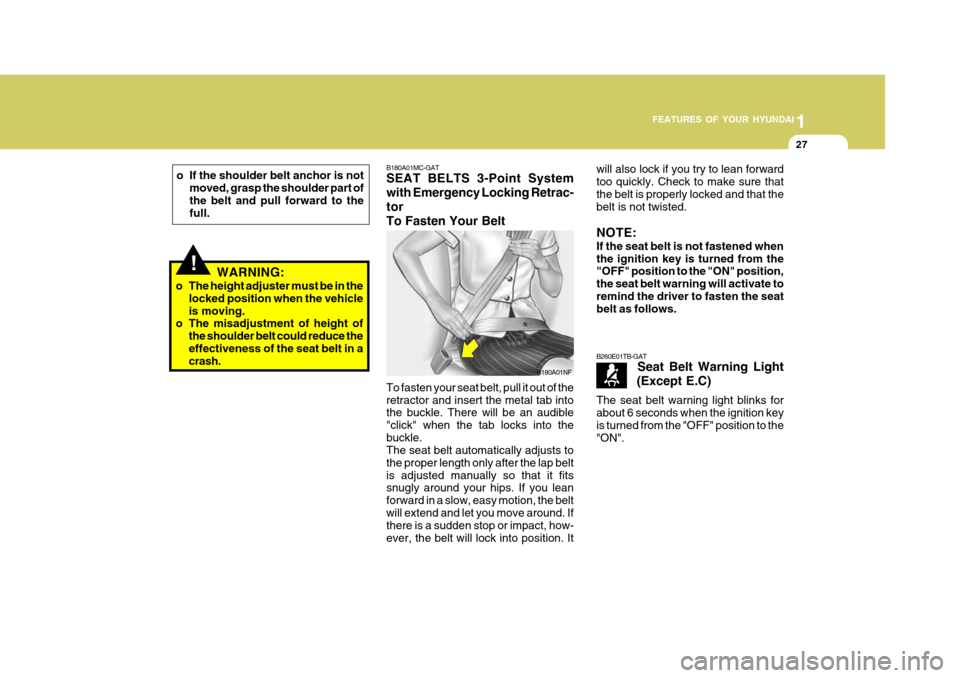
B180A01MC-GAT SEAT BELTS 3-Point System with Emergency Locking Retrac-torTo Fasten Your Belt To fasten your seat belt, pull it out of the retractor and insert the metal tab into the buckle. There will be an audible "click" when the tab locks into thebuckle. The seat belt automatically adjusts to the proper length only after the lap beltis adjusted manually so that it fits snugly around your hips. If you lean forward in a slow, easy motion, the beltwill extend and let you move around. If there is a sudden stop or impact, how- ever, the belt will lock into position. It
B180A01NF will also lock if you try to lean forward too quickly. Check to make sure thatthe belt is properly locked and that the belt is not twisted. NOTE: If the seat belt is not fastened when the ignition key is turned from the "OFF" position to the "ON" position, the seat belt warning will activate toremind the driver to fasten the seat belt as follows. B260E01TB-GAT
Seat Belt Warning Light
(Except E.C)
The seat belt warning light blinks for about 6 seconds when the ignition key is turned from the "OFF" position to the "ON".
!WARNING:
o The height adjuster must be in the locked position when the vehicle is moving.
o The misadjustment of height of
the shoulder belt could reduce theeffectiveness of the seat belt in a crash.
o If the shoulder belt anchor is not
moved, grasp the shoulder part of the belt and pull forward to the full.
Page 249 of 282

6 DO-IT-YOURSELF MAINTENANCE
26HEADLIGHT AIMING ADJUSTMENT
5. Open the hood.
6. Draw the vertical line (through the
center of each headlight beam pat-tern) and the horizontal line (throughthe center of each headlight beam pattern) on the aiming screen. And then, draw a horizontal parallel line at 30 mm (1.18 in.) under the horizontal line.
7. Adjust each cut-off line of the low beam to the parallel line with a phillipsscrewdriver - VERTICAL AIMING.
8. Adjust each cut-off line of the low
beam to each vertical line with aphillips screwdriver - HORIZONTAL AIMING. Horizontal aiming
Vertical aiming
If the vehicle has had front body repair and the headlight assembly has beenreplaced, an headlight aiming should be checked using an aiming screen as shown in the illustration. Turn on theheadlight switch. (Low Beam Position)
1. Adjust headlights so that main axisof light is parallel to center line of the body and is aligned with point "P" shown in the illustration.
2. Dotted lines in the illustration show the center of headlights.
G290B01MC-GAT Adjustment After Headlight As- sembly Replacement
G290A03A-GAT Before performing aiming adjustment, make sure of the following.
1. Keep all tires inflated to the correct
pressure.
2. Place the vehicle on level ground
and press the front bumper and rear bumper down several times. Place the vehicle at a distance of 3,000 mm (118 in.) from the test wall.
3. See that the vehicle is unloaded (except for full levels of coolant,engine oil and fuel, and spare tire,jack, and tools). Have the driver or equivalent weight placed in driver's seat.
4. Clean the head lights lenses and turn on the headlight (low beam). G290B01B
LW
H
H Cut-off line
Ground line
"P"
Horizontal line
Vertical line30 mm
G290A03MC