Page 247 of 282

6 DO-IT-YOURSELF MAINTENANCE
24
o When lifting a plastic-cased bat-
tery, excessive pressure on the case may cause battery acid to leak, resulting in personal injury.Lift with a battery carrier or with your hands on opposite corners.
o Never attempt to charge the bat-
tery when the battery cables areconnected.
o The electrical ignition system
works with high voltage.Never touch these components with the engine running or the ignition switched on.
CHECKING ELECTRIC COOLING FANS
!
G220B01A-AAT Checking Engine Cooling Fan The engine cooling fan should come on automatically if the engine coolant tem-perature is high. G220C01TB-GAT Checking Condenser Cooling Fan When the air conditioning is in opera- tion, the condenser cooling fan comeson automatically to be controlled by ECU.G220A01A-AAT
WARNING:
The cooling fan is controlled by en- gine coolant temperature and may sometimes operate even when the engine is not running. Use extremecaution when working near the blades of the cooling fan, so that you are not injured by a rotating fanblade. As the engine coolant temper- ature decreases the fan will automat- ically shut off. This is a normal con-dition.
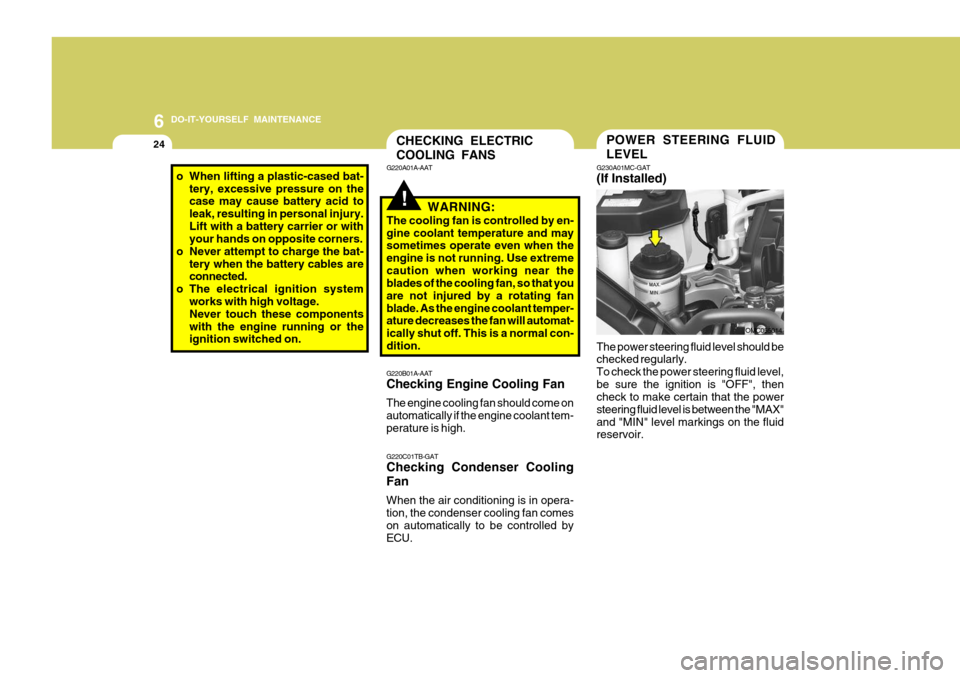
POWER STEERING FLUID LEVEL
G230A01MC-GAT (If Installed) The power steering fluid level should be checked regularly. To check the power steering fluid level,be sure the ignition is "OFF", then check to make certain that the power steering fluid level is between the "MAX"and "MIN" level markings on the fluid reservoir. OMC055014
Page 249 of 282

6 DO-IT-YOURSELF MAINTENANCE
26HEADLIGHT AIMING ADJUSTMENT
5. Open the hood.
6. Draw the vertical line (through the
center of each headlight beam pat-tern) and the horizontal line (throughthe center of each headlight beam pattern) on the aiming screen. And then, draw a horizontal parallel line at 30 mm (1.18 in.) under the horizontal line.
7. Adjust each cut-off line of the low beam to the parallel line with a phillipsscrewdriver - VERTICAL AIMING.
8. Adjust each cut-off line of the low
beam to each vertical line with aphillips screwdriver - HORIZONTAL AIMING. Horizontal aiming
Vertical aiming
If the vehicle has had front body repair and the headlight assembly has beenreplaced, an headlight aiming should be checked using an aiming screen as shown in the illustration. Turn on theheadlight switch. (Low Beam Position)
1. Adjust headlights so that main axisof light is parallel to center line of the body and is aligned with point "P" shown in the illustration.
2. Dotted lines in the illustration show the center of headlights.
G290B01MC-GAT Adjustment After Headlight As- sembly Replacement
G290A03A-GAT Before performing aiming adjustment, make sure of the following.
1. Keep all tires inflated to the correct
pressure.
2. Place the vehicle on level ground
and press the front bumper and rear bumper down several times. Place the vehicle at a distance of 3,000 mm (118 in.) from the test wall.
3. See that the vehicle is unloaded (except for full levels of coolant,engine oil and fuel, and spare tire,jack, and tools). Have the driver or equivalent weight placed in driver's seat.
4. Clean the head lights lenses and turn on the headlight (low beam). G290B01B
LW
H
H Cut-off line
Ground line
"P"
Horizontal line
Vertical line30 mm
G290A03MC
Page 279 of 282

10
INDEX
3
D Door Central door locks .................................................... 1-9
Door locks ................................................................ 1-7 Locking, unlocking front doors with a key ................ 1-7
Drink Holder ............................................................... 1-80
Driving
Economical driving ................................................. 2-18
Smooth corneri ng .................................................... 2-20
Winter driving .......................................................... 2-20
EElectronic Stability Program ...................................... 2-14
Emission Contro l System ............................................ 7-2
Engine
Before starting the engine ....................................... 2-3
Compartment ........................................................... 6-2
Coolant ................................................................... 6-10
Coolant temperature gauge .....................................1-66
If the engine overheats ............................................. 3-4
Number ..................................................................... 8-3
Oil ............................................................................. 6-6Starting ..................................................................... 2-5
Emergency Commodity ............................................. 3-11
Engine Exhaust Can Be Dangerous ............................ 2-2 F Fog Light
Front ....................................................................... 1-77
Rear ........................................................................ 1-78
Front Seats
Adjustable front seats ............................................. 1-15
Adjustable headrests .............................................. 1-16
Adjusting seat forward and rearward .......................1-15
Adjusting seatback angle ....................................... 1-15
Seat warmer ........................................................... 1-17
Fuel
Capacity ................................................................... 9-2
Gauge ..................................................................... 1-66
Recommendations .................................................... 1-2
Fuel Filler Lid
Remote release ...................................................... 1-92
Fuses ........................................................................ 6-20
Fuse Panel description .............................................. 6-35
G General Checks ........................................................... 6-5
Glove Box ................................................................. 1-86
H Hazard Warning System ............................................ 1-76
Headlight Aiming Adjustment..................................... 6-26
Headlight Leveling Device S ystem ............................1-76
Heating and Cooling Control ......................................1-99
Page:
< prev 1-8 9-16 17-24