2007 Hyundai Accent tires
[x] Cancel search: tiresPage 201 of 282

3 WHAT TO DO IN AN EMERGENCY
12
If there is small fire and you know how to use the fire extinguisher, take thefollowing steps carefully.
1. Pull the pin at the top of the extin-guisher that keeps the handle from being accidentally pressed.
2. Aim the nozzle toward the base of
the fire.
3. Stand approximately 2.5 m (8 ft)
away from the fire and squeeze the handle to discharge the extinguisher. If you release the handle, the dis- charge will stop.
4. Sweep the nozzle back and forth at the base of the fire. After the fireappears to be out, watch it carefullysince it may re-ignite.
Triangle Reflector The triangle reflector is located in the trunk. Placed the triangle reflector on the road to warn oncoming vehicles during emer- gencies, such as when the vehicle is parked by the roadside due to anyproblems. First Aid Kit The first aid kit is located in the trunk. There are some items such as scis- sors, bandage and adhesive tape and etc. in the kit to give first aid to aninjured person. Tire Pressure Gauge (If Installed) You can easily check the tire pressure with a tire pressure gauge that is found in OVM tool bag. Tires normally lose some air in day-to-day use, and youmay have to add a few pounds of air periodically and it is not usually a sign of a leaking tire, but of normal wear.Always check tire pressure when the tires are cold because tire pressure increases with temperature. To check the tire pressure, take the following steps;
1. Unscrew the inflation valve cap that
is located on the rim of the tire.
2. Press and hold the gauge against the tire valve. Some air will escape asyou begin and more will escape if youdon't press the gauge in firmly.
3. A firm non-leaking push will activate
the gauge.
4. Read the tire pressure on the gauge to know whether the tire pressure islow or high.
5. Adjust the tire pressures to the speci- fied pressure. See page 3-5.
6. Reinstall the inflation valve cap.
Page 209 of 282

44CORROSION PREVENTION AND APPEARANCE CARE
4WASHING AND WAXING
E030A01A-AAT Washing Your Hyundai Never wash your car when the surface is hot from being in the sun. Alwayswash your car in the shade. Wash your car frequently. Dirt is abra- sive and can scratch the paint if it is not removed. Air pollution or acid rain may damage the paint and trim throughchemical action if pollutants are al- lowed to remain in contact with the surface. If you live near the ocean or inan area where road salts or dust con- trol chemicals are used, you should pay particular attention to the under-side of the car. Start by rinsing the car to remove dust and loose dirt. In win- ter, or if you have driven through mudor muddy water, be sure to thoroughly clean the underside as well. Use a hard direct stream of water to removeaccumulations of mud or corrosive materials. Use a good quality car-washing solu-tion and follow the manufacturer's di- rections on the package. These are available at your Hyundai dealer orauto parts outlet. Don't use strong household detergents, gasoline, strongsolvents or abrasive cleaning powdersas these may damage the finish. Use a clean sponge or cloth, rinse it frequently and don't damage the finishby rubbing too hard. For stubborn spots, dampen them frequently and remove them a little at a time.To clean whitewall tires, use a stiff brush or soapy steel-wool scouring pad.To clean plastic wheel covers, use a clean sponge or soft cloth and water. To clean cast aluminum alloy wheels, use a mild soap or neutral detergent. Do not use abrasive cleaners. Protectthe bare-metal surfaces by cleaning, polishing and waxing. Because alumi- num is subject to corrosion, be sure togive aluminum alloy wheels special attention in winter. If you drive on salted roads, clean the wheels thor-oughly afterwards. After washing, be sure to rinse thor- oughly. If soapy water dries on the finish, streaking will result.
When the weather is warm and the humidity low, you may find it neces-sary to rinse each section immediately after washing to avoid streaking. After rinsing, dry the car using a damp chamois or soft, absorbent cloth. The reason for drying the car is to removewater from the car so it will dry without water spots. Don't rub, this can dam- age the finish. If you find any nicks or scratches in the paint, use touch-up paint to cover themto prevent corrosion. To protect the paintwork of the car against corrosion, you must clean your Hyundai (at leastonce a month). Give special attention to the removal of salt, mud and other substances on the underside of thesplashboards of the car. Make sure that the outlets and the underside of the doors are open. Paint damage canbe caused by small accumulation of tar, industrial precipitation, tree resin, insects and bird droppings, when notremoved immediately. If water alone is not strong enough to remove the accu-
Page 249 of 282

6 DO-IT-YOURSELF MAINTENANCE
26HEADLIGHT AIMING ADJUSTMENT
5. Open the hood.
6. Draw the vertical line (through the
center of each headlight beam pat-tern) and the horizontal line (throughthe center of each headlight beam pattern) on the aiming screen. And then, draw a horizontal parallel line at 30 mm (1.18 in.) under the horizontal line.
7. Adjust each cut-off line of the low beam to the parallel line with a phillipsscrewdriver - VERTICAL AIMING.
8. Adjust each cut-off line of the low
beam to each vertical line with aphillips screwdriver - HORIZONTAL AIMING. Horizontal aiming
Vertical aiming
If the vehicle has had front body repair and the headlight assembly has beenreplaced, an headlight aiming should be checked using an aiming screen as shown in the illustration. Turn on theheadlight switch. (Low Beam Position)
1. Adjust headlights so that main axisof light is parallel to center line of the body and is aligned with point "P" shown in the illustration.
2. Dotted lines in the illustration show the center of headlights.
G290B01MC-GAT Adjustment After Headlight As- sembly Replacement
G290A03A-GAT Before performing aiming adjustment, make sure of the following.
1. Keep all tires inflated to the correct
pressure.
2. Place the vehicle on level ground
and press the front bumper and rear bumper down several times. Place the vehicle at a distance of 3,000 mm (118 in.) from the test wall.
3. See that the vehicle is unloaded (except for full levels of coolant,engine oil and fuel, and spare tire,jack, and tools). Have the driver or equivalent weight placed in driver's seat.
4. Clean the head lights lenses and turn on the headlight (low beam). G290B01B
LW
H
H Cut-off line
Ground line
"P"
Horizontal line
Vertical line30 mm
G290A03MC
Page 266 of 282

Vehicle Identification Number (VIN) .............................. 8-2
Engine Number ............................................................. 8-3
Recommended Inflation Pressures .............................. 8-3
Snow Tires ................................................................... 8-4
Tire Chains ................................................................... 8-5
Tire Rotation ................................................................. 8-5
Tire Balancing ............................................................... 8-6
Tire Traction ................................................................. 8-6
When to Replace Tires ................................................. 8-6
Spare Tire and Tools .................................................... 8-7
8
CONSUMER INFORMATION
8
Page 268 of 282

8
CONSUMER INFORMATION
3ENGINE NUMBERTIRE
I010B01A-GAT
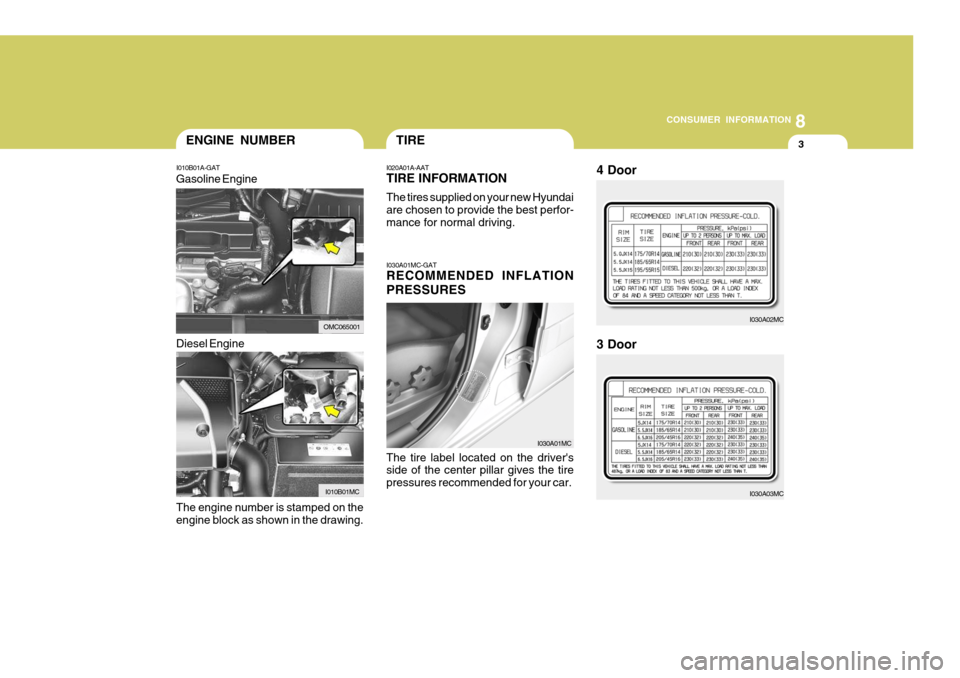
The engine number is stamped on the engine block as shown in the drawing. I020A01A-AAT TIRE INFORMATION The tires supplied on your new Hyundai are chosen to provide the best perfor-mance for normal driving. I030A01MC-GAT RECOMMENDED INFLATION PRESSURES The tire label located on the driver's side of the center pillar gives the tire pressures recommended for your car.
I030A01MC
Gasoline Engine Diesel Engine
OMC065001
I010B01MC
I030A01MC
I030A02MC
4 Door
I030A03MC
3 Door
Page 269 of 282

8CONSUMER INFORMATION
4
I040A02S-GAT SNOW TIRES If you equip your car with snow tires, they should be the same size and havethe same load capacity as the original tires. Snow tires should be installed on all four wheels; otherwise, poor han-dling may result. Snow tires should carry 28 kPa (4 psi) more air pressure than the pressurerecommended for the standard tires on the tire label on the driver's door edge, or up to the maximum pressure shownon the tire sidewall whichever is less. Do not drive faster than 120 km/h (75 mph) when your car is equipped withsnow tires.
These pressures were chosen to pro-vide the most satisfactory combinationof ride comfort, tire wear and stability under normal conditions. Tire pres- sures should be checked at leastmonthly. Proper tire inflation pressures should be maintained for these rea- sons:
o Lower-than-recommended tire pres-
sures cause uneven tread wear and poor handling.
o Higher-than-recommended tire
pressures increase the chance ofdamage from impacts and cause uneven tread wear. CAUTION:
Always observe the following:
o Check pressures when the tires are cold. That is, after the car has been parked for at least threehours and hasn't been driven more than 1.6 km or one mile since starting up.
o Check the pressure of your spare tire each time you check the pres-sure of other tires.
o Worn, old tires can cause acci-
dents. If your tread is badly worn, or if your tires have been dam-aged, replace them.
!
Page 270 of 282

8
CONSUMER INFORMATION
5
!
!
I050A01MC-AAT TIRE CHAINS Tire chains, if necessary should be installed on the front wheels. Be surethat the chains are installed in accor- dance with the manufacturer's instruc- tions.To minimize tire and chain wear, do not continue to use tire chains when they are no longer needed. I060A02A-AAT TIRE ROTATION Tires should be rotated every 10,000 km (6,000 miles). If you notice thattires are wearing unevenly between rotations, have the car checked by a Hyundai dealer so the cause may becorrected. After rotating, adjust the tire pressures and be sure to check wheel nut torque.
WARNING:
o If your vehicle is equipped with 205/45R16 size tires, do not install tire chains. This may cause dam-age to the vehicle (wheels, sus-pension and body) by chains con-tacting the body.
o When driving on roads covered with snow or ice, drive at less than30 km/h (20 mph).
o Use the SAE "S" class or wire & plastic chains.
o If you have noise caused by chains contacting the body, retighten thechain to avoid contact with thevehicle body. I060A01HP
Spare tire
WARNING:
Do not mix bias-ply and radial-ply tires under any circumstances. Thismay cause dangerous handling char- acteristics.
o To prevent body damage, retighten
the chains after driving 0.5~1 km.
o Don't use tire chains on a vehicle equipped with aluminium wheels. If it is unavoidable, use wire typechains.
o Use wire chains less than 15 mm to prevent damage to the chain'sconnection.
Page 271 of 282

8CONSUMER INFORMATION
6
I090A01MC-GAT WHEN TO REPLACE TIRES
The original tires on your car have tread wear indicators. The location of tread wear indicators is shown by the "TWI"or " " marks, etc., The tread wear indicators appear when the tread depth is 1.6 mm (0.06 in.). The tire should be replaced when these appear as a solid bar across two or more grooves of thetread. Always replace your tires with those of the recommended size. If you change wheels, the new wheel's rimwidth and offset must meet Hyundai specification.
!WARNING:
o Driving on worn-out tires is dan- gerous! Worn-out tires can cause
loss of braking effectiveness, steering control and traction. When replacing tires, never mixradial and bias-ply tires on the same car. If you replace radial tires with bias-ply tires, they mustbe installed in sets of four.
o Using tires and wheels of other
than the recommended sizes maycause unusual handling charac- teristics that may cause death, serious injury or property dam-age.
OMC055017
Wear indicator
I070A01A-AAT TIRE BALANCING A tire that is out of balance may affect handling and tire wear. The tires onyour Hyundai were balanced before the car was delivered but may need balancing again during the years youown the car. Whenever a tire is dismounted for repair, it should be rebalanced beforebeing reinstalled on the car. I080A01A-AAT TIRE TRACTION Tire traction can be reduced if you drive on worn tires, tires that are im- properly inflated or on slippery road surfaces. Tires should be replacedwhen tread wear indicators appear. To reduce the possibility of losing control, slow down whenever there is rain,snow or ice on the road.