Page 83 of 331

Push the lever up to lock the
steering wheel in position.
Make sure you have securely
locked the steering wheel in place
by trying to move it up and down.
Make any steering wheel adjustment
bef ore you start driving.
Move the steering wheel so it
points toward your chest, not
toward your f ace. Make sure you
can see the instrument panel
gauges and indicators. Push the lever on the lef t side of
the steering column all the way
down.
Pushthebuttontoturnonthe
hazard warning lights (f our-way
flashers). This causes all four
outside turn signals and both turn
indicators in the instrument panel to
f lash. Use the hazard warning lights
if you need to park in a dangerous
area near heavy traffic, or if your
vehicle is disabled. 3.
4.
1.
2. Steering Wheel A djustment
Hazard Warning Button
Hazard Warning Button, Steering Wheel A djustment
Inst rument s and Cont rols
79
Adjusting the steering wheel
position while driving may
cause you to lose control of the
vehicle and be seriously injured
inacrash.
Adjust the steering wheel only
when the vehicle is stopped.
Page 102 of 331
�µ
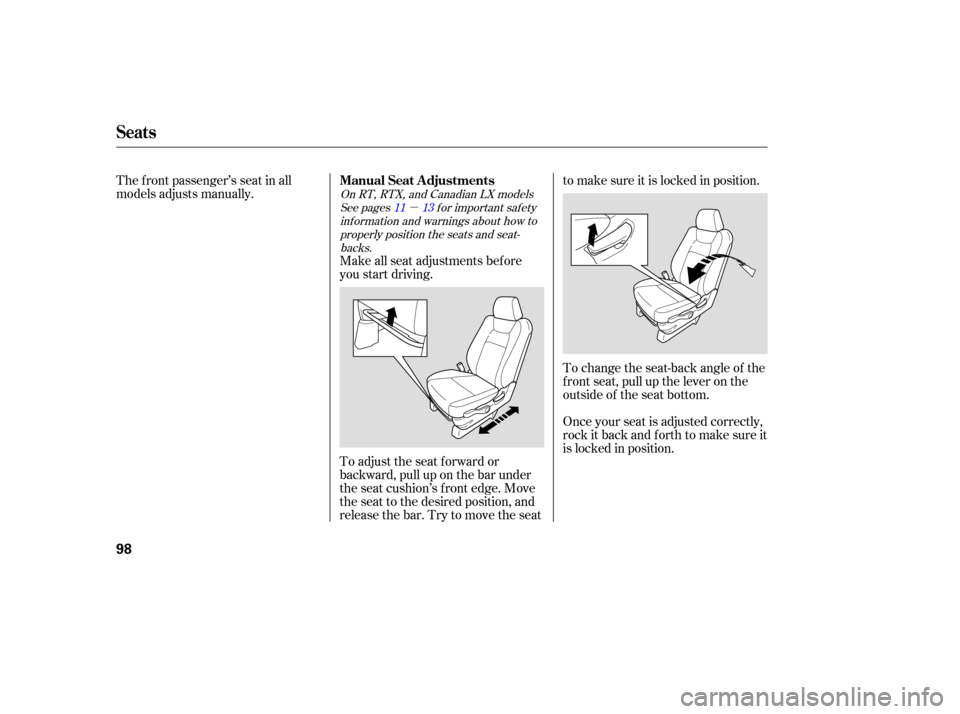
The front passenger’s seat in all
models adjusts manually.
Make all seat adjustm ents before
you start driving.
To adjust the seat forward or
backward, pull up on the bar under
the seat cushion’s front edge. Move
the seat to the desi red position, and
releasethebar.Trytomovetheseat to
make sure it is locked in position.
To change the seat-back angle of the
front seat, pull up the lever on the
outside of the seat bottom.
Once your seat is adjusted correctly,
rock it back and f orth to make sure it
is locked in position.
See pages f or important saf ety
inf ormation and warnings about how toproperly position the seats and seat-backs.
On RT, RTX, and Canadian LX models
11 13
Manual Seat Adjustments
Seats
98
Page 104 of 331
�µ
Moves the seat forward
and backward.
The
controls for the power
adjustable driver’s seat are on the
outside edge of the seat bottom. You
can adjust the seat with the ignition
switch in any position. Make all seat
adjustments before you start driving.
Moving the long horizontal switch
adjusts the seat bottom in several
directions. The seat bottom adjusts
in the direction you move the switch.
The short vertical switch adjusts the
seat-back angle. Moves
the whole seat up
and forward, or down
and backward. The front
of the seat also tilts up or
down at the same time.
Moves the front of the
seat up or down.
Raises or lowers the seat. Adjusts
the seat-back
angle forward or
backward.
Increases or decreases
the lumbar support.
(RTL and Canadian EXL
models)
See pages f or important saf ety
inf ormation and warnings about how toproperly position the seats and seat-backs. 11 13
On RTS, RTL, and Canadian EXL
models
Power Seat A djustments
Seats
100
Page 106 of 331
See page for important safety
inf ormation and a warning about how to properly position the head restraints. 13
The head restraints adjust f or height.
You need both hands to adjust the
restraint. Do not attempt to adjust it
while driving. To raise it, pull upward.
To lower the restraint, push the
release button sideways, and push
the restraint down.
Your vehicle is equipped with head
restraints in all seating positions to
help protect you and your
passengers f rom whiplash and other
injuries.
Theyaremosteffectivewhenyou
adjust them so the back of the
occupant’s head rests against the
center of the restraint.
When a passenger is seated in the
rear center seating position, make
sure the center head restraint is
properly positioned.
Head Restraints
Seats
102
RELEASE BUTTON
Rear Center Position
RELEASE BUTTON
Page 184 of 331

Whenever filling a fuel container,
use an approved fuel container, and
place it on the ground. Do not fill the
fuel container in the vehicl e,
including the pickup bed and the
In-Bed Trunk. Make sure to put the
fuel pump nozzle in the fuel filler of
the container securely and to handle
it properly.
Your vehicle has a warning label for
filling a portable fuel container on
the left rear side of the pickup bed.
Before
placing the fuel container in
the vehicle, wipe up any spill
completely. Gasoline or fuel vapors are
extremely flammable and explosive.
Improperly handling fuel can cause
anexplosioninwhich youcanbe
seriously injured.
Screw
the fuel fill cap back on
until it clicks at least once. If you
do not properly tighten the cap,
the malf unction indicator lamp
maycomeon(seepage ).You
will also see a ‘‘TIGHTEN FUEL
CAP’’ message on the inf ormation
display.
Push the f uel f ill door closed until
it latches.
5.
6.
289
Service Station Procedures
Filling a Port able Fuel Cont ainer
180
Do not fill a portable fuel
container in the pickup bed.
Static electricity can ignite gas
vapors and you can be burned.
Page 275 of 331

�µIf
your vehicle’s battery is
disconnected or goes dead, the audio
system will disable itself. The next
timeyouturnontheradioyouwill
see ‘‘CODE’’ in the freque ncy display.
Use the preset bars to enter the code
(see page ).
The navigation system will also
disableitself.Thenexttimeyouturn
on the ignition switch, the system
will require you to enter a PIN
bef ore it can be used. Ref er to the
navigation system manual.
If additional battery maintenance is
needed, see your dealer or a
qualif ied technician.
Battery posts,
terminals, and related accessories
contain lead and lead compounds. If you need to connect the battery to
a charger, disconnect both cables to
prevent damaging your vehicle’s
electrical system. Always disconnect
the negative ( ) cable first, and
reconnect it last.
Check the terminals f or corrosion (a
white or yellowish powder). To
remove it, cover the terminals with a
solution of baking soda and water. It
will bubble up and turn brown. When
this stops, wash it of f with plain
water. Dry off the battery with a
cloth or paper towel. Coat the
terminals with grease to help prevent
f uture corrosion.
162
On vehicles with navigation system
Checking the Battery
WARNING:
Wash your hands af ter handling.
Maint enance
271
The battery gives off explosive
hydrogen gas during normal
operation.
A spark or flame can cause the
battery to explode with enough
force to kill or seriously hurt you.
Wear protective clothing and a
face shield, or have a skilled
technician do the battery
maintenance.
Page 279 of 331
 position. Have all
passengers get out of the vehicle
while you change the tire.
Park
the vehicle on firm,")
Turn on the hazard warning lights,
and turn the ignition switch to the
LOCK (0) position. Have all
passengers get out of the vehicle
while you change the tire.
Park
the vehicle on firm, level, and
non-slippery ground. Put the
transmission in Park. Apply the
parking brake.
If you are towing a trailer, unhitch
it.
If
you have a flat tire while driving,
stop in a safe place to change it.
Drive slowly along the shoulder until
you get to an exit or an area to stop
that is far away from the traffic lanes.
If you tow a trailer frequently, we
recommend that you use a regular
tire as a spare. You can store the
regular size spare tire on the tire tray,
but store the tool kit at the side of
the In-Bed Trunk (see page ),
and secure it. 2.
1.
281
CONT INUED
Changing a Flat Tire
T aking Care of t he Unexpect ed
275
TOOL BOX SPARE TIRE
The vehicle can easily roll off
the jack, seriously injuring
anyone underneath.
Follow the directions for
changing a tire exactly, and
never get under the vehicle
when it is supported only by the
jack.
Page 290 of 331

If you see steam and/or spray
coming f rom under the hood, turn
of f the engine. Wait until you see
no more signs of steam or spray,
then open the hood.
If you do not see steam or spray,
leave the engine running, and
watch the temperature gauge. If
the high heat is due to overloading,
the engine should start to cool
down almost immediately. If it
does, wait until the temperature
gauge comes down to the midpoint,
then continue driving. Saf ely pull to the side of the road.
Put the transmission in Park, and
set the parking brake. Turn of f all
accessories, and turn on the
hazard warning indicators.
The pointer of your vehicle’s
temperature gauge should stay in
the midrange under most conditions.
If it climbs to the red mark, you
should determine the reason (hot
day, driving up a steep hill, etc.).
If the vehicle overheats, you should
take immediate action. The only
indication may be the temperature
gauge climbing to or above the red
mark. Or you may see steam or
spray coming f rom under the hood. 1.
2.
3.
If theEngineOverheats
286
Steam and spray from an
overheated engine can
seriously scald you.
Do not open the hood if steam
is coming out.
Driving with the temperature gauge
pointer at the red mark can cause
serious damage to the engine.