Page 218 of 331
�Î�Î�Î
�Î
�Î�Î
�µ�µ
Number of
Occupants 2
3
4
5 Max.
Trailer Weight Max. Tongue Load
Towing Weight Guidelines
214
Total Trailer Weight and Tongue Load Guidelines:
5000 lbs (2268 kg)
4750 lbs (2155 kg)
4750 lbs (2155 kg)
4500 lbs (2041 kg) 600
lbs (272 kg)
600 lbs (272 kg)
570 lbs (258 kg)
516 lbs (234 kg)
Recommended tongue load should be 5 15% of the total trailer weight for boat trailers, and 10 15% of the total trailer weight for all other
trailers. The corresponding weight limits assume occupants fill seats from the front of the vehicle to the back, each occupant weighs 150 lbs (70 kg),
and each has 15 lbs (7 kg) of cargo in the cab, pickup bed, or In-Bed Trunk. Any additional weight, including cargo or accessories, reduces
the maximum trailer weight and maximum tongue load. Never exceed the gross axle weight ratings (see page ). 213
Page 219 of 331
To accurately check your loads at
the public scale, the vehicle and
trailer should be f ully loaded, and all
occupants should stay in the vehicle
while the attendant watches the
scale.Check the f ront gross axle weight.
Limit: 3,105 lbs (1,410 kg) Check the gross vehicle weight.
Limit: 6,050 lbs (2,745 kg)
Check the weight of the hitched
trailer. Write this number down. Remember, maximum gross
combined weight should be
decreased 2 % f or every 1,000 f eet
(305 meters) of elevation. Check the gross combined weight.
Limit: 10,088 lbs (4,575 kg)
Remember, maximum gross
combined weight should be
decreased 2 % f or every 1,000 f eet
(305 meters) of elevation.
If you cannot weigh the rear axle
directly, you can calculate the rear
gross axle weight by subtracting
the weight in step 1 from the
weight in step 2.
Limit: 2,945 lbs (1,335 kg) Check the rear gross axle weight.
Limit: 3,252 lbs (1,475 kg)
1. 2.
3.
4.
5.
6.
Checking L oads
Towing a Trailer
Driving
215
Page 220 of 331

Check the weight of the unhitched
trailer. Limit: See page . Towing
generally requires a variety
of supplemen tal equipmen t. To
ensure the best quality, we
recommend that you purch ase
Honda equipment whenever possible.
Calculate the tongue load.
Subtract the weight in step 6 from
the weight in step 7.
Limit: See page .
Recommended: See page .Your dealer of f ers an optional trailer
package f or models other than RTX.
The package includes a hitch, a ball
mount, and a wiring harness.
Discuss any additional needs with
your trailer sales or rental agency,
and make sure all equipment is
properly installed, maintained, and
also meets state, f ederal, province,
and local regulations.
A weight distributing hitch is not
recommended f or use with your
vehicle, as an improperly adjusted
weight distributing hitch may reduce
handling, stability, and braking
perf ormance. Read the trailer manufacturer’s
instructions, and select the
appropriate draw bar f or the height
of the trailer you will be towing. We strongly recommend that you
have your dealer install a class 3
hitch. Using non-Honda equipment
may result in serious damage to your
vehicle.
7.
8. 212
214 214
All models except RTX
T owing Equipment and
A ccessoriesHitch
Weight Distributing Hitch
Towing a Trailer
216
Page 221 of 331

There are two common types of
trailer brakes: surge and electric.
Surge brakes are common f or boat
trailers, since the brakes will get wet.
If you choose electric brakes, be
sure they are electronically actuated.
Do not attempt to tap into your
vehicle’s hydraulic system. No
matter how successf ul it may seem,
any attempt to attach trailer brakes
to your vehicle’s hydraulic system
will lower braking ef f ectiveness and
create a potential hazard.
Seeyourtrailermanufacturerfor
more inf ormation on installing
electric brakes. Honda requires that any trailer with
a total trailer weight of 1,000 lbs (455
kg) or more have its own brakes.A f actory installed, 4-pin gray
connector is located under the
instrument panel near the top of the
parking brake pedal. This connector
has all of the circuits required to
install most electric trailer brake
controllers. A jumper harness to
adapt your electric trailer brake
controller to the vehicle is included
with the optional Genuine Honda
trailer hitch kit. To obtain a trailer
hitch kit, see your dealer.
Have a qualif ied mechanic install
your trailer brake controller
f ollowing the trailer brake controller
manuf acturer’s instructions. Failure
to properly install the trailer brake
controller may increase the distance
it takes f or you to stop your vehicle
when towing a trailer.Use this illustration to identif y each
terminal in the trailer brake
controller connector.
CONT INUED
Trailer Brakes
Towing a Trailer
Driving
217
BRAKE
(20A)
(BLUE)
GROUND
(BLACK)
ELECTRIC BRAKE
(BROWN/WHITE)
STOP
(WHITE/BLACK)
Page 222 of 331

Always use safety chains when you
tow a trailer. Make sure the chains
are secured to the trailer and hitch,
and that they cross under the tongue
and can catch the trailer if it
becomes unhitched. Leave enough
sl ack to allow the trailer to turn
co rners easily, but do not let the
ch ains drag on the ground.
This device is recommended if your
trailer tends to sway. Your trailer
maker can tell you what kind of sway
control you need and how to install it.
Many states and provinces require
special exterior mirrors when towing
a trailer. Even if they don’t, you
should install special mirrors if you
cannot clearly see behind you, or if
the trailer creates a blind spot. When
towing a trailer, we
recommend that you carry a full-size
spare wheel and tire for your vehicle
and trailer. See page for proper
tire size, page for how to store a
full size wheel and tire, and page
f or inf ormation on changing a
flat tire.
Remember to unhitch the trailer
bef ore changing a f lat. Ask your
trailer sales or rental agency where
and how to store the trailer’s spare
tire. 269
280
275
Saf et y Chains
Sway Cont rolTrailer Mirrors Spare Tires
Towing a Trailer
218
Page 223 of 331
�´
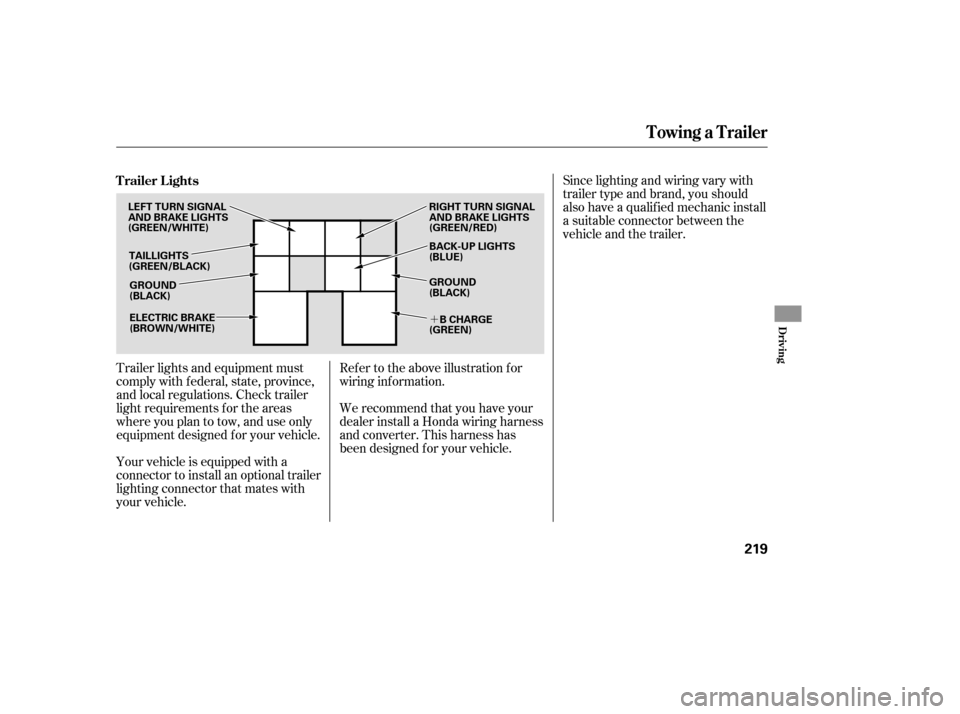
Trailer lights and equipment must
comply with f ederal, state, province,
and local regulations. Check trailer
light requirements f or the areas
where you plan to tow, and use only
equipment designed f or your vehicle.Since lighting and wiring vary with
trailer type and brand, you should
also have a qualif ied mechanic install
a suitable connector between the
vehicle and the trailer.
Your vehicle is equipped with a
connector to install an optional trailer
lighting connector that mates with
your vehicle. We recommend that you have your
dealer install a Honda wiring harness
and converter. This harness has
been designed f or your vehicle. Ref er to the above illustration f or
wiring information.
Trailer Lights
Towing a Trailer
Driving
219
GROUND
(BLACK)
LEFT TURN SIGNAL
AND BRAKE LIGHTS
(GREEN/WHITE)
TAILLIGHTS
(GREEN/BLACK)
ELECTRIC BRAKE
(BROWN/WHITE) RIGHT TURN SIGNAL
AND BRAKE LIGHTS
(GREEN/RED)
BACK-UP LIGHTS
(BLUE)
GROUND
(BLACK)
B CHARGE
(GREEN)
Page 224 of 331

Your vehicle has a class 3 trailer
hitch as standard equipment.
The cover, the ball mount, the hitch
pin, the hitch pin clip, and the jumper
harness are stored in the In-Bed
Trunk.
Also see page f or trailer-related
inf ormation. We recommend that you always use
the cover when you are not using the
ball mount to keep dirt, mud, and
snow f rom clogging the hitch.
To install the cover, slide it into the
opening at the end of the trailer
hitch. To remove the cover, pull it
out and store it in a saf e place.
Install the ball mount bef ore you tow
a trailer. Check f or and remove
f oreign material inside of the trailer
hitch bef ore installing the ball mount.
To install the ball mount, slide it into
the trailer hitch. Line up the holes in
the trailer hitch with the holes in the
ball mount, then insert the hitch pin
into the hole. Secure the hitch pin
with the hitch pin clip.
218
On U.S. RTX model only
Towing a Trailer
Towing EquipmentInst alling t he Cover
Inst alling t he Ball Mount
220
TRAILER HITCH
7-PIN TRAILER CONNECTOR
4-PIN TRAILER
CONNECTOR
TRAILER HITCHCOVER
HITCH PIN HITCH PIN
CLIP
BALL MOUNT
TRAILER HITCH
Page 225 of 331
CONT INUED
The 7-pin trailer connector is needed
f or the trailer lights. To connect the
connector, do this:Make sure the connector and the
socketarefreeof dirt,moisture,
or other f oreign material.
Open the socket lid by pulling it up. Insert the connector securely into
the socket.
Hook the retaining tab on the
inner side of the lid against the
retaining tab of the connector to
prevent disconnection during
operation.
Remove the socket cover, and
attach it securely over the socket.
Insert the connector into the
socket securely to prevent
disconnection during operation.
The 4-pin trailer connector is also
needed f or the trailer lights. To
connect the connector, do this:
1. 1.
2. 3.
4.
2.
Towing a Trailer
Connect ing t he T railer Connect ors
Driving
221
7-PIN TRAILER CONNECTOR SOCKETRETAINING
TAB
RETAINING
TAB
LID
4-PIN TRAILER CONNECTORSOCKET COVER
7-PIN TRAILER
CONNECTOR 4-PIN TRAILER
CONNECTOR