Page 73 of 258
�µ
Hold past ON to turn the rear
window wiper on and to spray the
rear window washer.
Rotate the switch
counterclockwise to spray the
window washer. Push down on the
lef t lever to signal a lef t turn and up
to signal a right turn. To signal a lane
change, push lightly on the lever and
hold it. The lever will return to the
center when you release it or
complete a turn.
Therearwindowwasherusesthe
same f luid reservoir as the wind-
shield washer.
Turn signal
Of f
Parking and interior lights
Headlights
High beams
Flashhighbeams
Fog lights of f
Fog lights on
3.
4.
1.
2.
3.
4.
5.
6.
7.
8.
CONT INUED
On Sport model
Turn Signal and Headlights Turn Signal
Windshield Wipers and Washers, Turn Signal and Headlights
Inst rument s and Cont rols
71
Page 75 of 258
. This causes all four
outside turn signals and both turn
indicators in the instrument panel to
f lash. Use the hazard war")
CONT INUED
Pushthebuttontoturnonthe
hazard warning lights (f our-way
flashers). This causes all four
outside turn signals and both turn
indicators in the instrument panel to
f lash. Use the hazard warning lights
if you need to park in a dangerous
area near heavy traffic, or if your
vehicle is disabled.
You can change the instrument panel
brightness only when the light
switch is on.
The rear window def ogger will clear
fog, frost, and thin ice from the
window. Push the def ogger button to
turn it on and off. The indicator in
the button comes on to show the
def ogger is on. You must manually
shut of f the rear window def ogger
when it is no longer needed.
Turntheknobontheupperpartof
the instrument panel to adjust the
brightness.
You will hear a beep when maximum
or minimum brightness is reached.
You will also hear a beep when the
maximum level is canceled by
turning the knob a click to the lef t.
Instrument Panel Brightness, Hazard Warning Button, Rear Window Def ogger
Rear Window Def ogger
Hazard Warning Button
Instrument Panel Brightness
Inst rument s and Cont rols
73
INSTRUMENT PANEL BRIGHTNESS
CONTROL KNOB
Page 76 of 258
Make sure the rear window is clear
and you have good visibility bef ore
starting to drive.
Thedefoggerwiresontheinsideof
the rear window can be accidentally
damaged. When cleaning the glass,
always wipe side-to-side.Make any steering wheel adjustment
bef ore you start driving.
Push the lever under the steering
column all the way down.
Move the steering wheel so it
points toward your chest, not
toward your f ace. Make sure you
can see the instrument panel
gauges and indicators. Push the lever up to lock the
steering wheel in position.
Make sure you have securely
locked the steering wheel in place
by trying to move it up and down.
1.
2. 3.
4.
Steering Wheel A djustment
Rear Window Def ogger, Steering Wheel A djustment
74
Adjusting the steering wheel
position while driving may
cause you to lose control of the
vehicle and be seriously injured
inacrash.
Adjust the steering wheel only
when the vehicle is stopped.
Page 95 of 258
�µTo open the driver’s
window f ully, push the window
switch f irmly down to the second
detent, and release it. The window
will automatically go down all the
way. To stop the window, pull back
on the window switch briefly.
Turn the ignition switch to the ON
(II) position to raise or lower any
window. To open the window, push
the switch down and hold it. Release
the switch when you want to stop the
window. To close the window, pull
back on the switch and hold it.
To unlatch the detachable anchor,
insert the latch plate into the slot on
the side of the anchor buckle. Store
the detachable anchor and seat belt
latch plates in the retractor housing.
CONT INUED
AUTO
Power Windows
Seats, Power Windows
Inst rument s and Cont rols
93
DRIVER’S WINDOW SWITCH
MAIN SWITCH
ANCHOR BUCKLE
LATCH PLATEClosing a power window on
someone’s hands or fingers can
cause serious injury.
Make sure your passengers are
away from the windows before
closing them.
Page 96 of 258
Turn the ignition switch to the ON
(II) position.
Move the selector switch to L
(driver’s side) or R (passenger’s
side).
Keeptheinsideandoutsidemirrors
clean and adjusted f or best visibility.
Be sure to adjust the mirrors bef ore
you start driving.
The inside mirror has day and night
positions. The night position reduces
glare f rom headlights behind you.
Flip the tab on the bottom edge of
the mirror to select the day or night
position.
When you push the MAIN switch in,
the switch is off, and the passenger
windows cannot be raised or lowered.
To cancel this f eature, push on the
switch again to get it to pop out.
Keep the MAIN switch of f when you
have children in the vehicle so they
do not injure themselves by
operating the windows
unintentionally.
2. 1.
All models except Canadian DX
Adjusting the Power Mirrors
Mirrors
Power Windows, Mirrors
94
SELECTOR SWITCH
ADJUSTMENT SWITCH
TAB
Page 100 of 258

position, the light comes on when
you:Open any door.
Unlock the doors and the tailgate
with t")
The ceiling light has a three-position
switch; ON, Door Activated, and
OFF. In the Door Activated (center)
position, the light comes on when
you:Open any door.
Unlock the doors and the tailgate
with the key or the remote
transmitter (if equipped). After all doors are closed tightly, the
light f ades out in about 30 seconds.
The ceiling light (with the switch in
the door activated position) comes
on when you remove the key f rom
the ignition switch. If you do not
open a door, the light f ades out in
about 30 seconds.
To use the accessory power socket,
pull up the cover. The ignition switch
must be in the ACCESSORY (I) or
ON (II) position.
It will not power an automotive type
cigarette lighter element.
To use the sun visor, pull it down.
Whenusingthesunvisorforthe
side window, remove the support rod
f rom the clip, and swing it out. This socket is intended to supply
power f or 12 volt DC accessories
that are rated 120 watts or less (10
amps).
If you leave any door open without
the key in the ignition switch, the
ceiling light will go of f af ter 3
minutes.
Interior Convenience Items, Interior L ights
Ceiling L ight
A ccessory Power Socket
Sun Visor
98
DOOR ACTIVATED
OFF ON
Page 102 of 258
�Î
�Î
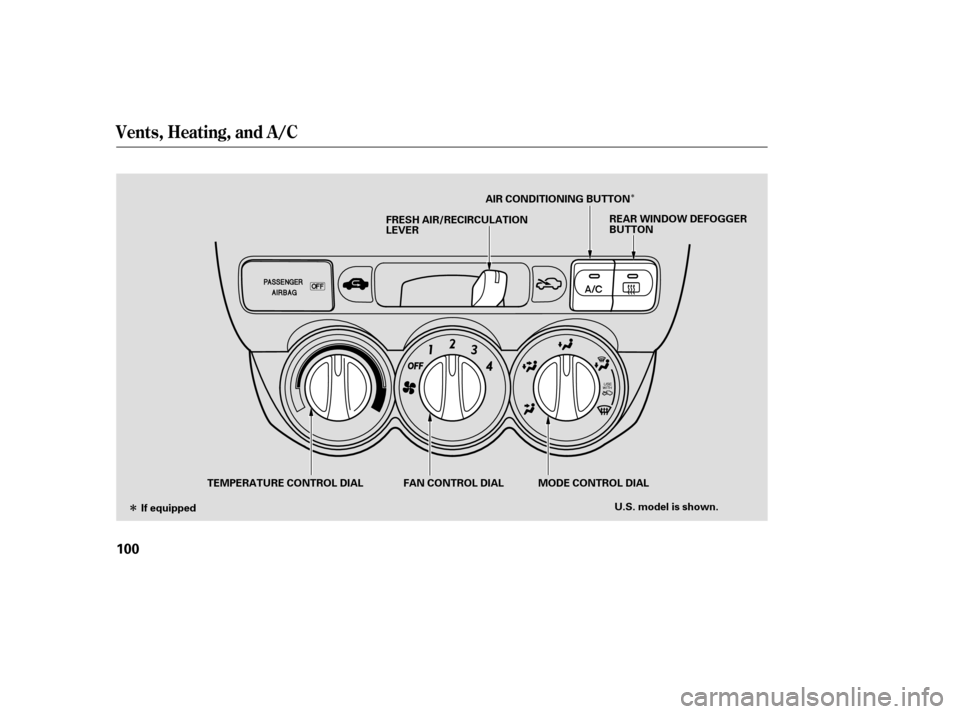
Vents, Heating, and A/C
100
REAR WINDOW DEFOGGER
BUTTON
TEMPERATURE CONTROL DIAL AIR CONDITIONING BUTTON
If equipped U.S. model is shown.
MODE CONTROL DIAL
FAN CONTROL DIAL
FRESH AIR/RECIRCULATION
LEVER
Page 103 of 258

The outside air intakes for the
heating and cooling system are at
the base of the windshield. Keep this
area clear of leaves and other debris.
Thesystemshouldbeleftinfresh
air mode under almost all conditions.
Keeping the system in reci rculation
mode, parti cularly with the A/C off,
can cause the windows to fog up.
Switch to recirc ulation mode when
driving through dusty or smoky
conditions, then return to fresh air
mode.
Tu
rning this dial clockwise increases
the temperature of the airflow.
Turn
this dial to increase or decrease
the fan speed and airflow.
This button turns the air
conditioning on and off. The
indicatorinthebuttonisonwhen
the A/C is on.
This lever controls the source of the
air going into the system. When you
slide the lever to the side, air is
brought in from outside the vehicle
(fresh air mode). When you select
the side, air from the vehicle’s
interior is sent through the system
again (recirculation mode). Use
the mode control dial to select
the vents the air flows from. Some
air will flow from the dashboard
corn er vents in all modes. Airflow
is divided between
the vents in the dashboard and the
floor vents.
Air flows from the floor
vents. Air
flows from the center
and corner vents in the dashboard.
Air flows from the defroster
vents at the base of the windshield.
Airflow
is divided between
the floor vents and the defroster
vents at the base of the windshield.
When you select or ,
the system automatically turns on
the A/C (if equipped). You cannot
turn the A/C of f in this mode.
This button turns the rear window
def ogger on and of f (see page ).
73
If equipped
Rear Window Def ogger Button
Air Conditioning (A/C) Button T emperature Control Dial
Fan Control Dial
Fresh A ir/Recirculation L ever
Mode Control Dial
A irf low Controls
Vents, Heating, and A/C
Features
101


 position.
Move the selector switch to L
(driver’s side) or R (passenger’s
side).
Keeptheinsideandoutsidemirrors
clean and adjusted f or best visibility.
Be")