Page 154 of 304
 or ON (II)
posi")
�µ �µ �µ �µ
You operate the PC card player with
the same controls used f or the radio
and the disc player. To load or play a
card, the ignition switch must be in
the ACCESSORY (I) or ON (II)
position.
The PC card player reads and plays
cards in MP3 or WMA f ormats.
Depending on the f ormat, the screen
will indicate ‘‘MP3’’ or ‘‘WMA’’ when
a card is playing. The card limit of
the player is 99 f olders and 999
tracks. If the card has a complex
structure, it takes some time f or the
system to begin playing it.
Based on PCMCIA 2.1/JEIDA 4.2,
the recommended PC cards f or the
PC card reader are: Always use the recommended
memory card with the appropriate
adapter (if an adapter is needed).
Some memory cards will not work in
this unit.
When you insert a PC card into
the slot, make sure you put it in
straight. If you cannot insert it,
remove it, and insert again.
Do not keep PC cards in the
vehicle. Direct sunlight and high
heat will damage them.
To avoid damaging the card
reader, do not insert hard disc
drive cards into the PC card slot.
You cannot close the screen
(move it to the upright position)
until the PC card is inserted all the
way into its slot or removed. Never insert f oreign objects into
the PC card slot.
The specif ications f or compatible
MP3 f iles are:
Compatible with variable bit rate
and multi-session
Maximum layers
(including ROOT): 8 layers
SD memory card
CompactFlash
Flash ATA Sampling f requency:
32/44.1/48 kHz (MPEG1)
24/22.05/16 kHz (MPEG2)
Bit rate:
32/40/48/56/64/80/96/112/128/
160/192/224/256/320 kbps
(MPEG1)
8/16/24/32/40/48/56/64/80/96/
112/128/160 kbps (MPEG2)
Audio System (Models with navigation system)
To Play a PC card
152
NOTE:
�����—�����—�����y�
�������������y���
�(�#�����
���y���
�����y
Page 156 of 304
Therearethreeplaymodes:Folder,
Artist, and Album. Touch the PLAY
MODE icon, then choose one of the
modes by touching its icon. When a
mode is selected, it is highlighted in
blue.
If play mode information was not
includedinthetrackswhenthey
were added to the card, it will not be
displayed on the screen.Foldermodeplaystracksinthe
order they were added to the card.
Artistmodeplaystracksin
alphabetical order, by artist and
song title.
Album mode plays albums
(f olders) in alphabetical order.
Audio System (Models with navigation system)
T o Select a Play Mode
154
FOLDER MODE
MODE INDICATOR
PLAY MODE ICON
PLAY MODE ICON PLAY MODE ICON
MODE INDICATOR MODE INDICATOR
ARTIST MODE ALBUM MODE
�����—�����—�����y�
�������������y���
�(�#�����
���y���
�����y
Page 158 of 304
If you select ‘‘Play a New Track List,’’
the system goes into the selected
play mode immediately and begins to
play the files in order to the new list.
To go back to the previous screen,
presstheCANCELbuttononthe
rightsideofthescreen.Toexitthe
play mode screens, press the AUDIO
button.You can use the preset buttons while
a card is playing to select or change
f iles. Each preset button’s f unction is
shownonthebottomof thescreen.Iconsonthescreencanalsobe
selected with the joystick. Move the
joystick lef t or right and up or down
until the icon is highlighted, then
press the ENT on the top of the
joystick to select the icon.
Audio System (Models with navigation system)
T o Change or Select T racks/Files
156
PRESET BUTTONS
PRESET BUTTON’S FUNCTION
�����—�����—�����y�
�������������y���
�(�#�����
���y���
���
�y
Page 161 of 304
�Û�Ý
CONT INUED
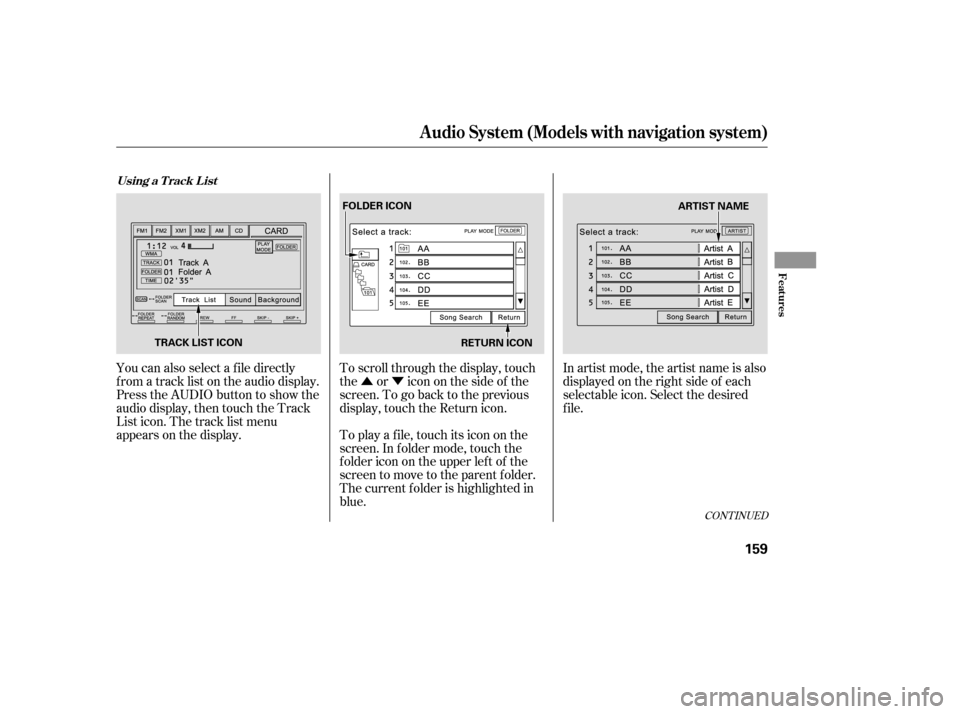
You can also select a f ile directly
f rom a track list on the audio display.
Press the AUDIO button to show the
audio display, then touch the Track
List icon. The track list menu
appears on the display.To scroll through the display, touch
the or icononthesideof the
screen.Togobacktotheprevious
display, touch the Return icon.
To play a f ile, touch its icon on the
screen. In f older mode, touch the
f older icon on the upper lef t of the
screen to move to the parent folder.
The current f older is highlighted in
blue.In artist mode, the artist name is also
displayed on the right side of each
selectable icon. Select the desired
f ile.
Audio System (Models with navigation system)
Using a T rack L ist
Features
159
RETURN ICON
FOLDER ICON
TRACK LIST ICON ARTIST NAME
�����—�����—�����y�
�������������y���
�(�#�����
���y���
�����y
Page 167 of 304

When a disc is not being played,
store it in its case to protect it f rom
dust and other contamination. To
prevent warpage, keep discs out of
direct sunlight and extreme heat.
To clean a disc, use a clean sof t cloth.
Wipe across the disc f rom the center
to the outside edge.
A new disc may be rough on the
inner and outer edges. The small
plastic pieces causing this roughness
can f lake of f and f all on the
recording surf ace of the disc,
causing skipping or other problems.
Remove these pieces by rubbing the
inner and outer edges with the side
of a pencil or pen.Handle a disc by its edges; never
touch either surf ace. Do not place
stabilizer rings or labels on the disc.
These, along with contamination
f rom f inger prints, liquids, and f elt-
tip pens, can cause the disc to not
play properly, or possibly jam in the
drive.
When recording a CD-R or
CD-RW, the recording must be
closedforittobeusedbythe
system.
When using CD-R or CD-RW discs,
use only high quality discs labeled
f or audio use.
Never try to insert f oreign objects in
the disc player.
Handle your discs properly to
prevent damage and skipping.
Play only standard round discs.
Odd-shaped discs may jam in the
driveorcauseotherproblems.
General Inf ormation Protecting Discs
Protecting Your Discs
Features
165
Do not use discs with adhesive labels.
The label can curl up and cause the
disc to jam in the unit.
�����—�����—�����y�
����
����
���y���
�(�#�����
���y���
�����y
Page 172 of 304

Once the security system is set,
opening any door, the trunk, or the
hood without using the key or the
remote transmitter will cause it to
alarm. It also alarms if the radio is
removed f rom the dashboard or the
wiring is cut.
The security system helps to protect
your vehicle and valuables f rom thef t.
The horn sounds and a combination
of headlights (low beam), parking
lights, side marker lights, and
taillights f lash if someone attempts
to break into your vehicle or remove
the radio. This alarm continues f or 2
minutes, then it stops. To reset an
alarming system bef ore the 2
minutes have elapsed, unlock the
driver’s door with the key or the
remote transmitter.
The security system automatically
sets 15 seconds after you lock the
doors, hood, and trunk. For the
system to activate, you must lock the
doors f rom the outside with the key,
driver’s lock tab, door lock switch, or
remote transmitter. The security
system indicator on the instrument
panel starts blinking immediately to
show you the system is setting itself . With the system set, you can still
open the trunk with the master key
or the remote transmitter without
triggering the alarm. The alarm will
sound if the trunk lock is f orced, or
the trunk is opened with the trunk
release handle.
The security system will not set if
the hood, trunk, or any door is not
f ully closed. If the system will not set,
check the door and trunk open
indicators on the instrument panel
(see page ) to see if the doors and
trunk are f ully closed. Since it is not
part of the monitor display, manually
check the hood.
Do not attempt to alter this system
or add other devices to it.
To see if the system is set
af ter you exit the vehicle, press the
LOCK button on the remote
transmitter within 5 seconds. If the
system is set, the horn will beep
once. 65
If equipped
Security System
170
NOTE:
SECURITY SYSTEM INDICATOR
�����—�����—�����y�
����
��������y���
�(�#�����
���y���
�����y
Page 179 of 304

Park the vehicle, and set the
parking brake. Pull the hood
release handle under the lower lef t
corner of the dashboard. The
hood will pop up slightly.
Screw the f uel f ill cap back on
until it clicks at least once. If you
do not properly tighten the cap,
the malf unction indicator lamp
maycomeon(seepage ).You
will also see a ‘‘CHECK FUEL
CAP’’ message on the inf ormation
display.
Push the f uel f ill door closed until
it latches.
Remove the f uel f ill cap slowly.
You may hear a hissing sound as
pressure inside the tank escapes.
The fuel fill cap is attached to the
f uel f iller with a tether. Place the
cap in the holder on the f uel f ill
door.
Stop f illing the tank af ter the f uel
nozzle automatically clicks of f . Do
not try to ‘‘top off’’ the tank. Leave
some room f or the f uel to expand
with temperature changes.
even though the tank is not f ull,
there may be a problem with your
vehicle’s fuel vapor recovery
system. The system helps keep
f uel vapor f rom going into the
atmosphere. Try f illing at another
pump. If this does not f ix the
problem, consult your dealer.
1.
5. 6.
4.
3.
268If the f uel nozzle keeps clicking of f
Service Station Procedures
Opening and Closing the Hood
178
HOOD RELEASE HANDLE
�����—�����—�����y�
����
�
������y���
�(�#�����
���y���
�����y
Page 180 of 304

Wait a f ew minutes af ter turning the
engine of f bef ore you check the oil.
Put your f ingers under the f ront
edge of the hood near the center.
Slide your hand to the lef t until
you f eel the hood latch handle.
Push this handle up to release it.
Lif t up the hood.
If the hood latch handle moves
stif f ly, or if you can open the hood
without lifting the handle, the
mechanism should be cleaned and
lubricated. Pull the support rod out of its clip
by holding the grip, and insert the
end into the designated hole in thehood.
To close the hood, lif t it up slightly
to remove the support rod f rom
the hole. Put the support rod back
into its holding clip. Lower the
hood to about a f oot (30 cm) above
the fender, then let it drop. Make
sure it is securely latched.
Remove the dipstick (orange
handle).
Insert it all the way back in its tube.
Wipe of f the dipstick with a clean
cloth or paper towel.
3.
1. 2.
3.
2.
CONT INUED
Service Station Procedures
Oil Check
Bef ore Driving
179
DIPSTICK
SUPPORT ROD
LATCH Except U.S. Si
�����—�����—�����y�
����
�
������y���
�(�#�����
���y���
�����y