Page 230 of 304

Check the f luid level in the
windshield washer reservoir at least
monthly during normal use.When you ref ill the reservoir, clean
the edges of the windshield wiper
blades with windshield washer f luid
on a clean cloth. This will help to
condition the blade edges.
Fill the reservoir with a good-quality
windshield washer f luid. This
increases the cleaning capability and
prevents f reezing in cold weather. The low washer
level indicator comes on when the
level is low (see page ).
Check the f luid level by removing
the cap and looking at the level
gauge. 64
On Canadian models:
Windshield Washers
Maint enance
231
LEVEL GAUGELEVEL GAUGE
Except U.S. Si U.S. Si
Do not use engine antif reeze or a
vinegar/water solution in the
windshield washer reservoir. Antif reeze
can damage your vehicle’s paint, while
a vinegar/water solution can damage
the windshield washer pump. Use only
commercially-available windshield
washer f luid.
�����—�����—�����y�
����
��������y���
�(�#�����
���y���������y
Page 231 of 304

Check the f luid level with the engine
at normal operating temperature.If the level is below the lower
mark, add f luid into the dipstick
hole to bring it to the level
between the upper and lower
marks.
Park the vehic le o n level g ro und.
Fo r ac c urate results, wait abo ut 60
sec o nds befo re g o ing to step 2, but
do n't wait lo ng er than 90 sec o nds.
Always use Honda ATF-Z1
(automatic transmission f luid). If
it’s not available, you may use a
DEXRON
III automatic
transmission f luid as a temporary
replacement. However, continued
use can af f ect the shif t quality.
Have the transmission f lushed and
ref illed with Honda ATF-Z1 by
your dealer as soon as it is
convenient.
Remove the dipstick and check
the f luid level. It should be
between the upper and lower
marks.
Insert the dipstick all the way into
the transmission securely as
shown in the illustration.
Remove the dipstick (yellow loop)
f rom the transmission, and wipe it
with a clean cloth. Pour the f luid slowly and caref ully
so you do not spill any. Clean up
any spills immediately; it could
damage components in the engine
compartment.
3. 4. 5.
1. 2.
T ransmission Fluid
Automatic Transmission
232
DIPSTICK
UPPER
MARK
LOWER
MARK
�����—�����—�����y�
����
��������y���
�(�#�����
���y���������y
Page 232 of 304

If Honda MTF is not available, you
may use an SAE 10W-30 or 10W-40
viscosity motor oil with the API
Certif ication seal that says ‘‘FOR
GASOLINE ENGINES’’ as a
temporary replacement. However,
motor oil does not contain the proper
additives, and continued use can
cause stif f er shif ting. Replace as
soon as it is convenient.
Check the f luid level with the
transmission at normal operating
temperature and the vehicle sitting
on level ground. Remove the
transmission f iller bolt, and caref ully
f eel inside the bolt hole with your
f inger. The f luid level should be up
to the edge of the bolt hole. If it is
not, add Honda Manual
Transmission Fluid (MTF) until it
starts to run out of the hole. Reinstall
the f iller bolt, and tighten it securely.
Insert the dipstick all the way back
into the transmission securely as
shown in the illustration.
The automatic transmission should
be drained and ref illed with new f luid
when this service is indicated by a
maintenance message on the
inf ormation display.
If you are not sure how to add f luid,
contact your dealer.
6.
CONT INUED
Manual Transmission Fluid
A ut omat ic T ransmission Fluid, Manual T ransmission Fluid
Maint enance
233
FILLER BOLT
Correct LevelFILLER BOLT
Correct Level
Except U.S. Si
U.S. Si
�����—�����—�����y�
����
��������y���
�(�#�����
���y���������y
Page 234 of 304

Check the level on the side of the
reservoir when the engine is cold.
The f luid should be between the
UPPER LEVEL and LOWER LEVEL.
If not add power steering f luid to the
UPPER LEVEL mark.
Pour the f luid slowly and caref ully so
you do not spill any. Clean up any
spill immediately; it could damage
components in the enginecompartment.
Always use Honda Power Steering
Fluid. You may use another power
steering f luid as an emergency
replacement, but have the power
steering system f lushed and ref illed
with Honda PSF as soon as possible.
A low power steering f luid level can
indicate a leak in the system. Check
the f luid level f requently, and have
the system inspected as soon as
possible.
The f luid level should be between
theMINandMAXmarksontheside
of the reservoir. If it is not, add
brake f luid to bring it up to that level.
Use the same fluid specified for the
brake system.
A low f luid level can indicate a leak
in the clutch system. Have this
system inspected as soon as possible.
Manual Transmission only
All models except U.S. Si
Brake and Clutch Fluid, Power Steering Fluid
Power Steering Fluid
Clutch Fluid
Maint enance
235
MAX
MIN LOWER LEVEL
UPPER LEVEL
T urning the steering wheel to f ull lef t
or right lock and holding it there can
damage the power steering pump.
�����—�����—�����y�
����
����
���y���
�(�#�����
���y���������y
Page 259 of 304

position:When you turn the ignition switch to
the START")
Diagnosing why the engine won’t
start f alls into two areas, depending
on what you hear when you turn the
ignition switch to the START (III)
position:When you turn the ignition switch to
the START (III) position, you do not
hear the normal noise of the engine
trying to start. You may hear a
clicking sound, a series of clicks, or
nothing at all. Turn the ignition switch to the
START (III) position. If the
headlights do not dim, check the
condition of the f uses. If the f uses
areOK,thereisprobably
something wrong with the
electrical circuit f or the ignition
switch or starter motor. You will
need a qualif ied technician to
determine the problem. See
on page .
If the headlights dim noticeably or
go out when you try to start the
engine, either the battery is
discharged or the connections are
corroded. Check the condition of
the battery and terminal connec-
tions (see page ). You can
then try jump starting the vehicle
f rom a booster battery (see page ).
You can hear the starter motor
operating normally, or the starter
motor sounds like it is spinning
f aster than normal, but the engine
does not start up and run.
You hear nothing, or almost
nothing. The engine’s starter
motor does not operate at all, or
operates very slowly.
Turn the ignition switch to the ON
(II) position. Turn on the
headlights, and check their
brightness. If the headlights are
very dim or do not come on at all,
the battery is discharged. Seeon page .
Check the transmission interlock.
If you have a manual transmission,
the clutch pedal must be pushed
all the way to the f loor or the
starter will not operate. With an
automatic transmission, it must be
in Park or neutral.
Check these things:
263 276
252
263
Nothing Happens or the Starter
Motor Operates Very Slowly
Emergency T owing
Jump Starting
If theEngineWon’tStart
T aking Care of t he Unexpect ed
261
�����—�����—�����y�
���������
���y���
�(�#�����
���y���������y
Page 260 of 304
In this case, the starter motor’s
speed sounds normal, or even f aster
than normal, when you turn the
ignition switch to the START (III)
position, but the engine does not run.Are you using a properly coded
key? An improperly coded key will
cause the immobilizer system
indicator in the instrument panel
to blink rapidly (see page ).
Are you using the proper starting
procedure? Ref er to on page . Do you have f uel? Check the f uel
gauge; the low f uel indicator may
not be working.
There may be an electrical
problem, such as no power to the
f uel pump. Check all the f uses
(see page ).
If youfindnothingwrong,youwill
need a qualif ied technician to f ind
the problem. See
on page .
77
190 270
276
T he Starter Operates Normally
Starting the
Engine Emergency
Towing
If theEngineWon’tStart
262
�����—�����—�����y�
���������
���y���
�(�#�����
���y���������y
Page 262 of 304
�µ
�´
�´
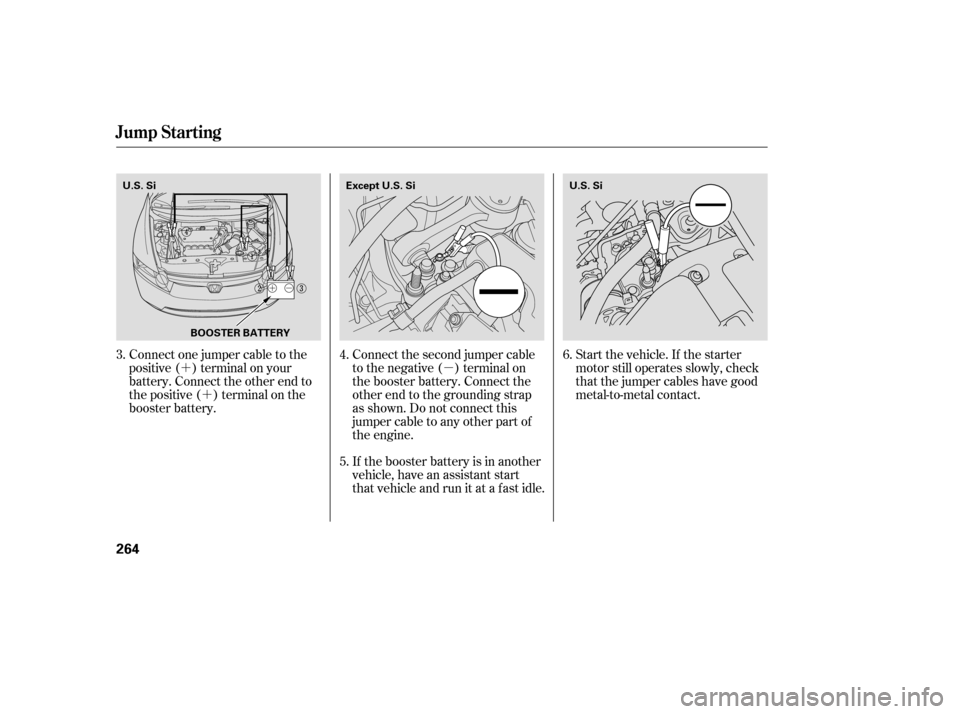
Start the vehicle. If the starter
motor still operates slowly, check
that the jumper cables have good
metal-to-metal contact.
Connect the second jumper cable
to the negative ( ) terminal on
the booster battery. Connect the
other end to the grounding strap
as shown. Do not connect this
jumper cable to any other part of
the engine.
If the booster battery is in another
vehicle, have an assistant start
that vehicle and run it at a fast idle.
Connect one jumper cable to the
positive ( ) terminal on your
battery. Connect the other end to
the positive ( ) terminal on the
booster battery.
6.
4. 5.
3.
Jump Start ing
264
BOOSTER BATTERY
U.S. Si
U.S. Si
Except U.S. Si
�����—�����—�����y�
�������������y���
�(�#�����
���y���������y
Page 264 of 304
.
If you do not see steam or spray,
leave")
Put the radiator cap back on
tightly. Run the engine, and check
the temperature gauge. If it goes
back to the red mark, the engine
needs repair (seeon page ).
If you do not see steam or spray,
leave the engine running, and
watch the temperature gauge. If
the high heat is due to overloading,
the engine should start to cool
down almost immediately. If it
does, wait until the temperature
gauge comes down to the midpoint,
then continue driving.
If the temperature gauge stays at
the red mark, turn of f the engine.
Look f or any obvious coolant leaks,
such as a split radiator hose.
Everything is still extremely hot,
so use caution. If you f ind a leak, it
must be repaired bef ore you
continue driving (see
on page ).
If you don’t f ind an obvious leak,
check the coolant level in the
radiator reserve tank (see page ). Add coolant if the level is
below the MIN mark. Start the engine, and set the
temperature control dial to
maximum heat. Add coolant to the
radiator up to the base of the f iller
neck. If you do not have the
proper coolant mixture available,
you can add plain water.
Remember to have the cooling
system drained and ref illed with
the proper mixture as soon as you
can.
If the temperature stays normal,
check the coolant level in the
radiator reserve tank. If it has
gone down, add coolant to the
MAX mark. Put the cap back on
tightly.
Using gloves or a large heavy
cloth, turn the radiator cap
counterclockwise, without pushing
down, to the f irst stop. Af ter the
pressure releases, push down on
the cap, and turn it until it comes
off.
If there was no coolant in the
reserve tank, you may need to add
coolant to the radiator. Let the
engine cool down until the reading
reaches the middle of the
temperature gauge or lower
bef ore checking the radiator.
7. 8. 9.
3. 4. 5. 6. 10. 11.
276
181 276
Emergency
Towing
Emergency
Towing
If theEngineOverheats
266
Removing the radiator cap
while the engine is hot can
cause the coolant to spray out,
seriously scalding you.
Always let the engine and
radiator cool down before
removing the radiator cap.
�����—�����—�����y�
�������������y���
�(�#�����
���y�������
�y

position, but the engine does not run.Are you using a proper")