Page 198 of 304

If your vehicle has an automatic
transmission, set the parking brake
bef ore you put the transmission in
Park. This keeps the vehicle f rom
moving and putting pressure on the
parking mechanism in the
transmission.Make sure the moonroof (if
equipped) and the windows are
closed.
Place any packages, valuables, etc.,
in the trunk or take them with you.
Turn of f the lights. If the vehicle is f acing uphill, turn
the f ront wheels away f rom the
curb. If you have a manual
transmission, put it in f irst gear.
If the vehicle is f acing downhill,
turn the front wheels toward the
curb. If you have a manual
transmission, put it in reverse gear.
Make sure the parking brake is
f ully released bef ore driving away.
Driving with the parking brake
partially set can overheat or
damage the rear brakes.
Lock the doors.
Always use the parking brake when
you park your vehicle. Make sure
the parking brake is set f irmly, or
your vehicle may roll if it is parked
on an incline.
Check the indicator on the
instrument panel to verif y that the
security system is set.
Never park over dry leaves, tall
grass, or other f lammable
materials. The hot three way
catalytic converter could cause
these materials to catch on fire.
On vehicles with security system
Parking T ips
Parking
198
Never install a sunshade between the
upper and lower meters on the
instrument panel. If you do, you could
cause heat damage to the upper meter
on a very hot day.
�����—�����—�����y�
����
��������y���
�(�#�����
���y���������y
Page 207 of 304
Trailer lights and equipment must
comply with federal, state, and local
regulations. Check with your local
recreational vehicle dealer f or the
requirements in your area, and use
only equipment designed f or your
vehicle.
Since lighting and wiring vary by
trailer type and brand, you should
have a qualif ied technician install a
suitable connector between the
vehicle and the trailer. Improper
equipment or installation can cause
damage to your vehicle’s electrical
system and af f ect your vehicle
warranty.Many states and Canadian provinces
require special outside mirrors when
towing a trailer. Even if they don’t,
you should install special mirrors if
you cannot clearly see behind you, or
if the trailer creates a blind spot.
Askyourtrailersalesorrental
agency if any other items are
recommended or required f or your
towing situation.
A ddit ional T owing Equipment
T railer L ights
Towing a Trailer
Driving
207
�����—�����—�����y�
����
������
�y���
�(�#�����
���y�����
���y
Page 208 of 304

When preparing to tow, and bef ore
driving away, be sure to check the
f ollowing:The vehicle has been properly
serviced, and the tires, brakes,
suspension, cooling system, and
lights are in good operating
condition.
All weights and loads are within
limits (see pages and ).
Thehitch,safetychains,andany
other attachments are secure.
All items in or on the trailer are
properly secured and cannot shif t
while you drive.
The lights and brakes on your
vehicle and the trailer are working
properly. Your vehicle tires and spare are
properly inf lated (see page ),
and the trailer tires and spare are
trailer maker.
Crosswinds and air turbulence
caused by passing trucks can disrupt
your steering and cause trailer to
sway. When being passed by a large
vehicle, keep a constant speed, and
steer straight ahead. Do not try to
make quick steering or braking
corrections. Always drive slowly and have
someone guide you when backing up.
Grip the of the steering
wheel; then turn the wheel to the lef t
to get the trailer to move to the lef t,
andturnthewheelrighttomovethe
trailer to the right.
Follow all normal precautions when
parking, including f irmly setting the
parking brake and putting the
transmission in Park (automatic) or
in 1st or reverse (manual). Also,
place wheel chocks at each of the
trailer’s tires.
246
205
204
bottom
Pre-T ow Checklist
Handling Crosswinds and Buf f et ing Backing Up
Parking
Towing a Trailer
208
�����—�����—�����y�
����
������
�y���
�(�#�����
���y�����
���y
Page 217 of 304

�µ�µ�µ
�µ
�µ
�µ
�Ì Engine oil level Check every
time you fill the fuel tank. See
page .
Engine coolant level Check the
radiator reserve tank every time
you f ill the f uel tank. See page .
Automatic transmission Check
the f luid level monthly. See page
.
Brakes Check the f luid level
monthly. See page .
Tires Check the tire pressure
monthly. Examine the tread f or
wear and foreign objects. See page .
Lights Check the operation of
the headlights, parking lights,
taillights, high-mount brake light,
and license plate lights monthly.
See page .
U.S. Vehicles:
According to state and federal
regulations, f ailure to perf orm
maintenance on the items marked
with will not void your emissions
warranties. However, all
maintenance services should be
perf ormed in accordance with the
intervals indicated by the
inf ormation display.
Youshouldcheckthefollowing
items at the specif ied intervals. If
you are unsure of how to perf orm
any check, turn to the appropriate
page listed.
However, service at a dealer is not
mandatory to keep your warranties
in effect. Maintenance may be done
by any qualif ied service f acility or
person who is skilled in this type of
automotive service. Make sure to
have the service f acility or person
reset the display as previously
described. Keep all receipts as proof
of completion, and have the person
who does the work fill out the
maintenance record. Check your
warranty booklet f or more
inf ormation.
We recommend using Honda parts
and fluids whenever you have
maintenance done. These are
manuf actured to the same high
quality standards as the original
components, so you can be conf ident
of their perf ormance and durability.
179
181
232 234
245
236
Maintenance Minder
Maintenance,
replacement, or repair of
emissions control devices and
systems may be done by any
automotive repair establishment
or individual using parts that are
‘‘certif ied’’ to EPA standards.
Owner’s Maintenance Checks
218
�����—�����—�����y�
����
��������y���
�(�#�����
���y���������y
Page 235 of 304
Your vehicle has halogen headlight
bulbs. When replacing a bulb, handle
it by its base, and protect the glass
f rom contact with your skin or hard
objects. If you touch the glass, clean
it with denatured alcohol and a clean
cloth.To change the headlight bulb on
the driver’s side, remove the
engine coolant reserve tank by
pulling it out of its holder.
Theheadlightswereproperlyaimed
when your vehicle was new. If you
regularly carry heavy items in the
trunk or pull a trailer, readjustment
may be required. Adjustments
should be perf ormed by your dealer
or other qualif ied mechanic.
1.
Headlight A iming Replacing a Headlight Bulb
High Beam Headlight
Lights
236
Halogen headlight bulbs get very hot
when lit. Oil, perspiration, or a scratch
on the glass can cause the bulb to
overheat and shatter.
�����—�����—�����y�
����
��������y���
�(�#�����
���y�������
�y
Page 236 of 304

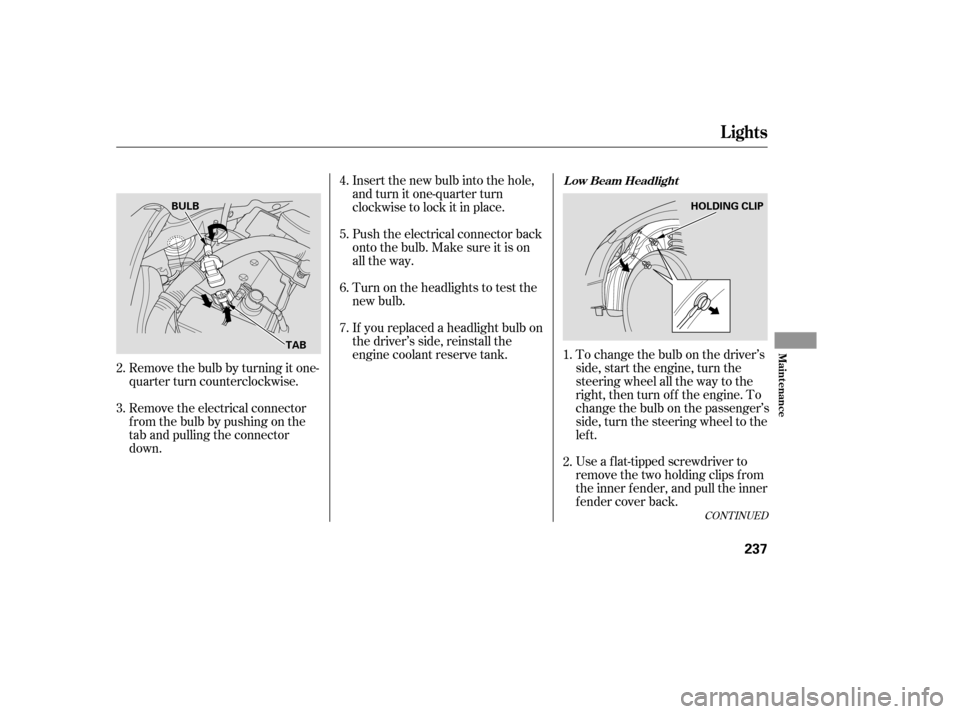
If youreplacedaheadlightbulbon
the driver’s side, reinstall the
engine coolant reserve tank. To change the bulb on the driver’sside, start the engine, turn the
steering wheel all the way to the
right, then turn off the engine. To
change the bulb on the passenger’s
side, turn the steering wheel to the
lef t.
Use a f lat-tipped screwdriver to
remove the two holding clips f rom
the inner f ender, and pull the inner
f ender cover back.
Remove the bulb by turning it one-
quarter turn counterclockwise. Push the electrical connector back
onto the bulb. Make sure it is on
all the way.
Insert the new bulb into the hole,
and turn it one-quarter turn
clockwise to lock it in place.
Turn on the headlights to test the
new bulb.
Remove the electrical connector
f rom the bulb by pushing on the
tab and pulling the connector
down.
2. 3.
2.
4. 5.6. 7.
1.
CONT INUED
Lights
L ow Beam Headlight
Maint enance
237
TAB HOLDING CLIP
BULB
�����—�����—�����y�
����
��������y���
�(�#�����
���y���������y
Page 237 of 304
To change the bulb on the driver’s
side, start the engine, turn the
steering wheel all the way to the
right, then turn off the engine. To
change the bulb on the passenger’s
side, turn the steering wheel to the
lef t.
Reinstall the inner f ender cover.
Then reinstall the holding clips,
andlocktheminplacebypushing
on their centers.
Insert the new bulb into the hole,
and turn it one-quarter turn
clockwise to lock it in place.
Push the electrical connector back
onto the bulb. Make sure it is on
all the way.
Turn on the headlights to test the
new bulb.
Remove the electrical connector
f rom the bulb by pushing on the
tab and pulling the connector
down.
Remove the bulb by turning it one-
quarter turn counterclockwise. 5. 6.
1.
7. 8.
3. 4.
Lights
Replacing the Front Side Marker/
Parking/Turn Signal Light Bulb
238
TAB HOLDING CLIP
SOCKET
�����—�����—�����y�
����
��������y���
�(�#�����
���y���������y
Page 238 of 304

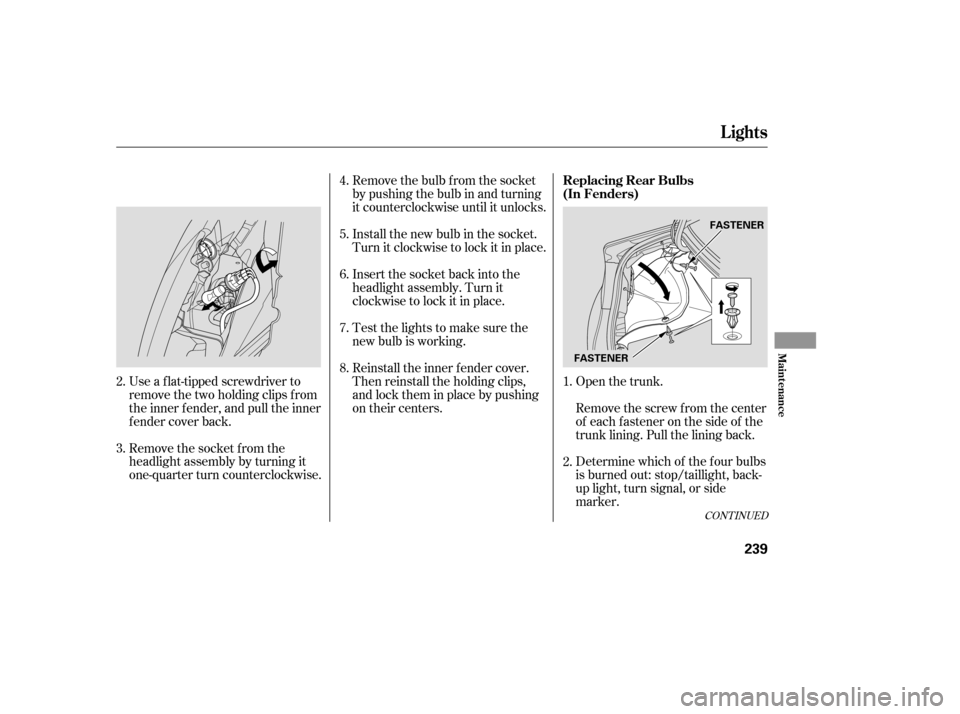
Open the trunk.
Remove the socket from the
headlight assembly by turning it
one-quarter turn counterclockwise.
Use a f lat-tipped screwdriver to
remove the two holding clips f rom
the inner f ender, and pull the inner
f ender cover back. Remove the bulb f rom the socket
by pushing the bulb in and turning
it counterclockwise until it unlocks.
Remove the screw from the center
of each f astener on the side of the
trunk lining. Pull the lining back.
Determine which of the f our bulbs
is burned out: stop/taillight, back-
up light, turn signal, or side
marker.
Install the new bulb in the socket.
Turn it clockwise to lock it in place.
Insert the socket back into the
headlight assembly. Turn it
clockwise to lock it in place.
Test the lights to make sure the
new bulb is working.
Reinstall the inner f ender cover.
Then reinstall the holding clips,
andlocktheminplacebypushing
on their centers.
1.
4. 5. 6. 7. 8.
3.
2.
2.
CONT INUED
Replacing Rear Bulbs
(In Fenders)
Lights
Maint enance
239
FASTENERFASTENER
�����—�����—�����y�
����
��������y���
�(�#�����
���y���������y