2007 HONDA CIVIC HYBRID display
[x] Cancel search: displayPage 213 of 268

Replace your tires with radial tires of
the same size, load range, speed
rating, and maximum cold tire
pressure rating (as shown on the
tire’s sidewall).
Mixing radial and bias-ply tires on
your vehicle can reduce braking
ability, traction, and steering
accuracy. Using tires of a dif f erent
size or construction can cause the
ABS to work inconsistently.
It is best to replace all f our tires at
thesametime.If thatisnotpossible
or necessary, replace the two f ront
tires or two rear tires as a pair.
Replacing just one tire can seriously
af f ect your vehicle’s handling.
TheABSworksbycomparingthe
speed of the wheels. When replacing
tires, use the same size originally
supplied with the vehicle. Tire size
and construction can affect wheelspeed and may cause the system to
activate.
If you ever replace a wheel, make
sure the new one matches the
specif ications of the original.
Replacement wheels are available at
your dealer.
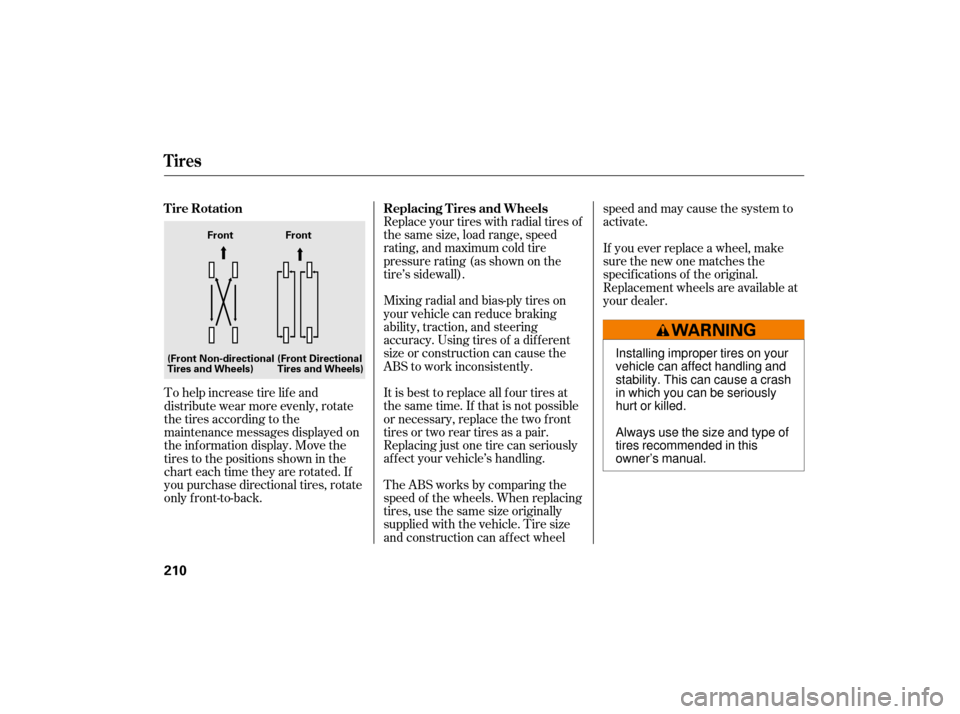
To help increase tire lif e and
distribute wear more evenly, rotate
the tires according to the
maintenance messages displayed on
the information display. Move the
tires to the positions shown in the
chart each time they are rotated. If
you purchase directional tires, rotate
only f ront-to-back. Replacing T ires and Wheels
Tire Rotation
Tires
210
Front Front
(Front Non-directional
Tires and Wheels) (Front Directional
Tires and Wheels)
Installing improper tires on your
vehicle can affect handling and
stability. This can cause a crash
in which you can be seriously
hurt or killed.
Always use the size and type of
tires recommended in this
owner’s manual.
Page 228 of 268

The reading on the vehicle’s
temperature gauge should stay in
the midrange. If it climbs to the red
mark, you should determine the
reason (hot day, driving up a steep
hill, etc.).
When the current f uel mileage is
shownonthedisplay,the
temperature gauge will interrupt on
the display and blink for several
times if the coolant temperature
rises to 224°F (118°C) or more. At
the same time, the beeper sounds
once.
If your vehicle overheats, you should
take immediate action. The only
indicationmaybethetemperature
gauge climbing to or above the red
mark. Or you may see steam or
spray coming f rom under the hood.If you see steam and/or spray
coming f rom under the hood, turn
of f the engine. Wait until you see
no more signs of steam or spray,
then open the hood.
If you do not see steam or spray,
leave the engine running, and
watch the temperature gauge. If
the high heat is due to overloading,
the engine should start to cool
down almost immediately. If it
does, wait until the temperature
gauge reading comes down to the
midpoint, then continue driving.
If the temperature gauge stays at
the red mark, turn of f the engine.
Saf ely pull to the side of the road.
Put the transmission in Park, and
set the parking brake. Turn of f all
accessories, and turn on the
hazard warning lights.
1. 2.
3.
4.
CONT INUED
If theEngineOverheats
T aking Care of t he Unexpect ed
225
Steam and spray from an
overheated engine can
seriously scald you.
Do not open the hood if steam
is coming out.
Driving with the temperature gauge
reading at the red mark can cause
serious damage to your engine.
Page 232 of 268

If the indicator comes on repeatedly,
even though it may turn off as you
continue driving, have your vehicle
checked by your dealer as soon as
possible.
If
the indicator comes on
while driving, it means one
of the engine’s emissions
control systems may have a problem.
Even though you may feel no
difference in your vehicle’s
performance, it can reduce your fuel
economy and cause increased
emissions. Continued operation may
cause serious damage. If
the battery in your vehicle has
been disconnected or gone dead,
these codes are erased. It takes at
least three days of driving under
various conditions to set the codes
again.
To check if they are set, turn the
ignition switch to the ON (II)
position, without starting the engine.
The malfunction indicator lamp will
come on for 20 seconds. If it then
goes off, the readiness codes are set.
If it blinks five times, the readiness
codes are not set. If possible, do not
take your vehicle for a state
emissions test until the readiness
codes are set. Refer to
for more
info rmation (see page ).
Your
vehicle has certain ‘‘readiness
codes’’ that are part of the on-board
diagnostics for the emissions
systems. In some states, part of the
emissions testing is to make sure
these codes are set. If they are not
set, the test cannot be completed.
If
you have recently refueled your
vehicle, the indicator coming on
could be due to a loose or missing
fuel fill cap. You will also see a
‘‘CHECK FUEL CAP’’ message on
the information display. Tighten the
cap until it clicks at least once (see
page ). Tightening the cap will
not turn the indicator of f
immediately; it takes at least three
days of normal driving. 151
250State
Emissions T esting
Readiness Code
Malf unction Indicator L amp
T aking Care of t he Unexpect ed
229
If you keep driving with the
Malf unction Indicator Lamp on, you
can damage your vehicle’s emissions
controls and engine. Those repairs may
not be covered by your vehicle’s
warranties. This indicator may also
come on with the ‘‘D’’ indicator.
Page 261 of 268

Bulb Replacement..........................
Back-up Lights .201
.....................
Brake Lights . 200, 201
........
Front Side Marker Lights .199
...........
Front Turn Signal Light .199
.................................
Headlights .197
..........................
Parking Lights .199
.........
Rear Side Marker Lights .200
..........
Rear Turn Signal Lights .200
............................
Specif ications .243
..............................
Bulbs, Halogen .197
.........................................
Card, PC .129
............................
Capacities Chart .242
.............
Carbon Monoxide Hazard .52
.............................
Carrying Cargo .158
.............
CAUTION, Explanation of .iii
.......................................
CD Player .112
....................................
Ceiling Light .97
........................
Certif ication Label .240
............................................
Chains .211
....................
Changing a Flat Tire .217
Changing Oil
........................................
How to .190 ......................................
When to .179
...
Charging System Indicator . 62, 228
..............
Check Fuel Cap Indicator .68
............
Checklist, Bef ore Driving .164
.....................................
Child Saf ety .34
Child Seats
.............
LATCH Anchor System .43
.............................
Lower Anchor .43
............................
Tether Anchor .47
..................
Childproof Door Locks .81
....................
Cleaning the Wheels .207
.........................
Clock, Setting the .119
........................
CO in the Exhaust .247
............
Cold Weather, Starting in .165
..............................
Compact Spare .216
.............
Controls, Instruments and .55
Coolant
........................................
Adding .192
....................................
Checking .154
.........................
Proper Solution .192
...................
Temperature Gauge .65
Crankcase Emissions Control ........................................
System .247
............
Cruise Control Operation .145
....
Customer Service Inf ormation .252 ...............
DANGER, Explanation of .iii
...................................
Dashboard . 3, 56
................
Daytime Running Lights .74
............
Def ects, Reporting Saf ety .254
........................
Def og and Def rost .104
................
Def ogger, Rear Window .75
..............
Def rosting the Windows .104
....................................
Dimensions .242
...............
Dimming the Headlights .73
Dipstick
..........
Automatic Transmission .195
..................................
Engine Oil .153
..........................
Directional Signals .73
Disc Brake Pad Wear
...................................
Indicators .174
.....................................
Disc Player .112
..................
Display Change Button .64
.....................
Disposal of Used Oil .192
Doors
.
Auto Door Locking/Unlocking .81
.....................
Auto Door Locking .81
.................
Auto Door Unlocking .83
..............
Locking and Unlocking .80
......................
Power Door Locks .80
Index
C D
II
Page 263 of 268

.................
Jacking up the Vehicle .217
.......................................
Jack, Tire .217
................................
Jump Starting .223
..................................................
Keys .76
.......................
Label, Certif ication .240
.................
Lane Change, Signaling .73
..................
Lap/Shoulder Belts . 14, 18
...........
LATCH Anchorage System .43
Lights
....................
Bulb Replacement .197
.......................................
Indicator .60
.........................................
Parking .73
..................................
Turn Signal .73
....................................
Load Limits .159
......
LOCK (Ignition Key Position) .79
Gauges
...
Engine Coolant Temperature .65
...............................................
Fuel .66
Gearshif t Lever Positions ..........
Automatic Transmission .166
........................................
Glove Box .96
.............
Halogen Headlight Bulbs .197
..............
Hazard Warning Flashers .74
Headlights
........................................
Aiming .197
............
Daytime Running Lights .74
..................
High Beam Indicator .60
........................
Reminder Beeper .73
........
Replacing Halogen Bulbs .197
...................................
Turning on .73
..............................
Head Restraints .91
...............................
Heated Mirrors .94
.............
High Altitude, Starting at .165
.................
High-Low Beam Switch .73
.......................
Hood, Opening the .152
..................................................
Horn .71 ...
Identif ication Number, Vehicle .240
Ignition
..............................................
Keys .76
...........................................
Switch .79
............
Timing Control System .248
.........
Important Safety Precautions .6
.........
Indicators, Instrument Panel .57
...............................
Inf ant Restraint .39
Inf ant Seats
......
LATCH Anchorage System .43
...........................
Lower Anchors .43
...........................
Tether Anchors .47
.....
Inf lation, Recommended Tire .208
...................................
Pressures .208
........................
Inf ormation Display .64
...................................
Inside Mirror .93
.............................
Inspection, Tire .209
............................
Instrument Panel .57
................
Instrument Panel Lights .58
........
Instrument Panel Brightness .74
.................................
Interior Lights .97
........................................
Introduction .i
Index
I
H J
K
L
IV