Page 143 of 268
Radio signals, especially on the FM
band, are def lected by large objects
such as buildings and hills. Your
radio then receives both the direct
signal f rom the station’s transmitter,
and the def lected signal. This causes
the sound to distort or flutter. This is
a main cause of poor radio reception
in city driving.Radio reception can be af f ected by
atmospheric conditions such as
thunderstorms, high humidity, and
even sunspots. You may be able to
receive a distant radio station one
day and not receive it the next day
because of a change in conditions.Electrical interf erence f rom passing
vehicles and stationary sources can
cause temporary reception problems.
As required by the FCC:
Changes or modif ications not expresslyapproved by the party responsible f orcompliance could void the user’sauthority to operate the equipment.
Radio Reception
140
Page 145 of 268

If you lose the card, you must obtain
the code number f rom a dealer. To
do this, you will need the system’s
serial number.
Your vehicle’s audio system will
disable itself if it is disconnected
f rom electrical power f or any reason.
To make it work again, you must
enter a specif ic f ive-digit code
(except f or model with navigation
system)/f our-digit code (model with
navigation system) in the preset
buttons. Because there are hundreds
of number combinations possible
from five or four-digits, making the
system work without knowing the
exact code is nearly impossible.
Youshouldhavereceivedacardthat
lists your audio system’s code and
serial numbers. It is best to store this
card in a saf e place at home. In
addition, you should write the audio
system’s serial number in this owner’s
manual. If you make a mistake entering the
code, do not start over; complete the
f ive-digit (except f or model with
navigation system)/f our-digit (model
with navigation system) sequence,
then enter the correct code. You
have 10 tries to enter the correct
code. If you are unsuccessf ul in 10
attempts, you must then leave the
system on f or 1 hour bef ore trying
again.
If your vehicle’s battery is
disconnected or goes dead, or the
radio f use is removed, the audio
system will disable itself . Use the
preset buttons to enter the five-digit
code (except f or model with
navigation system)/f our-digit code
(model with navigation system). The
code is on the radio code card
included in your owner’s manual kit.
When it is entered correctly, the
radio will start playing.
Radio T hef t Protection
142
Page 146 of 268
, or a PC card
(if a card is loaded).
If you are")
�´
�µ �´�µ
�´ �µ �´�µ
�Û�Ý The MODE button changes the
mode. Pressing the button
repeatedly selects FM1, FM2, AM, a
disc (if a disc is loaded), or a PC card
(if a card is loaded).
If you are listening to the radio, use
the CH button to change stations.
Each time you press the top ( ) of
the button, the system goes to the
next preset station on the band you
are listening to. Press the bottom
( ) to go back to the previous
station.If youpressandholdtheCH
button ( ) or ( ) until you hear a
beep, the system goes into the seek
mode. It finds a station with a strong
signal.
If you are playing a disc, the system
skips to the beginning of the next
track each time you press the top
( ) of the CH button. Press the
bottom ( ) to return to the
beginning of the current track. Press
it again to return to the previous track. You will see the disc and track
numbers in the display. If you press
andholdtheCHbutton( )or( )
until you hear a beep, you can select
a different folder.
Tousethevoicecontrolsystem,
ref er to the navigation system
manual.
Three controls f or the audio system
are mounted in the steering wheel
hub. These let you control basic
f unctions without removing your
hand f rom the wheel.
The VOL button adjusts the volume
up ( ) or down ( ). Press the top
or bottom of the button, hold it until
the desired volume is reached, then
release it. The auxiliary input jack is under the
accessory power socket. The system
will accept auxiliary input from
standard audio accessories.
When the appropriate audio unit is
connected to the auxiliary input jack,
press the CD/XM or XM/AUX
button to select the unit.
On models with navigation system
Remote Audio Controls
Auxiliary Input Jack
Features
143
CH BUTTONVOL BUTTON
MODE BUTTON
Page 147 of 268

With the system set, you can still
open the trunk with the master key
or the remote transmitter without
triggering the alarm. The alarm will
sound if the trunk lock is forced, or
the trunk is opened with the trunk
release handle.
The security system will not set if
the hood, trunk, or any door is not
fully closed. If the system will not set,
check the door and trunk open
indicators on the instrument panel
(see page ) to see if the doors and
trunk are f ully closed. Since it is not
part of the monitor display, manually
check the hood.
To see if the system is set
af ter you exit the vehicle, press the
LOCK button on the remote
transmitter within 5 seconds. If the
system is set, the horn will beep
once.
The security system helps to protect
your vehicle and valuables f rom thef t.
The horn sounds and a combination
of headlights (low beam), parking
lights, side marker lights, and
taillights f lash if someone attempts
to break into your vehicle or remove
the radio. This alarm continues f or 2
minutes, then it stops. To reset an
alarming system before the 2
minutes have elapsed, unlock the
driver’s door with the key or the
remote transmitter.
The security system automatically
sets 15 seconds after you lock the
doors, hood, and trunk. For the
system to activate, you must lock the
doors f rom the outside with the key,
driver’s lock tab, door lock switch, or
remote transmitter. The security
system indicator on the instrument
panel starts blinking immediately to
show you the system is setting itself .
Once the security system is set,
opening any door, the trunk, or the
hood without using the key or the
remote transmitter will cause it to
alarm. It also alarms if the radio is
removed f rom the dashboard or the
wiring is cut.
Do not attempt to alter this system
or add other devices to it.62
Security System
144
NOTE:
SECURITY SYSTEM
INDICATOR
Page 159 of 268

Your dealer has Honda accessories
that allow you to personalize your
vehicle. These accessories have
been designed and approved for your
vehicle, and are covered by warranty.
When properly installed, cellular
phones, alarms, two-way radios, and
low-powered audio systems should
not interfere with your vehicle’s
computer controlled systems, such
as your airbags and anti-lock brakes. Befo
re installing any accessory:
Make sure the accessory does not
obscure any lights, or interfere
with proper vehicle operation or
performance.
Modifying
your vehicle, or installing
some non-Honda accessories, can
make it unsafe. Before you make any
modifications or add any accessories,
be sure to read the following
info rmation.
Al though non-Honda accessories
may fit on your vehicle, they may not
meet factory specifications, and
could adversely affect your vehicle’s
handling and stability. Be sure electronic accessories do
not overload electrical circuits
(see page ) or interf ere with
the proper operation of your
vehicle.
Do not install accessories on the
side pillars or across the rear
windows. In these areas,
accessories may interf ere with
proper operation of the side
curtain airbags. Bef ore installing any electronic
accessory, have the installer
contact your dealer for assistance.
If possible, have your dealer
inspect the f inal installation.
231
A ccessories
A ccessories and Modif ications
156
Improper accessories or
modifications can affect your
vehicle’s handling, stability, and
performance, and cause a
crash in which you can be hurt
or killed.
Follow all instructions in this
owner’s manual regarding
accessories and modifications.
Page 205 of 268
Pull the bulb straight out of its
socket. Push the new bulb straight
into the socket until it bottoms.
Insert the socket back into the
light assembly. Turn it clockwise
to lock it in place.
Push the trunk lid trim back into
position.
Put the f asteners into the holes on
the trunk lid trim. Reinstall the
screws.Beforeusinganautomaticcarwash,
remove the radio antenna so it does
not get damaged. Remove the
antenna by unscrewing it. When you
reinstall the antenna, tighten it
securely.
Bef ore entering or parking in areas
with low ceiling height, remove the
antenna.
Turn on the lights to make sure
the new bulb is working.
Remove the socket by turning it
one-quarter turn counterclockwise.
2. 3.
4.
5.
6.
7.
Roof A ntenna
Lights, Roof Antenna
202
BULB
SOCKET
Page 236 of 268
If you cannot drive the vehicle
without f ixing the problem, and you
do not have a spare fuse, take a fuse
of the same rating or a lower rating
f rom one of the other circuits. Make
sureyoucandowithoutthatcircuit
temporarily (such as the accessory
power socket or radio).
If you replace the blown f use with a
spare f use that has a lower rating, it
might blow out again. This does not
indicate anything wrong. Replace the
fuse with one of the correct rating as
soon as you can.
Check the smaller f uses in the
under-hood f use boxes and all the
fuses in the interior fuse box by
pulling out each one with the f use
puller provided in the primary
under-hood f use box. Look f or a blown wire inside the
f use. If it is blown, replace it with
oneof thesparefusesof thesame
rating or lower. The spare f uses
are provided back of the under-
hood f use cover.
4. 5.
CONT INUED
Fuses
T aking Care of t he Unexpect ed
233
FUSE PULLER BLOWN
Page 239 of 268
�µ
�µ
�µ
�µ�µ
�µ
�µ
�µ
�µ
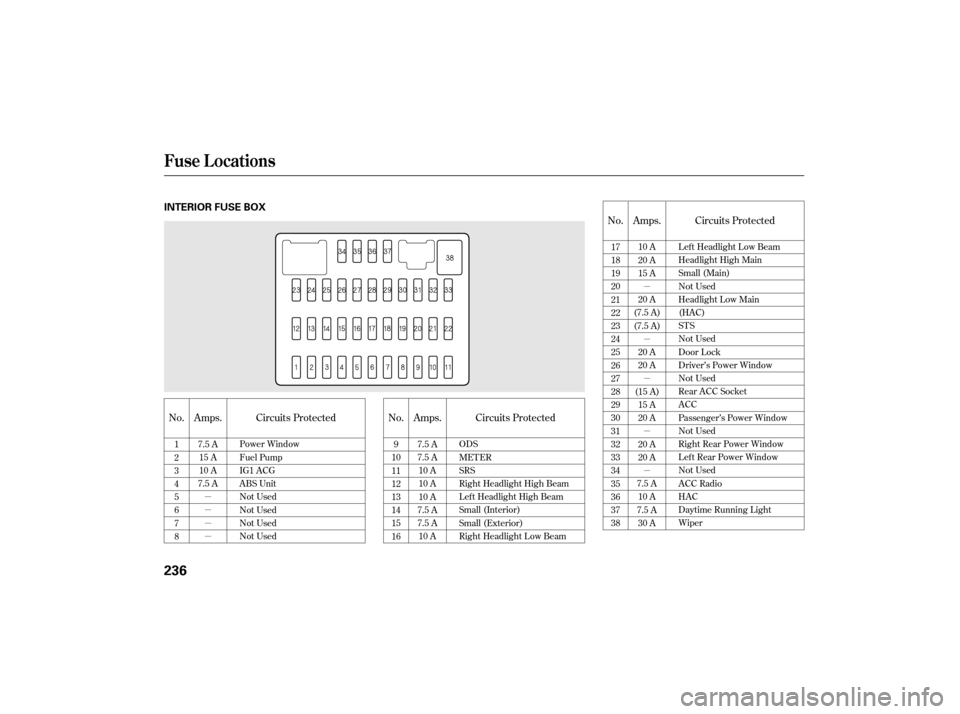
No.
No.No.
Amps.
Amps. Amps.
Circuits Protected Circuits ProtectedCircuits Protected
1
2
3
4
5
6
7
8
9
10
11
12
13
14
15
16 17
18
19
20
21
22
23
24
25
26
27
28
29
30
31
32
33
34
35
36
37
38
7.5 A
7.5 A
10 A
10 A
10 A
7.5 A
7.5 A 10 A
7.5 A
15 A
10 A
7.5 A 10 A
20 A
15 A
20 A
(7.5 A)
(7.5 A)
20 A
20 A
(15 A) 15 A
20 A
20 A
20 A
7.5 A 10 A
7.5 A 30 A
Power Window
Fuel Pump
IG1 ACG
ABS Unit
Not Used
Not Used
Not Used
Not Used ODS
MET ER
SRS
Right Headlight High Beam
Left Headlight High Beam
Small (Interior)
Small (Exterior)
Right Headlight Low BeamLeft Headlight Low Beam
Headlight High Main
Small (Main)
Not Used
Headlight Low Main
(HAC)
STS
Not Used
Door Lock
Driver’s Power Window
Not Used
Rear ACC Socket
ACC
Passenger’s Power Window
Not Used
Right Rear Power Window
Left Rear Power Window
Not Used
ACC Radio
HAC
Daytime Running Light
Wiper
Fuse Locations
236
INTERIOR FUSE BOX