Page 69 of 287

This indicator normally comes on f or
a f ew seconds when you turn the
ignition switch to the ON (II)
position. If it comes on at any other
time, it indicates a problem in the
integrated motor assist (IMA)
system. With the IMA indicator on,
the vehicle may not accelerate as it
normally does. Have the vehicle
checked by the dealer as soon as
possible.
If the power steering system
overheats while driving, the assist is
reduced and steering may f eel
slightly harder.
Driving with the power steering
system continuously overheating can
cause system damage.
This indicator normally comes on
when you turn the ignition switch to
the ON (II) position and goes of f
af ter the engine starts. If it comes on
at any other time, there is a problem
in the electric power steering system.
If this happens, stop the vehicle in a
saf e place, and turn of f the engine.
Reset the system by restarting the
engine. The indicator will not turn
of f immediately. If it does not go of f
after driving a short distance, or
comes back on again while driving,
take the vehicle to your dealer to
have it checked. With the indicator
on, the EPS may be of f , making the
vehicle harder to steer.
See page .
While the engine is operating in its
most economical range, this
indicator may come on and stay on.178
Instrument Panel Indicators
Electric Power Steering
(EPS) Indicator
IMA System Indicator
A uto Idle Stop Indicator
Fuel Economy Indicator
66
06/08/08 14:27:18 31SDR620_071
Page 76 of 287

This shows how much f uel you have.
It may show slightly more or less
than the actual amount. The needle
returns to the bottom after you turn
of f the ignition.
The inf ormation display in the
instrument panel shows you the
engine oil lif e and maintenance
service items when the ignition
switch is in the ON (II) position. This
inf ormation helps to keep you aware
of the periodic maintenance your
vehicle needs f or continued trouble-
f ree driving. Ref er to page f or
more inf ormation.Your vehicle’s onboard diagnostic
system will detect a loose or missing
f uel f ill cap as an evaporative system
leak. The f irst time a leak is detected
a ‘‘CHECK FUEL CAP’’ message
appears on the information display.
Turn the engine of f , and conf irm the
f uel f ill cap is installed. If it is, loosen
it, then retighten it until it clicks at
least once. The message should go
off after several days of normal
driving once you tighten or replace
the f uel f ill cap. To scroll to another
display, press the select/reset knob.
The ‘‘CHECK FUEL CAP’’ message
will appear each time you restart the
engine until the system turns the
message of f .
If the system still detects a leak in
your vehicle’s evaporative emissions
system, the malf unction indicator
lamp (MIL) comes on. If the f uel f ill
cap was not already tightened, turn
the engine of f , and check or
retighten the f uel f ill cap until it
clicks at least once. The MIL should
go off after several days of normal
driving once the cap is tightened or
replaced. If the MIL does not go of f ,
have your vehicle inspected by a
dealer. For more inf ormation, see
page .
167 246
Fuel Gauge Check Fuel Cap Message
Maintenance Minder
Gauges
Inst rument s and Cont rols
73
Avoid driving with an extremely low
f uel level. Running out of f uel could
cause the engine to misf ire, damaging
the catalytic converter.
06/08/08 14:28:27 31SDR620_078
Page 77 of 287
�Î
�ÎOnly on vehicles equipped with navigation system. Ref er to the navigation system manual.
:
Controls Near the Steering Wheel
74
INSTRUMENT PANEL
BRIGHTNESS
VOICE CONTROL
SWITCHES HEADLIGHTS/
TURN SIGNALS
REMOTE AUDIO
CONTROLS
HORN
STEERING WHEEL
ADJUSTMENT CRUISE CONTROLS
REAR WINDOW
DEFOGGER
HAZARD
WARNING BUTTON
VSA OFF SWITCH
MOONROOF
SWITCH WINDSHIELD
WIPERS/WASHERS
PASSENGER AIRBAG
OFF INDICATOR
(P.78)
(P.76)
(P.143)
(P.97) (P.184)(P.80) (P.75)
(P.33)
(P.79)
(P.147)(P.79, 109, 112)
06/08/08 14:28:35 31SDR620_079
Page 81 of 287

With the headlight switch off, the
high beam headlights and the high
beam indicator come on with
reduced brightness when you turn
the ignition switch to the ON (II)
position and release the parking
brake. They remain on until you turn
the ignition switch of f , even if you
set the parking brake.
The headlights revert to normal
operation when you turn them on
with the switch.The instrument panel will illuminate
with reduced brightness when you
open the driver’s door. The
brightness will increase slightly
when you insert the key in the
ignitionswitch,thengotonormalbrightness when you turn the
ignition switch to the ON (II)
position.
The Select/Reset knob on the
instrument panel controls the
brightness of the instrument panel
lights. Turn the knob to adjust the
brightness. If you do not insert the key in the
ignition switch af ter opening the
driver’s door, the illumination turns
of f about 30 seconds af ter you close
the door.
To reduce glare at night, the instru-
ment panel illumination dims when
you turn the light switch to or
. Turning the Select/Reset
knob f ully to the right until you hear
a click will cancel the reduced bright-
ness. If you insert the key but do not turn
the ignition switch to the ON (II)
position, the illumination turns of f in
about 10 seconds.
Instrument Panel Brightness
Daytime Running L ights
Turn Signal and Headlights, Instrument Panel Brightness
78
SELECT/RESET KNOB
06/08/08 14:29:16 31SDR620_083
Page 82 of 287

Push the button between the center
vents to turn on the hazard warning
lights (f our-way f lashers). This
causes all f our outside turn signals
and both turn indicators in the
instrument panel to f lash. Use the
hazard warning lights if you need to
park in a dangerous area near heavy
traf f ic, or if your vehicle is disabled.The rear window def ogger will clear
fog, frost, and thin ice from the
window. Push the def ogger button to
turn it on and of f . The indicator in
the button comes on to show the
def ogger is on. It shuts of f when you
turn of f the ignition. You have to
turn the def ogger on again when you
restart the vehicle.Make sure the rear window is clear
and you have good visibility bef ore
starting to drive.
Thedefoggerwiresontheinsideof
the rear window can be accidentally
damaged. When cleaning the glass,
always wipe side to side.
Rear Window Def ogger
Hazard Warning
Hazard Warning L ight, Rear Window Def ogger
Inst rument s and Cont rols
79
Vehicles without navigation system
Vehicles with navigation system
HAZARD WARNING BUTTON
06/08/08 14:29:27 31SDR620_084
Page 83 of 287
Make any steering wheel adjustment
bef ore you start driving.Move the steering wheel up or
down, and in or out to the desired
position. Make sure you can see
the instrument panel gauges and
the indicator lights.
Insert the key in the ignition
switch, and unlock the steering
column.
Push the lever under the steering
column all the way down.
1.
2.
3.
Steering Wheel A djustment
80
Adjusting the steering wheel
position while driving may
cause you to lose control of the
vehicle and be seriously injured
inacrash.
Adjust the steering wheel only
when the vehicle is stopped.
06/08/08 14:29:35 31SDR620_085
Page 86 of 287

�µ�µ
�µ
�µ
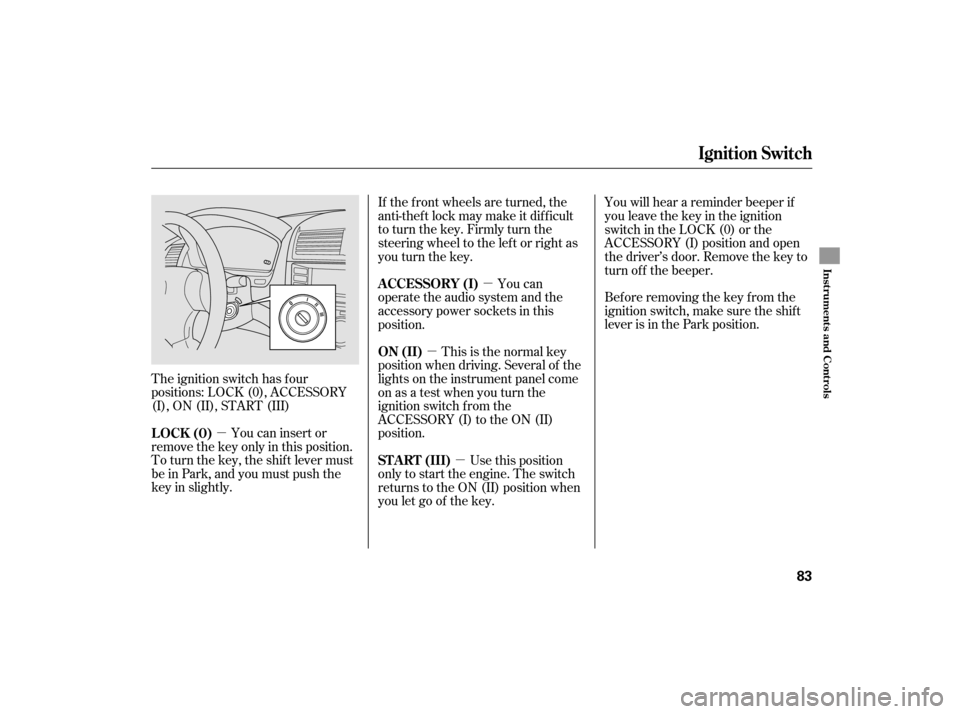
The ignition switch has f our
positions: LOCK (0), ACCESSORY
(I), ON (II), START (III) Bef ore removing the key f rom the
ignition switch, make sure the shif t
lever is in the Park position.
You can insert or
remove the key only in this position.
To turn the key, the shift lever must
be in Park, and you must push the
key in slightly. If the f ront wheels are turned, the
anti-thef t lock may make it dif f icult
to turn the key. Firmly turn the
steering wheel to the lef t or right as
you turn the key.
You can
operate the audio system and the
accessory power sockets in this
position.
This is the normal key
position when driving. Several of the
lights on the instrument panel come
on as a test when you turn the
ignition switch f rom the
ACCESSORY (I) to the ON (II)
position.
Use this position
only to start the engine. The switch
returns to the ON (II) position when
you let go of the key. You will hear a reminder beeper if
you leave the key in the ignition
switch in the LOCK (0) or the
ACCESSORY (I) position and open
thedriver’sdoor.Removethekeyto
turn of f the beeper.
LOCK (0) A CCESSORY (I)
ON (II)
ST A RT (III)
Ignition Switch
Inst rument s and Cont rols
83
06/08/08 14:30:05 31SDR620_088
Page 101 of 287

The moonroof has a key-of f delay
f unction. You can still open and close
the moonroof f or up to 10 minutes
after you turn off the ignition switch.
The key-of f delay f unction cancels as
soon as you open either f ront door.
You must then turn the ignition
switch to the ON (II) position to
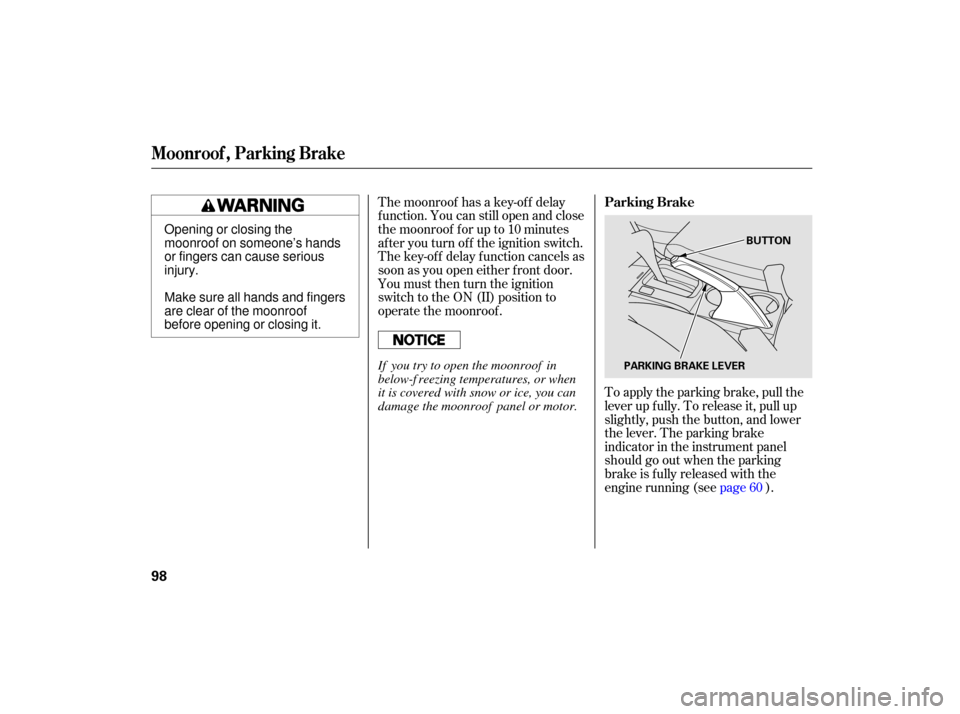
operate the moonroof .To apply the parking brake, pull the
lever up f ully. To release it, pull up
slightly, push the button, and lower
the lever. The parking brake
indicator in the instrument panel
should go out when the parking
brake is f ully released with the
engine running (seepage).60
Parking Brake
Moonroof , Parking Brake
98
PARKING BRAKE LEVER
BUTTON
Opening or closing the
moonroof on someone’s hands
or fingers can cause serious
injury.
Make sure all hands and fingers
are clear of the moonroof
before opening or closing it.
If you try to open the moonroof in
below-f reezing temperatures, or when
it is covered with snow or ice, you can
damage the moonroof panel or motor.
06/08/08 14:32:49 31SDR620_103