2007 GMC YUKON XL DENALI lights
[x] Cancel search: lightsPage 171 of 608

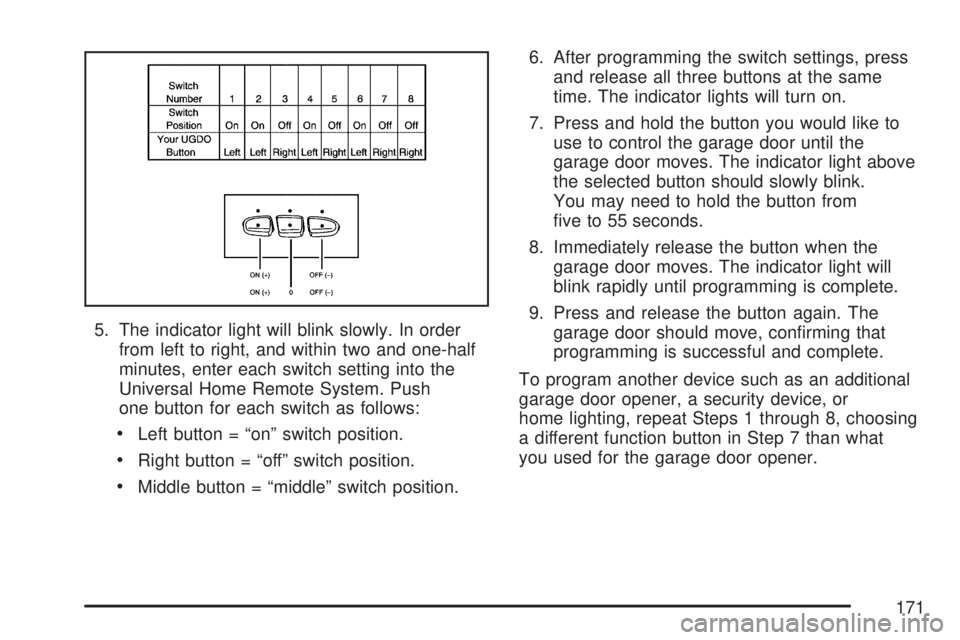
5. The indicator light will blink slowly. In order
from left to right, and within two and one-half
minutes, enter each switch setting into the
Universal Home Remote System. Push
one button for each switch as follows:
Left button = “on” switch position.
Right button = “off” switch position.
Middle button = “middle” switch position.6. After programming the switch settings, press
and release all three buttons at the same
time. The indicator lights will turn on.
7. Press and hold the button you would like to
use to control the garage door until the
garage door moves. The indicator light above
the selected button should slowly blink.
You may need to hold the button from
�ve to 55 seconds.
8. Immediately release the button when the
garage door moves. The indicator light will
blink rapidly until programming is complete.
9. Press and release the button again. The
garage door should move, con�rming that
programming is successful and complete.
To program another device such as an additional
garage door opener, a security device, or
home lighting, repeat Steps 1 through 8, choosing
a different function button in Step 7 than what
you used for the garage door opener.
171
Page 173 of 608

4. Press and hold the button you would like to
use to control the garage door until the
garage door moves. The indicator light, above
the selected button, should slowly blink.
You may need to hold the button from
�ve to 20 seconds.
5. Immediately release the button when the
garage door moves. The indicator light will
blink rapidly until programming is complete.
6. Press and release the button again. The
garage door should move, con�rming that
programming is successful and complete.
To program another device such as an additional
garage door opener, a security device, or
home lighting, repeat Steps 1 through 6, choosing
a different function button in Step 4 than what
you used for the garage door opener.
Using Universal Home Remote
Press and hold the appropriate button for at least
half of a second. The indicator light will come
on while the signal is being transmitted.
Reprogramming Universal Home
Remote Buttons
You can reprogram any of the three buttons by
repeating the instructions.
Erasing Universal Home Remote
Buttons
You should erase the programmed buttons when
you sell the vehicle or terminate your lease.
To erase either rolling code or �xed code on the
Universal Home Remote device, do the following:
1. Press and hold the two outside buttons at
the same time for approximately 20 seconds,
until the indicator lights, located directly
above the buttons, begin to blink rapidly.
2. Once the indicator lights begin to blink,
release both buttons. The codes from all
button will be erased.
For additional information on Universal Home
Remote, seeCustomer Assistance Offices
on page 574.
173
Page 187 of 608

Instrument Panel Overview........................ 190
Hazard Warning Flashers.......................... 192
Other Warning Devices............................. 192
Horn.......................................................... 192
Tilt Wheel.................................................. 193
Turn Signal/Multifunction Lever.................. 193
Turn and Lane-Change Signals................. 194
Headlamp High/Low-Beam Changer.......... 195
Flash-to-Pass............................................ 195
Windshield Wipers..................................... 196
Rainsense™ II Wipers............................... 197
Windshield Washer.................................... 198
Rear Window Wiper/Washer...................... 199
Cruise Control........................................... 200
Exterior Lamps.......................................... 203
Headlamps on Reminder........................... 205
Daytime Running Lamps (DRL)................. 205
Automatic Headlamp System..................... 205
Fog Lamps................................................ 206
Instrument Panel Brightness...................... 207
Dome Lamps............................................. 207
Dome Lamp Override................................ 207
Entry Lighting............................................ 207
Exit Lighting.............................................. 207Front Reading Lamps................................ 208
Battery Run-Down Protection..................... 208
Ultrasonic Rear Parking Assist (URPA)...... 208
Accessory Power Outlet(s)........................ 213
Ashtray(s) and Cigarette Lighter................ 214
Climate Controls......................................... 214
Dual Automatic Climate Control System....... 214
Outlet Adjustment...................................... 222
Rear Air Conditioning and Heating
System and Electronic Climate
Controls................................................. 223
Warning Lights, Gages, and Indicators..... 225
Instrument Panel Cluster........................... 226
Speedometer and Odometer...................... 227
Trip Odometer........................................... 227
Tachometer............................................... 227
Safety Belt Reminder Light........................ 228
Passenger Safety Belt Reminder Light....... 228
Airbag Readiness Light............................. 229
Passenger Airbag Status Indicator............. 230
Charging System Light.............................. 232
Voltmeter Gage......................................... 232
Brake System Warning Light..................... 233
Section 3 Instrument Panel
187
Page 203 of 608

Using Cruise Control on Hills
How well your cruise control will work on hills
depends upon your speed, load, and the
steepness of the hills. When going up steep hills,
you may have to step on the accelerator pedal
to maintain the vehicle’s speed. When going
downhill, you may have to brake or shift to a
lower gear to keep the vehicle’s speed down.
Of course, applying the brake takes you out
of cruise control. Many drivers �nd this to be too
much trouble and do not use cruise control on
steep hills.
Ending Cruise Control
There are three ways to end cruise control:
Step lightly on the brake pedal.
Press the cancel button on the steering wheel.
Press the On/Off button on the steering
wheel.
Erasing Speed Memory
When you turn off the cruise control or the ignition,
your cruise control set speed memory is erased.
Exterior Lamps
The exterior lamps
control is located on the
instrument panel to
the left of the steering
wheel.
It controls the following systems:
Headlamps
Taillamps
Parking Lamps
License Plate Lamps
Instrument Panel Lights
203
Page 204 of 608

The exterior lamps control has four positions:
9(Off):Turn the control to this position to
turn off the automatic headlamps and daytime
running lamps (DRL). Turning the headlamp
control to the off position again will turn the
automatic headlamps or DRL back on.
For vehicles �rst sold in Canada, the off position
will only work for vehicles that are shifted into
the PARK (P) position.
AUTO (Automatic):Turn the control to this
position to automatically turn on the headlamps at
normal brightness, together with the following:
Parking Lamps
Instrument Panel Lights
Taillamps
License Plate Lamps
;(Parking Lamps):Turn the control to this
position to turn on the parking lamps together with
the following:
Instrument Panel Lights
Taillamps
License Plate Lamps
2(Headlamps):Turn the control to this position
to turn on the headlamps together with the
following lamps listed below. A warning chime will
sound if you open the driver’s door when the
ignition switch is off and the headlamps are on.
Parking Lamps
Instrument Panel Lights
Taillamps
License Plate Lamps
204
Page 205 of 608

Headlamps on Reminder
A reminder chime will sound when the headlamps
or parking lamps are manually turned on and
your ignition is off and a door is open. To disable
the chime, turn the light off then back on.
Daytime Running Lamps (DRL)
Daytime Running Lamps (DRL) can make it easier
for others to see the front of your vehicle during
the day. DRL can be helpful in many different
driving conditions, but they can be especially
helpful in the short periods after dawn and before
sunset. Fully functional DRL are required on all
vehicles �rst sold in Canada.
The DRL system will come on when the following
conditions are met:
The ignition is on
The exterior lamps control is in AUTO
The light sensor determines it is daytime
When the DRL are on, only your DRL lamps will
be on. The taillamps, sidemarker and other
lamps will not be on. The instrument panel back
lighting will not be on either.When it begins to get dark, the automatic
headlamp system will switch from DRL to the
headlamps.
When you turn the headlamp switch off, the
headlamps will go off.
Automatic Headlamp System
When it is dark enough outside, the automatic
headlamp system will turn on the headlamps at the
normal brightness, along with the taillamps,
sidemarker, parking lamps, and the instrument
panel lights. The radio back lighting will also be
dimly lit.
To turn off the automatic headlamp system, turn
the exterior lamps switch to the off position.
Turning off the automatic headlamp system with
the headlamp switch is not available for vehicles
�rst sold in Canada.
Your vehicle has a light sensor located on the top
of the instrument panel in the defroster grille
that regulates when the automatic headlamps turn
on. Be sure it is not covered, or the system will
come on whenever the ignition is on.
205
Page 206 of 608

The system may also turn on the headlamps when
driving through a parking garage, heavy overcast
weather, or a tunnel. This is normal.
There is a delay in the transition between the
daytime and nighttime operation of the Daytime
Running Lamps (DRL) and the automatic headlamp
systems so that driving under bridges or bright
overhead street lights does not affect the system.
The DRL and automatic headlamp system will only
be affected when the light sensor detects a change
in lighting lasting longer than the delay.
If you start your vehicle in a dark garage, the
automatic headlamp system will come on
immediately. Once you leave the garage, it will
take approximately one minute for the automatic
headlamp system to change to DRL if it is
bright enough outside. During that delay, your
instrument panel cluster may not be as bright as
usual. Make sure your instrument panel brightness
control is in the full bright position. SeeInstrument
Panel Brightness on page 207.
To idle your vehicle with the automatic headlamp
system off, turn the control to the off position.
You may be able to turn off your Automatic
Headlamp System. SeeDaytime Running Lamps
(DRL) on page 205for more information.Your headlamps will also stay on after you exit the
vehicle. You can program this feature using the
Driver Information Center (DIC). SeeDIC Vehicle
Customization (With DIC Buttons) on page 262.
As with any vehicle, you should turn on the regular
headlamp system when needed.
Fog Lamps
-(Fog Lamps):If your vehicle has fog lamps,
the control is located on the exterior lamps
control. The exterior lamps control is located on
the instrument panel to the left of the steering
column.
Your ignition must be in the RUN position for the
fog lamps to come on.
To turn the fog lamps on, press the exterior lamps
button. A light will come on in the instrument
panel cluster to let you know that the fog lamps
are on. Press the exterior lamps button again
to turn the fog lamps off.
When the headlamps are changed to high-beam,
the fog lamps also go off.
Some localities have laws that require the
headlamps to be on along with the fog lamps.
206
Page 207 of 608

Instrument Panel Brightness
D(Instrument Panel Brightness):This feature
controls the brightness of the instrument panel
lights.
The knob for this feature is located next to the
headlamp control.
Turn the knob clockwise or counterclockwise to
adjust the brightness of the instrument panel lights.
Turn the knob clockwise to return the instrument
panel cluster or radio display to full brightness
when the headlamps or parking lamps are on.
To turn on the dome lamps, turn the knob to the
farthest clockwise position.
Dome Lamps
The dome lamps come on when a door is opened.
The dome lamps can also be turned on by
turning the knob, located next to the exterior lamps
control, clockwise to the farthest position. In this
position, the dome lamps will remain on whether a
door is opened or closed.
Dome Lamp Override
E(Dome Lamp Override):Press the dome
override button, located next to the exterior lamps
control, to keep the dome lamps off when a
door is open. To set the lamps to the automatic
operation, press the button again so that it is
extended. With the button in this position,
the dome lamps will come on when a door is
opened.
Entry Lighting
Your vehicle has an illuminated entry feature.
When the doors are opened, the dome lamps will
come on if the dome override button is in the
extended position. If the dome override button is
pressed in, the lamps will not come on.
Exit Lighting
With exit lighting, the interior lamps will come on
when you remove the key from the ignition. They
will turn off automatically in 20 seconds. The lights
will not come on if the dome override button is
pressed in.
207