Page 559 of 674

Uniform Tire Quality Grading
Quality grades can be found where applicable on
the tire sidewall between tread shoulder and
maximum section width. For example:
Treadwear 200 Traction AA Temperature A
The following information relates to the system
developed by the United States National Highway
Traffic Safety Administration (NHTSA), which
grades tires by treadwear, traction, and
temperature performance. This applies only to
vehicles sold in the United States. The grades are
molded on the sidewalls of most passenger car
tires. The Uniform Tire Quality Grading (UTQG)
system does not apply to deep tread, winter-type
snow tires, space-saver, or temporary use
spare tires, tires with nominal rim diameters of
10 to 12 inches (25 to 30 cm), or to some
limited-production tires.
While the tires available on General Motors
passenger cars and light trucks may vary with
respect to these grades, they must also conform
to federal safety requirements and additional
General Motors Tire Performance Criteria (TPC)
standards.
Treadwear
The treadwear grade is a comparative rating based
on the wear rate of the tire when tested under
controlled conditions on a specied government
test course. For example, a tire graded 150 would
wear one and a half (1.5) times as well on the
government course as a tire graded 100. The
relative performance of tires depends upon the
actual conditions of their use, however, and may
depart signicantly from the norm due to variations
in driving habits, service practices, and differences
in road characteristics and climate.
Traction – AA, A, B, C
The traction grades, from highest to lowest, are
AA, A, B, and C. Those grades represent the tire’s
ability to stop on wet pavement as measured under
controlled conditions on specied government test
surfaces of asphalt and concrete. A tire marked C
may have poor traction performance.
Warning:The traction grade assigned to this
tire is based on straight-ahead braking traction
tests, and does not include acceleration, cornering,
hydroplaning, or peak traction characteristics.
559
Page 566 of 674
Removing the Spare Tire and Tools
A. Knob
B. Retaining Hook
C. Wheel BlocksD. Wing Nut Retaining
Wheel Blocks
E. JackA. Wing Nut
Retaining Wheel
Blocks
B. Wheel Blocks
C. Retaining Bracket
and Wing NutD. Tool Kit and
Jack Tools
E. Retaining Hook
F. Jack
G. Knob
1500 Crew Cab
Regular Cab and Crew Cab (Except 1500 Crew Cab)
566
Page 568 of 674

For regular cab models, the equipment you will
need is behind the passenger’s seat. For extended
and crew cab models, the equipment is on the shelf
behind the passenger’s side second row seat.
1. If there is a cover, move the seats forward
and turn the wing nut on the cover
counterclockwise to remove it. For crew cab
models, pull up the second row seat with
the loop at the base of the seat cushion to
access the tools.
2. Turn the knob on the jack counterclockwise to
lower the jack head to release the jack from
its holder.
3. Remove the wheel blocks and the wheel
block retainer by turning the wing nut
counterclockwise.
4. Remove the wing nut used to retain the
storage bag and tools by turning it
counterclockwise.
You will use the jack handle extensions and the
wheel wrench to remove the underbody-mounted
spare tire.A. Spare Tire (Valve
Stem Pointed Down)
B. Hoist Assembly
C. Hoist Cable
D. Tire/Wheel Retainer
E. Hoist Shaft
F. Hoist End of
Extension ToolG. Hoist Shaft
Access Hole
H. Wheel Wrench
I. Jack Handle
Extensions
J. Spare Tire Lock
(If Equipped)
568
Page 569 of 674
1. Open the spare tire lock cover on the bumper
and use the ignition key to remove the lock,
if equipped with a spare tire lock (J). To
remove the spare tire lock, insert the key, turn
and pull straight out.
2. Assemble the wheel wrench (H) and the
two jack handle extensions (I) as shown.3. Insert the hoist end
(open end) (F) of the
extension through
the hole (G) in
the rear bumper.
Be sure the hoist end of the extension (F)
connects to the hoist shaft (E). The ribbed
square end of the extension is used to lower
the spare tire.
569
Page 570 of 674
4. Turn the wheel wrench (H) counterclockwise
to lower the spare tire to the ground. Continue
to turn the wheel wrench until the spare tire
can be pulled out from under the vehicle.
If the spare tire does not lower to the ground,
the secondary latch is engaged causing
the tire not to lower. SeeSecondary Latch
System on page 580.
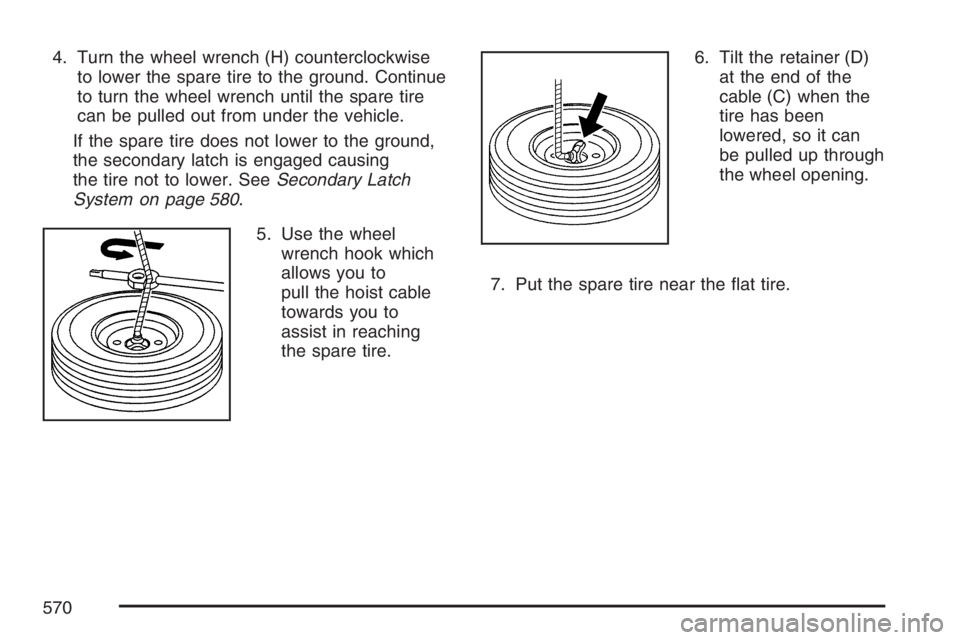
5. Use the wheel
wrench hook which
allows you to
pull the hoist cable
towards you to
assist in reaching
the spare tire.6. Tilt the retainer (D)
at the end of the
cable (C) when the
tire has been
lowered, so it can
be pulled up through
the wheel opening.
7. Put the spare tire near the at tire.
570
Page 571 of 674
Removing the Flat Tire and
Installing the Spare Tire
Use the following pictures and instructions to
remove the at tire and raise the vehicle.
The tools you will be using include the jack (A),
the wheel blocks (B), the jack handle (C), the jack
handle extensions (D), and the wheel wrench (E).1. If your vehicle has
wheel nut caps,
loosen them
by turning the
wheel wrench
counterclockwise.
If the vehicle has a center cap with wheel nut
caps, the wheel nut caps are designed to
stay with the center cap after they are
loosened. Remove the entire center cap.
571
Page 575 of 674
4. Make sure the jack head is positioned so that
the rear axle is resting securely between the
grooves that are on the jack head.
5. Turn the wheel wrench clockwise to raise the
vehicle. Raise the vehicle far enough off the
ground so there is enough room for the spare
tire to t under the wheel well.
Rear Position – 2WD Pickup ModelsRear Position – All Other Models
575
Page 576 of 674
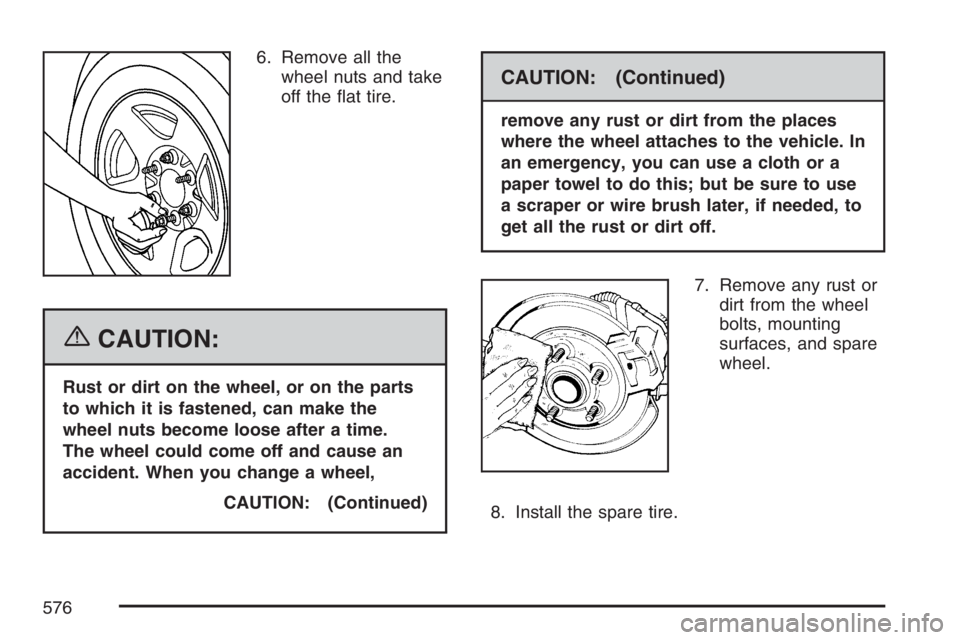
6. Remove all the
wheel nuts and take
off the at tire.
{CAUTION:
Rust or dirt on the wheel, or on the parts
to which it is fastened, can make the
wheel nuts become loose after a time.
The wheel could come off and cause an
accident. When you change a wheel,
CAUTION: (Continued)
CAUTION: (Continued)
remove any rust or dirt from the places
where the wheel attaches to the vehicle. In
an emergency, you can use a cloth or a
paper towel to do this; but be sure to use
a scraper or wire brush later, if needed, to
get all the rust or dirt off.
7. Remove any rust or
dirt from the wheel
bolts, mounting
surfaces, and spare
wheel.
8. Install the spare tire.
576