2007 GMC SIERRA CLASSIC wheel
[x] Cancel search: wheelPage 393 of 674
And, if your tires do not have much tread left,
you will get even less traction. It is always wise to
go slower and be cautious if rain starts to fall
while you are driving. The surface may get wet
suddenly when your re�exes are tuned for driving
on dry pavement. If your vehicle has four-wheel
drive, seeFour-Wheel Drive on page 153for
transfer case mode selection.
The heavier the rain, the harder it is to see.
Even if your windshield wiper blades are in good
shape, a heavy rain can make it harder to see
road signs and traffic signals, pavement markings,
the edge of the road, and even people walking.
It is wise to keep your wiping equipment in
good shape and keep your windshield washer
�uid reservoir �lled with washer �uid. Replace your
windshield wiper inserts when they show signs
of streaking or missing areas on the windshield,
or when strips of rubber start to separate from
the inserts.
{CAUTION:
Wet brakes can cause accidents. They
may not work as well in a quick stop and
may cause pulling to one side. You could
lose control of the vehicle.
After driving through a large puddle of
water or a car wash, apply your brake pedal
lightly until your brakes work normally.
Driving too fast through large water puddles or
even going through some car washes can cause
problems, too. The water may affect your brakes.
Try to avoid puddles. But if you cannot, try to slow
down before you hit them.
393
Page 399 of 674
Here are some things you can check before a trip:
Windshield Washer Fluid:Is the reservoir
full? Are all windows clean inside and outside?
Wiper Blades:Are they in good shape?
Fuel, Engine Oil, Other Fluids:Have you
checked all levels?
Lamps:Are they all working? Are the lenses
clean?
Tires:They are vitally important to a safe,
trouble-free trip. Is the tread good enough
for long-distance driving? Are the tires
all in�ated to the recommended pressure?
Weather Forecasts:What is the weather
outlook along your route? Should you
delay your trip a short time to avoid a major
storm system?
Maps:Do you have up-to-date maps?
Highway Hypnosis
Is there actually such a condition as highway
hypnosis? Or is it just plain falling asleep at the
wheel? Call it highway hypnosis, lack of
awareness, or whatever.
There is something about an easy stretch of road
with the same scenery, along with the hum of the
tires on the road, the drone of the engine, and the
rush of the wind against the vehicle that can make
you sleepy. Do not let it happen to you! If it does,
your vehicle can leave the road in less than a
second, and you could crash and be injured.
What can you do about highway hypnosis?
First, be aware that it can happen.
Then here are some tips:
Make sure your vehicle is well ventilated,
with a comfortably cool interior.
Keep your eyes moving. Scan the road ahead
and to the sides. Check your mirrors and your
instruments frequently.
If you get sleepy, pull off the road into a rest,
service, or parking area and take a nap, get
some exercise, or both. For safety, treat
drowsiness on the highway as an emergency.
399
Page 403 of 674

What is the worst time for this? Wet ice. Very cold
snow or ice can be slick and hard to drive on.
But wet ice can be even more trouble because it
may offer the least traction of all. You can get
wet ice when it is about freezing, 32°F (0°C), and
freezing rain begins to fall. Try to avoid driving
on wet ice until salt and sand crews can get there.Whatever the condition — smooth ice, packed,
blowing, or loose snow — drive with caution.
If you have the Traction Assist System (TAS),
it will improve your ability to accelerate when
driving on a slippery road. But you can turn the
TAS off if you ever need to. You should turn
the TAS off if your vehicle ever gets stuck in sand,
mud, ice, or snow. SeeIf Your Vehicle is Stuck
in Sand, Mud, Ice, or Snow on page 406.
Even though your vehicle has TAS, you will want
to slow down and adjust your driving to the
road conditions. Under certain conditions, you may
want to turn the TAS off, such as when driving
through deep snow and loose gravel, to help
maintain vehicle motion at lower speeds.
SeeTraction Assist System (TAS) on page 363.
If you do not have TAS, accelerate gently. Try not
to break the fragile traction. If you accelerate
too fast, the drive wheels will spin and polish the
surface under the tires even more.
403
Page 406 of 674

You will need a well-charged battery to restart the
vehicle, and possibly for signaling later on with
your headlamps. Let the heater run for a while.
Then, shut the engine off and close the window
almost all the way to preserve the heat. Start
the engine again and repeat this only when you
feel really uncomfortable from the cold. But do it as
little as possible. Preserve the fuel as long as
you can. To help keep warm, you can get out of
the vehicle and do some fairly vigorous exercises
every half hour or so until help comes.If Your Vehicle is Stuck in Sand,
Mud, Ice, or Snow
In order to free your vehicle when it is stuck,
you will need to spin the wheels, but you do not
want to spin your wheels too fast. The method
known as rocking can help you get out when you
are stuck, but you must use caution.
{CAUTION:
If you let your vehicle’s tires spin at high
speed, they can explode, and you or others
could be injured. And, the transmission or
other parts of the vehicle can overheat.
That could cause an engine compartment
�re or other damage. When you are stuck,
spin the wheels as little as possible. Do not
spin the wheels above 35 mph (55 km/h) as
shown on the speedometer.
406
Page 407 of 674
Notice:Spinning the wheels can destroy parts
of your vehicle as well as the tires. If you
spin the wheels too fast while shifting
the transmission back and forth, you can
destroy the transmission.
For information about using tire chains on your
vehicle, seeTire Chains on page 562.
Rocking Your Vehicle to Get It Out
First, turn the steering wheel left and right.
That will clear the area around the front wheels.
If you have a four-wheel-drive vehicle, shift
into Four-Wheel High. If your vehicle has the
Traction Assist System (TAS), you should
turn it off by pressing the TAS on/off button.Then shift back and forth between REVERSE (R)
and a forward gear, or with a manual transmission,
between FIRST (1) or SECOND (2) and
REVERSE (R), spinning the wheels as little as
possible. Release the accelerator pedal while you
shift, and press lightly on the accelerator pedal
when the transmission is in gear. By slowly
spinning the wheels in the forward and reverse
directions, you will cause a rocking motion
that may free your vehicle. If that does not get
your vehicle out after a few tries, it may need to be
towed out. Or, you can use the recovery hooks
if your vehicle has them. If your vehicle does need
to be towed out, seeTowing Your Vehicle on
page 423.
407
Page 415 of 674
Two-Tiered Loading
By positioning four 2 inches (5 cm) by 6 inches
(15 cm) wooden planks across the width of
the pickup box, you can create an upper load
platform. The planks must be inserted in the pickup
box depressions. The length of the planks must
allow for at least a 3/4 inch (2 cm) bearing surface
on each end of the plank.
When using this upper load platform, be sure the
load is securely tied down to prevent it from
shifting. The load’s center of gravity should be
positioned in a zone over the rear axle. The zone
is located in the area between the front of each
wheel well and the rear of each wheel well.
The center of gravity height must not extend above
the top of the pickup box �areboard.
Any load that extends beyond the vehicle’s
taillamp area must be properly marked according
to local laws and regulations.
Remember not to exceed the Gross Axle Weight
Rating (GAWR) of the front or rear axle.
Add-On Equipment
When you carry removable items, you may need
to put a limit on how many people you carry
inside your vehicle. Be sure to weigh your vehicle
before you buy and install the new equipment.
Notice:Overloading your vehicle may cause
damage. Repairs would not be covered by your
warranty. Do not overload your vehicle.
Remember not to exceed the Gross Axle Weight
Rating (GAWR) of the front or rear axle.
*Equipment Maximum Weight
Ladder Rack and Cargo 750 lbs (340 kg)
Cross Toolbox and Cargo 400 lbs (181 kg)
Side Boxes and Cargo 250 lbs per side
(113 kg per side)
*The combined weight for all rail-mounted equipment
should not exceed 1,000 lbs (454 kg), excluded
1500 crew cab models with 5 ft 8 in (173 cm) box
length. A reinforcement kit for rail-mounted add-on
equipment is recommended. See your dealer.
Ladder racks are not recommended for 1500 crew
cab models with 5 ft 8 in (173 cm) pick-up box length.
Maximum recommended cross-mounted toolbox and
cargo weight is 300 lbs (136 kg) for the 1500 crew
cab with 5 ft 8 in (173 cm) pick-up box length.
415
Page 418 of 674
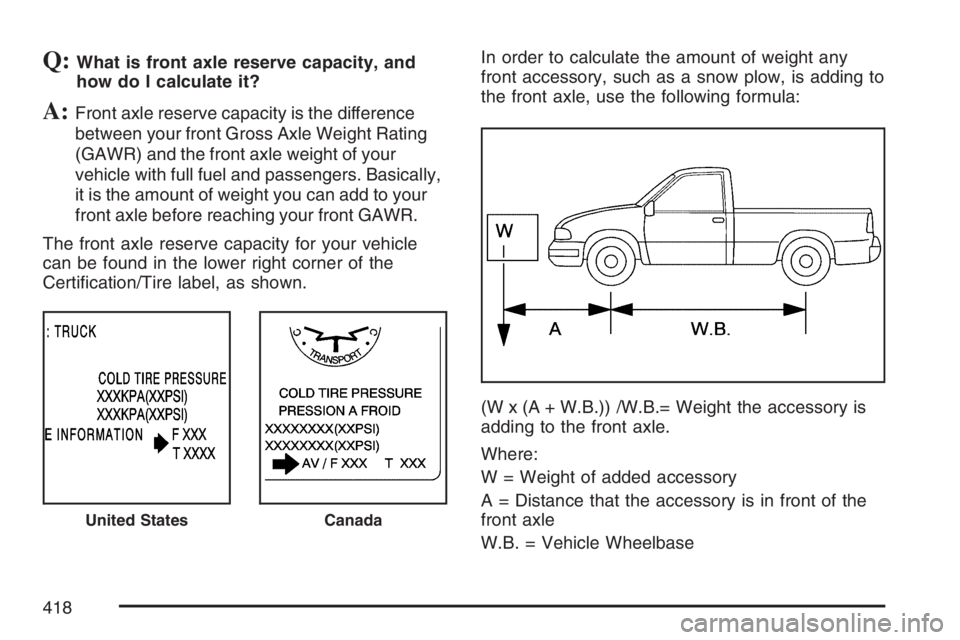
Q:What is front axle reserve capacity, and
how do I calculate it?
A:Front axle reserve capacity is the difference
between your front Gross Axle Weight Rating
(GAWR) and the front axle weight of your
vehicle with full fuel and passengers. Basically,
it is the amount of weight you can add to your
front axle before reaching your front GAWR.
The front axle reserve capacity for your vehicle
can be found in the lower right corner of the
Certi�cation/Tire label, as shown.In order to calculate the amount of weight any
front accessory, such as a snow plow, is adding to
the front axle, use the following formula:
(W x (A + W.B.)) /W.B.= Weight the accessory is
adding to the front axle.
Where:
W = Weight of added accessory
A = Distance that the accessory is in front of the
front axle
W.B. = Vehicle Wheelbase
United StatesCanada
418
Page 419 of 674
For example, adding a 700 lb (318 kg) snow plow
actually adds more than 700 lbs (318 kg) to the
front axle. Using the formula, if the snow plow
is 4 ft (122 cm) in front of the front axle and the
wheel base is 10 ft (305 cm), then:
W = 700 lb (318 kg)
A = 4 ft (122 cm)
W.B. = 10 ft (305 cm)
(W x (A + W.B.))/W.B. = (700 x (4 + 10))/10 =
980 lbs (445 kg)
So, if your truck’s front axle reserve capacity is
more than 980 lbs (445 kg), you could add
the snow plow without exceeding the front GAWR.
Q:What if I want to add heavier equipment
to my vehicle?
A:You can add heavier equipment on the front
of the vehicle if you compensate for it by
carrying fewer passengers, less cargo, or by
positioning cargo towards the rear. This
has the effect of reducing the load on the front.
However, the front GAWR, rear GAWR, and
the Gross Vehicle Weight Rating (GVWR)
must never be exceeded.
{CAUTION:
On some vehicles that have certain front
mounted equipment, such as a snow
plow, it may be possible to load the front
axle to the front gross axle weight rating
(GAWR) but not have enough weight on
the rear axle to have proper braking
performance. If your brakes can not work
properly, you could have a crash. To help
your brakes work properly when a snow
plow is installed, always follow the snow
plow manufacturer or installer’s
recommendation for rear ballast to ensure
a proper front and rear weight distribution
ratio, even though the actual front weight
may be less than the front GAWR, and the
total vehicle weight is less than the gross
vehicle weight rating (GVWR). Maintaining
a proper front and rear weight distribution
ratio is necessary to provide proper
braking performance.
419