2007 GMC CANYON Recreational towing
[x] Cancel search: Recreational towingPage 126 of 492

Four-Wheel Drive
If your vehicle has four-wheel drive, you can send
your engine’s driving power to all four wheels
for extra traction. To get the best performance
out of four-wheel drive, you must be familiar
with its operation. Read the part that follows
before using four-wheel drive. You should use
two-wheel-drive high for most normal driving
conditions.
Notice:Driving on clean, dry pavement in
four-wheel drive for an extended period of time
can cause premature wear on your vehicle’s
powertrain. Do not drive on clean, dry pavement
in four-wheel drive for extended periods of time.
Notice:If your vehicle has four-wheel drive
and the compact spare tire is installed on your
vehicle, do not drive in four-wheel drive until
you can have your �at tire repaired and/or
replaced. You could damage your vehicle, and
the repair costs would not be covered by your
warranty. Never use four-wheel drive when the
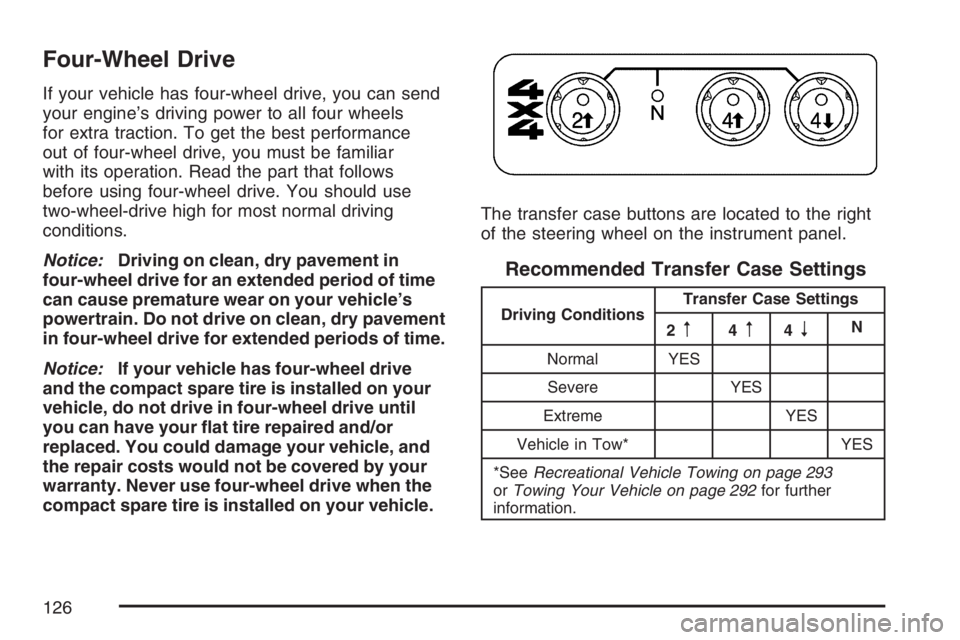
compact spare tire is installed on your vehicle.The transfer case buttons are located to the right
of the steering wheel on the instrument panel.
Recommended Transfer Case Settings
Driving ConditionsTransfer Case Settings
2m4m4nN
Normal YES
Severe YES
Extreme YES
Vehicle in Tow* YES
*SeeRecreational Vehicle Towing on page 293
orTowing Your Vehicle on page 292for further
information.
126
Page 129 of 492

Shifting from Four-Wheel Low to
Two-Wheel High or Four-Wheel High
To shift from Four-Wheel Low to Two-Wheel
High or Four-Wheel High, your vehicle must be
stopped or moving less than 3 mph (5 km/h)
with the transmission in NEUTRAL (N) for
an automatic transmission or the clutch pedal
engaged for a manual transmission. The preferred
method for shifting out of four-wheel low is to
have your vehicle moving 1 to 2 mph
(1.6 to 3.2 km/h).
Press and release the Four-Wheel High or
Two-Wheel High button. You must wait for the
Four-Wheel High or Two-Wheel High indicator
light to stop �ashing and stay on before shifting
the transmission into gear or releasing the
clutch pedal.
If the Four-Wheel High or Two-Wheel High button
is pressed when your vehicle is in gear and/or
moving faster than 3 mph (5km/h), the Four-Wheel
High or Two Wheel High indicator light will �ash
for 30 seconds but not complete the shift.
Shifting to NEUTRAL
Use NEUTRAL when you plan to tow your vehicle.
SeeRecreational Vehicle Towing on page 293
for towing instructions. To shift the transfer case
into NEUTRAL do the following:
1. Set the parking brake.
2. Start the vehicle.
3. Press the regular brake pedal and shift the
transmission in NEUTRAL (N), or press in
the clutch for vehicles with a manual
transmission.
4. Shift the transfer case to Two-Wheel High.
5. Press and hold the Two-Wheel High and
Four-Wheel Low buttons at the same time
for 10 seconds. The NEUTRAL (N) light
will come on when the transfer case shift to
NEUTRAL (N) is complete.
6. Press and hold the regular brake pedal and
shift the transmission to REVERSE (R) for
one second, then shift the transmission
to DRIVE (D) for one second, or FIRST (1) for
vehicles with manual transmissions, and let
out the clutch to insure the transfer case is in
NEUTRAL. If the vehicle is not in NEUTRAL,
repeat this procedure starting at Step 3.
129
Page 241 of 492

Your Driving, the Road, and Your Vehicle.... 242
Defensive Driving...................................... 242
Drunken Driving........................................ 243
Control of a Vehicle.................................. 246
Braking...................................................... 246
Anti-Lock Brake System (ABS).................. 247
Braking in Emergencies............................. 249
Traction Control System (TCS).................. 249
Limited-Slip Rear Axle............................... 250
Steering.................................................... 250
Off-Road Recovery.................................... 253
Passing..................................................... 253
Loss of Control.......................................... 255
Off-Road Driving........................................ 256
Driving at Night......................................... 270
Driving in Rain and on Wet Roads............ 271
City Driving............................................... 274Freeway Driving........................................ 275
Before Leaving on a Long Trip.................. 276
Highway Hypnosis..................................... 277
Hill and Mountain Roads........................... 278
Winter Driving........................................... 280
If Your Vehicle is Stuck in Sand,
Mud, Ice, or Snow ................................. 284
Rocking Your Vehicle to Get It Out........... 284
Recovery Hooks........................................ 285
Loading Your Vehicle................................ 286
Truck-Camper Loading Information............ 292
Pickup Conversion to Chassis Cab............ 292
Towing........................................................ 292
Towing Your Vehicle ................................. 292
Recreational Vehicle Towing...................... 293
Towing a Trailer........................................ 300
Trailer Recommendations.......................... 311
Section 4 Driving Your Vehicle
241
Page 292 of 492

Add-On Equipment
When you carry removable items, you may need
to put a limit on how many people you carry
inside your vehicle. Be sure to weigh your vehicle
before you buy and install the new equipment.
Notice:Overloading your vehicle may cause
damage. Repairs would not be covered by your
warranty. Do not overload your vehicle.
Remember not to exceed the Gross Axle Weight
Rating (GAWR) of the rear axle.
A reinforcement kit for mounting a toolbox is
recommended. See your dealer.
Truck-Camper Loading Information
Your vehicle was not designed to carry a
slide-in camper.
Pickup Conversion to Chassis Cab
General Motors is aware that some vehicle
owners may consider having the pickup box
removed and a commercial or recreational
body installed. However, we recommend that
conversions of this type not be done to pickups.
Owners should be aware that, as manufactured,
there are differences between a chassis cab and a
pickup with the box removed which may affect
vehicle safety.
Towing
Towing Your Vehicle
Consult your dealer or a professional towing service
if you need to have your disabled vehicle towed.
SeeRoadside Assistance Program on page 462.
If you want to tow your vehicle behind another
vehicle for recreational purposes (such as behind a
motorhome), see “Recreational Vehicle Towing”
following.
292
Page 293 of 492

Recreational Vehicle Towing
Recreational vehicle towing means towing your
vehicle behind another vehicle — such as behind
a motorhome. The two most common types of
recreational vehicle towing are known as “dinghy”
(towing your vehicle with all four wheels on the
ground) and “dolly” (towing your vehicle with
two wheels on the ground and two wheels up on a
device known as a “dolly”).
With the proper preparation and equipment, many
vehicles can be towed in these ways. See
“Dinghy Towing” and “Dolly Towing” following.Here are some important things to consider before
you do recreational vehicle towing:What’s the towing capacity of the towing
vehicle? Be sure you read the tow vehicle
manufacturer’s recommendations.
How far will you tow? Some vehicles have
restrictions on how far and how long they
can tow.
Do you have the proper towing equipment?
See your dealer or trailering professional
for additional advice and equipment
recommendations.
Is your vehicle ready to be towed? Just as
you would prepare your vehicle for a long
trip, you’ll want to make sure your vehicle is
prepared to be towed.
293
Page 488 of 492

Rearview Mirror, Automatic Dimming with
Compass and Temperature Display.......... 142
Rearview Mirror, Automatic Dimming with
OnStar
®, Compass and Temperature
Display..................................................... 139
Rearview Mirror with OnStar
®...................... 138
Rearview Mirrors......................................... 138
Reclining Seatbacks...................................... 12
Recommended Fluids and Lubricants.......... 447
Recovery Hooks.......................................... 285
Recreational Vehicle Towing........................ 293
Remote Keyless Entry (RKE) System.......... 100
Remote Keyless Entry (RKE) System,
Operation................................................. 101
Removing the Flat Tire and Installing
the Spare Tire.......................................... 398
Removing the Spare Tire and Tools............ 395
Replacement Bulbs..................................... 366
Reporting Safety Defects
Canadian Government............................. 474
General Motors........................................ 474
United States Government....................... 474Restraint System Check
Checking the Restraint Systems................. 94
Replacing Restraint System Parts After
a Crash.................................................. 95
Retained Accessory Power (RAP)................ 117
Right Front Passenger Position, Safety
Belts.......................................................... 34
Roadside
Assistance Program................................. 462
Rocking Your Vehicle to Get it Out.............. 284
Routing, Engine Drive Belt.......................... 450
Running the Engine While Parked............... 137
S
Safety Belt
Passenger Reminder Light....................... 180
Pretensioners............................................. 42
Reminder Light........................................ 180
Safety Belts
Care of.................................................... 418
Center Front Passenger Position................ 35
488
Page 491 of 492

Tires (cont.)
Tire Sidewall Labeling.............................. 370
Tire Terminology and De�nitions............... 374
Uniform Tire Quality Grading.................... 389
Wheel Alignment and Tire Balance........... 390
Wheel Replacement................................. 390
When It Is Time for New Tires................. 385
Towing
Recreational Vehicle................................. 293
Towing a Trailer....................................... 300
Your Vehicle............................................. 292
Traction
Control System (TCS).............................. 249
Limited-Slip Rear Axle.............................. 250
Trailer
Recommendations.................................... 311
Transmission
Fluid, Automatic....................................... 331
Fluid, Manual........................................... 334
Up-Shift Light........................................... 185
Transmission Operation, Automatic.............. 120
Transmission Operation, Manual.................. 124
Trip Odometer............................................. 179
Truck-Camper Loading Information.............. 292Turn and Lane-Change Signals................... 160
Turn Signal/Multifunction Lever.................... 159
U
Understanding Radio Reception................... 238
Uniform Tire Quality Grading....................... 389
Up-Shift Light.............................................. 185
V
Vehicle
Control..................................................... 246
Damage Warnings....................................... 5
Loading.................................................... 286
Parking Your............................................ 134
Symbols...................................................... 5
Vehicle Data Collection and Event Data
Recorders................................................ 468
Vehicle Identi�cation
Number (VIN).......................................... 424
Service Parts Identi�cation Label.............. 425
Ventilation Adjustment.................................. 176
Visors.......................................................... 112
491