Page 12 of 312
WARNING LIGHTS AND CHIMES
Standard instrument cluster (manual transmission)
Standard instrument cluster (automatic transmission)
Harley-Davidson instrument cluster
Warning lights and gauges can alert you to a vehicle condition that may
become serious enough to cause expensive repairs. A warning light may
illuminate when a problem exists with one of your vehicle’s functions.
2007 F-250/350/450/550(f23)
Owners Guide (post-2002-fmt)
USA(fus)
Instrument Cluster
12
Page 19 of 312

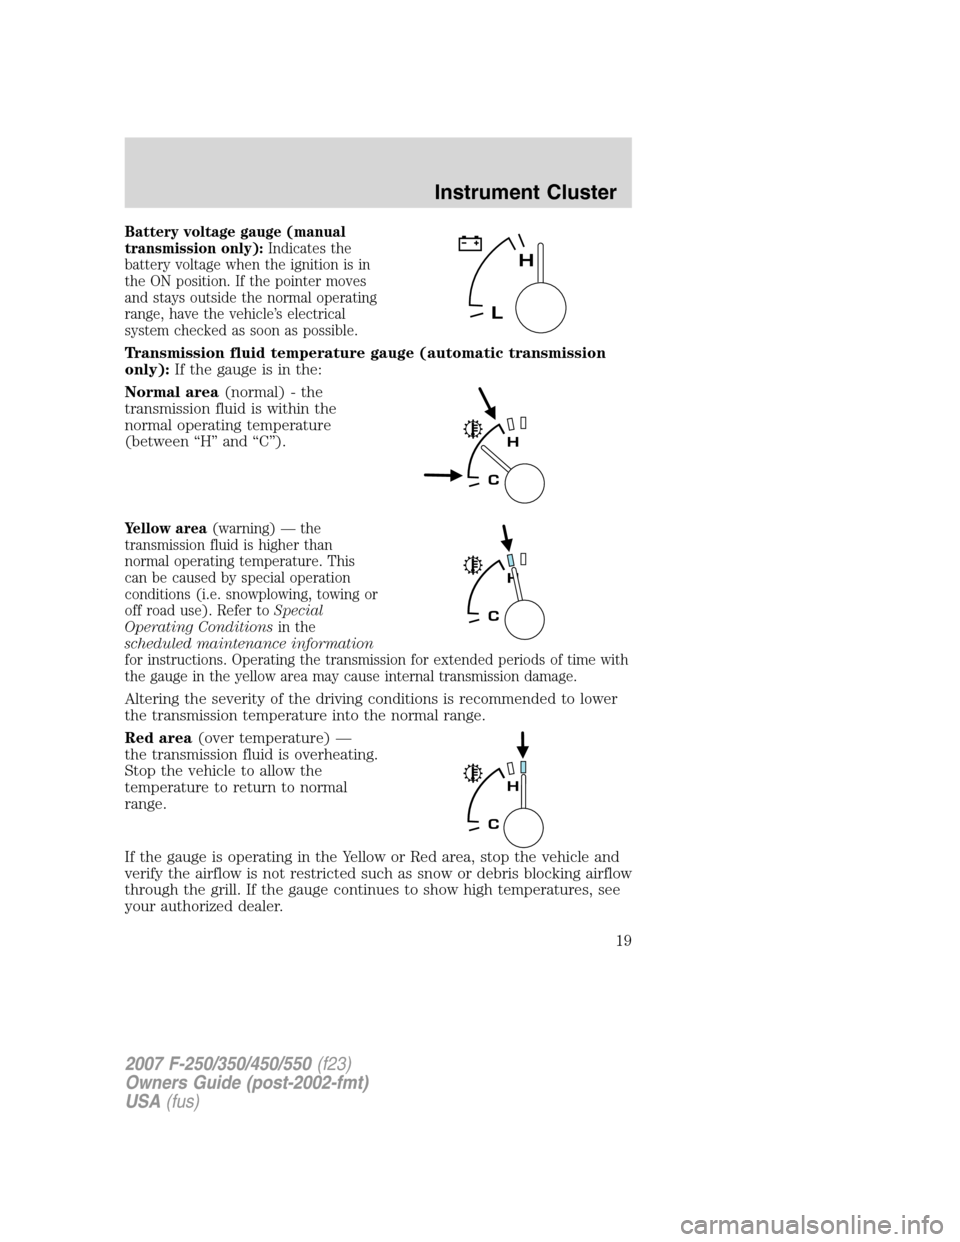
Battery voltage gauge (manual
transmission only):Indicates the
battery voltage when the ignition is in
the ON position. If the pointer moves
and stays outside the normal operating
range, have the vehicle’s electrical
system checked as soon as possible.
Transmission fluid temperature gauge (automatic transmission
only):If the gauge is in the:
Normal area(normal) - the
transmission fluid is within the
normal operating temperature
(between “H” and “C”).
Yellow area(warning) — the
transmission fluid is higher than
normal operating temperature. This
can be caused by special operation
conditions (i.e. snowplowing, towing or
off road use). Refer toSpecial
Operating Conditionsin the
scheduled maintenance information
for instructions. Operating the transmission for extended periods of time with
the gauge in the yellow area may cause internal transmission damage.
Altering the severity of the driving conditions is recommended to lower
the transmission temperature into the normal range.
Red area(over temperature) —
the transmission fluid is overheating.
Stop the vehicle to allow the
temperature to return to normal
range.
If the gauge is operating in the Yellow or Red area, stop the vehicle and
verify the airflow is not restricted such as snow or debris blocking airflow
through the grill. If the gauge continues to show high temperatures, see
your authorized dealer.
2007 F-250/350/450/550(f23)
Owners Guide (post-2002-fmt)
USA(fus)
Instrument Cluster
19
Page 108 of 312

Reasons given... Consider...
“I have an airbag” Airbags offer greater protection when used with
safety belts. Frontal airbags are not designed to
inflate in rear and side crashes or rollovers.
“I’d rather be
thrown clear”Not a good idea.Peoplewho areejected are 40
times more likely to DIE.Safety belts help
prevent ejection, WE CAN’T “PICK OUR CRASH”.
Do not sit on tope of a buckled safety belt or insert a latchplate
into the buckle to avoid the BeltMinder�chime. To do so may
adversely affect the performance of the vehicle’s air bag system
One time disable
Any time the safety belt is buckled and then unbuckled during an
ignition ON cycle, the BeltMinder�will be disabled for that ignition cycle
only.
Deactivating/activating the BeltMinder�feature
Read Steps1-5thoroughly before proceeding with the
deactivation/activation programming procedure.
The BeltMinder�feature can be deactivated/activated by performing the
following procedure:
Before following the procedure, make sure that the following conditions
are met:
•the parking brake is set
•the gearshift is in P (Park) (automatic transmission) or the neutral
position (manual transmission)
•the ignition switch is in the OFF position
•all vehicle doors are closed
•the driver’s safety belt is unbuckled
•the parklamps/headlamps are in the OFF position (If the vehicle is
equipped with Autolamps, this will not affect the procedure)
While the design allows you to deactivate your BeltMinder�,this
system is designed to improve your chances of being safely
belted and surviving an accident. We recommend you leave the
BeltMinder�system activated for yourself and others who may use the
vehicle. To reduce the risk of injury, do not deactivate/activate the
BeltMinder�feature while driving the vehicle.
2007 F-250/350/450/550(f23)
Owners Guide (post-2002-fmt)
USA(fus)
Seating and Safety Restraints
108
Page 158 of 312

Note:Do not exceed the GCWR listed for your vehicle on the following
chart/table, or the GVWR, GAWR or tire ratings specified on the Tire
Label or Safety Compliance Certification Label.
Towing trailers beyond the maximum recommended trailer
weight which exceeds the limit of the vehicle’s GCWR, GVWR,
GAWR or tire ratings could result in engine damage, transmission
damage, structural damage, loss of vehicle control, vehicle rollover and
personal injury.
Maximum GCWR - lb. (kg.)
Engine Rear axle
ratioManual
transmissionAutomatic
transmission
F–250/F–350 Single Rear Wheel (SRW)
5.4L 3.73 15000 (6804) 16000 (7257)
4.10 17000 (7711) 18000 (8165)
6.8L (F-250) 4.10 20000 (9072) 21000 (9525)
4.30 22000 (9979) 22500 (10206)
6.8L (F-350) 4.10 20000 (9072) 21000 (9525)
4.30 22000 (9979) 23000 (10433)
F–350 Dual Rear Wheel (DRW)
5.4L 3.73 15000 (6804) 16500 (7484)
4.10 17500 (7938) 18500 (8391)
6.8L 4.10 20500 (9299) 21500 (9752)
4.30 22500 (10206) 23000 (10433)
F–450/F–550
6.8L 4.88/5.38 26000 (11793) 26000 (11793)
Preparing to tow
Use the proper equipment for towing a trailer and make sure it is
properly attached to your vehicle. See your authorized dealer or a
reliable trailer dealer if you require assistance.
Hitches
Do not use hitches that clamp onto the vehicle’s bumper or attach to the
axle. You must distribute the load in your trailer so that 10%–15% for
conventional towing or 15%-25% fifth-wheel towing of the total weight of
the trailer is on the tongue.
2007 F-250/350/450/550(f23)
Owners Guide (post-2002-fmt)
USA(fus)
Tires, Wheels and Loading
158
Page 168 of 312
4x4 with manual shift transfer case:
•Place the transfer case in N (Neutral).
•Front hub locks are in the FREE position.
4x4 electronic shift transfer case vehicles with automatic
transmissions:
Regarding recreational towing or having your vehicle towed, 4x4 vehicles
with electronic shift on the fly cannot be towed with any wheels on the
ground unless the rear driveshaft is removed and the front hub locks are
in free mode (with the exception of moving it as a disabled vehicle off
the road out of traffic). The hub locks can be set to free mode at any
time by turning them from AUTO to LOCK and back to AUTO at least
two times. Always make sure that both hub locks are set to the same
position.
2007 F-250/350/450/550(f23)
Owners Guide (post-2002-fmt)
USA(fus)
Tires, Wheels and Loading
168
Page 169 of 312

STARTING
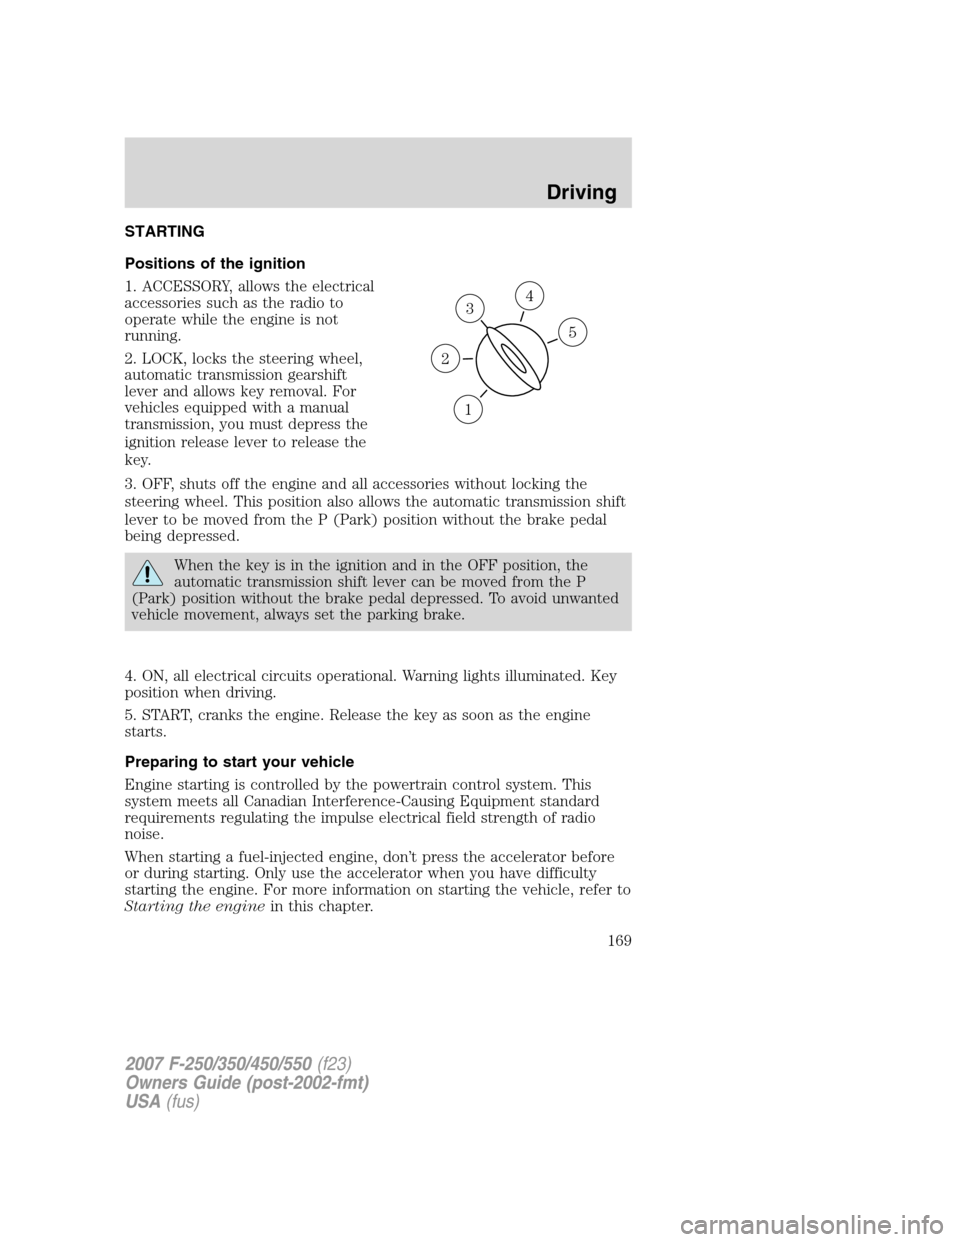
Positions of the ignition
1. ACCESSORY, allows the electrical
accessories such as the radio to
operate while the engine is not
running.
2. LOCK, locks the steering wheel,
automatic transmission gearshift
lever and allows key removal. For
vehicles equipped with a manual
transmission, you must depress the
ignition release lever to release the
key.
3. OFF, shuts off the engine and all accessories without locking the
steering wheel. This position also allows the automatic transmission shift
lever to be moved from the P (Park) position without the brake pedal
being depressed.
When the key is in the ignition and in the OFF position, the
automatic transmission shift lever can be moved from the P
(Park) position without the brake pedal depressed. To avoid unwanted
vehicle movement, always set the parking brake.
4. ON, all electrical circuits operational. Warning lights illuminated. Key
position when driving.
5. START, cranks the engine. Release the key as soon as the engine
starts.
Preparing to start your vehicle
Engine starting is controlled by the powertrain control system. This
system meets all Canadian Interference-Causing Equipment standard
requirements regulating the impulse electrical field strength of radio
noise.
When starting a fuel-injected engine, don’t press the accelerator before
or during starting. Only use the accelerator when you have difficulty
starting the engine. For more information on starting the vehicle, refer to
Starting the enginein this chapter.
3
1
2
5
4
2007 F-250/350/450/550(f23)
Owners Guide (post-2002-fmt)
USA(fus)
Driving
169
Page 171 of 312
If starting a vehicle with an automatic transmission:
1. Make sure the parking brake is
set.
2. Make sure the gearshift is in P
(Park).
If starting a vehicle with a manual
transmission:
1. Make sure the parking brake is
set.
2. Push the clutch pedal to the floor.
2007 F-250/350/450/550(f23)
Owners Guide (post-2002-fmt)
USA(fus)
Driving
171
Page 176 of 312
Parking brake
To set the parking brake, press the
parking brake pedal down until the
pedal stops.
The BRAKE warning lamp in the
instrument cluster illuminates and
remains illuminated until the
parking brake is released.
Pull the right side of the release
lever to release the parking brake;
the release lever pulls at an angle
toward the driver’s door. To prevent
the pedal from releasing too quickly,
place your left foot on the parking
brake pedal, then pull the release
lever, making sure the pedal fully
releases. You may want to pull the
release lever again to make sure the
parking brake is full released.
Always set the parking brake fully and make sure that the
gearshift is securely latched in P (Park) (automatic
transmission) or in 1 (First) (manual transmission).
P!
BRAKE
2007 F-250/350/450/550(f23)
Owners Guide (post-2002-fmt)
USA(fus)
Driving
176