2007 FORD SUPER DUTY air filter
[x] Cancel search: air filterPage 34 of 72
3. Remove the drain plug, using a 6mm hex drive, by turning it
counterclockwise. Allow the HFCM to drain for approximately 25 seconds
or until clean fuel is observed. Install the drain plug by turning it
clockwise until it is firmly seated.
4. Verify that the drain plug is closed and sealed, then remove the
container from under the vehicle.
5. Restart the engine and check WATER IN FUEL indicator light; it
should not be illuminated. If it continues to illuminate, have the fuel
system checked and repaired.
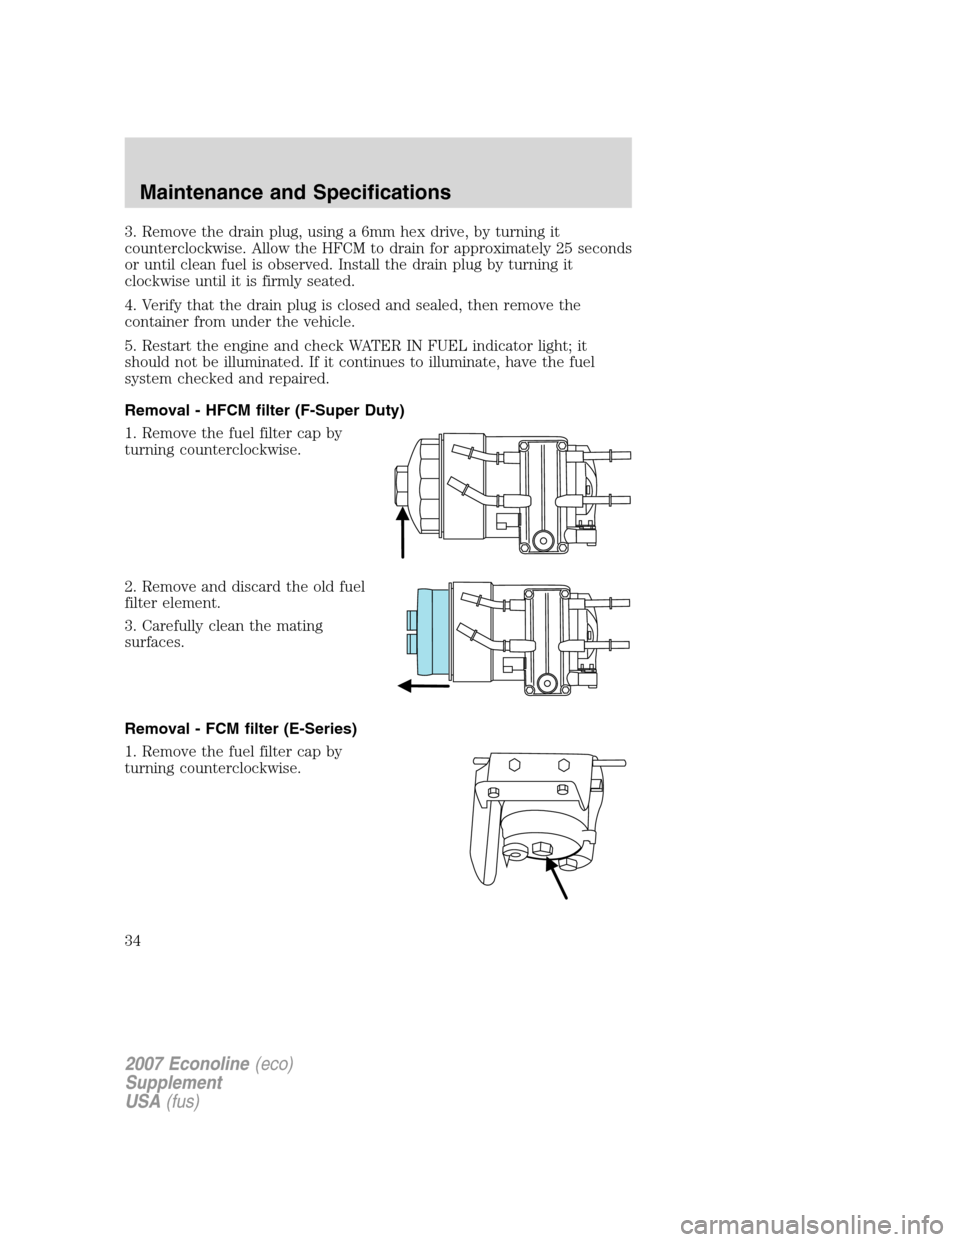
Removal - HFCM filter (F-Super Duty)
1. Remove the fuel filter cap by
turning counterclockwise.
2. Remove and discard the old fuel
filter element.
3. Carefully clean the mating
surfaces.
Removal - FCM filter (E-Series)
1. Remove the fuel filter cap by
turning counterclockwise.
2007 Econoline(eco)
Supplement
USA(fus)
Maintenance and Specifications
34
Page 36 of 72
2. Remove and discard the old fuel filter element.
3. Carefully clean the mating surfaces.
Installation - both
The engine will not run properly if the fuel filter is not installed
in housing.
1. Install the new fuel filter and cap seal (Motorcraft Part No. FD-4604,
F-Series and FD-4606, E-Series) into the fuel filter housing.
2. Tighten cap onto fuel filter housing slowly, allowing fuel to soak into
the fuel filter element. Tighten cap until it contacts the housing.
After replacing the fuel filter, the engine will purge the trapped
air as it runs. The engine may run roughly and smoke until the air
is completely eliminated.
Using a fuel which has more than average impurities may require
the fuel filter to be replaced more frequently than the service
interval specifies.
ENGINE OIL
Checking the engine oil level
Because it is normal to add some oil between oil changes, check your
engine oil level each time you stop for fuel. To check the engine oil level
consistently and accurately, the following procedure is recommended:
1. Have engine at normal operating temperature (at least into the
NORMAL range on the engine coolant temperature gauge).
2. Park the vehicle on a level surface, then turn off the engine and open
the hood.
3. Allow at least20 minutesafter engine shutdown to ensure that the
oil contained in the upper parts of the engine has returned to the oil
pan.
4. Protecting yourself from engine heat, pull out the dipstick, wipe it
clean and reinsert fully.
5. Read oil level on both sides of dipstick and use highest level (reading)
for the actual engine oil level.
6. Maintain the oil level between MIN and MAX or the ADD and
OPERATING RANGE on the dipstick by adding oil as required. The
distance from MIN to MAX or ADD to OPERATING RANGE on the
dipstick represents 2.0 quarts (1.9L). Do not overfill. If the oil level
exceeds MAX or OPERATING RANGE, oil consumption may result.
2007 Econoline(eco)
Supplement
USA(fus)
Maintenance and Specifications
36
Page 40 of 72
If you are operating your vehicle under any of these conditions, observe
the following service procedures:
•Change engine oil and filter every 5,000 miles (8,000 km).
•Use Motorcraft oil or an equivalent oil conforming to Ford
Specification WSS-M2C171–D or API categories, CI–4/SL, CI-4 PLUS or
DHD-1. If CI-4 PLUS oil is not available CI-4 or CH-4 is acceptable.
For more information refer thescheduled maintenance information
section of this supplement.
AIR FILTER
When replacing the air filter element, use the Motorcraft air filter
element listed. Refer to theMotorcraft part numberschart in this
chapter.
To reduce the risk of vehicle damage and/or personal burn
injuries do not start your engine with the air cleaner removed
and do not remove it while the engine is running.
Failure to use the correct air filter element may result in severe
engine damage.
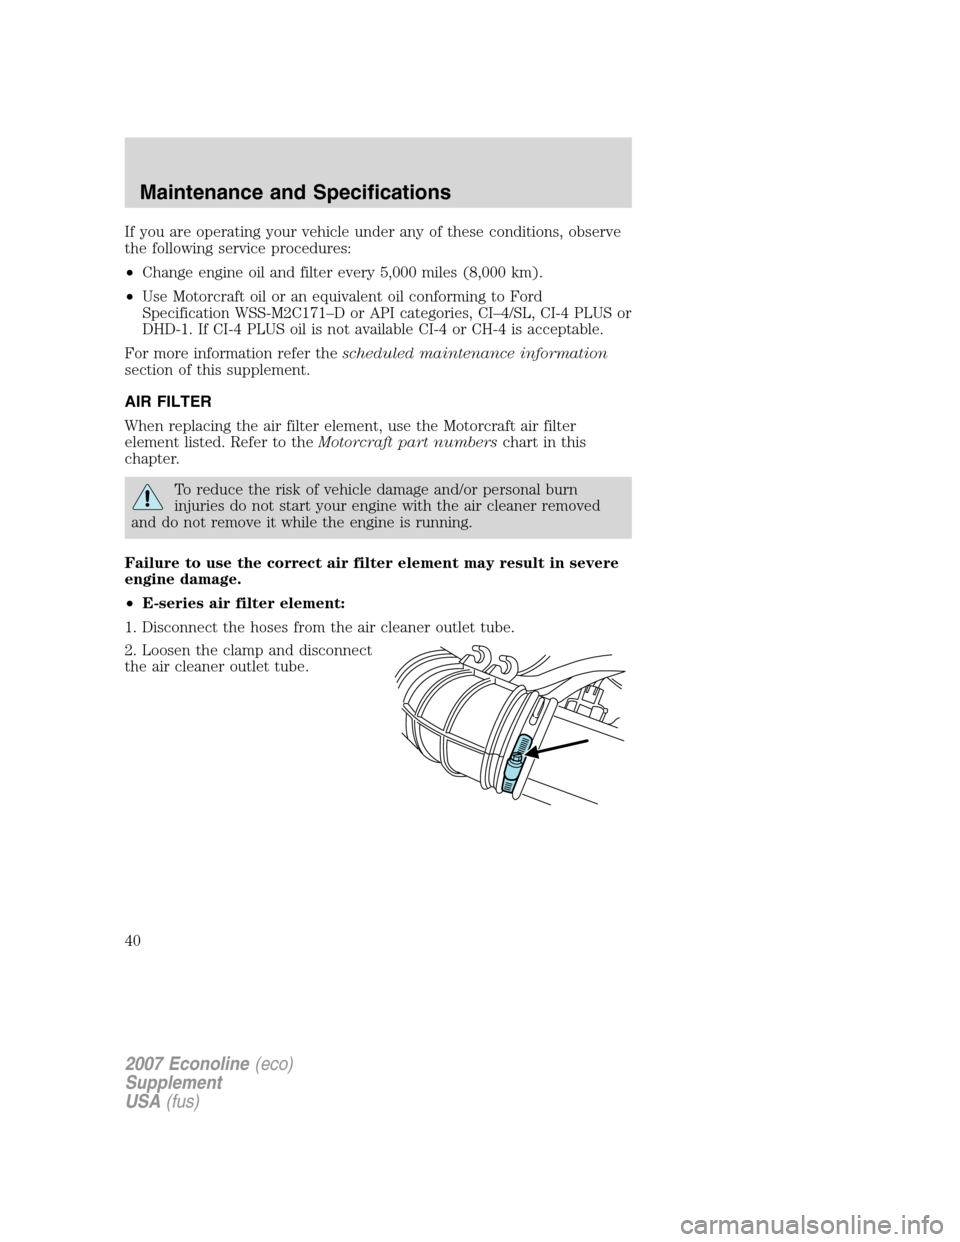
•E-series air filter element:
1. Disconnect the hoses from the air cleaner outlet tube.
2. Loosen the clamp and disconnect
the air cleaner outlet tube.
2007 Econoline(eco)
Supplement
USA(fus)
Maintenance and Specifications
40
Page 41 of 72
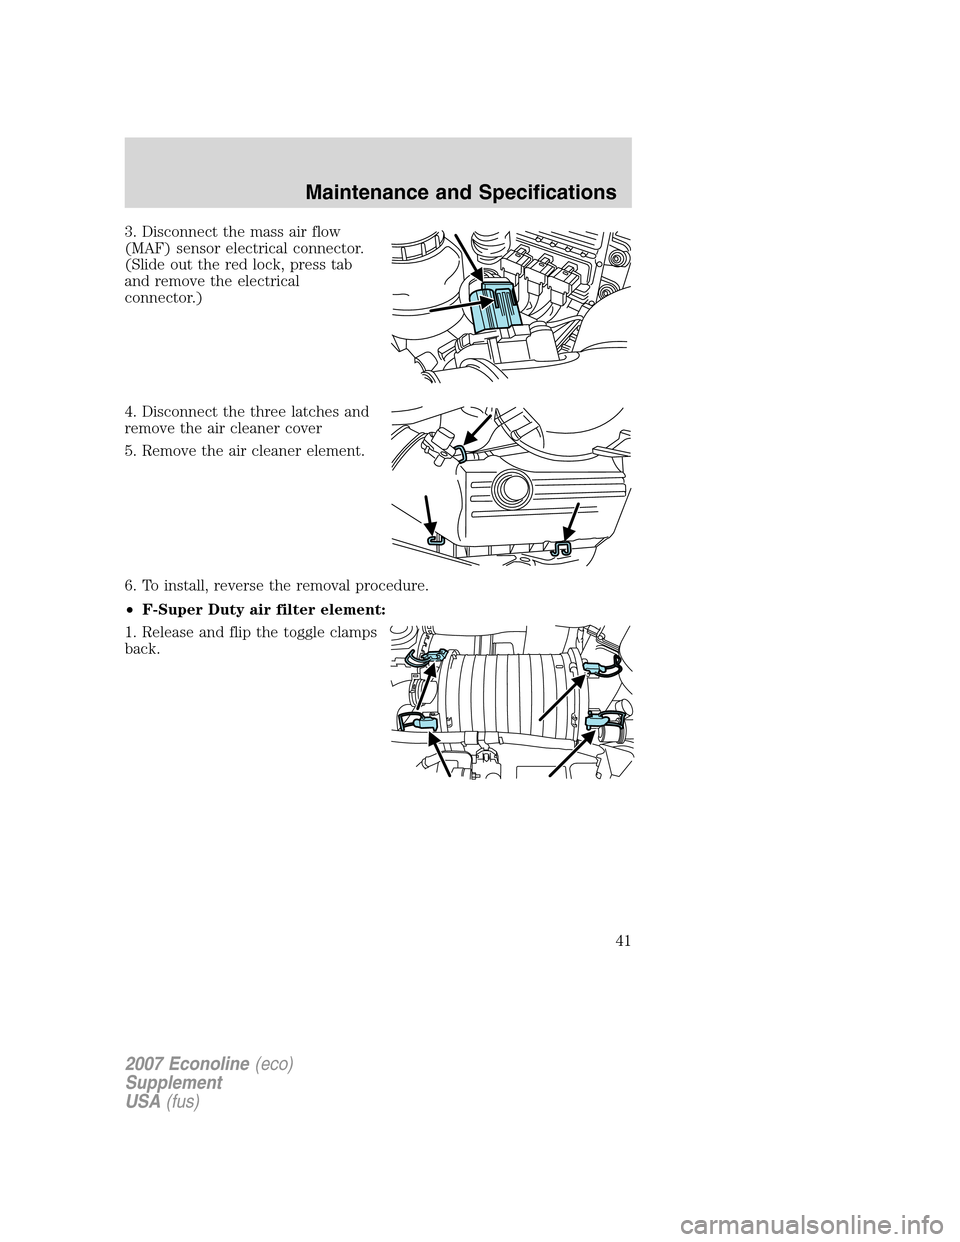
3. Disconnect the mass air flow
(MAF) sensor electrical connector.
(Slide out the red lock, press tab
and remove the electrical
connector.)
4. Disconnect the three latches and
remove the air cleaner cover
5. Remove the air cleaner element.
6. To install, reverse the removal procedure.
•F-Super Duty air filter element:
1. Release and flip the toggle clamps
back.
2007 Econoline(eco)
Supplement
USA(fus)
Maintenance and Specifications
41
Page 42 of 72
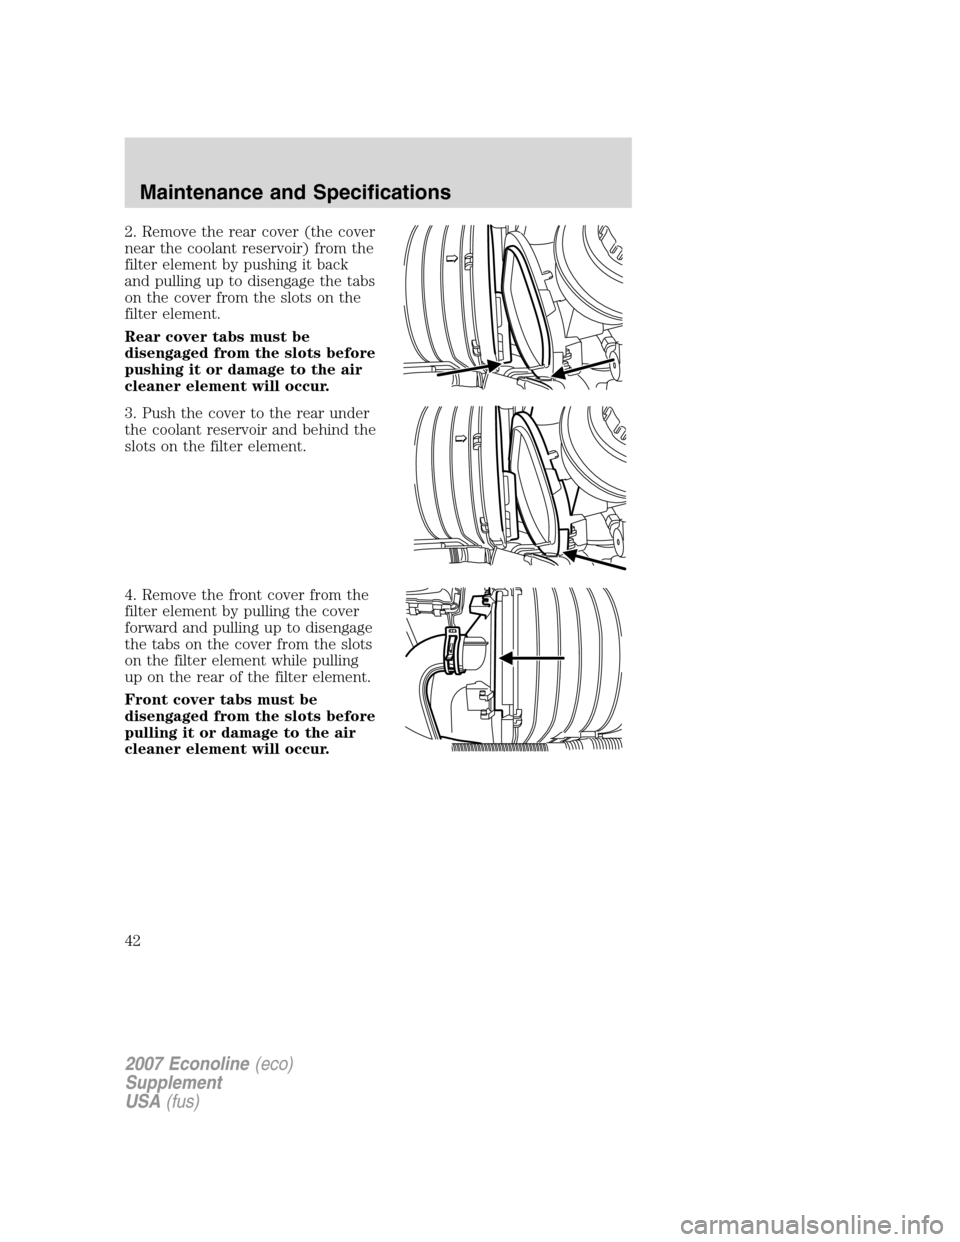
2. Remove the rear cover (the cover
near the coolant reservoir) from the
filter element by pushing it back
and pulling up to disengage the tabs
on the cover from the slots on the
filter element.
Rear cover tabs must be
disengaged from the slots before
pushing it or damage to the air
cleaner element will occur.
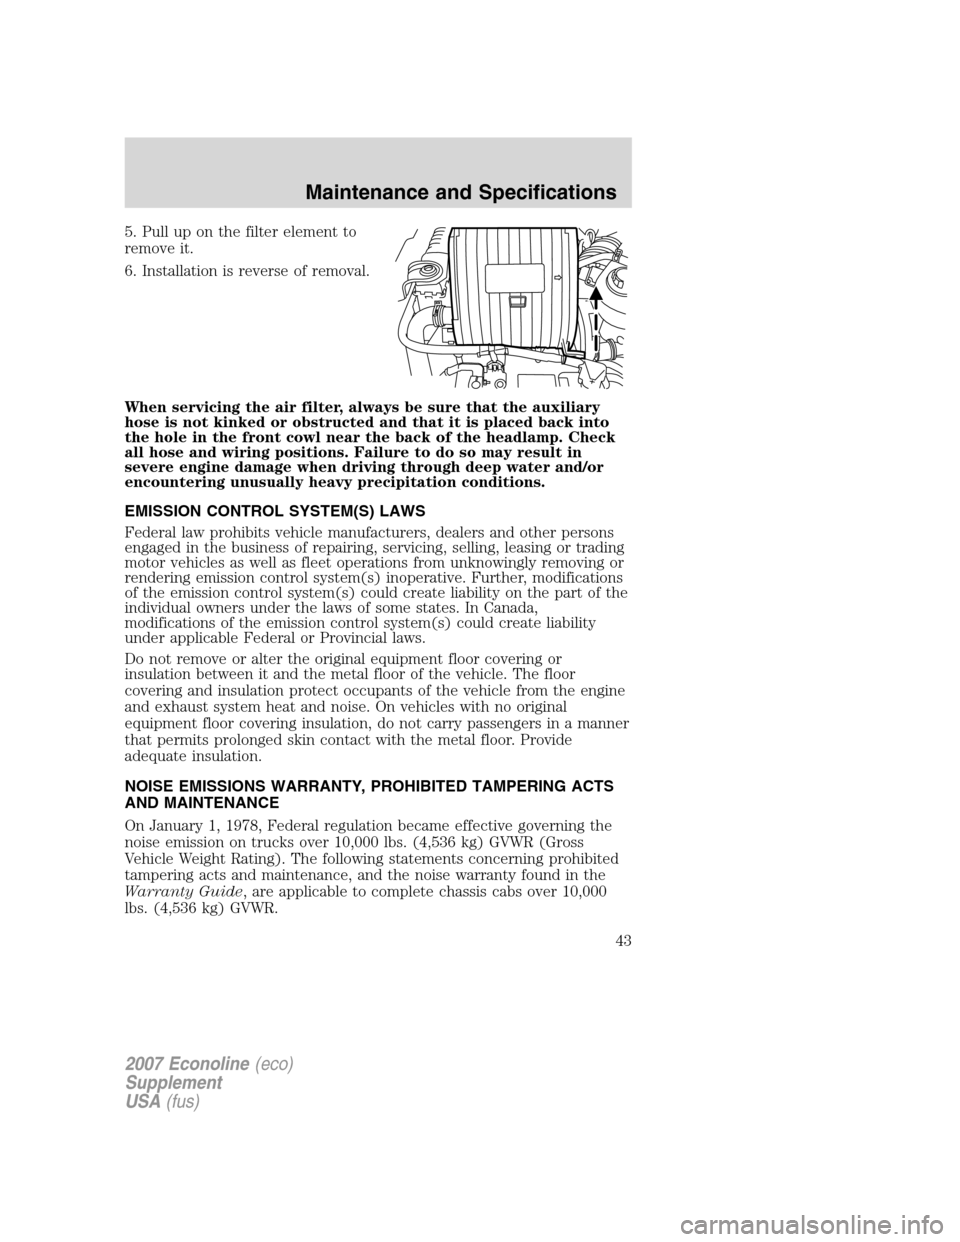
3. Push the cover to the rear under
the coolant reservoir and behind the
slots on the filter element.
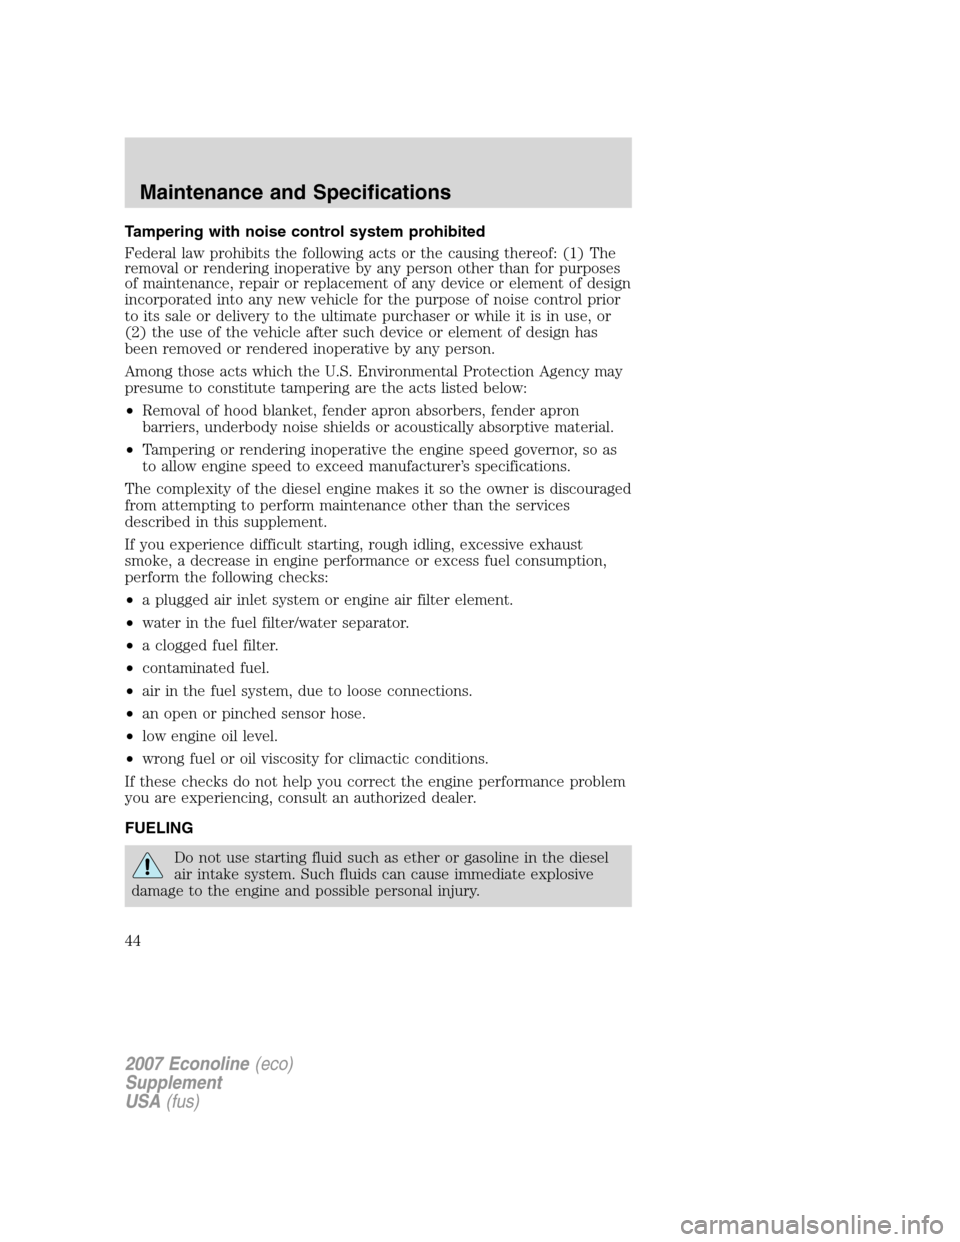
4. Remove the front cover from the
filter element by pulling the cover
forward and pulling up to disengage
the tabs on the cover from the slots
on the filter element while pulling
up on the rear of the filter element.
Front cover tabs must be
disengaged from the slots before
pulling it or damage to the air
cleaner element will occur.
2007 Econoline(eco)
Supplement
USA(fus)
Maintenance and Specifications
42
Page 43 of 72
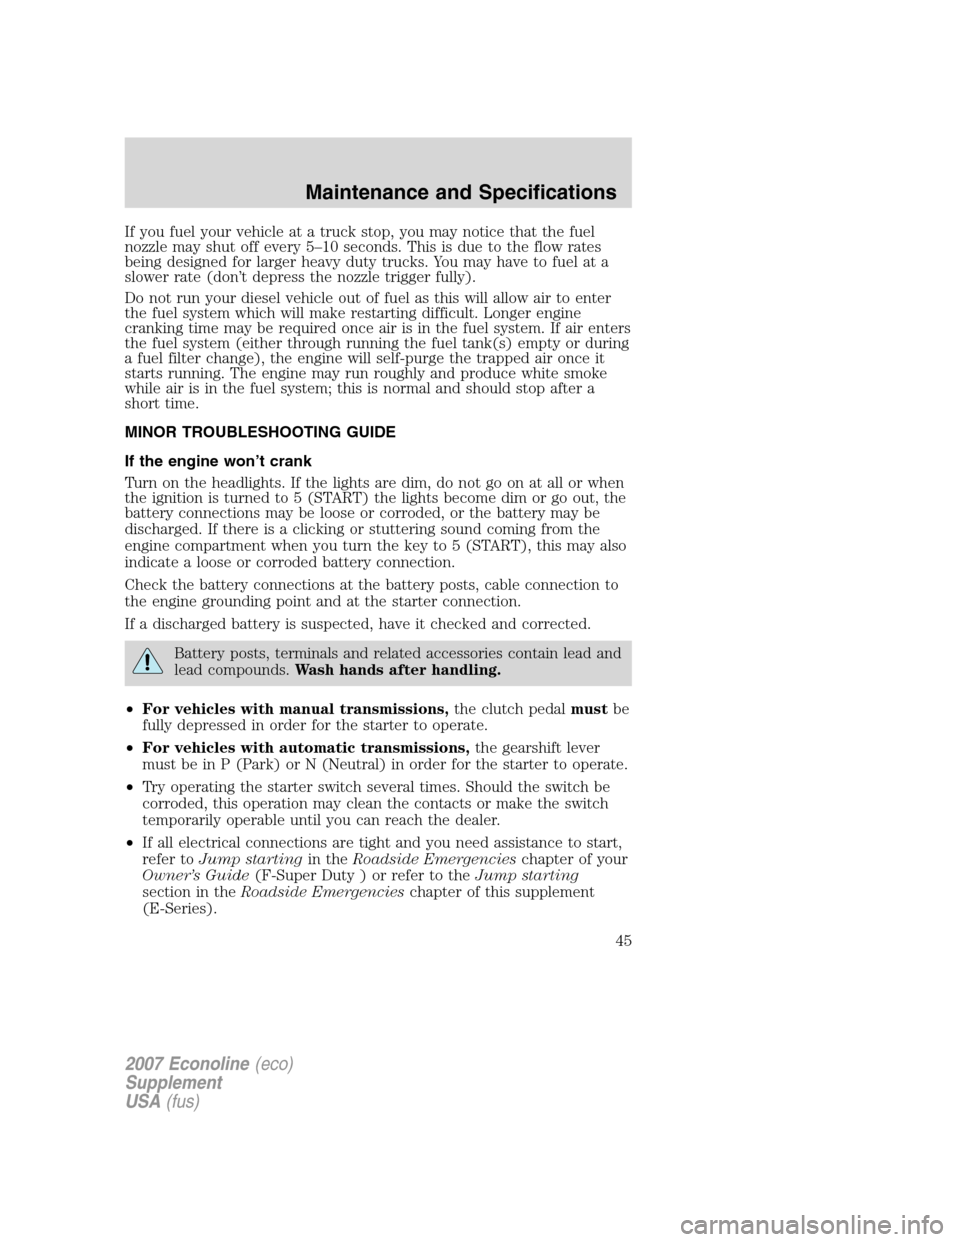
5. Pull up on the filter element to
remove it.
6. Installation is reverse of removal.
When servicing the air filter, always be sure that the auxiliary
hose is not kinked or obstructed and that it is placed back into
the hole in the front cowl near the back of the headlamp. Check
all hose and wiring positions. Failure to do so may result in
severe engine damage when driving through deep water and/or
encountering unusually heavy precipitation conditions.
EMISSION CONTROL SYSTEM(S) LAWS
Federal law prohibits vehicle manufacturers, dealers and other persons
engaged in the business of repairing, servicing, selling, leasing or trading
motor vehicles as well as fleet operations from unknowingly removing or
rendering emission control system(s) inoperative. Further, modifications
of the emission control system(s) could create liability on the part of the
individual owners under the laws of some states. In Canada,
modifications of the emission control system(s) could create liability
under applicable Federal or Provincial laws.
Do not remove or alter the original equipment floor covering or
insulation between it and the metal floor of the vehicle. The floor
covering and insulation protect occupants of the vehicle from the engine
and exhaust system heat and noise. On vehicles with no original
equipment floor covering insulation, do not carry passengers in a manner
that permits prolonged skin contact with the metal floor. Provide
adequate insulation.
NOISE EMISSIONS WARRANTY, PROHIBITED TAMPERING ACTS
AND MAINTENANCE
On January 1, 1978, Federal regulation became effective governing the
noise emission on trucks over 10,000 lbs. (4,536 kg) GVWR (Gross
Vehicle Weight Rating). The following statements concerning prohibited
tampering acts and maintenance, and the noise warranty found in the
Warranty Guide, are applicable to complete chassis cabs over 10,000
lbs. (4,536 kg) GVWR.
2007 Econoline(eco)
Supplement
USA(fus)
Maintenance and Specifications
43
Page 44 of 72
Tampering with noise control system prohibited
Federal law prohibits the following acts or the causing thereof: (1) The
removal or rendering inoperative by any person other than for purposes
of maintenance, repair or replacement of any device or element of design
incorporated into any new vehicle for the purpose of noise control prior
to its sale or delivery to the ultimate purchaser or while it is in use, or
(2) the use of the vehicle after such device or element of design has
been removed or rendered inoperative by any person.
Among those acts which the U.S. Environmental Protection Agency may
presume to constitute tampering are the acts listed below:
•Removal of hood blanket, fender apron absorbers, fender apron
barriers, underbody noise shields or acoustically absorptive material.
•Tampering or rendering inoperative the engine speed governor, so as
to allow engine speed to exceed manufacturer’s specifications.
The complexity of the diesel engine makes it so the owner is discouraged
from attempting to perform maintenance other than the services
described in this supplement.
If you experience difficult starting, rough idling, excessive exhaust
smoke, a decrease in engine performance or excess fuel consumption,
perform the following checks:
•a plugged air inlet system or engine air filter element.
•water in the fuel filter/water separator.
•a clogged fuel filter.
•contaminated fuel.
•air in the fuel system, due to loose connections.
•an open or pinched sensor hose.
•low engine oil level.
•wrong fuel or oil viscosity for climactic conditions.
If these checks do not help you correct the engine performance problem
you are experiencing, consult an authorized dealer.
FUELING
Do not use starting fluid such as ether or gasoline in the diesel
air intake system. Such fluids can cause immediate explosive
damage to the engine and possible personal injury.
2007 Econoline(eco)
Supplement
USA(fus)
Maintenance and Specifications
44
Page 45 of 72
If you fuel your vehicle at a truck stop, you may notice that the fuel
nozzle may shut off every 5–10 seconds. This is due to the flow rates
being designed for larger heavy duty trucks. You may have to fuel at a
slower rate (don’t depress the nozzle trigger fully).
Do not run your diesel vehicle out of fuel as this will allow air to enter
the fuel system which will make restarting difficult. Longer engine
cranking time may be required once air is in the fuel system. If air enters
the fuel system (either through running the fuel tank(s) empty or during
a fuel filter change), the engine will self-purge the trapped air once it
starts running. The engine may run roughly and produce white smoke
while air is in the fuel system; this is normal and should stop after a
short time.
MINOR TROUBLESHOOTING GUIDE
If the engine won’t crank
Turn on the headlights. If the lights are dim, do not go on at all or when
the ignition is turned to 5 (START) the lights become dim or go out, the
battery connections may be loose or corroded, or the battery may be
discharged. If there is a clicking or stuttering sound coming from the
engine compartment when you turn the key to 5 (START), this may also
indicate a loose or corroded battery connection.
Check the battery connections at the battery posts, cable connection to
the engine grounding point and at the starter connection.
If a discharged battery is suspected, have it checked and corrected.
Battery posts, terminals and related accessories contain lead and
lead compounds.Wash hands after handling.
•For vehicles with manual transmissions,the clutch pedalmustbe
fully depressed in order for the starter to operate.
•For vehicles with automatic transmissions,the gearshift lever
must be in P (Park) or N (Neutral) in order for the starter to operate.
•Try operating the starter switch several times. Should the switch be
corroded, this operation may clean the contacts or make the switch
temporarily operable until you can reach the dealer.
•If all electrical connections are tight and you need assistance to start,
refer toJump startingin theRoadside Emergencieschapter of your
Owner’s Guide(F-Super Duty ) or refer to theJump starting
section in theRoadside Emergencieschapter of this supplement
(E-Series).
2007 Econoline(eco)
Supplement
USA(fus)
Maintenance and Specifications
45