Page 2 of 312
Seating and Safety Restraints 113
Seating 113
Safety restraints 138
Airbags 153
Child restraints 167
Tires, Wheels and Loading 182
Tire information 182
Tire inflation 184
Tire Pressure Monitoring System (TPMS) 196
Vehicle loading 200
Trailer towing 206
Recreational towing 210
Driving 211
Starting 211
Brakes 214
Transmission operation 219
Roadside Emergencies 225
Getting roadside assistance 225
Hazard flasher switch 226
Fuel pump shut-off switch 227
Fuses and relays 227
Changing tires 235
Lug nut torque 245
Jump starting 245
Wrecker towing 251
Customer Assistance 253
Reporting safety defects (U.S. only) 259
Cleaning 260
Table of Contents
2
2007 Freestar(win)
Owners Guide (post-2002-fmt)
USA(fus)
Page 216 of 312

Parking brake
To set the parking brake, pull the
handle up as far as possible. The
BRAKE warning lamp will illuminate
and will remain illuminated until the
parking brake is released.
To release, press and hold the
button, pull the handle up slightly,
then push the handle down.
Always set the parking
brake fully and make sure
that the gearshift is securely
latched in P (Park).
ADVANCETRAC�STABILITY ENHANCEMENT SYSTEM
(IF EQUIPPED)
The AdvanceTrac�system helps the driver maintain the stability and
steer-ability of the vehicle. The system integrates anti-lock braking
system (ABS) and Traction Control�and a more advanced function to
further enhance the stability of the vehicle.
AdvanceTrac�constantly monitors the vehicle motion relative to the
driver’s intended course. This is done by using added sensors that
compare the steering inputs from the driver with the actual motion of
the vehicle. AdvanceTrac�determines whether an engine torque
reduction or brake application is needed to help control the vehicle. If
the vehicle begins to rotate excessively left or right, spin out, or slide
sideways, the system will attempt to correct the excessive motion. If the
vehicle does not respond to steering inputs, the system will attempt to
increase the turning response of the vehicle.
AdvanceTrac�enhances your vehicle’s stability during maneuvers that
require all available tire traction, like in wet/snowy/icy road conditions
and/or when performing emergency maneuvers. In an emergency
lane-change, the driver will experience better overall vehicle traction,
and have better control of the vehicle.
Driving conditions which may activate AdvanceTrac�include:
•Accelerating on a slippery surface
•Taking a turn too fast
P!
BRAKE
2007 Freestar(win)
Owners Guide (post-2002-fmt)
USA(fus)
Driving
216
Page 243 of 312

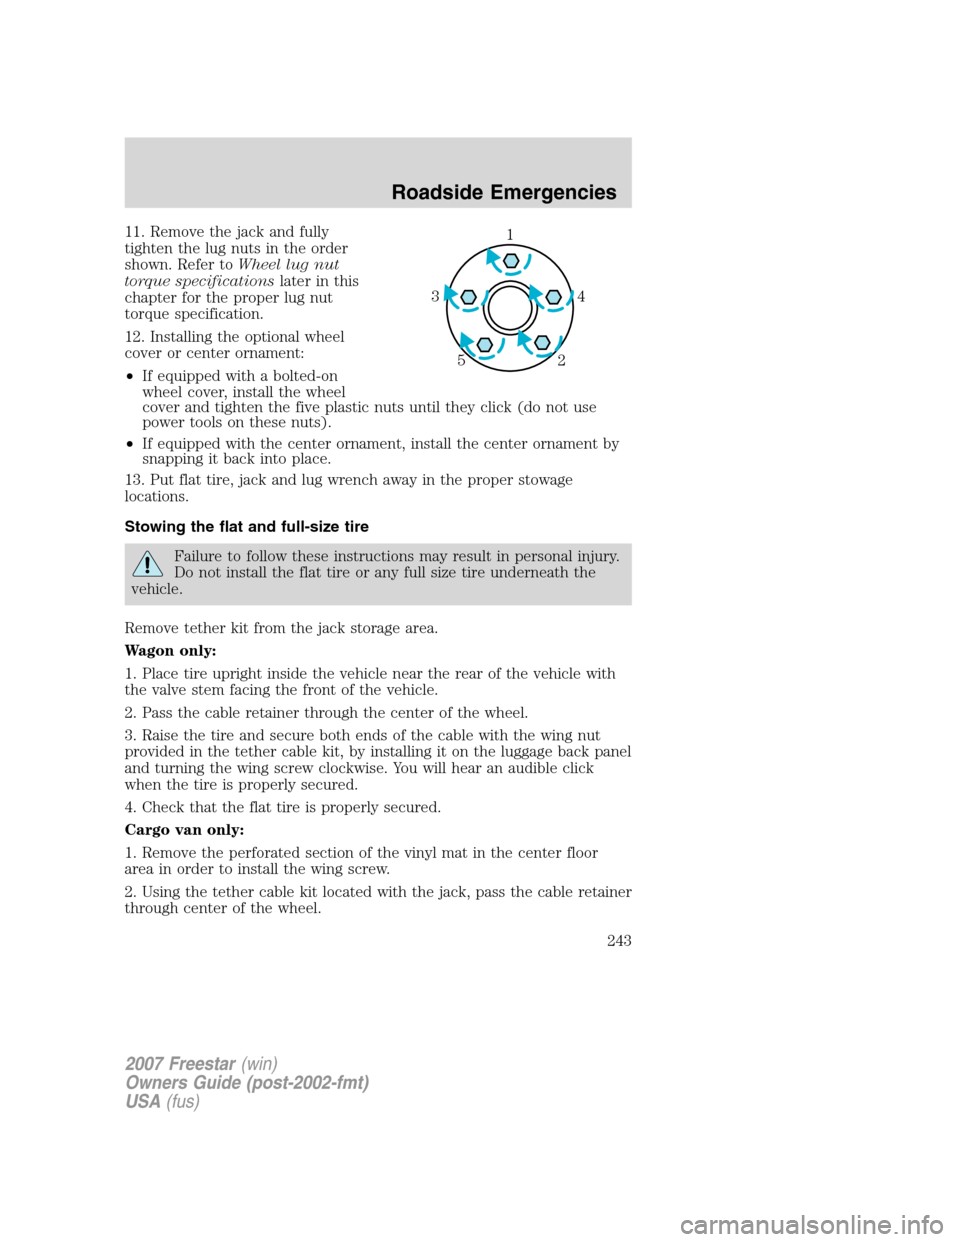
11. Remove the jack and fully
tighten the lug nuts in the order
shown. Refer toWheel lug nut
torque specificationslater in this
chapter for the proper lug nut
torque specification.
12. Installing the optional wheel
cover or center ornament:
•If equipped with a bolted-on
wheel cover, install the wheel
cover and tighten the five plastic nuts until they click (do not use
power tools on these nuts).
•If equipped with the center ornament, install the center ornament by
snapping it back into place.
13. Put flat tire, jack and lug wrench away in the proper stowage
locations.
Stowing the flat and full-size tire
Failure to follow these instructions may result in personal injury.
Do not install the flat tire or any full size tire underneath the
vehicle.
Remove tether kit from the jack storage area.
Wagon only:
1. Place tire upright inside the vehicle near the rear of the vehicle with
the valve stem facing the front of the vehicle.
2. Pass the cable retainer through the center of the wheel.
3. Raise the tire and secure both ends of the cable with the wing nut
provided in the tether cable kit, by installing it on the luggage back panel
and turning the wing screw clockwise. You will hear an audible click
when the tire is properly secured.
4. Check that the flat tire is properly secured.
Cargo van only:
1. Remove the perforated section of the vinyl mat in the center floor
area in order to install the wing screw.
2. Using the tether cable kit located with the jack, pass the cable retainer
through center of the wheel.
1
4 3
2 5
2007 Freestar(win)
Owners Guide (post-2002-fmt)
USA(fus)
Roadside Emergencies
243
Page 245 of 312

WHEEL LUG NUT TORQUE SPECIFICATIONS
Retighten the lug nuts to the specified torque at 500 miles (800 km)
after any wheel disturbance (rotation, flat tire, wheel removal, etc.).
Bolt size Wheel lug nut torque*
lb.ft. N•m
1�2x 20 100 135
* Torque specifications are for nut and bolt threads free of dirt and
rust. Use only Ford recommended replacement fasteners.
When a wheel is installed, always remove any corrosion, dirt or
foreign materials present on the mounting surfaces of the wheel
or the surface of the wheel hub, brake drum or brake disc that
contacts the wheel. Ensure that any fasteners that attach the rotor to
the hub are secured so they do not interfere with the mounting
surfaces of the wheel. Installing wheels without correct metal-to-metal
contact at the wheel mounting surfaces can cause the wheel nuts to
loosen and the wheel to come off while the vehicle is in motion,
resulting in loss of control.
JUMP STARTING
The gases around the battery can explode if exposed to flames,
sparks, or lit cigarettes. An explosion could result in injury or
vehicle damage.
Batteries contain sulfuric acid which can burn skin, eyes and
clothing, if contacted.
Do not attempt to push-start your automatic transmission
vehicle. Automatic transmissions do not have push-start
capability. Attempting to push-start a vehicle with an automatic
transmission may cause transmission damage.
Preparing your vehicle
When the battery is disconnected or a new battery is installed, the
transmission must relearn its shift strategy. As a result, the transmission
may have firm and/or soft shifts. This operation is considered normal and
will not affect function or durability of the transmission. Over time, the
adaptive learning process will fully update transmission operation.
2007 Freestar(win)
Owners Guide (post-2002-fmt)
USA(fus)
Roadside Emergencies
245