Page 107 of 312

•open and close the right and left power sliding doors (if equipped).
•recall memory seat/side view mirrors/adjustable pedals position Driver
1 or Driver 2 (if equipped).
The keypad can be operated with the factory set 5–digit entry code; this
code is located:
•on the owner’s wallet card in the glove box,
•marked on the passenger compartment fuse panel (located below and
to the left of the steering, near the brake pedal),
•and is available from your
authorized dealer.
You can also create your own 5–digit
personal entry code.
When pressing the controls on the
keypad, press the middle of the
controls to ensure a good activation.
Programming a personal entry
code
To create your own personal entry code(s):
1. Enter the factory set code.Note:The driver’s door will unlock.
2. Within five seconds press and release the 1•2 on the keypad.Note:
The lock motors will cycle, locked then unlocked.
3. Enter your personal 5-digit code. Each number must be entered
within five seconds of each other.
4. Enter a sixth digit if you wish to have the personal entry code recall
memory position Driver 1 or Driver 2 (if equipped with the memory
seat/side view mirrors/adjustable pedals feature).Note:The lock motors
will cycle, locked then unlocked.
•Press 1•2 to recall the Driver 1 position.
•Press 3•4 to recall the Driver 2 position.
5. After five seconds of keypad inactivity, programming mode is exited.
All of the vehicle doors will lock and unlock to confirm the code has
been stored. Each memory feature driver position (Driver 1 or Driver 2)
can be associated with only one personal code. The factory-set code
cannot be associated with a memory recall position.
You can program up to three personal codes; these codes do not replace
the factory-set code.
2007 Freestar(win)
Owners Guide (post-2002-fmt)
USA(fus)
Locks and Security
107
Page 108 of 312

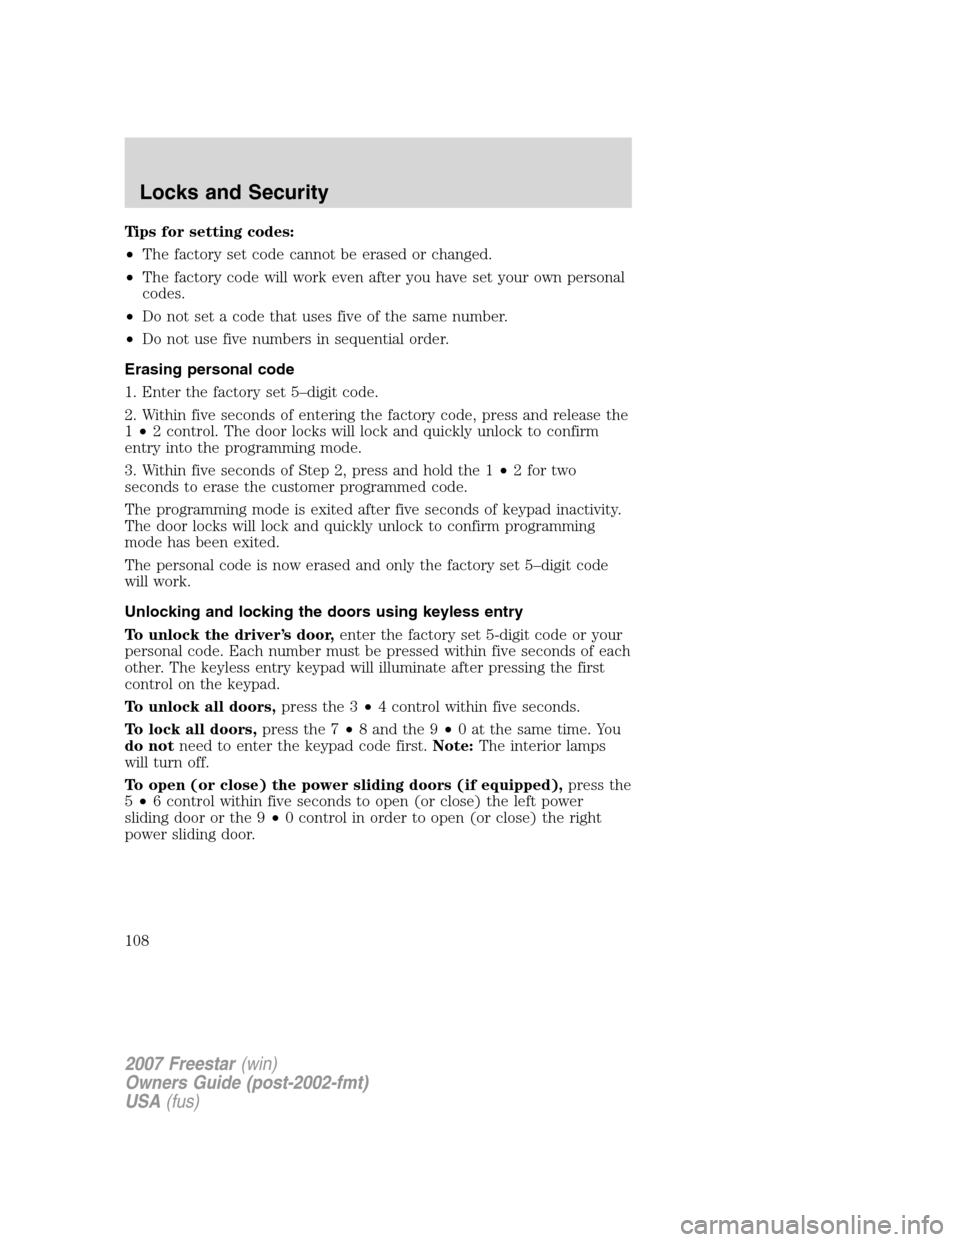
Tips for setting codes:
•The factory set code cannot be erased or changed.
•The factory code will work even after you have set your own personal
codes.
•Do not set a code that uses five of the same number.
•Do not use five numbers in sequential order.
Erasing personal code
1. Enter the factory set 5–digit code.
2. Within five seconds of entering the factory code, press and release the
1•2 control. The door locks will lock and quickly unlock to confirm
entry into the programming mode.
3. Within five seconds of Step 2, press and hold the 1•2 for two
seconds to erase the customer programmed code.
The programming mode is exited after five seconds of keypad inactivity.
The door locks will lock and quickly unlock to confirm programming
mode has been exited.
The personal code is now erased and only the factory set 5–digit code
will work.
Unlocking and locking the doors using keyless entry
To unlock the driver’s door,enter the factory set 5-digit code or your
personal code. Each number must be pressed within five seconds of each
other. The keyless entry keypad will illuminate after pressing the first
control on the keypad.
To unlock all doors,press the 3•4 control within five seconds.
To lock all doors,press the 7•8 and the 9•0 at the same time. You
do notneed to enter the keypad code first.Note:The interior lamps
will turn off.
To open (or close) the power sliding doors (if equipped),press the
5•6 control within five seconds to open (or close) the left power
sliding door or the 9•0 control in order to open (or close) the right
power sliding door.
2007 Freestar(win)
Owners Guide (post-2002-fmt)
USA(fus)
Locks and Security
108
Page 111 of 312

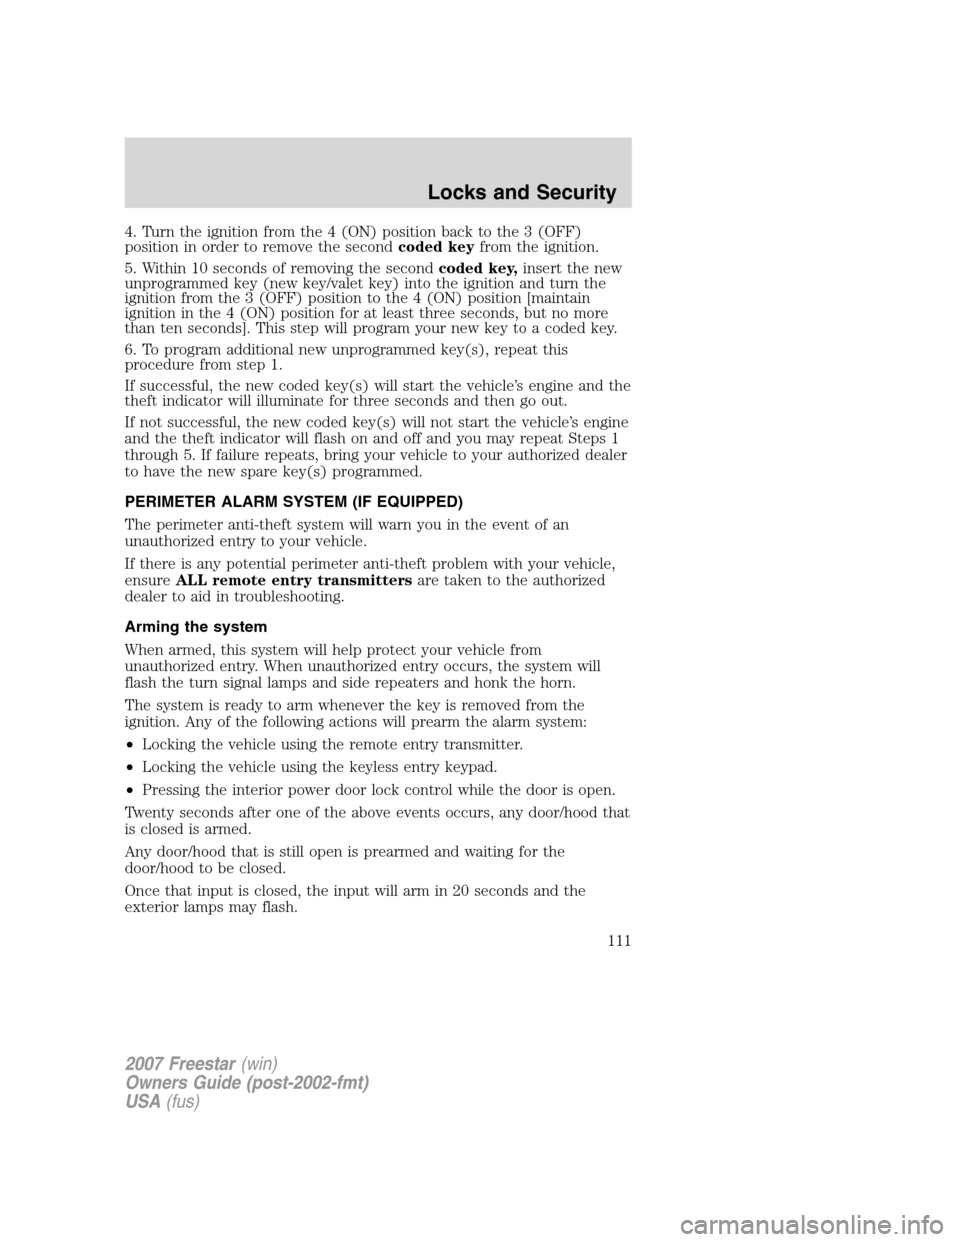
4. Turn the ignition from the 4 (ON) position back to the 3 (OFF)
position in order to remove the secondcoded keyfrom the ignition.
5. Within 10 seconds of removing the secondcoded key,insert the new
unprogrammed key (new key/valet key) into the ignition and turn the
ignition from the 3 (OFF) position to the 4 (ON) position [maintain
ignition in the 4 (ON) position for at least three seconds, but no more
than ten seconds]. This step will program your new key to a coded key.
6. To program additional new unprogrammed key(s), repeat this
procedure from step 1.
If successful, the new coded key(s) will start the vehicle’s engine and the
theft indicator will illuminate for three seconds and then go out.
If not successful, the new coded key(s) will not start the vehicle’s engine
and the theft indicator will flash on and off and you may repeat Steps 1
through 5. If failure repeats, bring your vehicle to your authorized dealer
to have the new spare key(s) programmed.
PERIMETER ALARM SYSTEM (IF EQUIPPED)
The perimeter anti-theft system will warn you in the event of an
unauthorized entry to your vehicle.
If there is any potential perimeter anti-theft problem with your vehicle,
ensureALL remote entry transmittersare taken to the authorized
dealer to aid in troubleshooting.
Arming the system
When armed, this system will help protect your vehicle from
unauthorized entry. When unauthorized entry occurs, the system will
flash the turn signal lamps and side repeaters and honk the horn.
The system is ready to arm whenever the key is removed from the
ignition. Any of the following actions will prearm the alarm system:
•Locking the vehicle using the remote entry transmitter.
•Locking the vehicle using the keyless entry keypad.
•Pressing the interior power door lock control while the door is open.
Twenty seconds after one of the above events occurs, any door/hood that
is closed is armed.
Any door/hood that is still open is prearmed and waiting for the
door/hood to be closed.
Once that input is closed, the input will arm in 20 seconds and the
exterior lamps may flash.
2007 Freestar(win)
Owners Guide (post-2002-fmt)
USA(fus)
Locks and Security
111
Page 112 of 312
Disarming the system
You can disarm the system by any of the following actions:
•Unlock the vehicle with the remote keyless transmitter.
•Unlock the vehicle with the keyless entry keypad.
•Unlock the vehicle with a key in the driver’s door lock cylinder.
•Use a SecuriLock�key to move the ignition to the 4 (ON) or
5 (START) position.
2007 Freestar(win)
Owners Guide (post-2002-fmt)
USA(fus)
Locks and Security
112
Page 117 of 312

•Push twice to activate low heat.
•Push a third time to deactivate.
The indicator light on the control will illuminate when activated. For low
heat, one light will be lit; for high heat, both lights will be lit.
The heating of the seat turns off after 10 minutes or when the vehicle is
turned off.
Memory seats/sideview mirrors/adjustable pedals (if equipped)
This system allows automatic
positioning of the driver seat,
outside rearview mirrors, and
adjustable pedals to two
programmable positions.
The memory seat control is located
on the door next to the window
inside from the mirror.
•To program position one, move
the driver seat to the desired
position using the seat controls. Press the SET control. The SET
control indicator light will briefly illuminate. While the light is
illuminated, press control 1.
•To program position two, repeat the previous procedure using control
2.
A position can only be recalled when the transmission gearshift is in
Park. A memory seat position may be programmed at any time.
The memory positions are also recalled when you press your remote
entry transmitter UNLOCK control if the transmitter is programmed to a
memory position or when you enter a valid personal entry code that is
programmed to a memory position.
To program the memory feature to a remote entry transmitter and for
more information on how to use the keypad, refer toRemote entry
systemin theLocks and Securitychapter.
REAR SEATS
Head restraints
Lift the head restraint so that it is located directly or as close as possible
behind your head.
SE T
12
2007 Freestar(win)
Owners Guide (post-2002-fmt)
USA(fus)
Seating and Safety Restraints
117
Page 229 of 312
The fuses are coded as follows:
Fuse/Relay
LocationFuse Amp
RatingPassenger Compartment Fuse
Panel Description
1 Relay Accessory delay relay 1
2 Relay Accessory delay relay 2
3 10A Front wiper motor Run feed
4 5A B+ feed to outside mirrors
5 20A Vent window power feed/Radio
feed
6 5A Driver door switch
illumination/Passenger door
switch illumination
7 10A Rear wiper Run feed
8 10A Cluster/Electronic Automatic
Temperature Control (EATC) B+
feed, DVD
9 10A Passive Anti-theft System (PATS)
LED feed
10 5A Auxiliary radio
11 5A Auxiliary climate control
system/Power Liftgate
Module/Left and right power
sliding door module/Data Link
Connector (DLC)/Clock B+ feeds
2007 Freestar(win)
Owners Guide (post-2002-fmt)
USA(fus)
Roadside Emergencies
229
Page 230 of 312

Fuse/Relay
LocationFuse Amp
RatingPassenger Compartment Fuse
Panel Description
12 5A Brake-Shift Interlock (BSI) Run
feed, Climate control system Run
feed
13 5A Compass/Driver heated
seat/Passenger heated
seats/Reverse sensing
system/Power Liftgate
Module/Power sliding door Run
feeds
14 5A Underhood fuse box Run feed,
Front blower Run feed
15 10A Brake On-Off (BOO) switch B+
16 5A Steering angle/Cluster/Power
sliding door and power liftgate
inhibit LED/Electrochromatic
mirror Run/Start/Tire Pressure
Monitoring System (TPMS)
17 10A Restraint Control Module
(RCM)/Passenger Air bag Disable
Indicator (PADI)/Passenger
Occupant Detection System
(PODS) Run/Start
18 10A Anti-lock Brake System (ABS)
module/Brake pressure
switch/Speed control Run/Start
19 5A PATS/Cluster/Air bag
LED/Powertrain Control Module
(PCM) relay Run/Start
20 10A Liftgate Start feed, Radio Start
feed
21 10A Starter relay power START
2007 Freestar(win)
Owners Guide (post-2002-fmt)
USA(fus)
Roadside Emergencies
230
Page 232 of 312

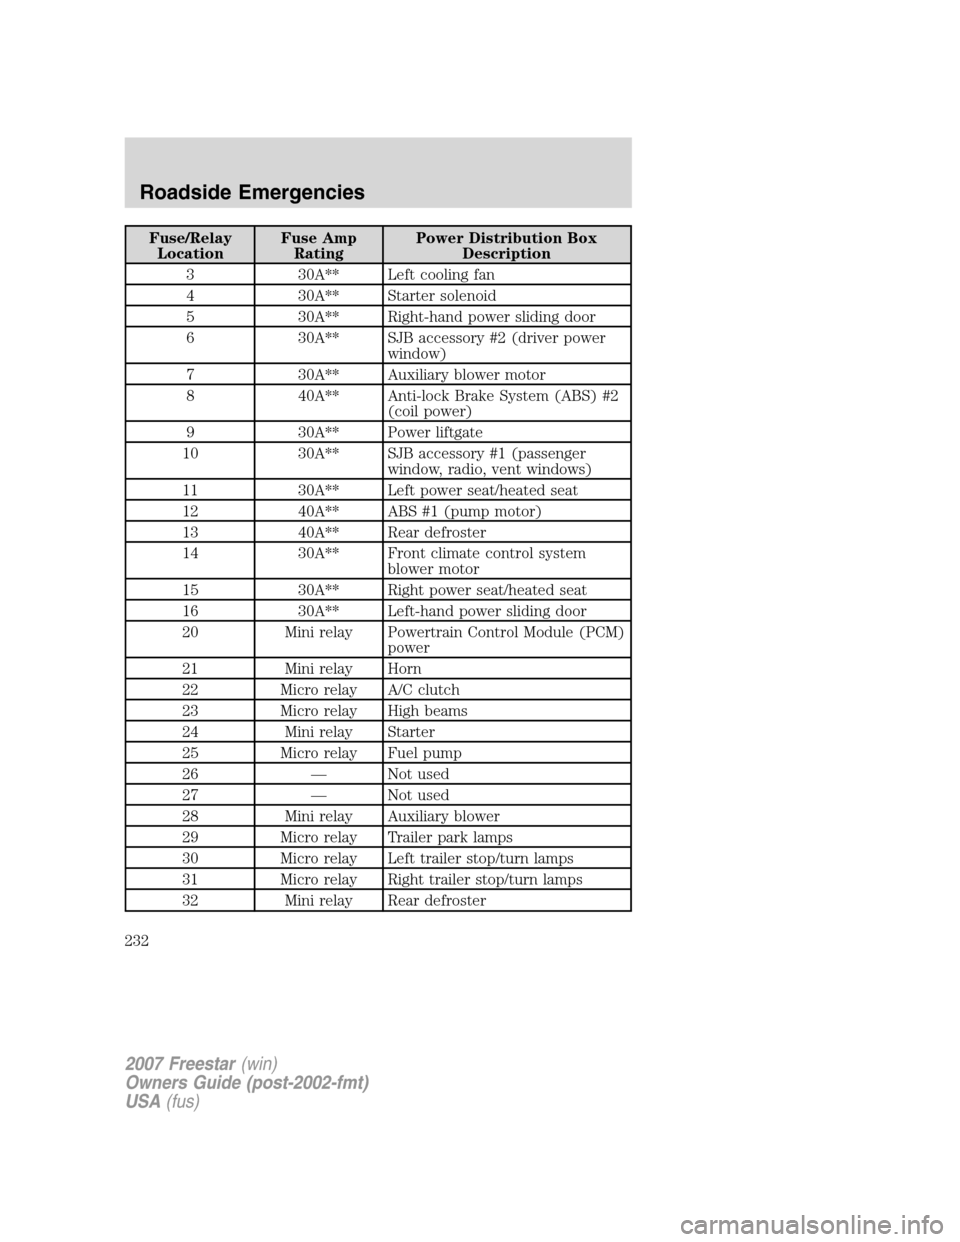
Fuse/Relay
LocationFuse Amp
RatingPower Distribution Box
Description
3 30A** Left cooling fan
4 30A** Starter solenoid
5 30A** Right-hand power sliding door
6 30A** SJB accessory #2 (driver power
window)
7 30A** Auxiliary blower motor
8 40A** Anti-lock Brake System (ABS) #2
(coil power)
9 30A** Power liftgate
10 30A** SJB accessory #1 (passenger
window, radio, vent windows)
11 30A** Left power seat/heated seat
12 40A** ABS #1 (pump motor)
13 40A** Rear defroster
14 30A** Front climate control system
blower motor
15 30A** Right power seat/heated seat
16 30A** Left-hand power sliding door
20 Mini relay Powertrain Control Module (PCM)
power
21 Mini relay Horn
22 Micro relay A/C clutch
23 Micro relay High beams
24 Mini relay Starter
25 Micro relay Fuel pump
26 — Not used
27 — Not used
28 Mini relay Auxiliary blower
29 Micro relay Trailer park lamps
30 Micro relay Left trailer stop/turn lamps
31 Micro relay Right trailer stop/turn lamps
32 Mini relay Rear defroster
2007 Freestar(win)
Owners Guide (post-2002-fmt)
USA(fus)
Roadside Emergencies
232