Page 96 of 344

toEngine coolantin theMaintenance and Specificationschapter. If
the warning stays on or continues to come on, contact your authorized
dealer as soon as possible.
Never remove the coolant reservoir cap while the engine is
running or hot.
REDUCED ENGINE POWER.Displayed when the engine is
overheating. Stop the vehicle as soon as safely possible, turn off the
engine. If the warning stays on or continues to come on, contact your
authorized dealer as soon as possible.
STOP ENGINE SAFELY.Displayed when the engine is overheating.
Stop the vehicle as soon as safely possible, turn off the engine. If the
warning stays on or continues to come on, contact your authorized
dealer as soon as possible.
LOW FUEL LEVEL.Displayed as an early reminder of a low fuel
condition.
CHECK CHARGING SYSTEM.Displayed when the electrical system is
not maintaining proper voltage. If you are operating electrical accessories
when the engine is idling at a low speed, turn off as many of the
electrical loads as soon as possible. If the warning stays on or comes on
when the engine is operating at normal speeds, have the electrical
system checked as soon as possible.
CHECK TRACTION CONTROL�.Displayed when the Traction
Control�system is not operating properly. If this message is displayed
on the message center the Traction Control�system will be partially
operable. If this warning stays on, contact your authorized dealer for
service as soon as possible. For further information, refer toTraction
control�in theDrivingchapter.
LOW BRAKE FLUID LEVEL.Indicates the brake fluid level is low and
the brake system should be inspected immediately. Refer toBrake fluid
reservoirin theMaintenance and Specificationschapter.
LOW OIL PRESSURE.Displayed when the engine oil pressure is low. If
this warning message is displayed, check the level of the engine oil.
Refer toEngine oilin theMaintenance and Specificationschapter for
information about adding engine oil. If the oil level is OK and this
warning persists, shut down the engine immediately and contact your
authorized dealer for service.
CHECK FUEL CAP.Displayed when the fuel filler cap is not properly
installed. Check the fuel filler cap for proper installation. Refer toFuel
filler capunder theFuel Information sectionin theMaintenance and
Specificationschapter.
2007 F-150(f12)
Owners Guide (post-2002-fmt)
USA(fus)
Driver Controls
96
Page 126 of 344
Combination lap and shoulder belts
1. Insert the belt tongue into the
proper buckle (the buckle closest to
the direction the tongue is coming
from) until you hear a snap and feel
it latch. Make sure the tongue is
securely fastened in the buckle.
2. To unfasten, push the release
button and remove the tongue from
the buckle.
Center front safety belt (Regular Cab center seating position only)
Always use both lap and shoulder safety belt in the Regular Cab
center seating position.
If you carry large cargo behind the seat or items that might damage or
soil the belt, detach the belt from the seat:
1. Release the mini-buckle by
inserting a key or safety belt tongue
into the slot.
2007 F-150(f12)
Owners Guide (post-2002-fmt)
USA(fus)
Seating and Safety Restraints
126
Page 127 of 344
2. Insert the belt into the clip on the
back panel. Protect the stowed belt
if you carry cargo this may damage
or soil the belt.
If the belt has been disconnected to carry large objects behind the seat,
reconnect it as follows:
1. Remove the belt from the
stowage clip on the back panel.
2. Buckle the small tongue on the
end of the belt into the mini-buckle
on the driver’s side. The belt is now
ready for use. This mini-buckle
should stay buckled at all times
unless cargo-carrying makes it
necessary to detach the belt.
Safety belt with cinch tongue (Regular Cab center only)
The cinch tongue will slide up and down the belt webbing when the belt
is stowed or while putting safety belts on. When the lap/shoulder safety
belt is buckled, the cinch tongue will allow the lap portion to be
2007 F-150(f12)
Owners Guide (post-2002-fmt)
USA(fus)
Seating and Safety Restraints
127
Page 140 of 344

hardware, should be inspected after a collision. Ford Motor Company
recommends that all safety belt assemblies in use in vehicles involved in
a collision be replaced. However, if the collision was minor and an
authorized dealer finds that the belts do not show damage and continue
to operate properly, they do not need to be replaced. Safety belt
assemblies not in use during a collision should also be inspected and
replaced if either damage or improper operation is noted.
Failure to inspect and if necessary replace the safety belt
assembly under the above conditions could result in severe
personal injuries in the event of a collision.
For proper care of soiled safety belts, refer toInteriorin theCleaning
chapter.
AIRBAG SUPPLEMENTAL RESTRAINT SYSTEM (SRS)
1. Airbag cover
The airbag supplemental restraint system is designed to work in
conjunction with the safety belts to help protect the driver and front
outboard passenger from certain upper body injuries. The term
“supplemental restraint” means the airbags are intended as a supplement
to the safety belts. Airbags alone cannot protect as well as airbags plus
safety belts in impacts for which the airbags are designed to deploy, and
airbags do not offer any protection in crashes for which they do not
deploy.
The airbag supplemental restraint system consists of:
•driver and passenger dual stage airbag modules (which include the
inflators and airbags).
•one or more impact and safing sensors.
•the same indicator light, RCM (restraints control module) and
diagnostic unit used for the Personal safety system.
1
2007 F-150(f12)
Owners Guide (post-2002-fmt)
USA(fus)
Seating and Safety Restraints
140
Page 247 of 344
The fuses are coded as follows.
Fuse/Relay
LocationFuse Amp
RatingPassenger Compartment Fuse
Panel Description
1 10A* Run/Accessory - Wipers,
Instrument cluster, Audio for
XL/STX
2 20A* Stop/Turn lamps, Brake on/off
switch, Hazard flashers
3 7.5A* Power mirrors, Memory seats and
pedals, Driver power seat
4 10A* DVD battery power, Power fold
mirror
5 7.5A* Keep alive memory for Powertrain
Control Module (PCM) and
climate control module
6 15A* Parklamps, BSM, Instrument
panel illumination
7 5A* Radio (start signal)
8 10A* Heated mirrors, Switch indicator
9 20A* Fuel pump relay, Fuel injectors,
Intake manifold runner control
(4.2L)
10 20A* Trailer tow back-up lamps relay
(PCB1), Trailer tow parklamp
relay (R201)
11 10A* A/C clutch, 4x4 solenoid
12 5A* PCM relay coil
13 10A* Climate control module power,
Flasher relay
2007 F-150(f12)
Owners Guide (post-2002-fmt)
USA(fus)
Roadside Emergencies
247
Page 248 of 344

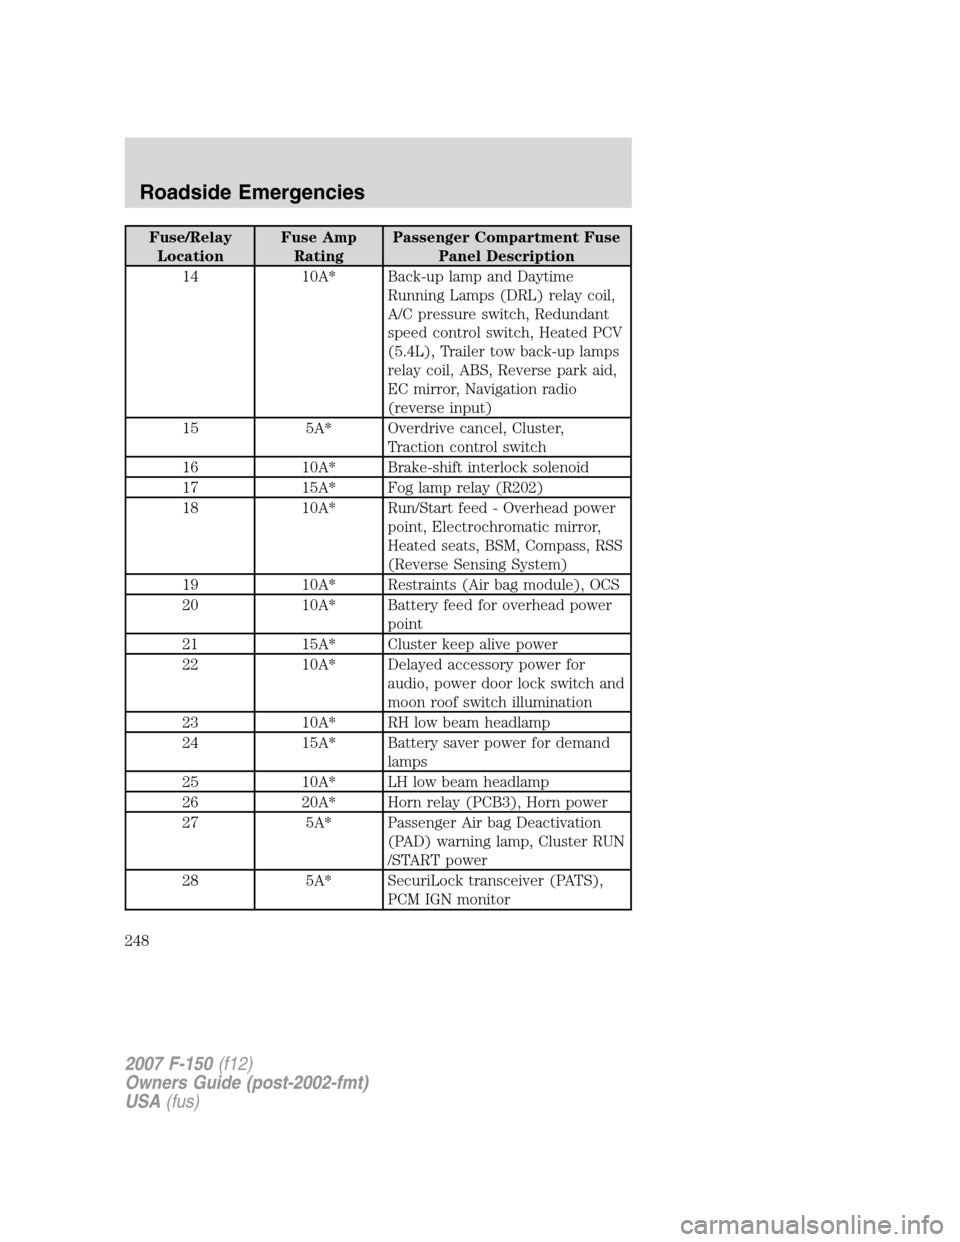
Fuse/Relay
LocationFuse Amp
RatingPassenger Compartment Fuse
Panel Description
14 10A* Back-up lamp and Daytime
Running Lamps (DRL) relay coil,
A/C pressure switch, Redundant
speed control switch, Heated PCV
(5.4L), Trailer tow back-up lamps
relay coil, ABS, Reverse park aid,
EC mirror, Navigation radio
(reverse input)
15 5A* Overdrive cancel, Cluster,
Traction control switch
16 10A* Brake-shift interlock solenoid
17 15A* Fog lamp relay (R202)
18 10A* Run/Start feed - Overhead power
point, Electrochromatic mirror,
Heated seats, BSM, Compass, RSS
(Reverse Sensing System)
19 10A* Restraints (Air bag module), OCS
20 10A* Battery feed for overhead power
point
21 15A* Cluster keep alive power
22 10A* Delayed accessory power for
audio, power door lock switch and
moon roof switch illumination
23 10A* RH low beam headlamp
24 15A* Battery saver power for demand
lamps
25 10A* LH low beam headlamp
26 20A* Horn relay (PCB3), Horn power
27 5A* Passenger Air bag Deactivation
(PAD) warning lamp, Cluster RUN
/START power
28 5A* SecuriLock transceiver (PATS),
PCM IGN monitor
2007 F-150(f12)
Owners Guide (post-2002-fmt)
USA(fus)
Roadside Emergencies
248
Page 249 of 344

Fuse/Relay
LocationFuse Amp
RatingPassenger Compartment Fuse
Panel Description
29 15A* PCM 4x4 power
30 15A* PCM 4x4 power
31 20A* Radio power, Satellite radio
module
32 15A* Vapor Management Valve (VMV),
A/C clutch relay, Canister vent,
Heated Exhaust Gas Oxygen
(HEGO) sensors #11 and #21,
CMCV, Mass Air Flow (MAF)
sensor, VCT, Heated Positive
Crankcase Ventilation (PCV) valve
(4.2L engine), CID sensor (4.2L
engine), 4.6L/4.2L EGR ,
Electronic fan clutch (4.6L/5.4L
engines)
33 15A* Shift solenoid, CMS #12 and #22,
Ignition coils
34 15A* PCM power
35 20A* Instrument cluster high beam
indicator, High beam headlamps
36 10A* Trailer tow right turn/stop lamps
37 20A* Rear power point, Center console
power point
38 25A* Subwoofer power
39 20A* Instrument panel power point
40 20A* Low beam headlamps, DRL
41 20A* Cigar lighter, Diagnostic connector
power
42 10A* Trailer tow left turn/stop lamps
101 30A** Starter solenoid
102 20A** Ignition switch feed
103 20A** ABS valves
2007 F-150(f12)
Owners Guide (post-2002-fmt)
USA(fus)
Roadside Emergencies
249
Page 279 of 344

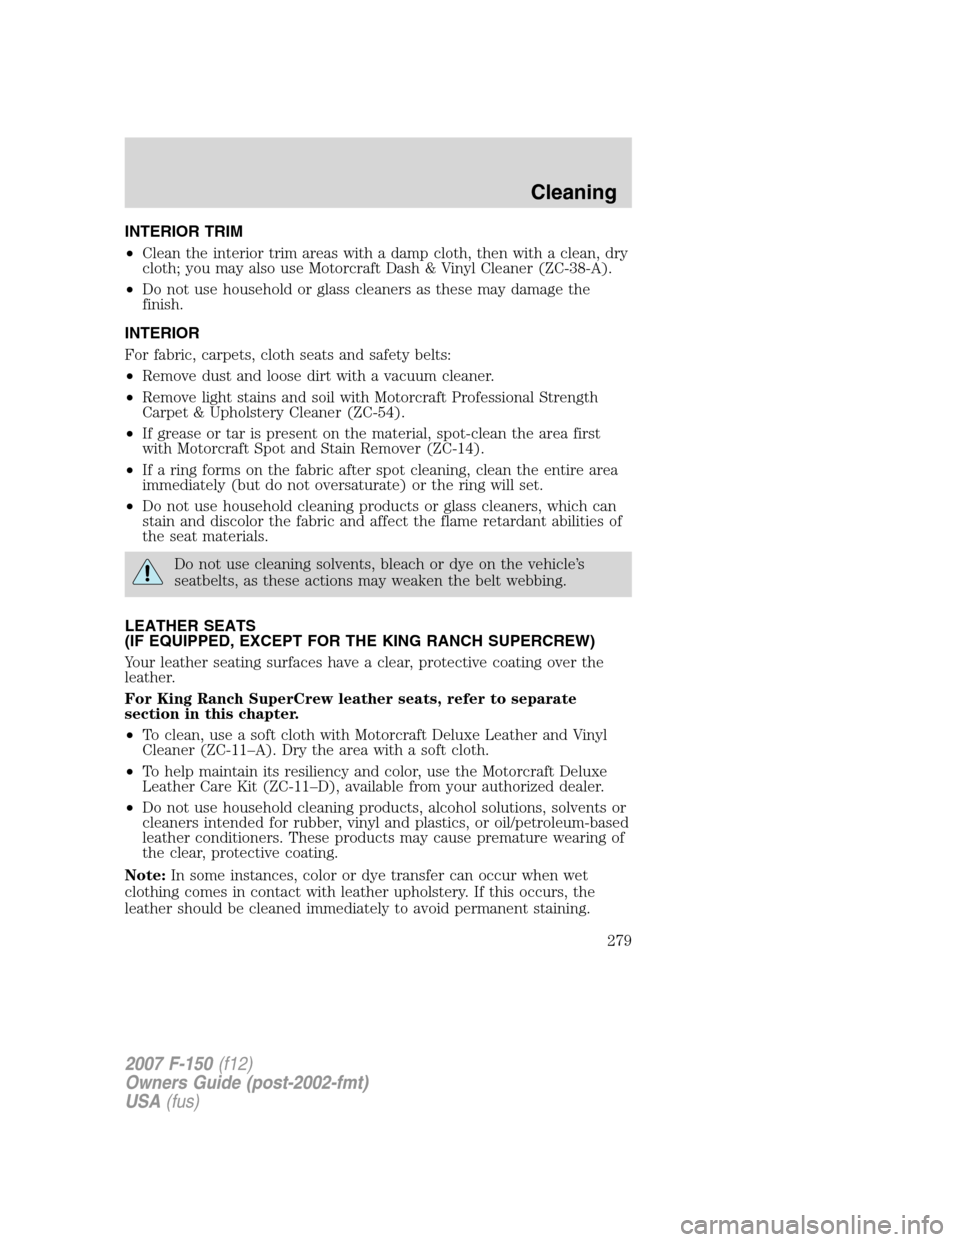
INTERIOR TRIM
•Clean the interior trim areas with a damp cloth, then with a clean, dry
cloth; you may also use Motorcraft Dash & Vinyl Cleaner (ZC-38-A).
•Do not use household or glass cleaners as these may damage the
finish.
INTERIOR
For fabric, carpets, cloth seats and safety belts:
•Remove dust and loose dirt with a vacuum cleaner.
•Remove light stains and soil with Motorcraft Professional Strength
Carpet & Upholstery Cleaner (ZC-54).
•If grease or tar is present on the material, spot-clean the area first
with Motorcraft Spot and Stain Remover (ZC-14).
•If a ring forms on the fabric after spot cleaning, clean the entire area
immediately (but do not oversaturate) or the ring will set.
•Do not use household cleaning products or glass cleaners, which can
stain and discolor the fabric and affect the flame retardant abilities of
the seat materials.
Do not use cleaning solvents, bleach or dye on the vehicle’s
seatbelts, as these actions may weaken the belt webbing.
LEATHER SEATS
(IF EQUIPPED, EXCEPT FOR THE KING RANCH SUPERCREW)
Your leather seating surfaces have a clear, protective coating over the
leather.
For King Ranch SuperCrew leather seats, refer to separate
section in this chapter.
•To clean, use a soft cloth with Motorcraft Deluxe Leather and Vinyl
Cleaner (ZC-11–A). Dry the area with a soft cloth.
•To help maintain its resiliency and color, use the Motorcraft Deluxe
Leather Care Kit (ZC-11–D), available from your authorized dealer.
•Do not use household cleaning products, alcohol solutions, solvents or
cleaners intended for rubber, vinyl and plastics, or oil/petroleum-based
leather conditioners. These products may cause premature wearing of
the clear, protective coating.
Note:In some instances, color or dye transfer can occur when wet
clothing comes in contact with leather upholstery. If this occurs, the
leather should be cleaned immediately to avoid permanent staining.
2007 F-150(f12)
Owners Guide (post-2002-fmt)
USA(fus)
Cleaning
279