Page 56 of 128
the vehicle speed when descending a hill, without the accelerator pedal
being pressed. The amount of downshift braking provided will vary based
upon the amount the brake pedal is depressed.
Grade braking downshifts occur automatically when:
•positive vehicle acceleration (natural acceleration from driving on a
decline) is sensed.
•nearly all pressure is released from the accelerator pedal.
•a minimum amount of time has expired since the last grade braking
downshift.
Grade braking downshift mode is immediately exited if the Tow/Haul
mode is deactivated or if the accelerator pedal is depressed beyond a
minimum threshold.
To deactivate the Tow/Haul feature and return to normal driving mode,
press the button on the end of the gearshift lever. The TOW HAUL light
will no longer be illuminated.
When you shut-off and restart the engine, the transmission will
automatically return to normal D (Overdrive) mode (Tow/Haul OFF).
Do not use the Tow/Haul feature when driving in icy or slippery
conditions as the increased engine braking can cause the rear
wheels to slide and the vehicle to swing around with the possible loss
of vehicle control.
3 (Third)
Transmission starts and operates in third gear only.
Used for improved traction on slippery roads. Selecting 3 (Third)
provides engine braking.
2 (Second)
Use 2 (Second) to start-up on slippery roads or to provide additional
engine braking on downgrades.
1 (First)
•Provides maximum engine braking.
•Allows upshifts by moving gearshift lever.
•The transmission will not downshift into 1 (First) at high speeds; it
will downshift to a lower gear and then shift into 1 (First) when the
vehicle reaches slower speeds.
2007 Motorhome(mot)
Supplement
USA(fus)
Driving
56
Page 57 of 128
Forced downshifts
•Allowed in D (Overdrive) with the Tow/Haul feature on or off.
•Depress the accelerator to the floor.
•Allows transmission to select an appropriate gear.
If your vehicle gets stuck in mud or snow
If your vehicle gets stuck in mud or snow, it may be rocked out by
shifting between forward and reverse gears, stopping between shifts in a
steady pattern. Press lightly on the accelerator in each gear.
Do not rock the vehicle if the engine is not at normal operating
temperature or damage to the transmission may occur.
Do not rock the vehicle for more than a minute or damage to the
transmission and tires may occur, or the engine may overheat.
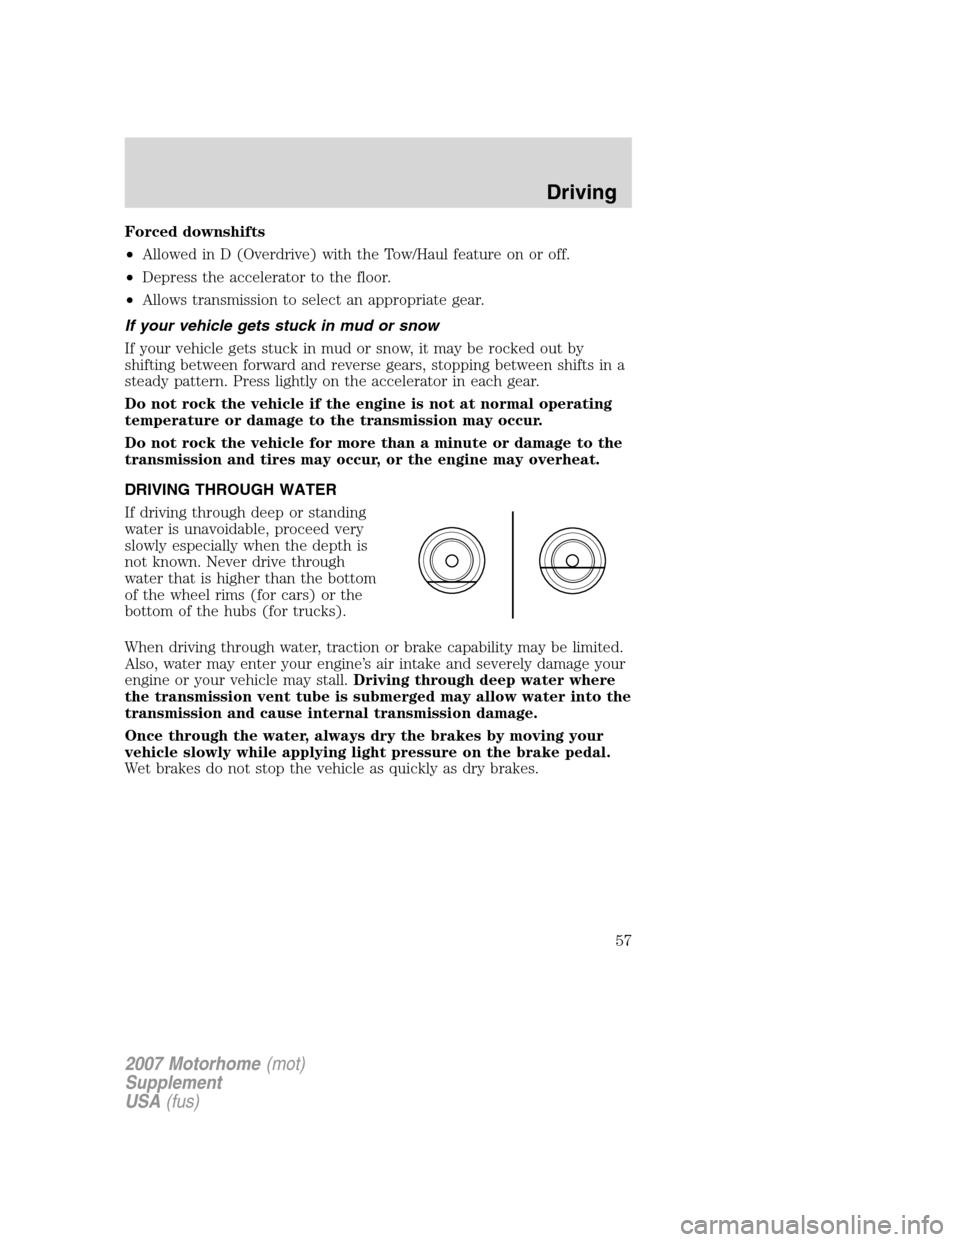
DRIVING THROUGH WATER
If driving through deep or standing
water is unavoidable, proceed very
slowly especially when the depth is
not known. Never drive through
water that is higher than the bottom
of the wheel rims (for cars) or the
bottom of the hubs (for trucks).
When driving through water, traction or brake capability may be limited.
Also, water may enter your engine’s air intake and severely damage your
engine or your vehicle may stall.Driving through deep water where
the transmission vent tube is submerged may allow water into the
transmission and cause internal transmission damage.
Once through the water, always dry the brakes by moving your
vehicle slowly while applying light pressure on the brake pedal.
Wet brakes do not stop the vehicle as quickly as dry brakes.
2007 Motorhome(mot)
Supplement
USA(fus)
Driving
57
Page 58 of 128
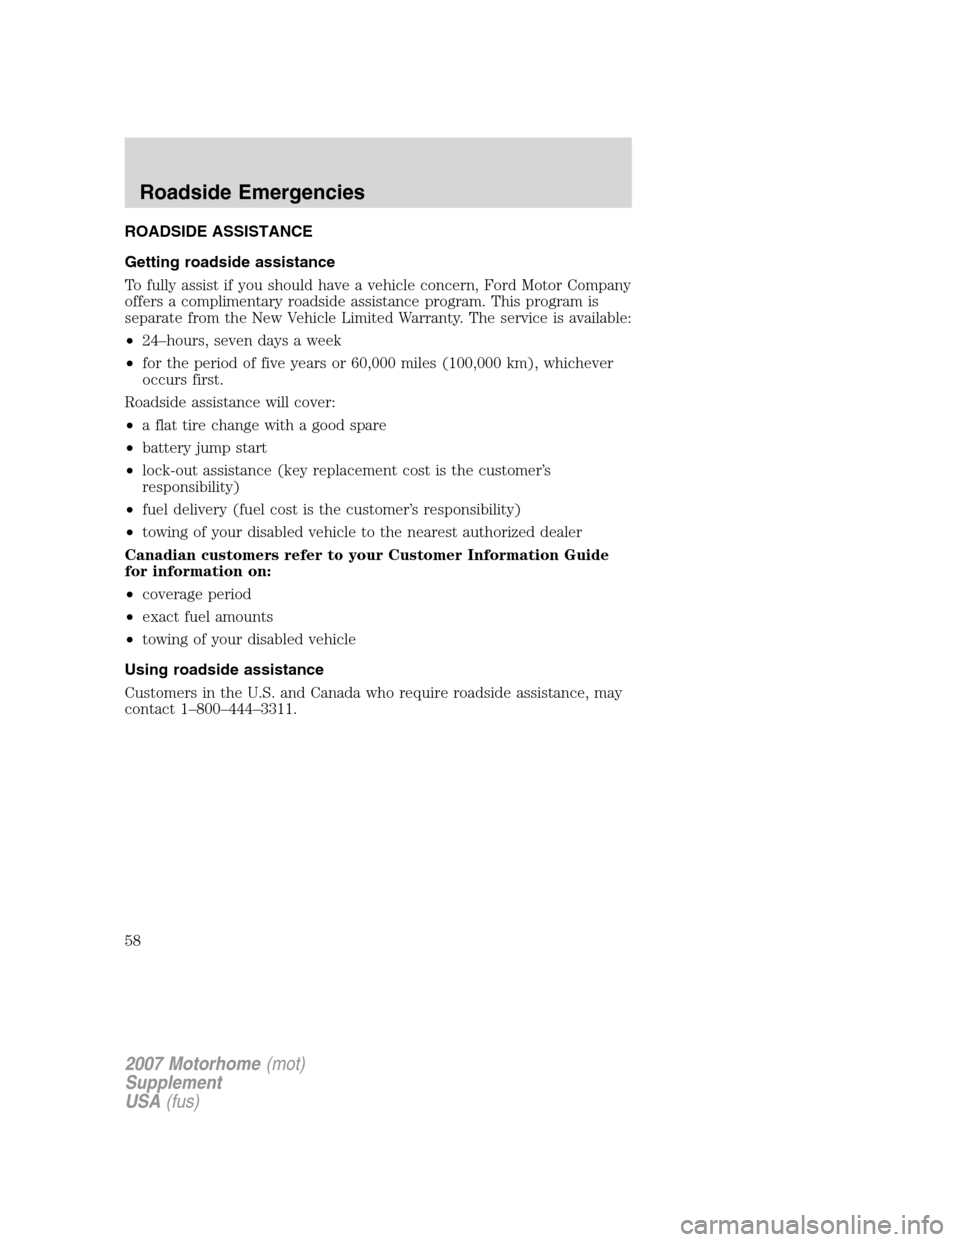
ROADSIDE ASSISTANCE
Getting roadside assistance
To fully assist if you should have a vehicle concern, Ford Motor Company
offers a complimentary roadside assistance program. This program is
separate from the New Vehicle Limited Warranty. The service is available:
•24–hours, seven days a week
•for the period of five years or 60,000 miles (100,000 km), whichever
occurs first.
Roadside assistance will cover:
•a flat tire change with a good spare
•battery jump start
•lock-out assistance (key replacement cost is the customer’s
responsibility)
•fuel delivery (fuel cost is the customer’s responsibility)
•towing of your disabled vehicle to the nearest authorized dealer
Canadian customers refer to your Customer Information Guide
for information on:
•coverage period
•exact fuel amounts
•towing of your disabled vehicle
Using roadside assistance
Customers in the U.S. and Canada who require roadside assistance, may
contact 1–800–444–3311.
2007 Motorhome(mot)
Supplement
USA(fus)
Roadside Emergencies
58
Page 62 of 128
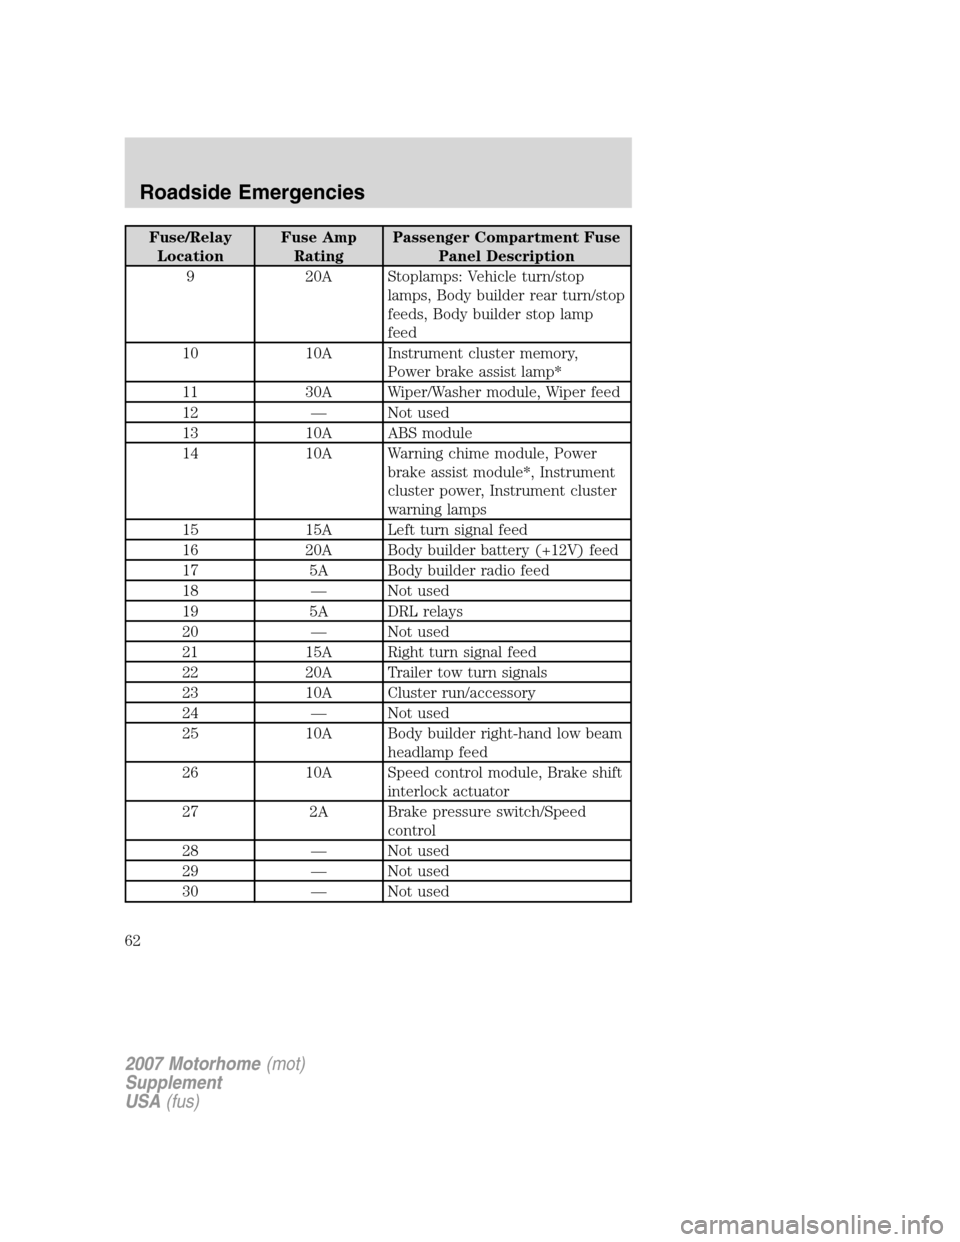
Fuse/Relay
LocationFuse Amp
RatingPassenger Compartment Fuse
Panel Description
9 20A Stoplamps: Vehicle turn/stop
lamps, Body builder rear turn/stop
feeds, Body builder stop lamp
feed
10 10A Instrument cluster memory,
Power brake assist lamp*
11 30A Wiper/Washer module, Wiper feed
12 — Not used
13 10A ABS module
14 10A Warning chime module, Power
brake assist module*, Instrument
cluster power, Instrument cluster
warning lamps
15 15A Left turn signal feed
16 20A Body builder battery (+12V) feed
17 5A Body builder radio feed
18 — Not used
19 5A DRL relays
20 — Not used
21 15A Right turn signal feed
22 20A Trailer tow turn signals
23 10A Cluster run/accessory
24 — Not used
25 10A Body builder right-hand low beam
headlamp feed
26 10A Speed control module, Brake shift
interlock actuator
27 2A Brake pressure switch/Speed
control
28 — Not used
29 — Not used
30 — Not used
2007 Motorhome(mot)
Supplement
USA(fus)
Roadside Emergencies
62
Page 63 of 128
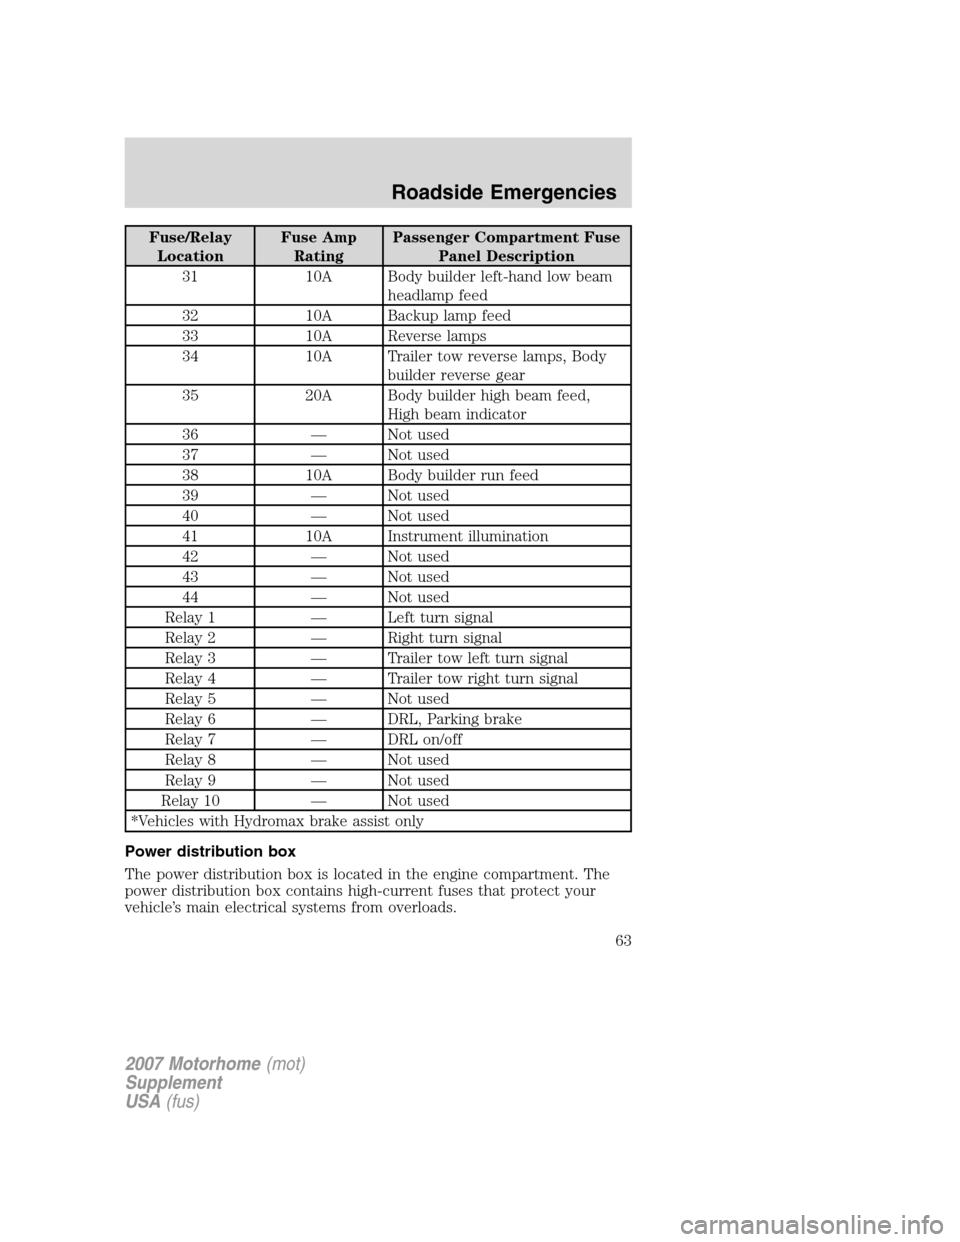
Fuse/Relay
LocationFuse Amp
RatingPassenger Compartment Fuse
Panel Description
31 10A Body builder left-hand low beam
headlamp feed
32 10A Backup lamp feed
33 10A Reverse lamps
34 10A Trailer tow reverse lamps, Body
builder reverse gear
35 20A Body builder high beam feed,
High beam indicator
36 — Not used
37 — Not used
38 10A Body builder run feed
39 — Not used
40 — Not used
41 10A Instrument illumination
42 — Not used
43 — Not used
44 — Not used
Relay 1 — Left turn signal
Relay 2 — Right turn signal
Relay 3 — Trailer tow left turn signal
Relay 4 — Trailer tow right turn signal
Relay 5 — Not used
Relay 6 — DRL, Parking brake
Relay 7 — DRL on/off
Relay 8 — Not used
Relay 9 — Not used
Relay 10 — Not used
*Vehicles with Hydromax brake assist only
Power distribution box
The power distribution box is located in the engine compartment. The
power distribution box contains high-current fuses that protect your
vehicle’s main electrical systems from overloads.
2007 Motorhome(mot)
Supplement
USA(fus)
Roadside Emergencies
63
Page 65 of 128
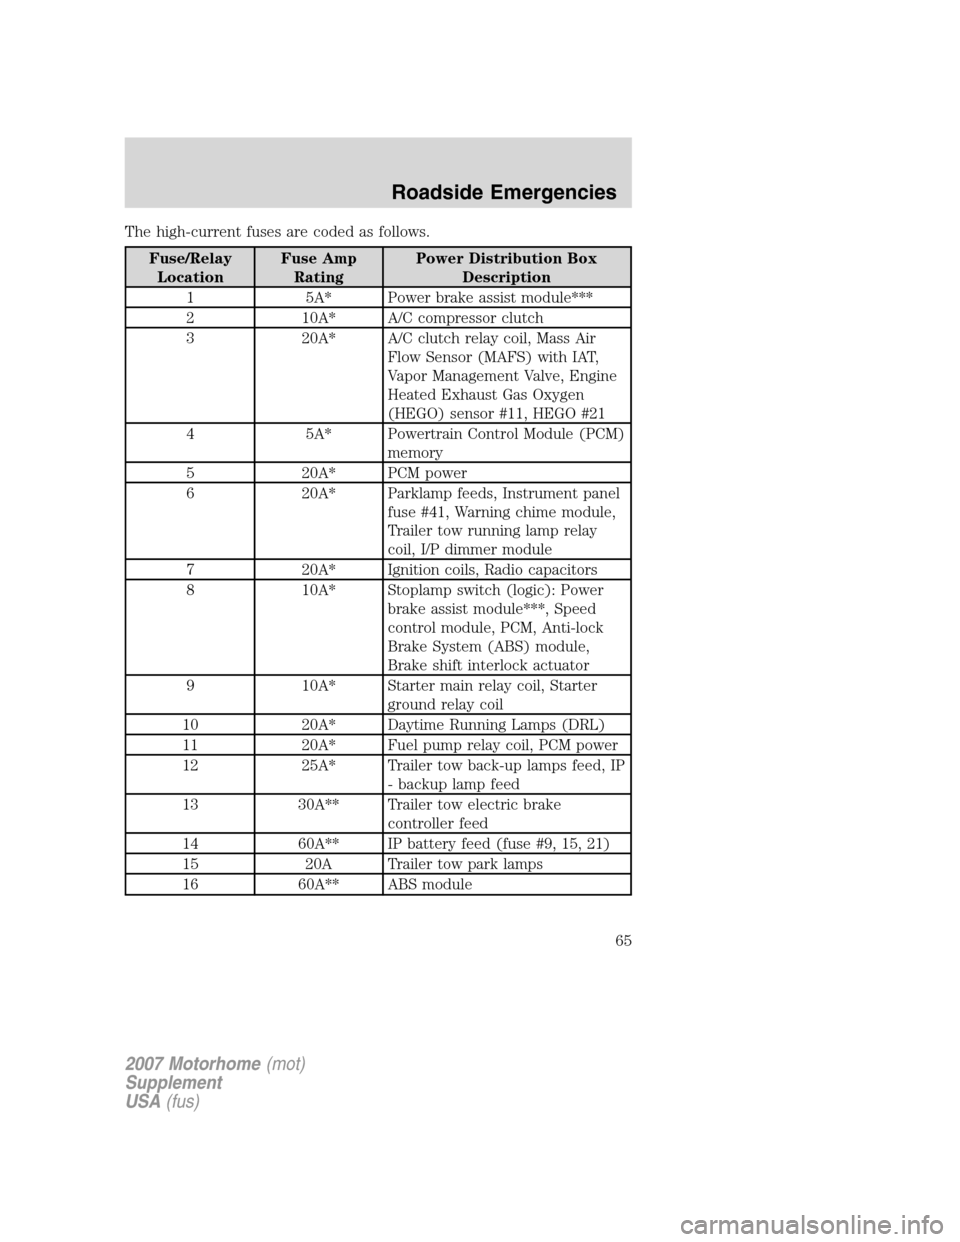
The high-current fuses are coded as follows.
Fuse/Relay
LocationFuse Amp
RatingPower Distribution Box
Description
1 5A* Power brake assist module***
2 10A* A/C compressor clutch
3 20A* A/C clutch relay coil, Mass Air
Flow Sensor (MAFS) with IAT,
Vapor Management Valve, Engine
Heated Exhaust Gas Oxygen
(HEGO) sensor #11, HEGO #21
4 5A* Powertrain Control Module (PCM)
memory
5 20A* PCM power
6 20A* Parklamp feeds, Instrument panel
fuse #41, Warning chime module,
Trailer tow running lamp relay
coil, I/P dimmer module
7 20A* Ignition coils, Radio capacitors
8 10A* Stoplamp switch (logic): Power
brake assist module***, Speed
control module, PCM, Anti-lock
Brake System (ABS) module,
Brake shift interlock actuator
9 10A* Starter main relay coil, Starter
ground relay coil
10 20A* Daytime Running Lamps (DRL)
11 20A* Fuel pump relay coil, PCM power
12 25A* Trailer tow back-up lamps feed, IP
- backup lamp feed
13 30A** Trailer tow electric brake
controller feed
14 60A** IP battery feed (fuse #9, 15, 21)
15 20A Trailer tow park lamps
16 60A** ABS module
2007 Motorhome(mot)
Supplement
USA(fus)
Roadside Emergencies
65
Page 66 of 128
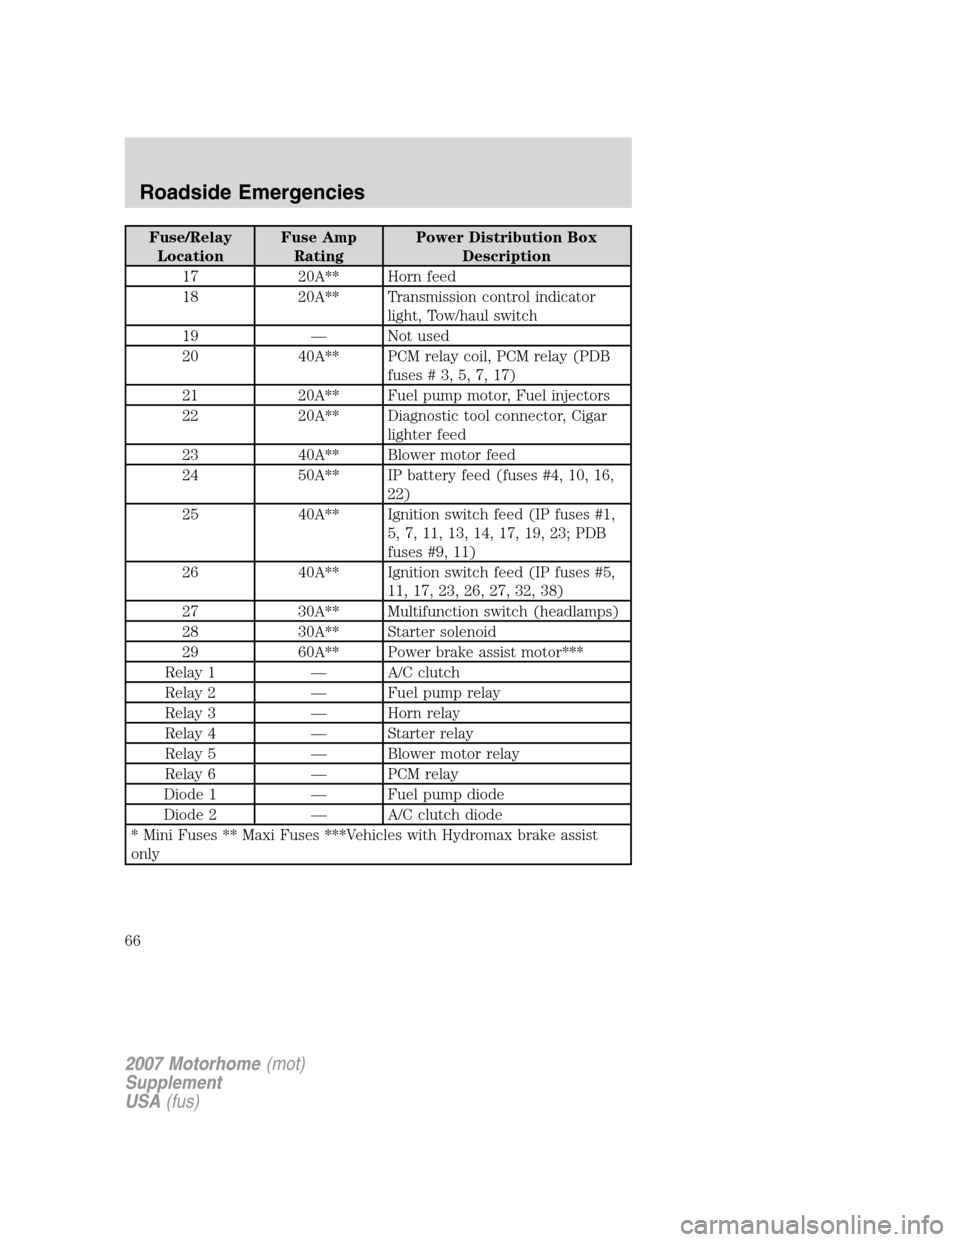
Fuse/Relay
LocationFuse Amp
RatingPower Distribution Box
Description
17 20A** Horn feed
18 20A** Transmission control indicator
light, Tow/haul switch
19 — Not used
20 40A** PCM relay coil, PCM relay (PDB
fuses#3,5,7,17)
21 20A** Fuel pump motor, Fuel injectors
22 20A** Diagnostic tool connector, Cigar
lighter feed
23 40A** Blower motor feed
24 50A** IP battery feed (fuses #4, 10, 16,
22)
25 40A** Ignition switch feed (IP fuses #1,
5, 7, 11, 13, 14, 17, 19, 23; PDB
fuses #9, 11)
26 40A** Ignition switch feed (IP fuses #5,
11, 17, 23, 26, 27, 32, 38)
27 30A** Multifunction switch (headlamps)
28 30A** Starter solenoid
29 60A** Power brake assist motor***
Relay 1 — A/C clutch
Relay 2 — Fuel pump relay
Relay 3 — Horn relay
Relay 4 — Starter relay
Relay 5 — Blower motor relay
Relay 6 — PCM relay
Diode 1 — Fuel pump diode
Diode 2 — A/C clutch diode
* Mini Fuses ** Maxi Fuses ***Vehicles with Hydromax brake assist
only
2007 Motorhome(mot)
Supplement
USA(fus)
Roadside Emergencies
66
Page 67 of 128
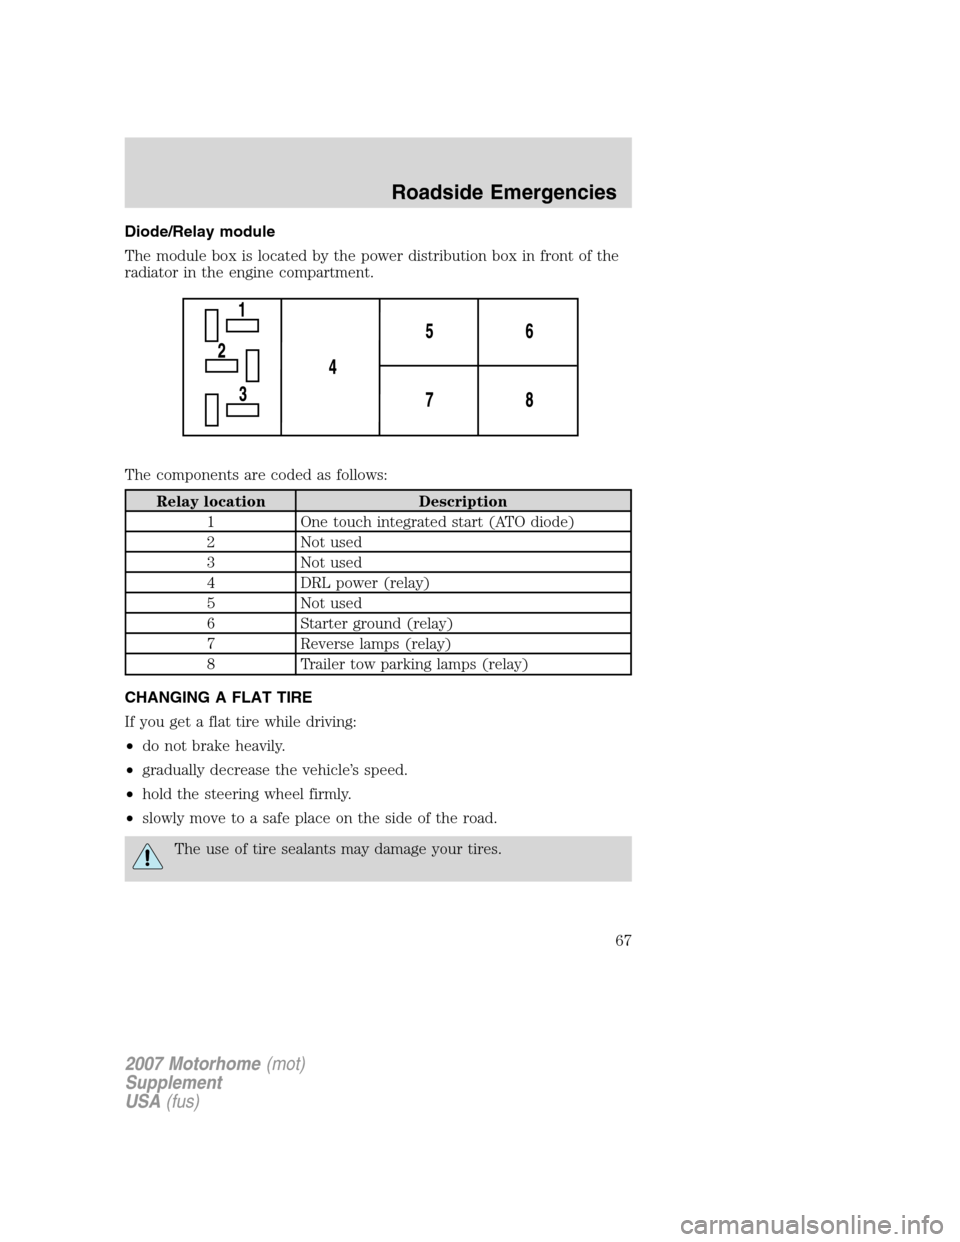
Diode/Relay module
The module box is located by the power distribution box in front of the
radiator in the engine compartment.
The components are coded as follows:
Relay location Description
1 One touch integrated start (ATO diode)
2 Not used
3 Not used
4 DRL power (relay)
5 Not used
6 Starter ground (relay)
7 Reverse lamps (relay)
8 Trailer tow parking lamps (relay)
CHANGING A FLAT TIRE
If you get a flat tire while driving:
•do not brake heavily.
•gradually decrease the vehicle’s speed.
•hold the steering wheel firmly.
•slowly move to a safe place on the side of the road.
The use of tire sealants may damage your tires.
2007 Motorhome(mot)
Supplement
USA(fus)
Roadside Emergencies
67