2007 FORD EXPEDITION air suspension
[x] Cancel search: air suspensionPage 193 of 328
any tire is under-inflated, carefully drive the vehicle to the nearest
location where air can be added to the tires. Inflate all the tires to the
recommended inflation pressure.
SNOW TIRES AND CHAINS
Snow tires must be the same size and grade as the tires you
currently have on your vehicle.
The tires on your vehicle have all weather treads to provide traction in
rain and snow. However, in some climates, you may need to use snow
tires and chains. If you need to use chains, it is recommended that steel
wheels (of the same size and specifications) be used, as chains may chip
aluminum wheels.
Follow these guidelines when using snow tires and chains:
•Use only cable type chains or chains offered by Ford as an accessory
or equivalent. Other conventional link type chains may contact and
cause damage to the vehicle’s wheel house and/or body.
•Do not install chains on the front wheels. Chains on the front wheels
may interfere with suspension components.
•Chains are not recommended for use on the P275/55R20 tire.
•Install chains securely, verifying that the chains do not touch any
wiring, brake lines or fuel lines.
•Drive cautiously. If you hear the chains rub or bang against your
vehicle, stop and re-tighten the chains. If this does not work, remove
the chains to prevent damage to your vehicle.
•If possible, avoid fully loading your vehicle.
•Remove the tire chains when they are no longer needed. Do not use
tire chains on dry roads.
•The suspension insulation and bumpers will help prevent vehicle
damage. Do not remove these components from your vehicle when
using snow tires and chains.
•Do not exceed 30 mph (48 km/h) with tire chains on your vehicle.
VEHICLE LOADING – WITH AND WITHOUT A TRAILER
This section will guide you in the proper loading of your vehicle and/or
trailer, to keep your loaded vehicle weight within its design rating
capability, with or without a trailer. Properly loading your vehicle will
provide maximum return of vehicle design performance. Before loading
2007 Expedition(exd)
Owners Guide (post-2002-fmt)
USA(fus)
Tires, Wheels and Loading
193
Page 204 of 328
2. Turn the air suspension (if equipped) control to OFF.
3. Measure the height of a reference point on the front and rear bumpers
at the center of the vehicle.
4. Attach the trailer to the vehicle and adjust the hitch equalizers so that
the front bumper height is within a
1�2” (13 mm) of the reference point.
After proper adjustment, the rear bumper should be no higher than in
Step 3.
5. Turn the air suspension (if equipped) control to ON.
Note:Adjusting a weight distributing hitch so the rear bumper of the
vehicle is higher than it was unloaded will defeat the function of the
weight distributing hitch and may cause unpredictable handling.
Safety chains
Always connect the trailer’s safety chains to the frame or hook retainers
of the vehicle hitch. To connect the trailer’s safety chains, cross the
chains under the trailer tongue and allow slack for turning corners.
If you use a rental trailer, follow the instructions that the rental agency
gives to you.
Do not attach safety chains to the bumper.
Trailer brakes
Electric brakes and manual, automatic or surge-type trailer brakes are
safe if installed properly and adjusted to the manufacturer’s
specifications. The trailer brakes must meet local and Federal
regulations.
Do not connect a trailer’s hydraulic brake system directly to your
vehicle’s brake system. Your vehicle may not have enough
braking power and your chances of having a collision greatly increase.
The braking system of the tow vehicle is rated for operation at the
GVWR not GCWR.
Trailer lamps
Trailer lamps are required on most towed vehicles. Make sure all running
lights, brake lights, turn signals and hazard lights are working. See your
authorized dealer or trailer rental agency for proper instructions and
equipment for hooking up trailer lamps.
2007 Expedition(exd)
Owners Guide (post-2002-fmt)
USA(fus)
Tires, Wheels and Loading
204
Page 220 of 328
•Wheels out of alignment
•Loose or worn suspension components
Variable assist steering
Your vehicle is equipped with variable assist power steering. At low
engine RPM, steering assist will adjust to reduce efforts and improve low
speed maneuverability. At high engine RPM, the assist will adjust to
improve steering feel at high speeds.
If the amount of effort required to steer your vehicle changes while
driving at a constant engine RPM, have the power steering system
checked by your authorized dealer.
AIR SUSPENSION SYSTEM (IF EQUIPPED)
The air suspension system is designed to improve ride, handling and
general vehicle performance during:
•Certain road conditions
•Steering maneuvers
•Braking
•Acceleration
This system keeps the rear of your vehicle at a constant level by
automatically adding air or releasing air from the springs. If you exceed
the load limit, the rear air suspension may not operate. The air
suspension system will stay active for 40 minutes after the ignition is
turned off to accommodate any load changes. (The air compressor may
run when the vehicle is off; this is normal.)
The air suspension system can be enabled or disabled through the
message center. Refer toMessage centerin theDriver Controlschapter.
If the system is off, the rear air suspension will not operate and will not
raise (pump) or lower (vent) while the vehicle is not moving. However, if
the system determines that the vehicle is low or high and needs to make
a height adjustment while driving at speeds above 15 mph (24 km/h), the
system will pump or vent as required. Normal vehicle operation does not
require any action by the driver.
On vehicles equipped with air suspension, turn the air
suspension and the ignition switch off prior to jacking, hoisting
or towing your vehicle.
2007 Expedition(exd)
Owners Guide (post-2002-fmt)
USA(fus)
Driving
220
Page 239 of 328
Maintenance and Modifications
The suspension and steering systems on your vehicle have been designed
and tested to provide predictable performance whether loaded or empty
and durable load carrying capability. For this reason, Ford Motor
Company strongly recommends that you do not make modifications such
as adding or removing parts (such as lift kits or stabilizer bars) or by
using replacement parts not equivalent to the original factory equipment.
Any modifications to a vehicle that raise the center of gravity can make
it more likely the vehicle will roll over as a result of a loss of control.
Ford Motor Company recommends that caution be used with any vehicle
equipped with a high load or device (such as ladder racks or pickup box
cover).
Failure to maintain your vehicle properly may void the warranty, increase
your repair cost, reduce vehicle performance and operational capabilities
and adversely affect driver and passenger safety. Frequent inspection of
vehicle chassis components is recommended if the vehicle is subjected to
heavy off-road usage.
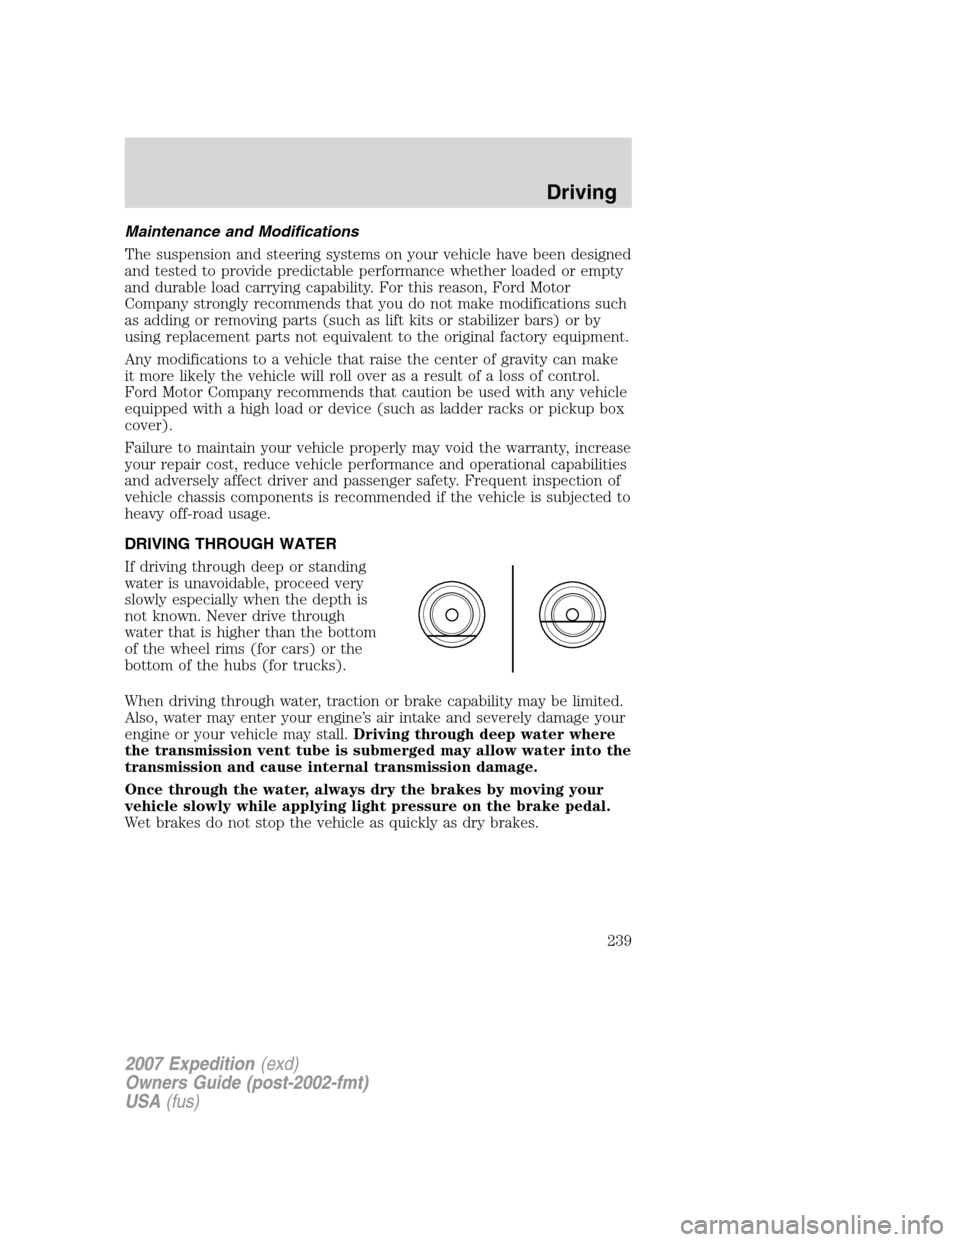
DRIVING THROUGH WATER
If driving through deep or standing
water is unavoidable, proceed very
slowly especially when the depth is
not known. Never drive through
water that is higher than the bottom
of the wheel rims (for cars) or the
bottom of the hubs (for trucks).
When driving through water, traction or brake capability may be limited.
Also, water may enter your engine’s air intake and severely damage your
engine or your vehicle may stall.Driving through deep water where
the transmission vent tube is submerged may allow water into the
transmission and cause internal transmission damage.
Once through the water, always dry the brakes by moving your
vehicle slowly while applying light pressure on the brake pedal.
Wet brakes do not stop the vehicle as quickly as dry brakes.
2007 Expedition(exd)
Owners Guide (post-2002-fmt)
USA(fus)
Driving
239
Page 249 of 328

Fuse/Relay
LocationFuse Amp
RatingPower Distribution Box
Description
34 25A* Trailer tow connector (stop/turn
lamps)
35 20A* 4x4 module
36 10A* Powertrain Control Module
(PCM) – Keep alive power,
Canister vent
37 15A* Transmission B+
38 30A** Third row seats (passenger side)
39 50A** Air suspension pump
40 30A** Starter motor
41 20A** IP/Console power point
42 — Not used
43 20A** 4x4 module motor
44 — Not used
45 30A** Driver seat
46 40A** Run/Start bus bar
47 30A** Air suspension – solenoids
48 — Not used
49 30A** Front wipers/washer
50 30A** PCM – bus bar
51 20A** Cargo power point
52 20A** Cigarette lighter
53 — Air suspension relay
54 — Starter relay
55 — Trailer tow connector relay (park
lamp)
56 — Trailer tow connector relay
(battery charge)
57 — Run/Start relay
58 — Not used
59 — PCM relay
60 — Not used
2007 Expedition(exd)
Owners Guide (post-2002-fmt)
USA(fus)
Roadside Emergencies
249
Page 250 of 328
Fuse/Relay
LocationFuse Amp
RatingPower Distribution Box
Description
61 — A/C clutch diode
62 — Fuel pump diode
63 15A* Trailer tow connector (back-up
lamp)
64 — Not used
65 10A* Air suspension logic
66 — Not used
67 10A* Blower coil
68 — Not used
69 30A* Run/Start – passenger
compartment fuse panel
70 20A* PCM (sensors) – EFC, A/C clutch
coil
71 5A* Fuel coil, ISP-R
72 20A* PCM (ignition coils)
73 5A* Transmission ignition
74 20A* PCM (sensors) – HEGO/CMS,
MAFS, EVMV, CMCV, Speed
deactivation switch, VCT
75 5A* 4x4 Integrated Wheel Ends
(IWE) solenoid
76 20A* PCM – VPWR
77 10A* ABS logic, Heated PCV
* Mini Fuses ** Cartridge Fuses
CHANGING THE TIRES
If you get a flat tire while driving, do not apply the brake heavily.
Instead, gradually decrease your speed. Hold the steering wheel firmly
and slowly move to a safe place on the side of the road.
Your vehicle may be equipped with a conventional spare tire that is
different in one or more of the following: type, brand, size, speed rating
and tread design. If this is the case, this dissimilar spare tire is still rated
for your vehicle loads (GAWR and GVWR). This temporary spare tire is
not equipped with a Tire Pressure Monitor System (TPMS) sensor.
2007 Expedition(exd)
Owners Guide (post-2002-fmt)
USA(fus)
Roadside Emergencies
250
Page 254 of 328
Removing the spare tire
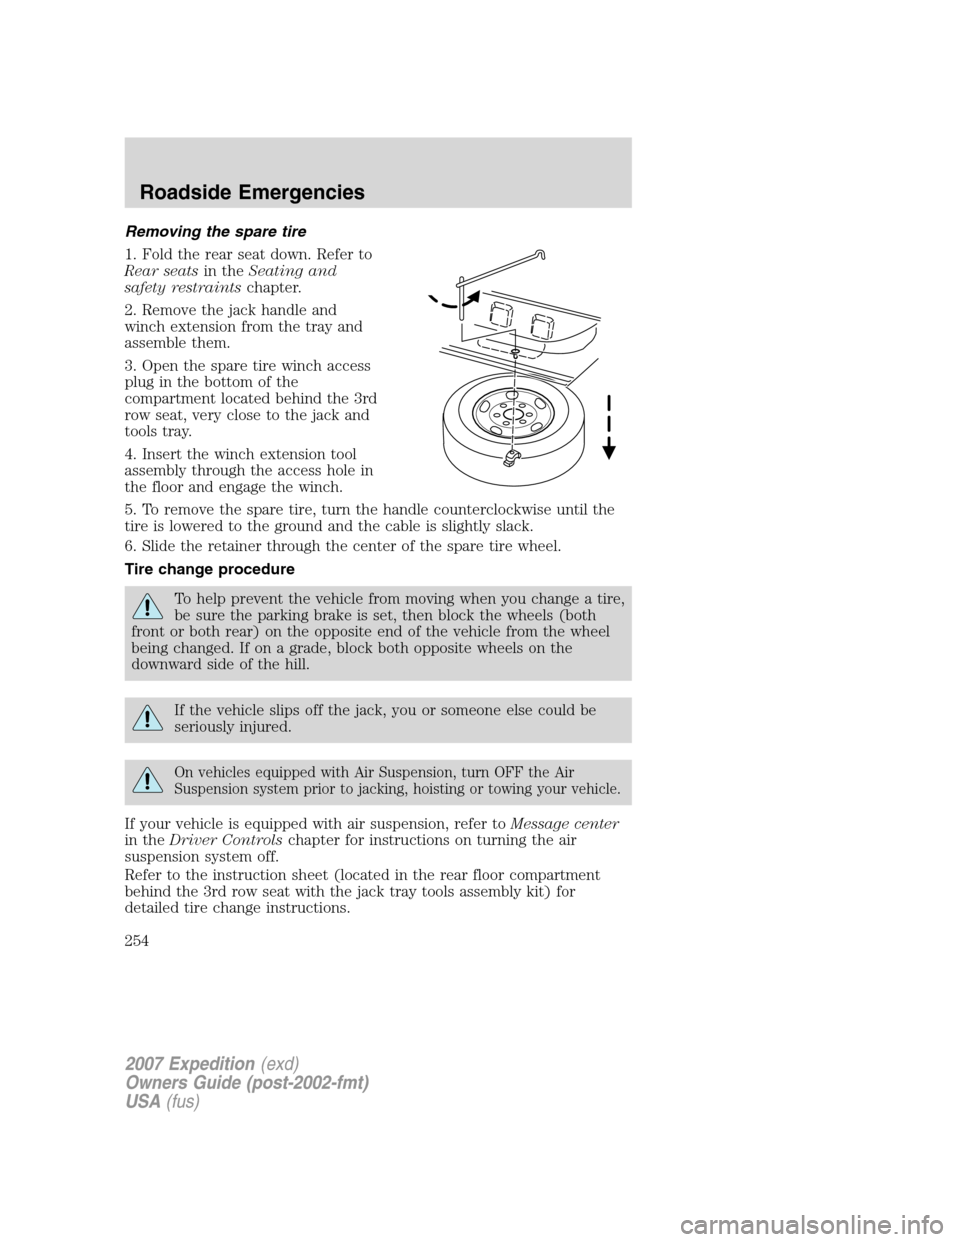
1. Fold the rear seat down. Refer to
Rear seatsin theSeating and
safety restraintschapter.
2. Remove the jack handle and
winch extension from the tray and
assemble them.
3. Open the spare tire winch access
plug in the bottom of the
compartment located behind the 3rd
row seat, very close to the jack and
tools tray.
4. Insert the winch extension tool
assembly through the access hole in
the floor and engage the winch.
5. To remove the spare tire, turn the handle counterclockwise until the
tire is lowered to the ground and the cable is slightly slack.
6. Slide the retainer through the center of the spare tire wheel.
Tire change procedure
To help prevent the vehicle from moving when you change a tire,
be sure the parking brake is set, then block the wheels (both
front or both rear) on the opposite end of the vehicle from the wheel
being changed. If on a grade, block both opposite wheels on the
downward side of the hill.
If the vehicle slips off the jack, you or someone else could be
seriously injured.
On vehicles equipped with Air Suspension, turn OFF the Air
Suspension system prior to jacking, hoisting or towing your vehicle.
If your vehicle is equipped with air suspension, refer toMessage center
in theDriver Controlschapter for instructions on turning the air
suspension system off.
Refer to the instruction sheet (located in the rear floor compartment
behind the 3rd row seat with the jack tray tools assembly kit) for
detailed tire change instructions.
2007 Expedition(exd)
Owners Guide (post-2002-fmt)
USA(fus)
Roadside Emergencies
254
Page 255 of 328
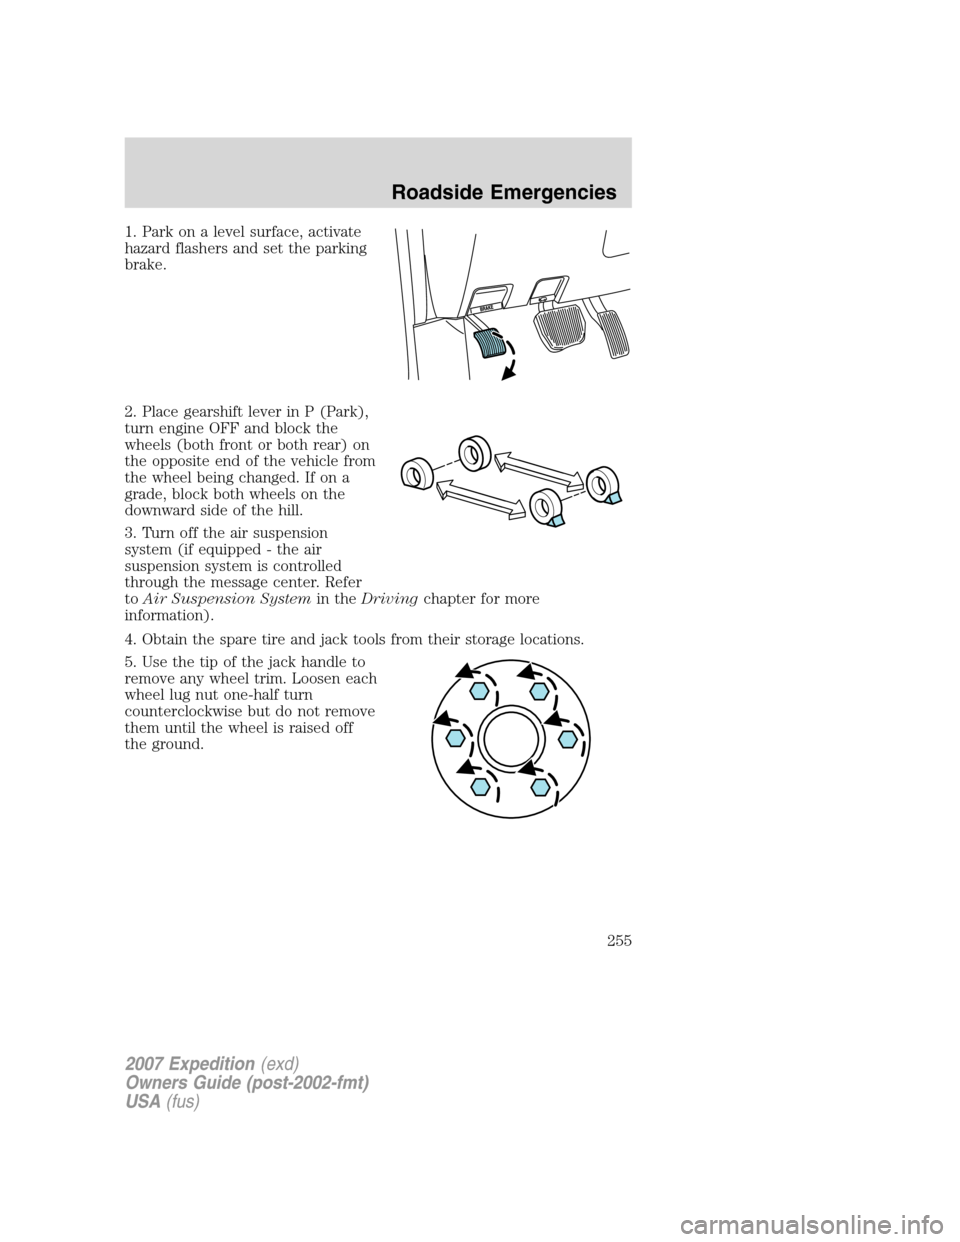
1. Park on a level surface, activate
hazard flashers and set the parking
brake.
2. Place gearshift lever in P (Park),
turn engine OFF and block the
wheels (both front or both rear) on
the opposite end of the vehicle from
the wheel being changed. If on a
grade, block both wheels on the
downward side of the hill.
3. Turn off the air suspension
system (if equipped - the air
suspension system is controlled
through the message center. Refer
toAir Suspension Systemin theDrivingchapter for more
information).
4. Obtain the spare tire and jack tools from their storage locations.
5. Use the tip of the jack handle to
remove any wheel trim. Loosen each
wheel lug nut one-half turn
counterclockwise but do not remove
them until the wheel is raised off
the ground.
2007 Expedition(exd)
Owners Guide (post-2002-fmt)
USA(fus)
Roadside Emergencies
255