Page 65 of 272
3. Press the SET + control and
release it.
4. Take your foot off the accelerator
pedal.
5. The indicator
light (if
equipped) on the instrument cluster
will turn on.
Note:
•Vehicle speed may vary momentarily when driving up and down a
steep hill.
•If the vehicle speed increases above the set speed on a downhill, you
may want to apply the brakes to reduce the speed.
•If the vehicle speed decreases more than 10 mph (16 km/h) below
your set speed on an uphill, your speed control will disengage.
Disengaging speed control
To disengage the speed control:
•Depress the brake pedal
Disengaging the speed control will not erase previous set speed.
Resuming a set speed
Press the RESUME control and
release it. This will automatically
return the vehicle to the previously
set speed.
2007 Crown Victoria(cro)
Owners Guide (post-2002-fmt)
USA(fus)
Driver Controls
65
ProCarManuals.com
Page 66 of 272

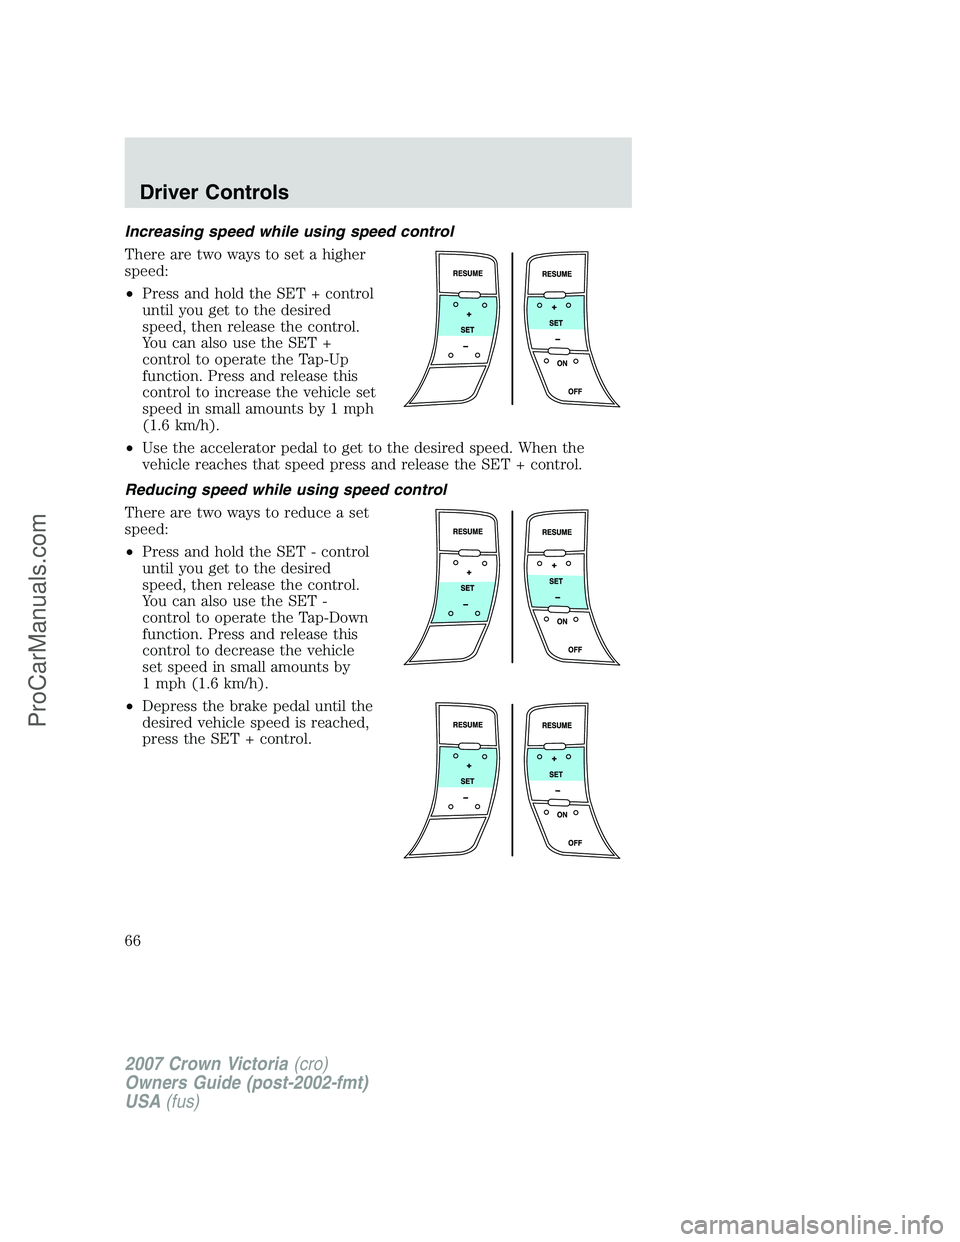
Increasing speed while using speed control
There are two ways to set a higher
speed:
•Press and hold the SET + control
until you get to the desired
speed, then release the control.
You can also use the SET +
control to operate the Tap-Up
function. Press and release this
control to increase the vehicle set
speed in small amounts by 1 mph
(1.6 km/h).
•Use the accelerator pedal to get to the desired speed. When the
vehicle reaches that speed press and release the SET + control.
Reducing speed while using speed control
There are two ways to reduce a set
speed:
•Press and hold the SET - control
until you get to the desired
speed, then release the control.
You can also use the SET -
control to operate the Tap-Down
function. Press and release this
control to decrease the vehicle
set speed in small amounts by
1 mph (1.6 km/h).
•Depress the brake pedal until the
desired vehicle speed is reached,
press the SET + control.
2007 Crown Victoria(cro)
Owners Guide (post-2002-fmt)
USA(fus)
Driver Controls
66
ProCarManuals.com
Page 67 of 272
Turning off speed control
There are two ways to turn off the speed control:
•Depress the brake pedal. This will
not erase your vehicle’s
previously set speed.
•Press the speed control OFF
control.
Note:When you turn the speed
control or the ignition off, your
speed control set speed memory is
erased.
STEERING WHEEL CONTROLS (IF EQUIPPED)
Audio control features
In Radio mode:
•Press NEXT to select the next
preset station within the current
radio band.
In Tape mode:
•Press NEXT to listen to the next
selection on the tape.
In CD mode:
•Press NEXT to listen to the next
track on the disc.
In any mode:
•Press VOL + or - to adjust the
volume.
2007 Crown Victoria(cro)
Owners Guide (post-2002-fmt)
USA(fus)
Driver Controls
67
ProCarManuals.com
Page 81 of 272

2. Press and hold the RESET
control for 3 seconds and release.
Oil life is set to 100% and “OIL LIFE
START VALUE SET TO XXX%” is
displayed.
POSITIVE RETENTION FLOOR MAT
Do not install additional floor mats on top of the factory installed
floor mats as they may interfere with the accelerator or the
brake pedals.
Position the driver floor mat so that
the eyelet is over the pointed end of
the retention post and rotate
forward to lock in. Make sure that
the mat does not interfere with the
operation of the accelerator or the
brake pedal. To remove the floor
mat, reverse the installation
procedure.
INTERIOR TRUNK CONTROL
The remote trunk release control is
located on the driver’s door trim
panel and can be operated at any
time.
You can render the switch
inoperable by locking the button
with your master key.
If equipped with a perimeter alarm system, the remote trunk release
control and power door locks will be disabled when the vehicle perimeter
alarm system is armed. This control will not work until the vehicle
perimeter alarm system is disarmed. Refer toPerimeter Alarm System
in theLocks and Securitychapter.
2007 Crown Victoria(cro)
Owners Guide (post-2002-fmt)
USA(fus)
Driver Controls
81
ProCarManuals.com
Page 89 of 272

•Perform the following programming procedure yourself:
Note:Ensure the brake pedal is not
depressed during this sequence.
Place the key in the ignition and
cycle from 1 (OFF/LOCK) to 3 (ON)
eight times in rapid succession
within 10 seconds. After doors
lock/unlock, press any control on all
transmitters (up to four). After
pressing the control on each remote
transmitter, the door will lock and
unlock. If programming multiple remote transmitters, you must press the
control buttons on each remote transmitter within 7 seconds of each
other to remain in programming mode. When completed, turn the
ignition to 1 (OFF/LOCK).
All transmittersmustbe programmed at the same time.
•When completed, turn the ignition to the 1 (OFF/LOCK) position and
wait at least 20 seconds in order to use the recently programmed
transmitter(s).
•Alltransmittersmustbe programmed during the same programming
cycle. A transmitter that is not programmed within the same
programming cycle will be erased and will no longer operate your
vehicle’s locks. If this occurs, you will have to reprogram all the
transmitters again, as you cannot just “add” a transmitter.
Illuminated entry
The interior lamps illuminate when the remote entry system is used to
unlock the door(s) or sound the personal alarm.
The illuminated entry system will turn off the interior lights if:
•the ignition switch is turned to the 2 (ACCESSORY), 3 (ON) or 4
(START) positions, or
•the remote transmitter lock control is pressed, or
•after 25 seconds of illumination.
The dome lamp control mustnotbe set to theoffposition for the
illuminated entry system to operate.
4
3
2
1
2007 Crown Victoria(cro)
Owners Guide (post-2002-fmt)
USA(fus)
Locks and Security
89
ProCarManuals.com
Page 109 of 272

Lap belts
Adjusting the front center seat lap belt (if equipped)
The lap belt should fit snugly and as low as possible around the
hips, not across the waist.
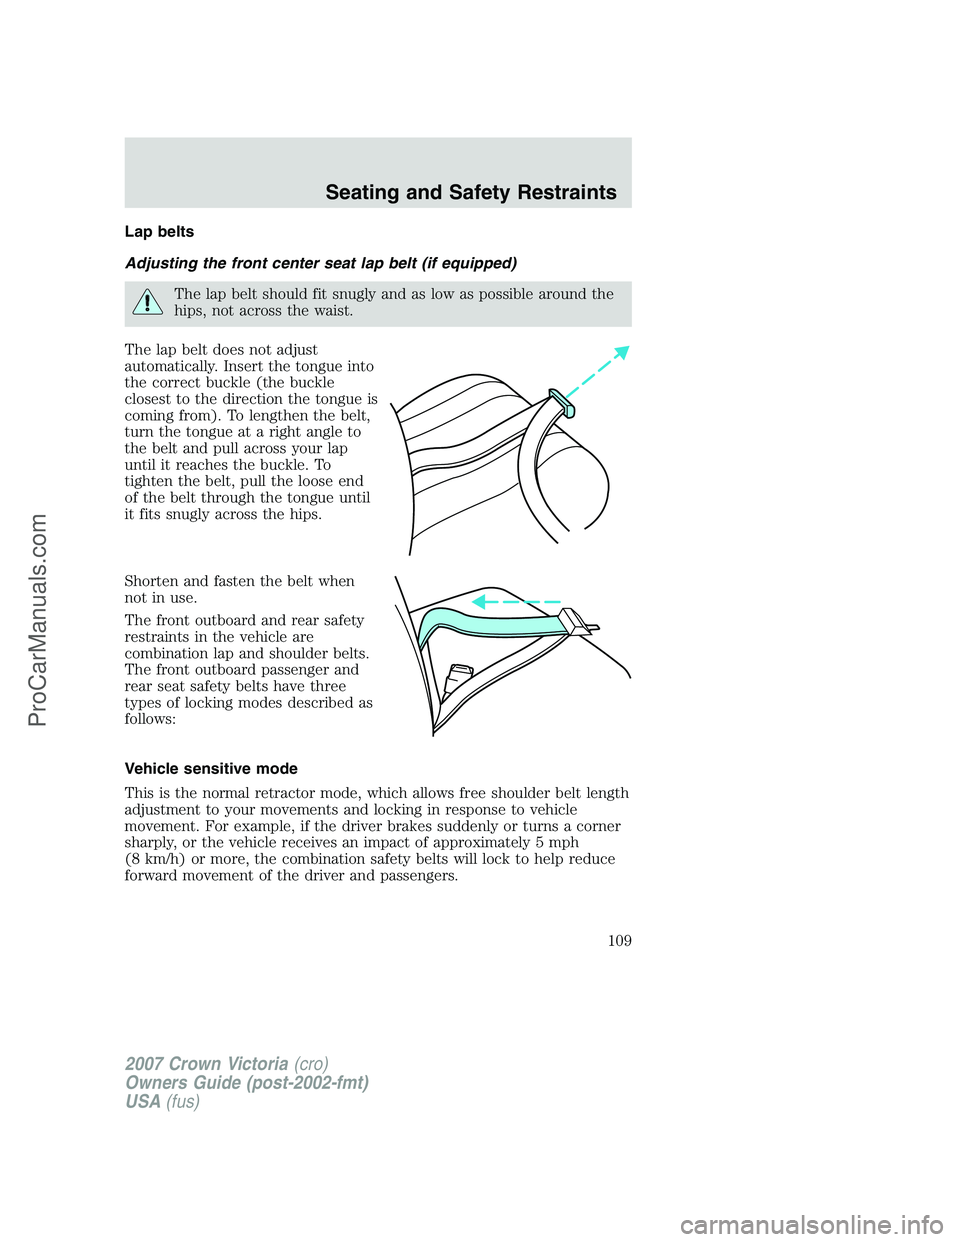
The lap belt does not adjust
automatically. Insert the tongue into
the correct buckle (the buckle
closest to the direction the tongue is
coming from). To lengthen the belt,
turn the tongue at a right angle to
the belt and pull across your lap
until it reaches the buckle. To
tighten the belt, pull the loose end
of the belt through the tongue until
it fits snugly across the hips.
Shorten and fasten the belt when
not in use.
The front outboard and rear safety
restraints in the vehicle are
combination lap and shoulder belts.
The front outboard passenger and
rear seat safety belts have three
types of locking modes described as
follows:
Vehicle sensitive mode
This is the normal retractor mode, which allows free shoulder belt length
adjustment to your movements and locking in response to vehicle
movement. For example, if the driver brakes suddenly or turns a corner
sharply, or the vehicle receives an impact of approximately 5 mph
(8 km/h) or more, the combination safety belts will lock to help reduce
forward movement of the driver and passengers.
2007 Crown Victoria(cro)
Owners Guide (post-2002-fmt)
USA(fus)
Seating and Safety Restraints
109
ProCarManuals.com
Page 116 of 272

One time disable
If at any time the driver/front passenger quickly buckles then unbuckles
the safety belt for that seating position, the Belt-Minder�is disabled for
the current ignition cycle. The Belt-Minder�feature will enable during
the same ignition cycle if the occupant buckles and remains buckled for
approximately 30 seconds. Confirmation is not given for the one time
disable.
Deactivating/activating the Belt-Minder�feature
The driver and front passenger Belt-Minder�are
deactivated/activated independently. When deactivating/activating
one seating position, do not buckle the other position as this will
terminate the process.
Read Steps1-4thoroughly before proceeding with the
deactivation/activation programming procedure.
Note: The driver and front passenger Belt-Minder�features must be
disabled/enabled separately. Both cannot be disable/enabled during the
same key cycle.
The driver and front passenger Belt-Minder�features can be
deactivated/activated by performing the following procedure:
Before following the procedure, make sure that:
•The parking brake is set
•The gearshift is in P (Park) (automatic transmission)
•The ignition switch is in the OFF position
•The driver and front passenger safety belts are unbuckled
While the design allows you to deactivate your Belt-Minder�, this
system is designed to improve your chances of being safely
belted and surviving an accident. We recommend you leave the
Belt-Minder�system activated for yourself and others who may use the
vehicle. To reduce the risk of injury, do not deactivate/activate the
Belt-Minder�feature while driving the vehicle.
1. Turn the ignition switch to the RUN (or ON) position. (DO NOT
START THE ENGINE)
2. Wait until the safety belt warning light turns off. (Approximately 1
minute)
•Step 3 must be completed within 50 seconds after the safety belt
warning light turns off.
2007 Crown Victoria(cro)
Owners Guide (post-2002-fmt)
USA(fus)
Seating and Safety Restraints
116
ProCarManuals.com
Page 157 of 272

SNOW TIRES AND CHAINS
Snow tires must be the same size and grade as the tires you
currently have on your vehicle.
The tires on your vehicle have all weather treads to provide traction in
rain and snow. However, in some climates, you may need to use snow
tires and chains. If you need to use chains, it is recommended that steel
wheels (of the same size and specifications) be used, as chains may chip
aluminum wheels.
Follow these guidelines when using snow tires and chains:
•Either cable type chains or SAE class S chains can be used.
•Install chains securely, verifying that the chains do not touch any
wiring, brake lines or fuel lines.
•Drive cautiously. If you hear the chains rub or bang against your
vehicle, stop and re-tighten the chains. If this does not work, remove
the chains to prevent damage to your vehicle.
•If possible, avoid fully loading your vehicle.
•Remove the tire chains when they are no longer needed. Do not use
tire chains on dry roads.
•The suspension insulation and bumpers will help prevent vehicle
damage. Do not remove these components from your vehicle when
using snow tires and chains.
VEHICLE LOADING – WITH AND WITHOUT A TRAILER
This section will guide you in the proper loading of your vehicle and/or
trailer, to keep your loaded vehicle weight within its design rating
capability, with or without a trailer. Properly loading your vehicle will
provide maximum return of vehicle design performance. Before loading
your vehicle, familiarize yourself with the following terms for determining
your vehicle’s weight ratings, with or without a trailer, from the vehicle’s
Tire Label or Safety Compliance Certification Label:
Base Curb Weight– is the weight of the vehicle including a full tank of
fuel and all standard equipment. It does not include passengers, cargo, or
optional equipment.
Vehicle Curb Weight– is the weight of your new vehicle when you
picked it up from your authorized dealer plus any aftermarket
equipment.
2007 Crown Victoria(cro)
Owners Guide (post-2002-fmt)
USA(fus)
Tires, Wheels and Loading
157
ProCarManuals.com