2007 DODGE SPRINTER mirror
[x] Cancel search: mirrorPage 14 of 393

13 At a glance
Cockpit
1
Function
Page
1
Door control panel
22
2
Light switch
77
3
Combination switch\4Turn signals
\4High-beam headlamps
\4Windshield wipers
\4Rear window wiper*
79
77
126
127
4
Cruise control lever*
147
5
Horn
6
Steering wheel without/
with* buttons
17
Function
Page
7
Instrument cluster
14, 84
8
Storage compartment
9
Storage compartment with
interior lamp
80
Overhead control panel*
19
a
Rear-view mirror*
125
b
Warning display for Park-
tronic system*
150
c
Opens / closes the right-
hand side window
144
d
Jack and vehicle tool kit
300
e
Glove box
165
Function
Page
f
Center console
18
g
Selector lever (automatic
transmission)
111
h
Ignition lock
67
j
Additional switch unit
20
k
Handbrake
115
l
Steering wheel adjustment
76
m
Hood lock release
185
n
Additional switch unit
20
Page 23 of 393

22 At a glanceDoor control panel
1
\3 Door control panel
N54.25-2914-31
Function
Page
1
Adjusts the exterior
mirrors*
125
2
Selects an exterior
mirror*
125
3
Opens / closes the left-
hand side window
144
4
Opens / closes the right-
hand side window
144
Page 50 of 393

49 Safety
Anti-theft systems
2
If the anti-theft alarm system is enabled
and the vehicle is locked, a visual and au-
dible alarm is triggered if one of the side
windows or the rear window on your vehi-
cle is smashed and someone reaches into
the interior, for example.
Enabling the interior motion sensor
\1Close:
\4the side windows
\4the sliding sunroof
This will prevent false alarms.
\1Lock your vehicle.
The interior motion sensor is enabled
after approximately 40 seconds.Deactivating the interior motion sensor
Deactivate the interior motion sensor if
people or animals remain in the locked ve-
hicle. This will prevent false alarms.
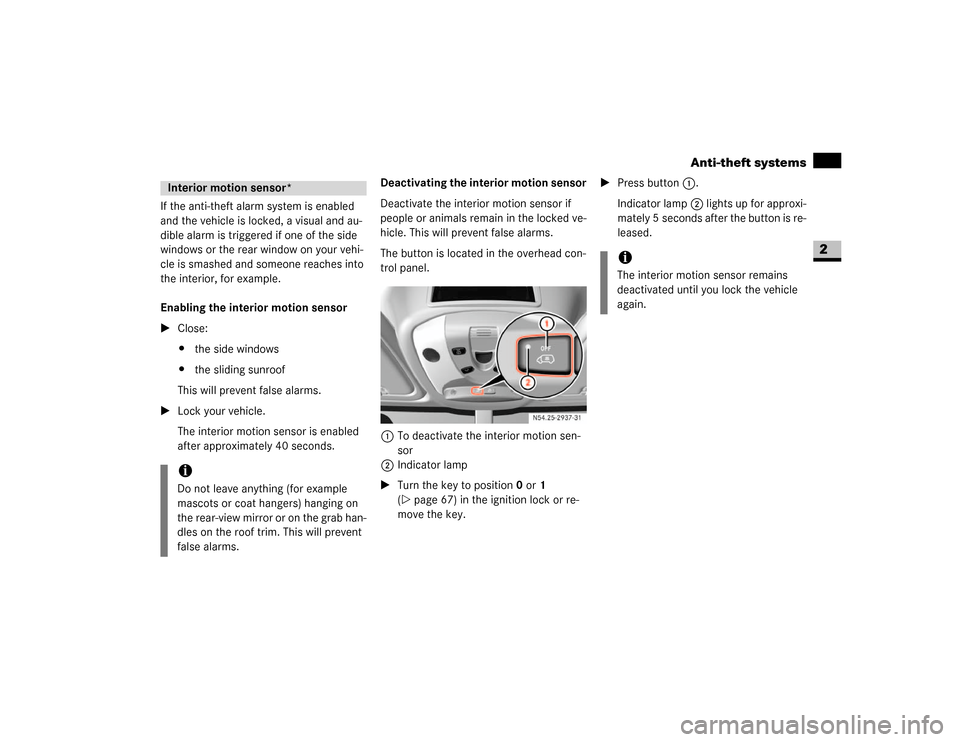
The button is located in the overhead con-
trol panel.
1To deactivate the interior motion sen-
sor
2Indicator lamp
\1Turn the key to position0 or1
(\2page 67) in the ignition lock or re-
move the key.\1Press button1.
Indicator lamp2 lights up for approxi-
mately 5 seconds after the button is re-
leased.Interior motion sensor*iDo not leave anything (for example
mascots or coat hangers) hanging on
the rear-view mirror or on the grab han-
dles on the roof trim. This will prevent
false alarms.
iThe interior motion sensor remains
deactivated until you lock the vehicle
again.
Page 126 of 393

125 Controls in detail
Good visibility
3
\3 Good visibilityBefore starting off, adjust the rear-view
mirror and the exterior mirrors in such a
way that you can get a good overview of
road and traffic conditions.
Rear-view mirror*
\1Adjust the rear-view mirror manually.
Setting the rear-view mirror to anti-
dazzle mode
1Anti-dazzle lever
\1Flick anti-dazzle lever1 to the rear.Exterior mirrors
\1Adjust the exterior mirrors manually.
Adjusting the exterior mirrors electrical-
ly*
The switch and button for adjusting the ex-
terior mirrors are located in the interior
trim of the driver’s door.1Exterior mirror on the left-hand side
2Exterior mirror on the right-hand side
3Sets the mirror position
\1Switch on the ignition (\2page 67).
\1Press left-hand side 1 of the switch
for the left-hand mirror or press right-
hand side2 of the switch for the right-
hand mirror.
\1Press button3 at the top or bottom,
right or left until you have adjusted the
mirror to the correct position.Mirrors
Warning
G
The exterior mirrors reduce the size of the
image. Objects therefore appear further
away than they really are. You could there-
fore cause an accident if you only observe
traffic in the exterior mirrors.
For this reason, you should pay attention to
traffic behind you by also using the main ex-
terior mirror and, if necessary, the rear-view
mirror, especially while maneuvering or
overtaking.
Page 153 of 393

152 Controls in detailDriving systems
3
The warning displays for the rear left and
right-hand sides are in the exterior mirror
concerned.Warning display in the left-hand exterior
mirror for the area to the rear left-hand side4Left-hand side of vehicle
5Indicator segments
The warning display is divided into 5 yellow
and 2 red segments for each side of the ve-
hicle. Parktronic is operational if yellow in-
dicator segments3 and5 light up.The selector lever position determines
whether the front and/or rear area is mon-
itored.
One or more segments light up as the vehi-
cle approaches an obstacle, depending on
the vehicle’s distance from the obstacle.From the:
\4sixth segment, an intermittent warning
tone sounds for approximately
2seconds
\4seventh segment, a continuous warn-
ing tone sounds. You have reached the
minimum distance.
Roll-back warning
Parktronic automatically begins to monitor
the area behind the vehicle if the vehicle
begins to roll backwards without reverse
gear engaged, e.g. after stopping on an up-
hill gradient.
If Parktronic detects an obstacle no more
than 31 in (80 cm) away,
\4all the segments of the warning dis-
plays light up
\4a continuous warning tone sounds as
the vehicle approaches the obstacle
and for a further 2 seconds after the ve-
hicle has come to a halt N54.65-2075-31
!
CAUTION
There is a malfunction if only the red
segments of the warning display light
up (\2page 262).
Transmission
position
Monitoring
D
Front area
R or N
Front and rear area
P
No areas activated
Page 179 of 393

178 OperationDriving tips
4
Attaching a trailer
Please observe the maximum permitted
trailer dimensions (width and length).
Most states and all Canadian provinces re-
quire safety chains between your tow vehi-
cle and the trailer. The chains should be
crisscrossed under the trailer tongue. They
must be attached to the hitch receiver, and
not to the vehicle’s bumper or axle. Be sure
to leave enough slack in the chains to per-
mit turning corners.Towing a trailer
There are many different laws, including
speed limit restrictions, having to do with
trailer towing. Make sure that your vehicle-
trailer combination will be legal, not only
for where you reside, but also for where
you will be driving. A good source for this
information can be the police or local au-
thorities.
Before you start driving with the trailer,
check the trailer hitch, break-away switch,
safety chains, electrical connections, light-
ing and tires. Also adjust the mirrors to
permit an unobstructed view beyond the
rear of the trailer.
If the trailer has electric brakes, start your
vehicle and trailer moving slowly, and then
apply only the trailer brake controller by
hand to be sure that the brakes are work-
ing properly.
When towing a trailer, check occasionally
to be sure that the load is secure, and that
lighting and trailer brakes (if so equipped)
are functioning properly.
iMost states and all Canadian provinces
require a separate brake system at var-
ious trailer weights.
Warning
G
Do not connect a trailer brake system (if
trailer is so equipped) directly to the vehi-
cle’s hydraulic brake system as your vehicle
is equipped with antilock brakes. If you do,
neither the vehicle’s brakes nor the trailer’s
brakes will function properly. This could
cause an accident resulting in property dam-
age, injury or death to you or others.
The provided vehicle electrical wiring har-
ness for trailer towing has a brake signal
wire for hook-up to a brake controller.
Most states and all Canadian provinces re-
quire a break-away switch on trailers with a
separate brake system. The switch activates
the trailer brakes in the possible event that
the trailer might separate from the tow vehi-
cle.
You should consider using a trailer sway
control system. For further information, see
your authorized Sprinter Dealer.
Page 243 of 393

242 OperationCleaning and care of the vehicle
4
Automatic car wash
You can clean the vehicle in an automatic
car wash from the very start. It is prefera-
ble to use a car wash that does not have
brushes.
If the vehicle is very dirty, prewash it be-
fore you drive into the car wash.
\1Remove the radio / telephone antenna
and fold the exterior mirrors in before
driving into the automatic car wash.After using an automatic car wash, wipe off
wax from the windshield and the wiper
blades. This prevents smears and reduces
wiping noises which can be caused by res-
idue on the windshield.High-pressure cleaners
\1The minimum distance that must be
maintained between the vehicle and
the nozzle of the high-pressure cleaner
is:
\4approximately 2.2 ft (70 cm) for
round-spray jets
\4approximately 1 ft (30 cm) for 25°
flat-spray jets and concentrated-
power jets
\1Move the high-pressure cleaner nozzle
around when cleaning your vehicle.Care of the vehicle!
CAUTION
After cleaning your vehicle, especially
the wheel rims with rim cleaner, do not
simply park the vehicle and leave it.
Rim cleaners can promote corrosion of
the brake discs and the brake pads /
linings. Before parking and leaving the
vehicle after cleaning, always warm the
vehicle up to normal operating temper-
ature first.
!
CAUTION
Make sure that the automatic car wash
is suitable for the size of the vehicle.
If you do not remove the radio / tele-
phone antenna and fold in the exterior
mirrors, there is a possibility that the
antenna, the exterior mirrors or the ve-
hicle could be damaged by the auto-
matic car wash.
!
CAUTION
Make sure that the windshield wiper
switch is set to 0 (\2page 126), other-
wise the rain sensor could be activated,
for example, and the windshield wipers
could be triggered unintentionally. This
could cause damage to the vehicle.
!
CAUTION
Do not use high-pressure cleaners with
round-spray jets for cleaning the tires.
You could otherwise damage the tires.
Have damaged tires replaced.
!
CAUTION
To avoid damage, do not aim directly at
the door joints, brake hoses, electrical
components, connectors or seals.
Page 307 of 393

306 Practical hintsChanging bulbs
5
\3 Changing bulbsBulbs and lights are an important aspect of
vehicle safety. For this reason, make sure
that all bulbs are in working order at all
times.
\4Switch off the lights to avoid a short cir-
cuit.
\4Only touch new bulbs with a clean lint-
free cloth or something similar. Do not
work with wet or greasy fingers.
\4Only fit 12 V bulbs of the same type as
before and of the correct wattage.
\4Have the headlamp setting checked
regularly.\4If the newly installed bulb does not light
up either, visit an authorized Sprinter
Dealer.
\4Have the following LEDs and bulbs
changed at an authorized Sprinter
Dealer:
\4The additional turn signals in the
exterior mirrors
\4The third brake lamp (cargo and
passenger vans only)*
\4The bi-xenon headlamps*
\4The foglamps* Before changing bulbs
Warning
G
Bulbs and bulb holders can become very
hot. For this reason, allow the light to cool
down before changing the bulb.
Keep bulbs out of the reach of children.
Never use a bulb which has been dropped.
Such a bulb may explode and injure you.
H7 bulbs are pressurized and may explode
when changed. You should therefore wear
eye protection and gloves when you are
changing them.