Page 213 of 492

SEEK Button (CD MODE for CD Audio Play)
Press the right side of the SEEK button for the next
selection on the CD. Press the left side of the button to
return to the beginning of the current selection, or return
to the beginning of the previous selection if the CD is
within the first 5 seconds of the current selection.
SCAN Button (CD MODE for CD Audio Play)
Press the Scan button to scan through each track on the
CD currently playing.
LOAD/EJECT Button (CD Mode for CD Audio
Play)
LOAD/EJECT - Load
Press the LOAD/EJT button and the push-
button with the corresponding number where
the CD is being loaded. The radio will display
PLEASE WAIT and prompt when to INSERT
DISC. After the radio displays9INSERT DISC,9insert the
CD into the player.Radio display will show9LOADING DISC9when the disc
is loading and ªREADING DISCº when the radio is
reading the disc.
LOAD/EJT - Eject
Press the LOAD/EJT button and the push-
button with the corresponding number where
the CD was loaded and the disc will unload
and move to the entrance for easy removal.
Radio display will show9EJECTING DISC9when the disc
is being ejected and prompt the user to remove the disc.
Press and hold the LOAD/EJT button for 5 seconds and
all CDs will be ejected from the radio.
If you have ejected a disc and have not removed it within
15 seconds, it will be reloaded. If the CD is not removed,
the radio will continue to play the non-removed CD. If
the CD is removed and there are other CD's in the radio,
the radio will play the next CD after a 2-minute timeout.
If the CD is removed and there are no other CD's in the
212 UNDERSTANDING YOUR INSTRUMENT PANEL
Page 214 of 492

radio, the radio will remain in CD mode and display
9INSERT DISCº for 2 minutes. After 2 minutes, the radio
will go to the previous tuner mode.
The disc can be ejected with the radio and ignition OFF.
TIME Button (CD MODE for CD Audio Play)
Press this button to change the display from a large CD
playing time display to a small CD playing time display.
RW/FF (CD MODE for CD Audio Play)
Press and hold FF (Fast Forward) and the CD player will
begin to fast forward until FF is released or RW or
another CD button is pressed. The RW (Reverse) button
works in a similar manner.
TUNE Control (CD MODE for CD Audio Play)
Pressing the TUNE control allows the setting of the Tone,
Fade, and Balance. See Radio Mode.
AM/FM Button (CD MODE for CD Audio Play)
Switches the Radio to the Radio mode.
RND/PTY Button (Random Play Button) (CD
MODE for CD Audio Play)
Press this button while the CD is playing to activate
Random Play. This feature plays the selections on the
compact disc in random order to provide an interesting
change of pace.
NOTE:MP3 and WMA Random Play are for file folders
only.
Press the SEEK button to move to the next randomly
selected track.
Press and hold the FF button to fast forward through the
tracks. Release the FF button to stop the fast forward
feature. If the RW button is pressed, the current track will
reverse to the beginning of the track and begin playing.
Press the RND button a second time to stop Random
Play.
UNDERSTANDING YOUR INSTRUMENT PANEL 213
4
Page 215 of 492

Buttons1-6(CDMODE for CD Audio Play)
Selects disc positions1-6forPlay/Load/Eject.
Notes On Playing MP3 Files
The radio can play MP3 files; however, acceptable MP3
file recording media and formats are limited. When
writing MP3 files, pay attention to the following restric-
tions.
Supported Media (Disc Types)
The MP3 file recording media supported by the radio are
CD-ROM, CD-R, and CD-RW.
Supported Medium Formats (File Systems)
The medium formats supported by the radio are ISO 9660
Level 1 and Level 2 and includes the Joliet extension.
When reading discs recorded using formats other than
ISO 9660 Level 1 and Level 2, the radio may fail to read
files properly and may be unable to play the file nor-
mally. UDF and Apple HFS formats are not supported.The radio uses the following limits for file systems:
²Maximum number of directory levels: 15
²Maximum number of files: 255
²Maximum number of folders: 100
²Maximum number of characters in file/folder names:
²Level 1: 12 (including a separator9.9and a
3-character extension)
²Level 2: 31 (including a separator9.9and a
3-character extension)
Multisession disc formats are supported by the radio.
Multisession discs may contain combinations of normal
CD audio tracks and computer files (including MP3 files).
Discs created with an option such as9keep disc open after
writing9are most likely multisession discs. The use of
multisession for CD audio or MP3 playback may result in
longer disc loading times.
214 UNDERSTANDING YOUR INSTRUMENT PANEL
Page 216 of 492

Supported MP3 File Formats
The radio will recognize only files with the *.mp3 exten-
sion as MP3 files. Non-MP3 files named with the *.mp3
extension may cause playback problems. The radio is
designed to recognize the file as an invalid MP3 and will
not play the file.
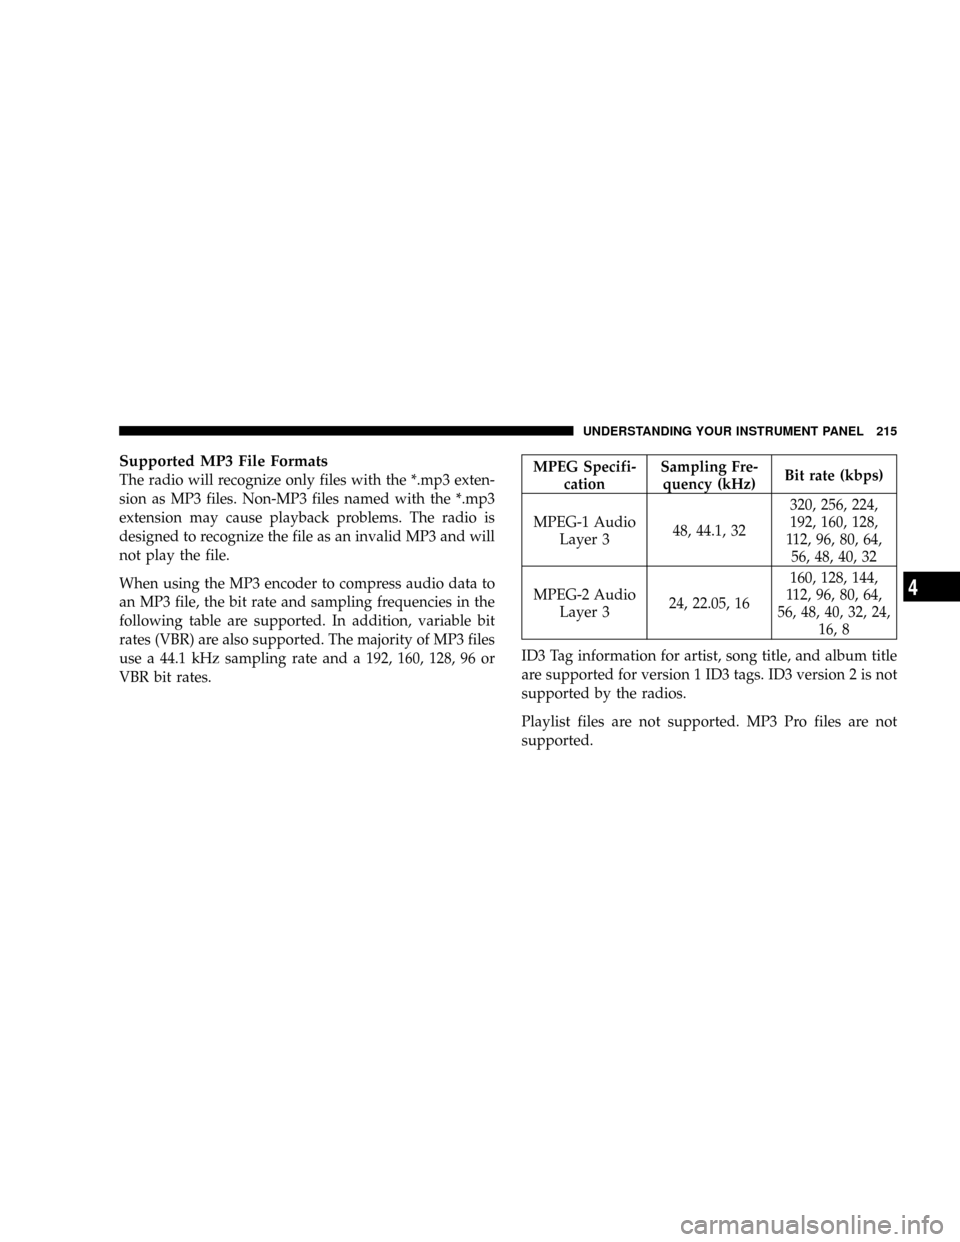
When using the MP3 encoder to compress audio data to
an MP3 file, the bit rate and sampling frequencies in the
following table are supported. In addition, variable bit
rates (VBR) are also supported. The majority of MP3 files
use a 44.1 kHz sampling rate and a 192, 160, 128, 96 or
VBR bit rates.MPEG Specifi-
cationSampling Fre-
quency (kHz)Bit rate (kbps)
MPEG-1 Audio
Layer 348, 44.1, 32320, 256, 224,
192, 160, 128,
112, 96, 80, 64,
56, 48, 40, 32
MPEG-2 Audio
Layer 324, 22.05, 16160, 128, 144,
112, 96, 80, 64,
56, 48, 40, 32, 24,
16, 8
ID3 Tag information for artist, song title, and album title
are supported for version 1 ID3 tags. ID3 version 2 is not
supported by the radios.
Playlist files are not supported. MP3 Pro files are not
supported.
UNDERSTANDING YOUR INSTRUMENT PANEL 215
4
Page 217 of 492

Playback of MP3 and WMA Files
When a medium containing MP3 data is loaded, the
radio checks all files on the medium. If the medium
contains a lot of folders or files, the radio will take more
time to start playing the MP3 files.
Loading times for playback of MP3 and WMA files may
be affected by the following:
²Media - CD-RW media may take longer to load than
CD-R media
²Medium formats - Multisession discs may take longer
to load than non-multisession discs
²Number of files and folders - Loading times will
increase with more files and folders
To increase the speed of disc loading, it is recommended
to use CD-R media and single-session discs. To create a
single-session disc, enable the Disc at Once option before
writing to the disc.
Operation Instructions - (CD Mode for MP3 and
WMA Audio Play)
SEEK Button (CD Mode for MP3 and WMA Play)
Pressing the right side of the SEEK button plays the next
file. Pressing the left side of the SEEK button plays the
beginning of the file. Pressing the button within the first
ten seconds plays the previous file.
LOAD/EJECT Button (CD Mode for MP3 and WMA
Play)
LOAD/EJT - Load
Press the LOAD/EJT button and the push-
button with the corresponding number where
the CD is being loaded. The radio will display
PLEASE WAIT and prompt when to INSERT
DISC. After the radio displays9INSERT DISC,9insert the
CD into the player.
216 UNDERSTANDING YOUR INSTRUMENT PANEL
Page 224 of 492

one and stop the search. Pressing a pre-set memory
button during a music type scan, will call up the memory
channel and stop the search.
PTY Button(SEEK(
When the desired program is obtained, press the9SEEK9
button within five seconds. The channel will change to
the next channel that matches the program type selected.
Satellite Antenna
To ensure optimum reception, do not place items on the
roof around the rooftop antenna location. Metal objects
placed within the line of sight of the antenna will cause
decreased performance. Larger luggage items should be
placed as far forward as possible. Do not place items
directly on or above the antenna.
Reception Quality
Satellite reception may be interrupted due to one of the
following reasons.
²The vehicle is parked in an underground parking
structure or under a physical obstacle.
²Dense tree coverage may interrupt reception in the
form of short audio mutes.
²Driving under wide bridges or along tall buildings can
cause intermittent reception.
²Placing objects over or too close to the antenna can
cause signal blockage.
UNDERSTANDING YOUR INSTRUMENT PANEL 223
4
Page 428 of 492
Cavity Cartridge
FuseMini
FuseDescription
11 20 Amp
YellowIgnition Off Draw
(IOD)-Cabin Com-
partment Node
(CCN)/Radio/Under
Hood Lamp/Wireless
Control Module
(WCM)/Satellite Digi-
tal Audio Receiver
(SDARS)/Hands Free
Module (HFM)
12 30 Amp
PinkElectric Brake
13 25 Amp
NaturalPower-Battery
RWAL/ABS Module
Feed
14 15 Amp
BluePark Lamps LeftCavity Cartridge
FuseMini
FuseDescription
15 20 Amp
YellowTrailer Park Lamps
16 15 Amp
BluePark Lamps Right
17 15 Amp
BlueSpare
18 40 Amp
GreenABS Pump
19 30 Amp
PinkTrailer Tow
20 10 Amp
RedOccupant Restraints
Controller (ORC) 2
21 10 Amp
RedOccupant Restraints
Controller (ORC) Pre-
set Carrier
22 2 Amp
GrayIGN Switch Feed
MAINTAINING YOUR VEHICLE 427
7
Page 430 of 492
Cavity Cartridge
FuseMini
FuseDescription
36 25 Amp
NaturalAudio_Amplifier
37 15 Amp
BlueSpare
38 20 Amp
YellowPower Outlet IP
39 10 Amp
RedSunroof/Seatbelt Ten-
sioner
40 20 Amp
YellowCigar Lighter
41 25 Amp
NaturalSpare
42 30 Amp
PinkDiesel PCM (Diesel
Only)CAUTION!
²When installing the Integrated Power Module
cover, it is important to ensure the cover is prop-
erly positioned and fully latched. Failure to do so
may allow water to get into the Integrated Power
Module, and possibly result in a electrical system
failure.
²When replacing a blown fuse, it is important to
use only a fuse having the correct amperage
rating. The use of a fuse with a rating other than
indicated may result in a dangerous electrical
system overload. If a properly rated fuse contin-
ues to blow, it indicates a problem in the circuit
that must be corrected.
MAINTAINING YOUR VEHICLE 429
7