2007 DODGE MAGNUM SRT parking brake
[x] Cancel search: parking brakePage 218 of 380

partial or complete loss of vehicle control and stopping
ability. To reduce this possibility, the following precau-
tions should be observed:
1. Slow down during rainstorms or when the roads are
slushy.
2. Slow down if road has standing water or puddles.
3. Replace tires when tread wear indicators first become
visible.
4. Keep tires properly inflated.
5. Maintain sufficient distance between your vehicle and
the vehicle in front to avoid a collision in a sudden stop.PARKING BRAKE
The parking brake should always be applied when the
driver is not in the vehicle.
WARNING!
Never use Park position on an automatic transmis-
sion as a substitute for the parking brake. Always
apply parking brake fully when parked to guard
against vehicle movement and possible injury or
damage.
When parking on a flat surface, place the gear selector in
the P (Park) position first, and then apply the parking
brake.
When parking on a hill, it is important to apply the
parking brake before placing the gear selector in P (Park),
otherwise the load on the transmission locking mecha-
nism may make it difficult to move the selector out of
park. As an added precaution, turn the front wheels
toward the curb on a downhill grade and away from the
curb on an uphill grade.
STARTING AND OPERATING 217
5
Page 219 of 380
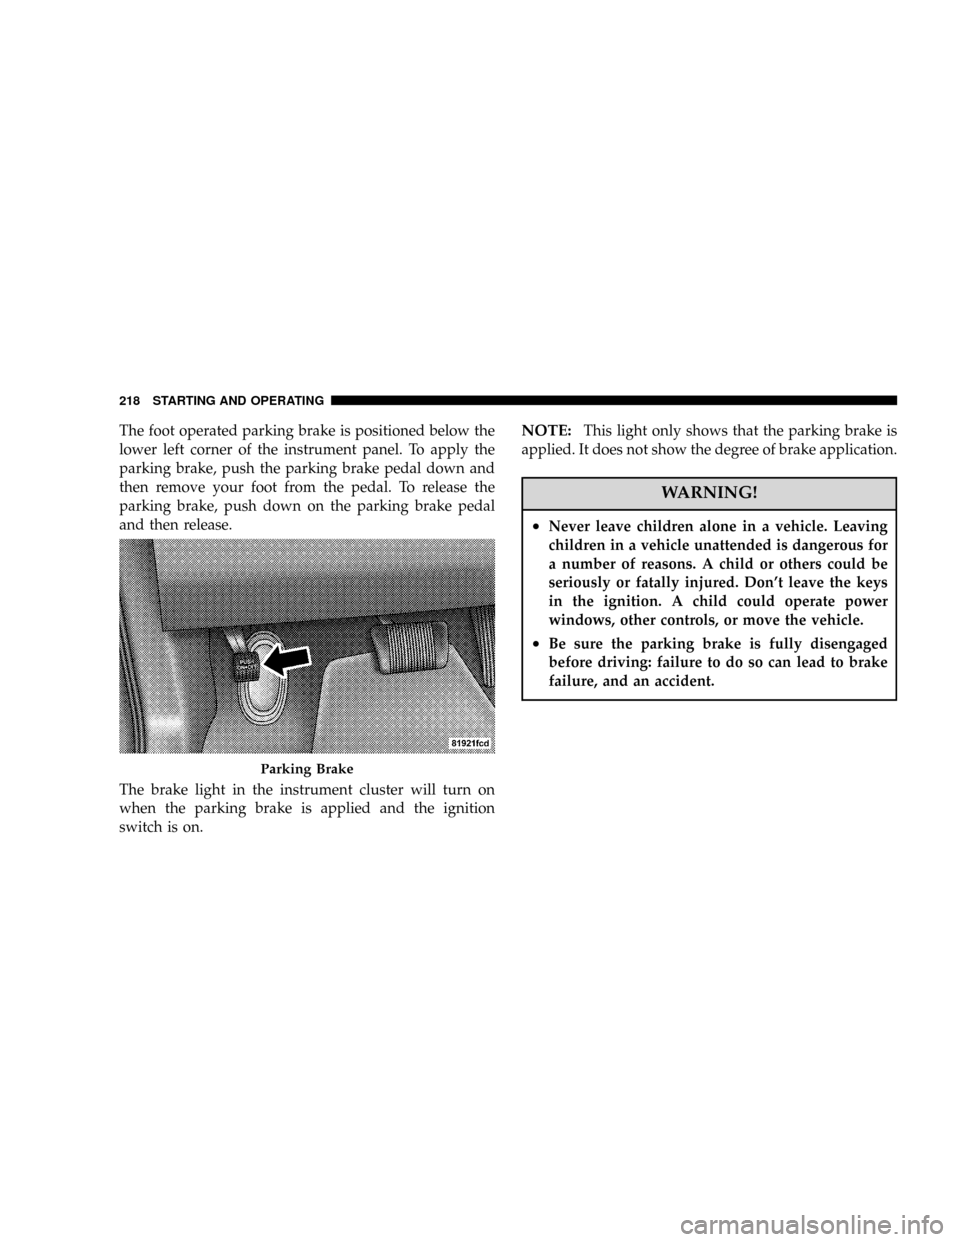
The foot operated parking brake is positioned below the
lower left corner of the instrument panel. To apply the
parking brake, push the parking brake pedal down and
then remove your foot from the pedal. To release the
parking brake, push down on the parking brake pedal
and then release.
The brake light in the instrument cluster will turn on
when the parking brake is applied and the ignition
switch is on.NOTE:This light only shows that the parking brake is
applied. It does not show the degree of brake application.
WARNING!
²Never leave children alone in a vehicle. Leaving
children in a vehicle unattended is dangerous for
a number of reasons. A child or others could be
seriously or fatally injured. Don't leave the keys
in the ignition. A child could operate power
windows, other controls, or move the vehicle.
²Be sure the parking brake is fully disengaged
before driving: failure to do so can lead to brake
failure, and an accident.
Parking Brake
218 STARTING AND OPERATING
Page 222 of 380

All vehicle wheels and tires must be the same size and
type and tires must be properly inflated to produce
accurate signals for the computer.
Anti-Lock Brake Light
The ABS light monitors the Anti-Lock Brake Sys-
tem. The light will come on when the ignition
switch is turned to the ON position and may stay on for
as long as four seconds.
If the ABS light remains on or comes on while driving, it
indicates that the Anti-Lock portion of the brake system
is not functioning and that service is required. However,
the conventional brake system will continue to operate
normally if the BRAKE warning light is not on.
If the ABS light is on, the brake system should be serviced
as soon as possible to restore the benefits of Anti-Lock
brakes. If the ABS light does not come on when the
Ignition switch is turned to the ON position, have the
bulb repaired as soon as possible.
If both the Brake Warning Light and the ABS Light
remain on, the Anti-Lock brakes (ABS) and ElectronicBrake Force Distribution (EBD) systems are not function-
ing. Immediate repair to the ABS system is required.
POWER STEERING
The standard power steering system will give you good
vehicle response and increased ease of maneuverability
in tight spaces. The system will provide mechanical
steering capability if power assist is lost.
If for some reason the power assist is interrupted, it will
still be possible to steer your vehicle. Under these condi-
tions, you will observe a substantial increase in steering
effort, especially at very low vehicle speeds and during
parking maneuvers.
NOTE:Increased noise levels at the end of the steering
wheel travel are considered normal and do not indicate
that there is a problem with the power steering system.
Upon initial start-up in cold weather, the power
steering pump may make noise for a short amount of
time. This is due to the cold, thick fluid in the steering
system. This noise should be considered normal, and
does not in any way damage the steering system.
STARTING AND OPERATING 221
5
Page 269 of 380

WARNING!
Improper towing can lead to an injury accident.
Follow these guidelines to make your trailer towing
as safe as possible:
Make certain that the load is secured in the trailer
and will not shift during travel. When trailering
cargo that is not fully secured, dynamic load shifts
can occur that may be difficult for the driver to
control. You could lose control of your vehicle and
have an accident.
²When hauling cargo, or towing a trailer, do not
overload your vehicle or trailer. Overloading can cause
a loss of control, poor performance, or damage to
brakes, axle, engine, transmission, steering, suspen-
sion, chassis structure, or tires.
²Safety chains must always be used between your
vehicle and trailer. Always connect the chains to the
frame or hook retainers of the vehicle hitch. Cross the
chains under the trailer tongue and allow enough
slack for turning corners.
²Vehicles with trailers should not be parked on a grade.
When parking, apply the parking brake on the tow
vehicle. Put the tow vehicle automatic transmission in
P for Park. Always, block or9chock9the trailer wheels.
²GCWR must not be exceeded.
²Total weight must be distributed between the tow
vehicle and the trailer such that the following four
ratings are not exceeded:
1. GVWR
2. GTW
3. GAWR
4. Tongue weight rating for the trailer hitch utilized
(This requirement may limit the ability to always
achieve the 10% to 15% range of tongue weight as a
percentage of total trailer weight).
Towing Requirements Ð Tires
þ
Do not attempt to tow a trailer while using a compact
spare tire.
268 STARTING AND OPERATING
Page 280 of 380

WARNING!
²Do not attempt to repair a tire on the side of the vehicle
close to traffic. Pull far enough off the road to avoid the
danger of being hit when operating the jack or repairing
a tire.
²Cuts or punctures larger than approximately 0.16 in. (4
mm), tire damage caused by driving with extremely low
tire pressure or on a flat tire, or a damaged wheel can
pose a hazard while driving. TIREFIT should not be
used in such circumstances. Do not drive the vehicle
under such circumstances. Contact your nearest autho-
rized dealer for assistance.
²Take care not to allow the contents of TIREFIT to come
in contact with hair, eyes or clothing. TIREFIT is harm-
ful if inhaled, swallowed or absorbed through the skin:
It causes skin, eye and respiratory irritation. Any contact
with eyes or skin should be flushed immediately with
plenty of water. If clothing comes in contact with
TIREFIT, change clothing as soon as possible.
²In case of allergic reaction or rash, consult a physician
immediately. Keep TIREFIT out of reach of children. If
swallowed, rinse mouth immediately with plenty of
water and drink plenty of water. Do not induce vomit-
ing! Consult a physician immediately.
Keep away from open flame or heat source.
Sealing tire with TIREFIT
1. Turn on the hazard warning flashers.
2. Move the transmission selector lever to the PARK
position, turn off the engine, and set the parking brake.
3. Open the hinged cover in the load floor in the cargo
area and remove the TIREFIT kit from its storage bin.
Close the load floor cover.
4. Pull the power plug (2) and the TIREFIT sealant hose
(6) out from the TIREFIT kit.
Hazard Flasher Switch
WHAT TO DO IN EMERGENCIES 279
6
Page 281 of 380

5. Unscrew the valve cap from the valve on the deflated
tire.
6. Screw the fitting at the end of TIREFIT sealant hose (6)
coming from the sealant bottle (5) onto the tire valve.
7. Insert the power plug (2) into the power point on the
instrument panel.
8. Leave the parking brake set and the transmission
selector lever in PARK and start the engine.
9. Press the switch (3) on the air pump to I (ON). The air
pump should start to inflate the tire and the tire sealant
(white fluid) will flow from the sealant bottle (5) through
the TIREFIT sealant hose (6) and into the tire.
10. Allow the air pump to run for five minutes and then
read the pressure gauge (4). If the tire inflates to 26 psi
(1.8 bar) or greater, proceed to Step 19 of this procedure.
If not, proceed to the following step.
11. Press the air pump switch (3) to 0 (OFF). Then,
disconnect the TIREFIT system from the tire and place it
back in the vehicle.12. Release the parking brake and drive the vehicle back
and forth approximately 30 feet (9.1 m) to distribute the
sealant more evenly within the tire.
13. Turn on the hazard warning flashers.
14. Move the transmission selector lever to the PARK
position, turn off the engine, and set the parking brake.
15. Disconnect the air pump hose (1) from the underside
of the sealant bottle (5) by flipping the hose valve open.
16. Connect the air pump hose valve to the tire valve and
flip the hose valve closed.
17. Leave the parking brake set and the transmission
selector lever in PARK and start the engine.
18. Press the switch (3) on the air pump to I (ON). The air
pump should inflate the tire to at least 26 psi (1.8 bar)
within five minutes. If the tire inflates to this level,
proceed to the following step.NOTE:If a tire pressure of
26 psi (1.8 bar) is not obtained within five minutes, the
tire is too badly damaged. Do not attempt to drive the
vehicle further. Call for assistance.
280 WHAT TO DO IN EMERGENCIES
Page 282 of 380

19. With a tire pressure of no less than 26 psi (1.8 bar)
press the air pump switch (3) to 0 (OFF) and turn off the
engine. Then, disconnect the TIREFIT system from the
tire and place it back in the vehicle.
20. Release the parking brake and drive the vehicle for
approximately 10 minutes to ensure optimum distribu-
tion of the tire sealant within the tire.
21. Turn on the hazard warning flashers.
22. Move the transmission selector lever to the PARK
position, turn off the engine, and set the parking brake.
23. Disconnect the air pump hose (1) from the underside
of the sealant bottle (5) by flipping the hose valve open.
24. Connect the air pump hose valve to the tire valve and
flip the hose valve closed.
25. Check the pressure in the tire by reading the pressure
gauge (4). If the pressure is 19 psi (1.3 bar) or greater,
proceed to the following step.NOTE:If the pressure is
less than 19 psi (1.3 bar), the tire is too badly damaged.
Do not attempt to drive the vehicle further. Call for
assistance.26. Leave the parking brake set and the transmission
selector lever in PARK and start the engine.
27. Inflate the tire to the pressure indicated on the tire
pressure label on the driver-side latch pillar by pressing
the switch (3) on the air pump to I (ON) and watching the
pressure gauge. When the tire pressure is set to the
pressure indicated on the tire pressure label, press the air
pump switch (3) to 0 (OFF) and turn off the engine.
28. Disconnect the TIREFIT system from the tire and
reinstall the valve cap.
29. Open the hinged access cover in the load floor in the
cargo area and place the sealant kit back in its storage bin.
Close the load floor cover. Replace the sealant bottle at
your nearest authorized MOPARtparts dealership.
30. Have the tire inspected at the earliest opportunity at
an authorized dealer or tire service center.
NOTE:
²
If a pressure of at least 19 psi (1.3 bar) cannot be
maintained in the tire, the tire is too badly damaged.
Do not attempt to drive the vehicle further, and call for
assistance.
WHAT TO DO IN EMERGENCIES 281
6
Page 284 of 380

NOTE:The battery is stored under a hinged access
cover in the load floor in the cargo area. Remote battery
terminals are located in the engine compartment for
jump-starting.
1. Wear eye protection and remove any metal jewelry
such as watchbands or bracelets that might make an
inadvertent electrical contact.
2. When boost is provided by a battery in another
vehicle, park that vehicle within booster cable reach, but
do not allow the vehicles to touch one another.WARNING!
Do not permit vehicles to touch each other as this
could establish a ground connection and personal
injury could result.
3. Set the parking brake, place the automatic transmis-
sion in PARK, and turn the ignition switch to the OFF (or
LOCK) position on both vehicles.
4. Turn off the heater, radio, and all unnecessary electri-
cal loads.
5. Connect one end of the jumper cable to the remote
jump-start positive battery post(+)in the engine com-
partment. Connect the other end of the same cable to the
positive terminal of the booster battery. Refer to the
following illustration for jump-starting connections.
WHAT TO DO IN EMERGENCIES 283
6