Page 328 of 400

WARNING!
Riding the brakes can lead to brake failure and
possibly an accident. Driving with your foot resting
or riding on the brake pedal can result in abnormally
high brake temperatures, excessive lining wear, and
possible brake damage. You wouldn’t have your full
braking capacity in an emergency.
Brake and Power Steering Hoses
When the vehicle is serviced for scheduled maintenance,
inspect surface of hoses and nylon tubing for evidence of
heat and mechanical damage. Hard and brittle rubber,
cracking, tears, cuts, abrasion, and excessive swelling
indicate deterioration of the rubber. Particular attention
should be made to examining those hose surfaces nearest
to high heat sources, such as the exhaust manifold.
Insure nylon tubing in these areas has not melted or
collapsed.
Inspect all hose connections such as clamps and cou-
plings to make sure they are secure and no leaks are
present.
NOTE:
•
Often, fluid such as oil, power steering fluid, and
brake fluid are used during assembly plant operations
to facilitate the assembly of hoses to couplings. There-
fore, oil wetness at the hose-coupling area is not
necessarily an indication of leakage. Actual dripping
of hot fluid when systems are under pressure (during
vehicle operation), should be noted before a hose is
replaced based on leakage.
•Inspect the brake hoses whenever the brake system is
serviced and at every engine oil change. Inspect hy-
draulic brake hoses for surface cracking, scuffing, or
worn spots. If there is any evidence of cracking,
scuffing, or worn spots, the hose should be replaced
immediately! Eventual deterioration of the hose can
take place resulting in a possibility of a burst failure.
328 MAINTAINING YOUR VEHICLE
Page 329 of 400

WARNING!
Worn brake hoses can burst and cause brake failure.
You could have an accident. If you see any signs of
cracking, scuffing, or worn spots, have the brake
hoses replaced immediately.
Master Cylinder - Brake Fluid Level Check
Check the fluid level in the master cylinder immediately
if the brake system warning light indicates system fail-
ure.
Check the fluid level in the master cylinder when per-
forming underhood services.
Clean the top of the master cylinder area before removing
the cap. Add fluid to bring the level up to the top of the
“FULL” mark on the side of the master cylinder reservoir.
Overfilling of fluid is not recommended because it may
cause leaking in the system.
Add enough fluid to bring the level up to the require-
ments described on the brake fluid reservoir. With discbrakes, fluid level can be expected to fall as the brake
pads wear. However, low fluid level may be caused by a
leak and a checkup may be needed.
Use only manufacturer’s recommended brake fluid. Re-
fer to “Fluids, Lubricants, and Genuine Parts” for the
correct fluid type.WARNING!
•Overfilling the brake fluid reservoir can result in
spilling brake fluid on hot engine parts and the
brake fluid catching fire.
•Use of a brake fluid that has a lower initial boiling
point than the recommended MOPAR�DOT 3
product or a brake fluid that is unidentified as to
FMVSS specification may result in sudden brake
failure during hard prolonged braking. You could
have an accident.
Use only brake fluid that has been in a tightly closed
container to avoid contamination from foreign matter or
moisture.
MAINTAINING YOUR VEHICLE 329
7
Page 330 of 400

CAUTION!
Do not allow petroleum base fluid to contaminate
the brake fluid, all brake seal components could be
damaged causing partial or complete brake failure.
Automatic Transmission
Fluid Level Check
Regular automatic transmission fluid level checks are not
required. For this reason, the dipstick is omitted.
If you notice fluid loss or gear shift malfunction, have
your authorized dealer check the transmission fluid level.
CAUTION!
•Using a transmission fluid other than the manu-
facturer’s recommended fluid may cause deterio-
ration in transmission shift quality and/or torque
converter shudder. Using a transmission fluid
other than that recommended by the manufac-
turer will result in more frequent fluid and filter
changes. Refer to “Fluids, Lubricants, and Genu-
ine Parts” for the correct fluid type.
•The fluid level is preset at the factory and it does
not require adjustment under normal operating
conditions. If a transmission fluid leak occurs,
visit your authorized dealer immediately. Severe
damage to the transmission may occur. Your au-
thorized dealer has the proper tools to adjust the
fluid level accurately.
Fluid and Filter Changes
Automatic transmission fluid and filter should be
changed as follows:
Normal Usage — No change necessary
330 MAINTAINING YOUR VEHICLE
Page 334 of 400

•If you detect any stone chips or scratches in the paint,
touch them up immediately. The cost of such repairs is
considered the responsibility of the owner.
•If your vehicle is damaged due to an accident or
similar cause, which destroys the paint and protective
coating, have your vehicle repaired as soon as pos-
sible. The cost of such repairs is considered the respon-
sibility of the owner.
•If you carry special cargo such as chemicals, fertilizers,
de-icer salt, etc., be sure that such materials are well
packaged and sealed.
•If a lot of driving is done on gravel roads, consider
mud or stone shields behind each wheel.
•Use Mopar�touch up paint or equivalent on scratches
as soon as possible. Your dealer has touch up paint to
match the color of your vehicle.
Wheel and Wheel Trim Care
All wheels and wheel trim, especially aluminum and
chrome plated wheels should be cleaned regularly with a
mild soap and water to prevent corrosion. To remove
heavy soil and/or excessive brake dust, use Mopar�Wheel Cleaner (05066247AB) or equivalent or select a
nonabrasive, non-acidic cleaner. Do not use scouring
pads, steel wool, a bristle brush, or metal polishes. Only
Mopar�or equivalent is recommended. Do not use oven
cleaner. Avoid automatic car washes that use acidic
solutions or harsh brushes that may damage the wheels’
protective finish.
Interior Care
Use Mopar�Fabric Cleaner or equivalent to clean fabric
upholstery and Mopar�Carpet Cleaner for carpeting.
Interior Trim should be cleaned starting with a damp
cloth, or Mopar�Satin Select. Do not use harsh cleaners
or Armorall. Use Mopar�Total Clean to clean vinyl
upholstery.
Mopar�Total Clean is specifically recommended for
leather upholstery.
Your leather upholstery can be best preserved by regular
cleaning with a damp soft cloth. Small particles of dirt
can act as an abrasive and damage the leather upholstery
and should be removed promptly with a damp cloth.
Stubborn soils can be removed easily with a soft cloth
334 MAINTAINING YOUR VEHICLE
Page 338 of 400
Cavity Car-
tridge
FuseMini
FuseDescription
11 — 25 Amp
ClearAuto Shutdown/
Powertrain Control
Module (PCM)
12 — — —
13 — — —
14 — 25 Amp
ClearPowertrain Control
Module (PCM)
15 — 20 Amp
YellowInjectors, Ignition Coils
16 — — —
17 30 Amp
Pink— Anti-lock Brakes System
(ABS) Valves - if
equipped/Powertrain
Control Module (PCM)
18 30 Amp
Pink— Windshield Wiper/
Washer
19 50 Amp
Red— Radiator FanCavity Car-
tridge
FuseMini
FuseDescription
20 20 Amp
Blue— Starter
21 50 Amp
Red— Anti-lock Brakes System
(ABS) Pump Motor - if
equipped
22 40 Amp
Green— AC Clutch/Radiator Fan
High — Low
23 — — —
24 60 Amp
Yellow— Radiator Fan - AWD
25 30 Amp
Pink— Front Control Module
(FCM)
26 20 Amp
Blue— Transmission - RLE
27 30 Amp
Pink— Front Control Module
(FCM)
338 MAINTAINING YOUR VEHICLE
Page 341 of 400
Cavity Car-
tridge
FuseMini
FuseDescription
13*———
14 — 10 Amp
RedAC Heater Control/
Cluster/Sentry Key Re-
mote Keyless Entry
15 — 20 Amp
YellowTrailer Tow Brake Mod-
ule - if equipped
16 — 20 Amp
YellowRear Power Outlet
17 — 20 Amp
YellowCluster
18 — 20 Amp
YellowSelectable Power Outlet
19 — 10 Amp
RedStop Lights
20 — 20 Amp
YellowRear Wiper
21 — — —
22 — — —
23 — — —Cavity Car-
tridge
FuseMini
FuseDescription
24 — — —
25 — — —
26 — — —
27 — 10 Amp
RedAirbag/Airbag Control
Module (ACM)
28 — 10 Amp
RedCurtain Airbag - if
equipped
29 — 5 Amp
OrangeAnti-lock Brakes Module
- if equipped/Cluster/
Front Control Module
(FCM)/Powertrain Con-
trol Module (PCM)/
Sentry Key Remote Key-
less Entry/Stop Lights
30 — 10 Amp
RedDoor Modules/Power
Mirrors - if equipped/
Steering Control Module
31 — — —
32 — — —
MAINTAINING YOUR VEHICLE 341
7
Page 352 of 400
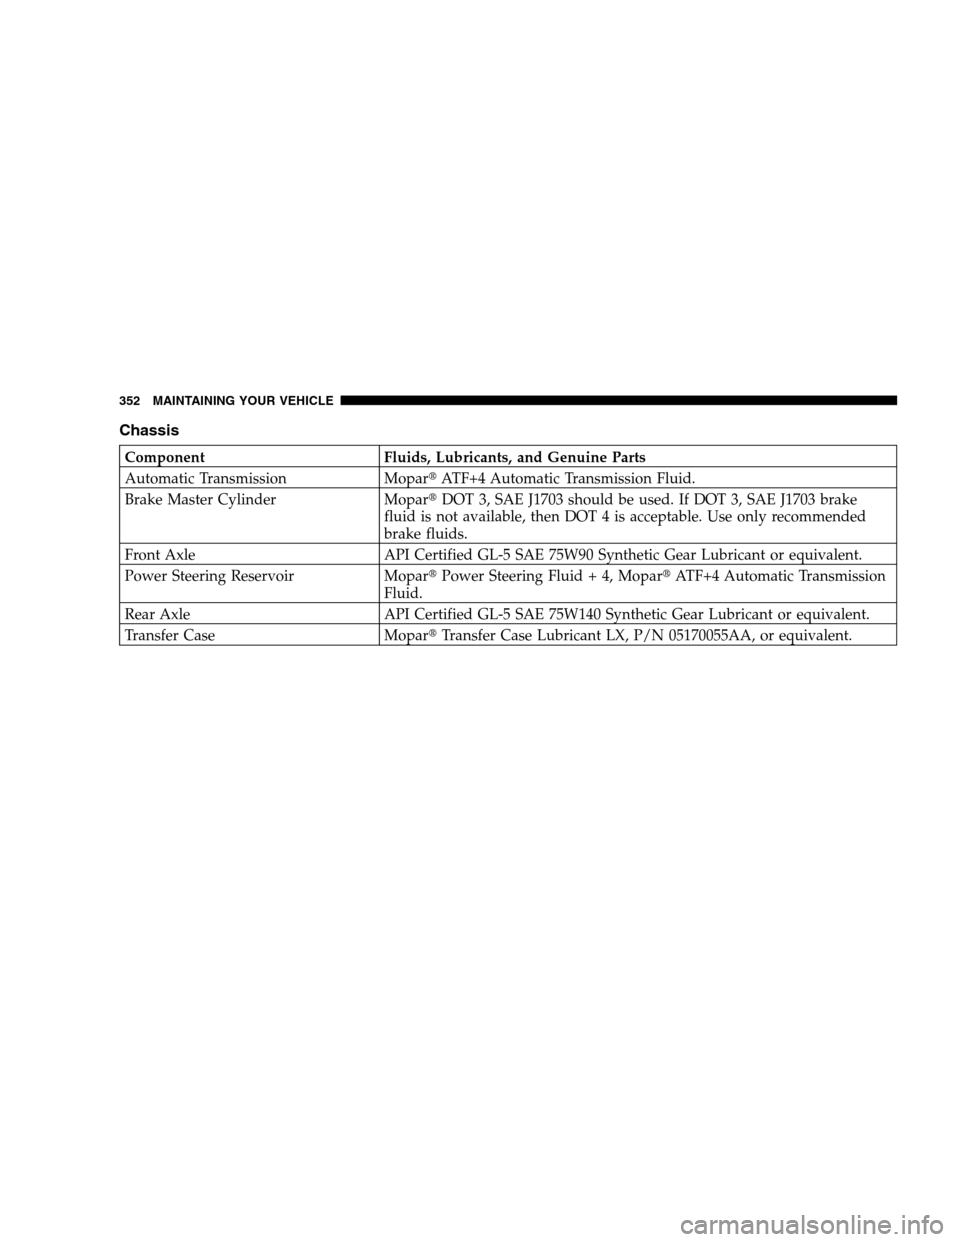
Chassis
Component Fluids, Lubricants, and Genuine Parts
Automatic Transmission Mopar�ATF+4 Automatic Transmission Fluid.
Brake Master Cylinder Mopar�DOT 3, SAE J1703 should be used. If DOT 3, SAE J1703 brake
fluid is not available, then DOT 4 is acceptable. Use only recommended
brake fluids.
Front Axle API Certified GL-5 SAE 75W90 Synthetic Gear Lubricant or equivalent.
Power Steering Reservoir Mopar�Power Steering Fluid + 4, Mopar�ATF+4 Automatic Transmission
Fluid.
Rear Axle API Certified GL-5 SAE 75W140 Synthetic Gear Lubricant or equivalent.
Transfer Case Mopar�Transfer Case Lubricant LX, P/N 05170055AA, or equivalent.
352 MAINTAINING YOUR VEHICLE
Page 356 of 400
the vehicle is on level ground will improve the accu-
racy of the oil level reading. Add oil only when the
level is at or below the ADD or MIN mark.
•Check the windshield washer solvent and add if
required.
Once a Month
•
Check tire pressure and look for unusual wear or
damage.
•Inspect the battery, and clean, and tighten the termi-
nals as required.
•Check the fluid levels of coolant reservoir and brake
master cylinder, and add as needed.
•Check all lights and all other electrical items for correct
operation.
•Check rubber seals on each side of the radiator for
proper fit.
At Each Oil Change
•
Change the engine oil filter.
•Inspect the exhaust system.
•Inspect the brake hoses.
•Inspect the CV joints and front and rear suspension
components.
•Check the coolant level, hoses, and clamps.
356 MAINTENANCE SCHEDULES
8
M
A
I
N
T
E
N
A
N
C
E
S
C
H
E
D
U
L
E
S

12 — — —
13 — — —
14 — 25 Amp
ClearPowertrain Control
Module (PCM)
15 — 20")