Page 267 of 400
 button for
4 seconds.
7. After shift is completed and the Neutral (N) light
comes on release Neu")
6. Using the point of a ballpoint pen or similar object,
depress the recessed transfer case Neutral (N) button for
4 seconds.
7. After shift is completed and the Neutral (N) light
comes on release Neutral (N) button.
8. Start engine.9. Shift automatic transmission into Reverse (R).
10. Release brake pedal for five seconds and ensure that
there is no vehicle movement.
11 .
Repeat steps 9 and 10 with the transmission in Drive (D).
12. Shut engine OFF and place ignition key to the
unlocked OFF position.
13. Shift automatic transmission into Park (P). Shift
Manual transmissions into 4th gear.
14. Attach vehicle to tow vehicle with tow bar.
15. Disconnect the negative battery cable.
NOTE:
Items 1 through 5 are requirements that must be
met prior to depressing the Neutral (N) selection button,
and must continue to be met until the 4 seconds elapse and
the shift has been completed. If any of these requirements
(with the exception of 3 - Key ON) are not met prior to
depressing the Neutral (N) button or are no longer met
STARTING AND OPERATING 267
5
Page 268 of 400
 indicator
light will flash continuously until all requirements are met
or until the Neutral (N) button is released.
NOTE:The ignition key must be ON for")
during the 4 second timer, then the Neutral (N) indicator
light will flash continuously until all requirements are met
or until the Neutral (N) button is released.
NOTE:The ignition key must be ON for a shift to take
place and for the position indicator lights to be operable.
If the key in not ON, the shift will not take place and no
position indicator lights will be on or flashing.
NOTE:Flashing neutral (N) position indicator light
indicates that shift requirements have not been met.
CAUTION!
Damage to the transmission may occur if the trans-
mission is shifted into Park (P) with the transfer case
in Neutral (N) and the engine RUNNING. With the
transfer case in Neutral (N), ensure that the engine is
OFF prior to shifting the transmission into Park (P).
Returning to Normal Operation
Use the following procedure to prepare your vehicle for
normal usage.
1. Reconnect the negative battery cable.
2. The vehicle must be at a complete stop.
3. Place the ignition if the Off position (if it has been
moved or the engine has been started).
4. Place ignition key in the ON position (engine Off).
5. Depress brake pedal.
6. Shift automatic transmission to Neutral (N) or depress
clutch on manual transmission.
7. Using the point of a ballpoint pen or similar object,
depress the recessed transfer case Neutral (N) button for
1 second.
268 STARTING AND OPERATING
Page 269 of 400
 indicator light turns off release
the Neutral (N) button.
9. After the Neutral (N) button has been released the
transfer case will shift to the position identified by the
sele")
8. After the Neutral (N) indicator light turns off release
the Neutral (N) button.
9. After the Neutral (N) button has been released the
transfer case will shift to the position identified by the
selector switch.
10. Start the engine. Shift the automatic transmission into
Drive (D), or place the manual transmission in 1st gear
and momentarily release the clutch, to verify that the
transfer case has engaged.
11. Set parking brake. Shift automatic transmission to
Park (P) or shift manual transmission to Neutral.
NOTE:Items 1 through 5 are requirements that must be
met prior to depressing the Neutral (N) selection button,and must continue to be met until 1 second elapses and
the shift has been completed. If any of these requirements
(with the exception of 3 - key ON) are not met prior to
depressing the Neutral (N) button or are no longer met
during the 1 second time, then all of the mode position
indicator lights will flash continuously until all require-
ments are met or until the Neutral (N) button is released.
NOTE:The ignition key must be ON for a shift to take
place and for the position indicator lights to be operable.
If the key is not ON, the shift will not take place and no
position indicator lights will be on or flashing.
NOTE:Flashing neutral (N) position indicator light
indicates that shift requirements have not been met.
STARTING AND OPERATING 269
5
Page 290 of 400

▫Front Suspension Ball Joints..............306
▫Drive Shaft Constant Velocity Joints........307
▫Body Lubrication.....................307
▫Windshield Wiper Blades................307
▫Windshield Washers...................308
▫Exhaust System......................309
▫Cooling System.......................310
▫Emission Related Components............315
▫Brake System........................316
▫Clutch Hydraulic System................318
▫Manual Transmission..................318
▫Automatic Transmission................318
▫Transfer Case........................321▫Axles ..............................321
▫Selection Of Lubricating Grease...........322
▫Appearance Care And Protection
From Corrosion......................323
�Fuses (Power Distribution Center)...........327
�Vehicle Storage........................332
�Replacement Light Bulbs.................332
�Bulb Replacement......................333
▫Headlamps..........................333
▫Front Park And Turn Signal Lamp..........337
▫Rear Side Marker, Taillamps/Stoplamp, And
Turn Signal Bulbs — Replacement.........338
▫Center High-Mounted Stoplamp And
Cargo Lamp.........................341
290 MAINTAINING YOUR VEHICLE
Page 318 of 400

WARNING!
Worn brake hoses can burst and cause brake failure.
You could have an accident. If you see any sign of
cracking, scuffing, or worn spots, have the brake
hoses replaced immediately.
Clutch Hydraulic System
The clutch hydraulic system is a sealed maintenance free
system. In the event of leakage or other malfunction, the
system must be replaced.
Manual Transmission
Fluid Level Check
This fluid should be checked whenever other underhood
services are performed. The fluid level is checked by
removing the fill plug. If the level of the lubricant is more
than 1/4�(6.35 mm) below the bottom of the filler hole
while the vehicle is level, enough lubricant should beadded to bring the level to the bottom of the filler hole.
This fluid does not require periodic changing. However,
if it becomes necessary to add or replace the fluid in these
transmissions, refer to Fluids, Lubricants and Genuine
Parts for correct fluid type.
Automatic Transmission
Fluid Level Check
Check the fluid level while the transmission is at normal
operating temperature 180°F (82°C). This occurs after at
least 15 miles (24 km) of driving. At normal operating
temperature the fluid cannot be held comfortably be-
tween the fingertips.
To check the automatic transmission fluid level properly,
the following procedure must be used:
1. Operate the engine at idle speed and normal operating
temperature.
2. The vehicle must be on level ground.
318 MAINTAINING YOUR VEHICLE
Page 347 of 400
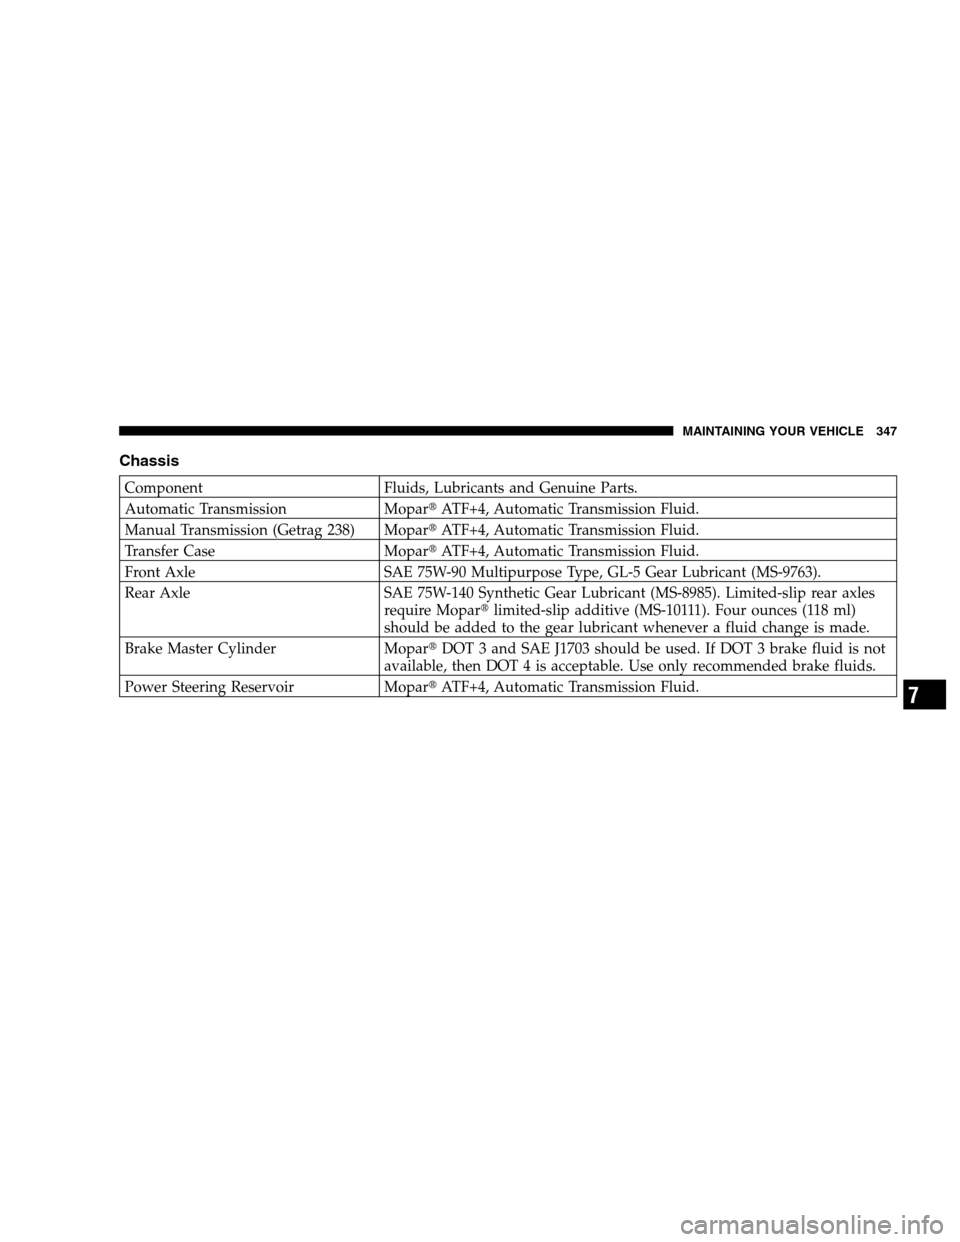
Chassis
Component Fluids, Lubricants and Genuine Parts.
Automatic Transmission Mopar�ATF+4, Automatic Transmission Fluid.
Manual Transmission (Getrag 238) Mopar�ATF+4, Automatic Transmission Fluid.
Transfer Case Mopar�ATF+4, Automatic Transmission Fluid.
Front Axle SAE 75W-90 Multipurpose Type, GL-5 Gear Lubricant (MS-9763).
Rear Axle SAE 75W-140 Synthetic Gear Lubricant (MS-8985). Limited-slip rear axles
require Mopar�limited-slip additive (MS-10111). Four ounces (118 ml)
should be added to the gear lubricant whenever a fluid change is made.
Brake Master Cylinder Mopar�DOT 3 and SAE J1703 should be used. If DOT 3 brake fluid is not
available, then DOT 4 is acceptable. Use only recommended brake fluids.
Power Steering Reservoir Mopar�ATF+4, Automatic Transmission Fluid.
MAINTAINING YOUR VEHICLE 347
7
Page 352 of 400

At Each Stop for Fuel
•Check the engine oil level about 5 minutes after a fully
warmed engine is shut off. Checking the oil level while
the vehicle is on level ground will improve the accu-
racy of the oil level reading. Add oil only when the
level is at or below the ADD or MIN mark.
•Check the windshield washer solvent and add, if
required.
Once a Month
•Check tire pressure and look for unusual wear or
damage.
•Inspect the battery and clean and tighten the terminals
as required.
•Check the fluid levels of coolant reservoir, brake
master cylinder, and transmission and add as needed.
•Check all lights and all other electrical items for correct
operation.
At Each Oil Change
•Change the engine oil filter.
•Inspect the exhaust system.
•Inspect the brake hoses.
•Inspect the CV joints (if equipped) and front suspen-
sion components.
•Check the automatic transmission fluid level (if
equipped).
•Check the manual transmission fluid level (if
equipped).
•Check the coolant level, hoses, and clamps.
352 MAINTENANCE SCHEDULES
8
M
A
I
N
T
E
N
A
N
C
E
S
C
H
E
D
U
L
E
S
Page 387 of 400

Manual Transmission...............187,196,318
Fluid Level Check...................... 318
Lubricant Selection..................318,347
Map/Reading Lights..................... 103
Mirrors ................................ 79
Automatic Dimming..................... 79
Electric Powered....................... 81
Heated.............................. 82
Outside.............................. 80
Rearview............................. 79
Modifications/Alterations, Vehicle............. 7
Mopar Parts.........................295,373
Multi-Function Control Lever................ 94
New Vehicle Break-In Period................ 71
Occupant Classification System (OCS).......... 48
Occupant Restraints....................... 34
Octane Rating, Gasoline (Fuel).............. 238Oil, Engine.........................297,346
Capacity............................ 345
Change Interval....................... 298
Dipstick............................. 297
Disposal............................ 300
Filter ............................300,346
Filter Disposal........................ 300
Identification Logo..................... 299
Materials Added to..................... 300
Recommendation...................299,345
Synthetic............................ 300
Viscosity..........................299,345
Onboard Diagnostic System..............293,294
Opener, Garage Door (HomeLink�) ........... 110
Outside Rearview Mirrors.................. 80
Overdrive..........................139,193
Overdrive OFF Switch.................... 193
Overhead Console....................103,104
Overhead Travel Information Center.......... 104
INDEX 387
10